
Categorie popolari
State cercando un filato?


Commenti / Domande (56)
![]() Chantal Maillard ha scritto:
Chantal Maillard ha scritto:
Bonjour, où trouver la vidéo car je ne comprends pas toutes les explications. Notamment, pour tricoter le devant droit en relevant les mailles du dos ? Merci de m'éclairer.
16.03.2024 - 16:15DROPS Design ha risposto:
Bonjour Mme Maillard, il n'existe pas de vidéo spécifique à cette technique, suivez attentivement les indications sous ASTUCE POUR RELEVER LES MAILLES :, autrement dit, en fin de rang sur l'endroit, relevez 1 maille au bord du dos, mettez cette maille sur l'aiguille droite et passez la dernière maille tricotée par-dessus la maille relevée (ainsi on n'augmente pas de mailles). Bon tricot!
18.03.2024 - 08:53
![]() Grit ha scritto:
Grit ha scritto:
Ich bin jetzt am Anfang des rechten Randteils, beim Stricken der verkürzten Reihen ist auf dem Foto ein Muster (Löcher) erkennbar, was bei mir nicht entsteht, wenn ich das Anleitungsvideo "Verkürzte Reihen kraus rechts" benutze. Gibt es da einen Trick? Vielen Dank
16.02.2023 - 17:00DROPS Design ha risposto:
Liebe Grit, diese Löcher entstehen, wenn man diese Technik für verkürzten Reihen strickt, je mehr die erste Masche festgezogen wird, desto weniger wird das Loch. Viel Spaß beim stricken!
17.02.2023 - 11:30
![]() Ruth ha scritto:
Ruth ha scritto:
Hola! Tengo una pregunta la verdad no se como empezar a tejer, el patrón dice que tengo que montar puntos para la espalda pero que también tengo que unir con las delanteras izquierda y derecha ahi es donde no entiendo tengo que tener ya tejidas las delanteras para poder tejer la espalda la verdad estoy muy perdida no se como empezar de antemano agradezco su ayuda saludos.
30.06.2022 - 19:40DROPS Design ha risposto:
Hola Ruth, primero trabajas la espalda. Cuando terminas la espalda, montas puntos para el delantero. Empiezas a trabajar el delantero en punto musgo y al mismo tiempo, lo unes a la parte de la espalda. Cuando trabajas por el lado derecho, al final de la fila, levanta 1 punto en el borde de la espalda, pasar el punto levantado a la aguja derecha y montar el último punto del delantero sobre el punto levantado de la espalda. Es decir, unimos el delantero y la espalda a la vez que tejemos el delantero. También puedes unir según el siguiente vídeo, trabajando 2pjd en vez de disminución simple: https://www.garnstudio.com/video.php?id=482&lang=es.
04.07.2022 - 19:37
![]() Tony And Linda Simmonds ha scritto:
Tony And Linda Simmonds ha scritto:
I am thinking about making this but would like to use a finer yarn that would normally use 3.25mm needles. What size difference would I need to make i.e would I go up 1 or 2 sizes? Also, I would like to add sleeves. Do you think this is possible and how would you suggest please. Thank you
11.02.2022 - 22:29DROPS Design ha risposto:
Dear Tony and Linda, you would need to check the gauge by working one with your thread and needles, to compare it to the one in the pattern and then calculate which would be the proportional size taking into account the gauge. We don't make personalized patterns. Happy knitting!
13.02.2022 - 19:56
![]() Kopanyicza Gyöngyi ha scritto:
Kopanyicza Gyöngyi ha scritto:
Hogyan kell rövidített sorokat kötni? Mi lesz a többi szemmel? Üdv: Gyöngyi
31.01.2022 - 16:44DROPS Design ha risposto:
Hi, if you could write your question in English, we will try to answer :)
22.04.2022 - 11:46
![]() Ragnhild Jordet ha scritto:
Ragnhild Jordet ha scritto:
Hva menes med garngruppe A+A? På bildet er angitt farge nr 38, korall i foreslått garntype (bomull), mens i fargekartet er farge nr 38 kalt bringebær; er dette samme farge? Hvordan holder fasongen seg i vask, ved bruk av foreslått bomullsgarn?
07.03.2021 - 09:43DROPS Design ha risposto:
Hei Ragnhild, Under garngruppen er Parisgarnet fra gruppe C (som beskriver tykkelsen). Man kan erstatte et garn fra gruppe C med et annet garn fra samme gruppa, eller ved å bruke et garn fra Gruppe A og strikke med dobbelt garn (A+A). Farge 38 er Bringebær og er den samme fargen. Det er et høykvalitetsgarn som holder bra på fasongen. God fornøyelse!
08.03.2021 - 07:20
![]() Åse Søviknes ha scritto:
Åse Søviknes ha scritto:
Høyre forstykke str L Riller bakre arm (rygg) blir 7m + (1+6 økte masker) = 14 m Riller forstykke arm blir 4 m + (6 m økte masker) = 10 m Hva har jeg misforstått ?
19.12.2019 - 22:27DROPS Design ha risposto:
Hej Åse, du øger lige mange masker i riller på rygstykket som på forstykket. God fornøjelse!
10.02.2020 - 15:26
![]() Gunilla Lindblad ha scritto:
Gunilla Lindblad ha scritto:
På sid 3 i mönstret står det " upprepa tills ar 1:a m som är ökt till armb. Eftersom jag inte förstod detta gick jag in på den engelska översättningen och där stod det kort och gott: repeat until piece measures 36 cm, Ni kanske bör ändra i den svenska varianten?
09.07.2019 - 13:25DROPS Design ha risposto:
Hej. Tack för info, det har nu korrigerats på den svenska översättningen. Mvh DROPS Design
10.07.2019 - 13:34
![]() Carol ha scritto:
Carol ha scritto:
I am so confused. On the side (right or left) when one row is worked across in pattern with eg 7 sts, A1 - 4 times, 9 sts: then begin two rows, 25 sts ( A1 - 2 times in total) : two rows 34 sts (A1 - 3 times in total). Now two rows over all. The result over these last two rows do not line up with the A1 pattern. The stitches over the 3rd A1 are 2 rows behind pattern repeat. What is the secret to complete.
20.05.2019 - 18:20DROPS Design ha risposto:
Dear Carol, you work A.1 on all this row, let's say on row 1 of the short rows you work row 1 in the first 2-3-3-4 A.1, you will work row 2 of A.1 over these 2-3-3-4 repeats on next row, then work row 3 in A.1 over the 2-3-3-4 first A.1, then row 1 over the next repeat (= 3-4-4-6 repeats on this row), turn and work row 2 over 1 repeat, row 4 over the next 2-3-3-4 repeats, on next row over all sts, work row 5 over the first 2-3-3-4 repeats, row 3 over next repeat and row 1 over the remaining repeat. ie you have to continue each repeat following the previous row worked on this repeat, not same row for all repeats so that the pattern will be the same on all repeats. Happy knitting!
21.05.2019 - 09:44
![]() Carol ha scritto:
Carol ha scritto:
I am starting the left side piece and am about to k7 sts (band) then continues with A1(4-5-5-6) times, finish with 9-4-8-3 sts. My question is, are there no sts worked between each A1?
09.05.2019 - 18:37DROPS Design ha risposto:
Dear Carol, left front piece will be worked reversed/mirored to the right front piece, ie short rows will start from WS, then when working A.1 you will work from RS: 9-4-8-3 sts in garter st, repeat A.1 a total of 4-5-5-6 times and finish with 7 sts in garter st for front band. Then short rows will also be worked the same way but starting from WS (instead of from RS). Happy knitting!
10.05.2019 - 09:08
|
|||||||||||||||||||||||||||||||||||||
Evangeline#evangelinecardigan |
|||||||||||||||||||||||||||||||||||||
 |
 |
||||||||||||||||||||||||||||||||||||
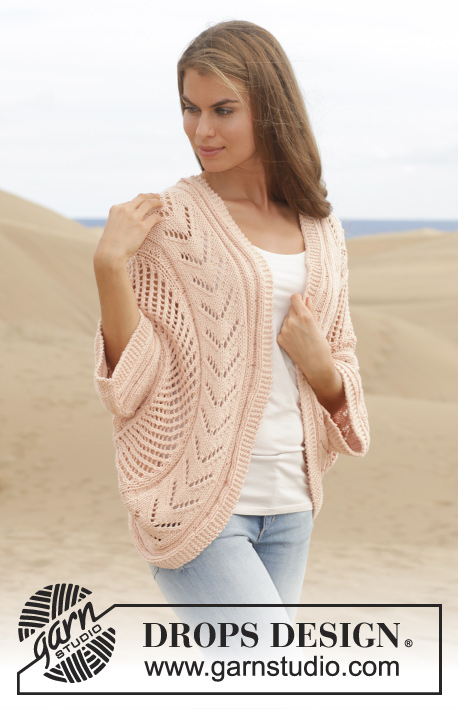
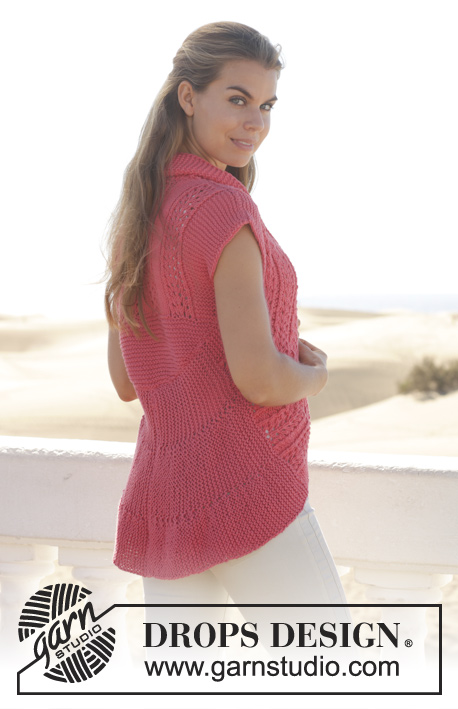
Gilet DROPS lavorato ai ferri a maglia legaccio, lavorato a cerchio con motivo traforato in "Paris". Taglie: S - XXXL.
DROPS 154-35 |
|||||||||||||||||||||||||||||||||||||
|
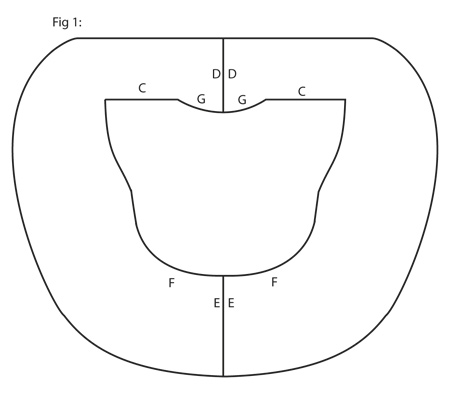
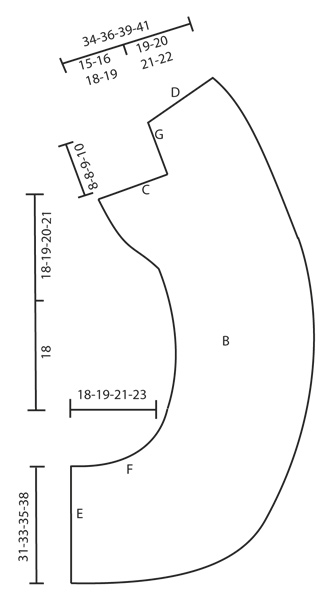
M LEGACCIO (avanti e indietro sui f): Lavorare tutti i f a dir. 1 “costa” a m legaccio = 2 f dir. MOTIVO: Vedere il diagramma A.1 (= 9 m). Il diagramma mostra tutti i f del motivo visti dal diritto del lavoro. SUGGERIMENTO PER PRENDERE LE MISURE: Tutte le misure della lunghezza vengono prese sul lato più corto. SUGGERIMENTO PER GLI AUMENTI: Tutti gli aumenti vengono fatti dal diritto del lavoro. Aumentare all’interno della 1° m a m legaccio verso il lato e lavorare gli aumenti a m legaccio. Aumentare facendo 1 gettato, sul f successivo lavorare il gettato a dir ritorto (cioè lavorare nel filo dietro della m invece di quello davanti) per evitare buchi. SUGGERIMENTO PER RIPRENDERE LE MAGLIE: Bordo destro: * Riprendere 1 m nel filo più esterno della m/f successivo sul dietro alla fine del f dal diritto del lavoro con il f sinistro, trasferire la nuova m sul f destro e accavallare l’ultima m lavorata sulla nuova m, lavorare 1 costa a m legaccio *, ripetere *-* su ogni f dal diritto del lavoro (cioè il bordo è ora lavorato insieme al dietro). NOTA: Per far sì che il motivo combaci sul dietro c’è 1 costa in più sul bordo destro rispetto al bordo sinistro. Bordo sinistro: Riprendere come per il destro ma iniziare all’inizio di ogni f dal diritto del lavoro. ---------------------------------------------------------- GILET: Il gilet è lavorato in 3 parti: 1 dietro (A) + 2 bordi (B) sono lavorati dal centro dietro e finiscono al centro dietro del collo. Poi sono lavorati insieme al dietro e poi cuciti ad anello – vedere la fig.1. DIETRO: Lavorato avanti e indietro sui f. Avviare 29-33-39-47 m con i f circolari n° 5 mm con Paris. Inserire 1 segnapunti dopo 15-17-20-24 m. Affrancare il bordo destro e sinistro con il dietro a ogni lato del segnapunti. Lavorare a M LEGACCIO – leggere la spiegazione sopra, ALLO STESSO TEMPO avviare 2 m a ogni lato del lavoro alla fine dei 2 f successivi, ripetere gli aumenti a ogni lato altre 2 volte, poi avviare 1 m a ogni lato del lavoro alla fine dei 2 f successivi, ripetere gli aumenti altre 9 volte = 61-65-71-79 m sul f. Poi lavorare come segue sul f successivo dal diritto del lavoro: 5-7-3-7 m a m legaccio, A.1 (= 9 m), * 5 m a m rasata, A.1 *, ripetere *-* 3-3-4-4 volte in totale, finire con 5-7-3-7 m a m legaccio. Continuare il motivo in verticale. Quando il lavoro misura 14-13-13-12 e 15-14-14-13 cm, aumentare 1 m a ogni lato = 65-69-75-83 m sul f (= sul 1° o 4° f in A.1) – lavorare gli aumenti a m legaccio. Quando il lavoro misura 16-15-15-14 cm, aumentare 1 m per la manica a ogni lato – LEGGERE IL SUGGERIMENTO PER GLI AUMENTI! Ripetere gli aumenti ogni 2 f per un totale di 6 volte. Alla fine di tutti gli aumenti, ci sono 77-81-87-95 m sul f (= sul 1° o 4° f in A.1). Quando il lavoro misura 30-30-31-31 cm – aggiustarlo dopo 1 ripetizione di A.1 in verticale – intrecciare le 21-23-25-27 m centrali per il collo e finire ogni spalla in modo separato. Continuare a intrecciare 1 m sul f successivo verso il collo = 27-28-30-33 m rimaste su ogni spalla. Continuare con il motivo sulle m rimaste. Intrecciare quando il lavoro misura 32-32-33-33 cm, aggiustarlo dopo 1 ripetizione in verticale. BORDO DESTRO: Lavorato avanti e indietro sui f. Avviare 52-56-60-64 m con i f circolari n° 5 mm con Paris. Il bordo di avvio è indicato con E sullo schema. Lavorare a m legaccio, ALLO STESSO TEMPO lavorare il bordo insieme al dietro dal segnapunti – vedere il SUGGERIMENTO PER RIPRENDERE LE MAGLIE – ALLO STESSO TEMPO lavorare a f accorciati, iniziare dal diritto del lavoro come segue: * lavorare 2 f su tutte le m, poi lavorare 2 f sulle prime 34-36-40-42 m, poi 2 f sulle prime 17-18-20-21 m *, ripetere *-* fino a quando il lavoro misura 18-19-21-23 cm nel punto più corto – leggere il SUGGERIMENTO PER PRENDERE LE MISURE. LEGGERE TUTTA LA SEZIONE SEGUENTE PRIMA DI CONTINUARE! Continuare a riprendere le m, ALLO STESSO TEMPO lavorare come segue sul f successivo dal diritto del lavoro: 7 m a m legaccio (= bordo), A.1 4-5-5-6 volte in totale, finire con 9-4-8-3 m a m legaccio, ALLO STESSO TEMPO quando il lavoro misura 19-20-22-24 cm, lavorare come segue dal diritto del lavoro: * 2 f sulle prime 25-34-34-43 m (7 m a m legaccio, A.1 2-3-3-4 volte in totale), 2 f sulle prime 34-43-43-52 m (7 m a m legaccio, A.1 3-4-4-5 volte in totale), 2 f su tutte le m *, ripetere *-* fino a quando il lavoro misura 36-37-39-41 cm – Ricordarsi del SUGGERIMENTO PER PRENDERE LE MISURE. I ferri accorciati sono finiti. La ripresa delle m finisce quando le m sono state riprese fino al primo aumento per la manica sul dietro. Continuare con il motivo. Terminata la ripresa delle m, aumentare per la manica a lato come sul dietro (= 6 aumenti) = 58-62-66-70 m sul f (= sul 1° o 4° f in A.1). Poi lavorare il motivo e a m legaccio su tutte le m. Quando il lavoro misura 54-56-59-62 cm, intrecciare le 27-28-30-33 m più esterne sul lato sinistro per la spalla – aggiustarlo dopo 1 ripetizione di A.1 in verticale = 31-34-36-37 m rimaste per il colletto a scialle. Lavorare il resto del f. Ora misurare il lavoro da qui. Ora continuare il lavoro a m legaccio. Lavorare come segue dal diritto del lavoro: * 2 f sulle prime 23-26-28-29 m, 2 f su tutte le m *, ripetere *-* fino alla fine del lavoro. Intrecciare quando il lavoro misura 7-8-8-9 cm (misurato sul lato più corto). BORDO SINISTRO: Avviare e lavorare come per il destro ma a specchio. CONFEZIONE: Vedere lo schema. Cucire nei fili più esterni delle m di vivagno, e assicurarsi di evitare un bordo stretto. Cucire i bordi insieme nel bordo inferiore (E su E) e sul collo (D su D). Affrancare il bordo al dietro cucendo i margini delle spalle (C) e i bordi su fino al dietro (G) sul retro del collo. |
|||||||||||||||||||||||||||||||||||||
Spiegazioni del diagramma |
|||||||||||||||||||||||||||||||||||||
|
|||||||||||||||||||||||||||||||||||||
 |
|||||||||||||||||||||||||||||||||||||
 |
|||||||||||||||||||||||||||||||||||||
 |
|||||||||||||||||||||||||||||||||||||
Avete terminato questo modello?Allora taggate le vostre foto con #dropspattern #evangelinecardigan o inviatele alla #dropsfan gallery. Avete bisogno di aiuto con questo modello?Troverete 20 video tutorial, una sezione per i commenti/domande e molto altro guardando il modello su www.garnstudio.com © 1982-2026 DROPS Design A/S. Ci riserviamo tutti i diritti. Questo documento, compreso tutte le sue sotto-sezioni, è protetto dalle leggi sul copyright. Potete leggere quello che potete fare con i nostri modelli alla fine di ogni modello sul nostro sito. |
|||||||||||||||||||||||||||||||||||||


Con oltre 40 anni di esperienza nel design di modelli di maglia e uncinetto, DROPS Design offre la più estesa collezione di modelli gratuiti su internet - tradotti in 17 lingue. Ad oggi vi possiamo fornire 324 cataloghi e 12290 modelli - 9561 dei quali sono tradotti in Italiano.
Ci stiamo impegnando molto per darvi il meglio che vi possiamo offrire in termini di maglia e uncinetto, ispirazioni e consigli così come filati di grande qualità ad un prezzo incredibile! Volete utilizzare i nostri modelli per qualcosa d'altro oltre al vostro uso personale? Potete leggere tutto ciò che è consentito nel testo sul Copyright in basso su tutte le pagine dei nostri modelli. Buon lavoro!
Lasciare un commento sul modello DROPS 154-35
Noi saremmo felici di ricevere i tuoi commenti e opinioni su questo modello!
Se vuoi fare una domanda, fai per favore attenzione a selezionare la categoria corretta nella casella qui sotto per velocizzare il processo di risposta. I campi richiesti sono indicati da *.