
Categorie popolari
State cercando un filato?


Commenti / Domande (78)
![]() Ellen ha scritto:
Ellen ha scritto:
I don’t understand the pattern .. there is no explanation. The A1 diagram has numbers to indicate the size but what is the pattern ? I have read the whole pattern and can’t find any directions
20.01.2023 - 03:49DROPS Design ha risposto:
Dear Ellen, the pattern consists on diagram A.1 shown at the right side of the measurement chart, it is worked over 2 stitches and 4 rows. Read more about diagrams here. Happy knitting!
20.01.2023 - 08:30
![]() Verena ha scritto:
Verena ha scritto:
Hallo leibes Drops-Team, kann es sein, dass die Grafik für das Strickdiagramm fehlt? Oder ist das nur bei mir so? Vielen Dank im Voraus. Verena
03.01.2023 - 11:18DROPS Design ha risposto:
Liebe Verena, das Strickdiagram A.1 finden Sie neben der Skizze, unter den Ärmel; A.1 wird über 2 Maschen und 4 Reihen gestrickt. Viel Spaß beim stricken!
03.01.2023 - 11:56
![]() Jeffrey T Enle ha scritto:
Jeffrey T Enle ha scritto:
I don't see any instruction on sewing the bind off and cast on stitches under the arm. What is recommended? Thank you.
02.05.2022 - 21:49DROPS Design ha risposto:
Dear Mrs T Enle, yes please, this will be added asap, you have to close the seam under raglan sleeve - this video shows two different techniques. Happy knitting!
03.05.2022 - 10:15
![]() Liv Grethe Waage ha scritto:
Liv Grethe Waage ha scritto:
Hei Hvor er diagrammet (mønsteret ) til denne oppskriften ? Finner bare forklaringen , men ikke mønsteret ?
19.04.2022 - 20:25
![]() Maria ha scritto:
Maria ha scritto:
Grazie per la risposta, ma mi sfugge qualcosa. Il lavoro non è a legaccio? Ho capito male? Grazie mille. Maria
26.10.2021 - 19:58DROPS Design ha risposto:
Buonasera Maria, la lavorazione segue il diagramma, ma durante la lavorazione in tondo non ci sono giri sul rovescio del lavoro, è come se si lavorasse sempre sul diritto del lavoro. Buon lavoro!
26.10.2021 - 21:09
![]() Maria ha scritto:
Maria ha scritto:
Buongiorno. Gli aumenti per il raglan prevedono 1 gettato prima e dopo le 3 m a diritto. Nel giro successivo i gettati devono essere lavorati a diritto ritorto. Ma questo giro è ovviamente a rovescio. Quindi come devo fare? Grazie mille. Maria
26.10.2021 - 18:21DROPS Design ha risposto:
Buonasera Maria, il lavoro è in tondo, non ci sono giri a rovescio e i gettati si lavorano a diritto ritorto. Buon lavoro!
26.10.2021 - 19:36
![]() Karin Schikowski ha scritto:
Karin Schikowski ha scritto:
Muss ich mit merheren Knäuel olle stricken ,denn sonnst habe ich ja keine trennung für Vorder-Rücken-Ärmel .Das heißt mit 4 Knäuel stricken,ist das richtig?
18.08.2021 - 15:35DROPS Design ha risposto:
Liebe Frau Schikowski, der Pullover wird mit nur einem Knäuel pro Reihe/Runde gestrickt, dh er wird zuerst in Reihen gestrickt und es wird für den Raglan und V-Ausschnitt zugenommen, dann wird es in Runden gestrickt. Diese Lektion zeigt, wie man einen Pullover von oben nach unten strickt, sicher kann sie Ihnen helfen. Viel Spaß beim stricken!
18.08.2021 - 16:50
![]() Christiane ha scritto:
Christiane ha scritto:
Ich hänge gerade an der Raglanaufnahme fest. 8M pro Aufnahme Rjnde in jeder 2. u 3. Runde von Duagramm A1. Das ist klar. Aber über eueviele Rubden Stricke ich dieRaglan Aufbahme? 20x das Diagramm A1? Danach noch zusätzlich die Angaben für Größe M? Hänge da grade fest... Danke für eure Hilfe
11.05.2021 - 22:22DROPS Design ha risposto:
Liebe Christiane, die Raglanzunahmen werden abwechslungsweise in jeder 2. und in jeder 3. Runde gestrickt, dh 1. Runde in A.1 = keine Zunahme, 2. Runde in A.1: Zunahmen, 3. + 4. Runde in A.1 = keine Zunahmen, 5. Runde (= 1. Runde in A.1) = Zunahmen, und so weiter stricken, dh immer nach jeder 2. und jeder 3. Runden zunehmen und gleichzeitig die 4 Reihen in A.1 wiederholen. Viel Spaß beim stricken!
12.05.2021 - 08:00
![]() Christel ha scritto:
Christel ha scritto:
Hvor er diagrammene? Man ser kun en tegning av genserens mål, men ingen diagrammer for mønsteret.
28.02.2021 - 14:56DROPS Design ha risposto:
Hej Christel, jo diagrammet er til højre for måleskitsen nederst i opskriften :)
01.03.2021 - 14:51
![]() Barbara Hamp ha scritto:
Barbara Hamp ha scritto:
Hello! I am starting it for the 3rd time now from the begining and need help. When adding new stitches on the 2nd and 3rd row from the A.1 pattern I have problem with messy part - for example: when I am starting after 3 stocking stitches after marker there are messy holes, and streched yarn looking really bad. On the other side before the 3 sts everything looks fine. I was doing it like this - A.1: 2nd row: YO, pattern, YO..., 3rd row: YO, K twisted st, pattern , K twisted st, YO. Help, please!
15.06.2020 - 16:20DROPS Design ha risposto:
Dear Mrs Hamp, you have to wait to have worked 2 increases for raglan to be able to work one more repeat in width after first 3 sts and before last 3 sts on raglan. ie work the new sts in stocking st until you can work a whole repeat of A.1 over the new sts and just work these 2 new sts as the other in A.1, ie either as in row 1 or as in row 3. Happy knitting!
16.06.2020 - 08:46
|
|||||||||||||
Long Beach#longbeachsweater |
|||||||||||||
|
|
|||||||||||||
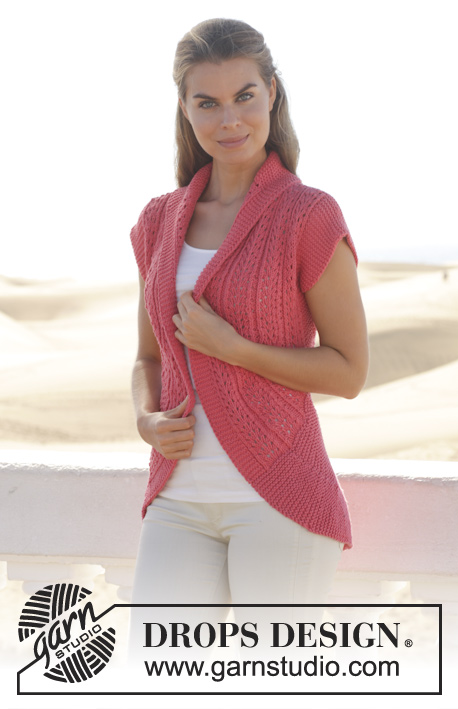
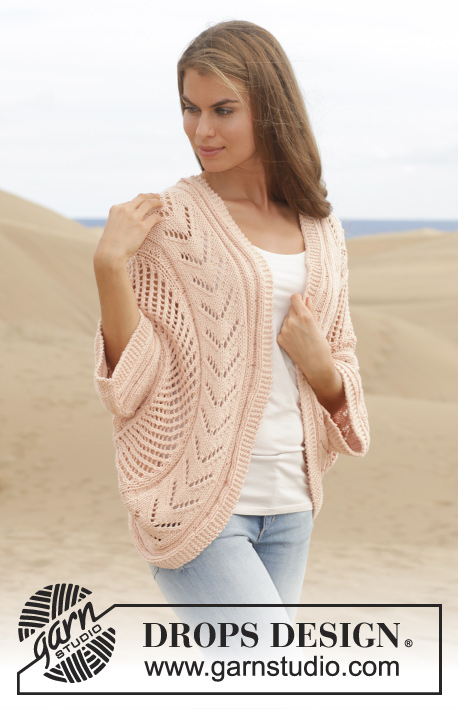
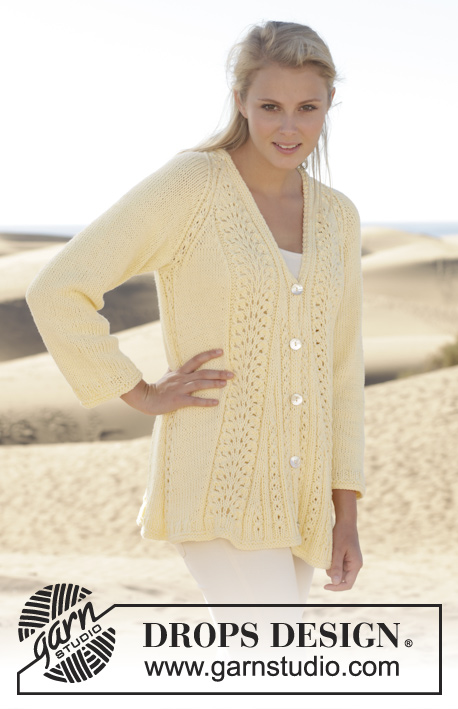
Maglione DROPS lavorato ai ferri con motivo a pizzo, lavorato dall’alto in basso in "Paris". Taglie: S - XXXL.
DROPS 154-2 |
|||||||||||||
|
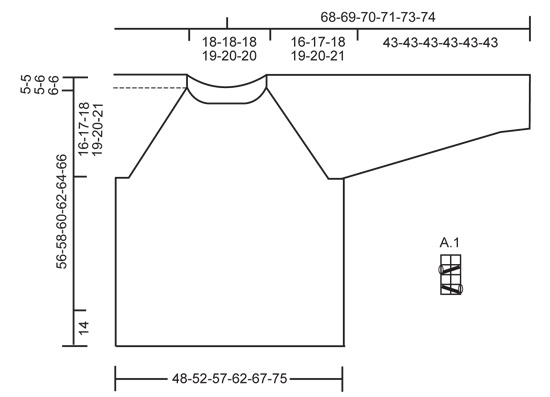
M LEGACCIO (in tondo sui f circolari/doppia punta): * 1 giro dir e 1 giro rov *, ripetere *-*. 1 “costa” a m legaccio = 2 giri. M LEGACCIO (avanti e indietro sui f): Lavorare tutti i f a dir. MOTIVO: Vedere il diagramma A.1. Il diagramma mostra tutti i f del motivo visti dal diritto del lavoro. RAGLAN: Aumentare 8 m su ogni giro con gli aumenti. Aumentare a ogni lato delle 3 m a m rasata che separano il dietro, il davanti e le maniche. Aumentare facendo 1 gettato, lavorare il gettato a dir ritorto sul f successivo per evitare buchi. Lavorare gli aumenti nel motivo A.1: aumentare ogni 2 e 3 giri 20-20-22-20-22-14 volte in totale. Poi lavorare e aumentare in modo diverso sulle maniche e sul davanti/dietro per le diverse taglie come segue: TAGLIA S: Lavorare altri 3 giri senza aumenti = 232 m sul f. TAGLIA M: aumentare su ogni giro sul davanti/dietro 3 volte e aumentare sul 3 giri 1 volta sulle maniche. Lavorare 2 giri senza aumenti = 248 m sul f. TAGLIA L: aumentare su ogni giro 4 volte sul davanti/dietro, non aumentare sulle maniche = 264 m sul f. TAGLIA XL: aumentare su ogni giro 9 volte sul davanti/dietro e aumentare ogni 3 giri 3 volte sulle maniche = 288 m sul f. TAGLIA XXL: aumentare su ogni giro 9 volte sul davanti/dietro e aumentare ogni 3 giri 2 volte sulle maniche = 304 m sul f. TAGLIA XXXL: Aumentare su ogni giro 23 volte sul davanti/dietro e aumentare a giri alterni 11 volte sulle maniche = 332 m sul f. SUGGERIMENTO PER LE DIMINUZIONI: Diminuire a ogni lato delle 3 m a m rasata al centro sotto la manica. Diminuire come segue prima delle m: lavorare fino a quando rimangono 2 m prima delle 3 m, passare 1 m a dir senza lavorarla, 1 m dir, accavallare la m passata sopra quella appena lavorata. Diminuire come segue dopo le m: lavorare 2 m insieme a dir. ---------------------------------------------------------- MAGLIONE: Lavorato dall’alto in basso. Avviare 84-84-84-92-96-96 m con i f circolari n° 5,5 e lavorare 2 “coste” in tondo sui f. Lavorare 1 giro dir e distribuire 12 diminuzioni in modo uniforme per tutte le taglie = 72-72-72-80-84-84 m. Lavorare 1 giro rov – ALLO STESSO TEMPO inserire i segnapunti nel lavoro come segue: 1° segnapunti all’inizio del giro (= inizio del dietro), 2° segnapunti dopo 18-18-18-18-20-20 m (= fine del dietro), 3° segnapunti dopo 3 m, 4° segnapunti dopo 12-12-12-16-16-16 m (= manica sinistra), 5° segnapunti dopo 3 m, 6° segnapunti dopo 18-18-18-18-20-20 m (= fine del davanti), 7° segnapunti dopo 3 m, 8° segnapunti dopo 12-12-12-16-16-16 m (= manica destra). Poi lavorare secondo il diagramma A.1 sul davanti, dietro e le maniche, ALLO STESSO TEMPO aumentare per il RAGLAN – leggere la spiegazione sopra a ogni lato delle 3 m a m rasata che separano le maniche, il davanti e il dietro. Dopo gli aumenti del raglan ci sono 232-248-264-288-304-332 m sul f. Sul giro successivo lavorare A.1 sulle 58-64-70-76-82-94 m sul dietro, intrecciare 3 m, lavorare A.1 sulle 52-54-56-62-64-66 m sulla manica destra, trasferire le m della manica su un fermamaglie. Intrecciare 3 m, lavorare A.1 sulle 58-64-70-76-82-94 m sul davanti e intrecciare 3 m, lavorare A.1 sulle 52-54-56-62-64-66 m sulla manica sinistra, trasferire le m della manica su un fermamaglie e intrecciare 3 m. Poi lavorare il corpo e le maniche in modo separato. CORPO: Lavorare il f successivo come segue: A.1 sulle 58-64-70-76-82-94 m successive (= dietro), avviare 4 nuove m sotto la manica destra, A.1 sulle 58-64-70-76-82-94 m successive (= davanti) e avviare 4 nuove m sotto la manica sinistra = 124-136-148-160-172-196 m. Inserire un segnapunti al centro delle 4 nuove m sotto ogni manica e spostare questi segnapunti durante il lavoro. Unire il lavoro e lavorare in tondo secondo A.1 su tutte le m fino a quando il lavoro misura 41-43-45-47-49-51 cm. Lavorare 2 “coste” su 4 m a ogni lato dei segnapunti e A.1 sulle altre m come prima. (= 8 m a ogni lato della m legaccio). Sul giro successivo dividere il lavoro all’altezza dei segnapunti e lavorare il davanti e il dietro in modo separato fino alla fine del lavoro con 4 m a m legaccio a ogni lato = 62-68-74-80-86-98 m sul f. Lavorare fino a quando il lavoro misura 54-56-58-60-62-64 cm e lavorare 2 “coste”. Lavorare 1 f dir e ALLO STESSO TEMPO distribuire 10-10-12-14-14-14 aumenti in modo uniforme = 72-78-86-94-100-112 m. Lavorare 1 f dir e intrecciare senza stringere. Il lavoro ora misura circa 56-58-60-62-64-66 cm. MANICA: Riportare le m della manica sui f di lavoro = 52-54-56-62-64-66 m, avviare 3 nuove m e unire il lavoro e continuare in tondo sui f circolari/doppia punta = 55-57-59-65-67-69 m. Lavorare le 3 nuove m sotto la manica a m rasata e lavorare le altre m secondo il diagramma A.1 come prima. Inserire un segnapunti al centro sotto la manica, misurare il lavoro da qui. Quando il lavoro misura 2 cm, diminuire 1 m a ogni lato delle 3 m a m rasata al centro sotto la manica – LEGGERE IL SUGGERIMENTO PER LE DIMINUZIONI sopra, ripetere le diminuzioni ogni 2½-2-2-2-1½-1½ cm altre 15-16-16-18-19-19 volte (16-17-17-19-20-20 diminuzioni in totale) = 23-23-25-27-27-29 m. Lavorare fino a quando il lavoro misura circa 41 cm dal segnapunti, 1 giro dir, 1 giro rov, 1 giro dir e 1 giro rov e ALLO STESSO TEMPO distribuire 4 aumenti in modo uniforme = 27-27-29-31-31-33 m, lavorare 1 giro rov e intrecciare senza stringere. Il lavoro misura circa 43 cm (la stessa lunghezza per tutte le taglie a causa della maggiore ampiezza del corpo nelle taglie più grandi). CONFEZIONE: Cucire le aperture sotto le maniche. |
|||||||||||||
Spiegazioni del diagramma |
|||||||||||||
|
|||||||||||||
 |
|||||||||||||
Avete terminato questo modello?Allora taggate le vostre foto con #dropspattern #longbeachsweater o inviatele alla #dropsfan gallery. Avete bisogno di aiuto con questo modello?Troverete 22 video tutorial, una sezione per i commenti/domande e molto altro guardando il modello su www.garnstudio.com © 1982-2026 DROPS Design A/S. Ci riserviamo tutti i diritti. Questo documento, compreso tutte le sue sotto-sezioni, è protetto dalle leggi sul copyright. Potete leggere quello che potete fare con i nostri modelli alla fine di ogni modello sul nostro sito. |
|||||||||||||


Con oltre 40 anni di esperienza nel design di modelli di maglia e uncinetto, DROPS Design offre la più estesa collezione di modelli gratuiti su internet - tradotti in 17 lingue. Ad oggi vi possiamo fornire 324 cataloghi e 12290 modelli - 9561 dei quali sono tradotti in Italiano.
Ci stiamo impegnando molto per darvi il meglio che vi possiamo offrire in termini di maglia e uncinetto, ispirazioni e consigli così come filati di grande qualità ad un prezzo incredibile! Volete utilizzare i nostri modelli per qualcosa d'altro oltre al vostro uso personale? Potete leggere tutto ciò che è consentito nel testo sul Copyright in basso su tutte le pagine dei nostri modelli. Buon lavoro!
Lasciare un commento sul modello DROPS 154-2
Noi saremmo felici di ricevere i tuoi commenti e opinioni su questo modello!
Se vuoi fare una domanda, fai per favore attenzione a selezionare la categoria corretta nella casella qui sotto per velocizzare il processo di risposta. I campi richiesti sono indicati da *.