
Categorie popolari
State cercando un filato?


Commenti / Domande (61)
![]() Lappi ha scritto:
Lappi ha scritto:
Miten voin laskea kaula-aukkoa korkeammalle? Tarkoitan ylemmäs, on liian iso.. Miten vähennän kavennuksia. En ole hyvä näissä jutuissa.
27.04.2026 - 09:18DROPS Design ha risposto:
Saat korkeamman kaula-aukon, jos neulot muutaman senttimetrin enemmän ennen kuin päätät pääntien silmukat ohjeen mukaan.
28.04.2026 - 16:37
![]() Claire ha scritto:
Claire ha scritto:
Reading the pattern I am confused from BACK PIECE = number of stitches. Are these continued on from the jacket instructions as not clear
03.02.2026 - 19:40DROPS Design ha risposto:
Hi Claire, Yes, you should have this number of stitches left on the back piece after casting off for the armholes on each side. Regards, Drops Team.
06.02.2026 - 07:14
![]() Jenny Carton ha scritto:
Jenny Carton ha scritto:
I have just finished this gorgeous jacket. I admit I used double knitting yarn in cotton . So have used size 4mm needles. The effect is wonderful and I have received many compliments. I'm not sure how to add a picture of my finished jacket.
26.09.2024 - 21:51
![]() Anna Watson ha scritto:
Anna Watson ha scritto:
Hello I am knitting this lovely cardigan and have reached the point where the jacket measures 42 cm and I have to cast off 6 stitches for the arm holes which is fine. However I do not understand the next bit which starts Back Piece =. Have I to separate out so many stitches for the back piece? I have I'm afraid found this pattern very hard to follow: ( Hope you can help. Many thanks. Anna
25.11.2020 - 17:57DROPS Design ha risposto:
Dear Mrs Watson, when piece measures 42 cm you should now cast off 6 sts for both armholes, ie cast off 3 sts on each side of both markers to divide piece into the both front pieces and the back piece, in 4th size work: 55 sts, cast off 6 sts, work 110 sts, cast off 6 sts, work 55 sts - you keep sts of back piece on the needle and slip the sts of both front pieces on a thread/stitch holder and work now first back piece and when back piece is finished, work left front piece then right front piece. Happy knitting!
26.11.2020 - 09:38
![]() Anne Cole ha scritto:
Anne Cole ha scritto:
I’m new to knitting what size needle do I use to get large?
03.10.2020 - 09:43DROPS Design ha risposto:
See answer below :)
05.10.2020 - 09:07
![]() Anne Cole ha scritto:
Anne Cole ha scritto:
What size needle do I use to get a large size? I’m new to knitting.
03.10.2020 - 09:41DROPS Design ha risposto:
Dear Mrs Cole, you will find all these informations under header, ie you are working here with needle size 4 mm or the size require to get the correct tension of 21 sts x 40 rows in garter st = 10 x 10 cm. Read more about tension here. Happy knitting!
05.10.2020 - 09:07
![]() Marianne ha scritto:
Marianne ha scritto:
Hallo, omdat eerdere patronen die ik heb gebreid wat kort uitvielen, wil ik deze graag een centimeter of 5 langer maken. Moet ik dan op 5cm + 4 beginnen met minderen of kan ik beter meer steken opzetten en vaker minderen (ik brei de L). Alvast bedankt
12.03.2020 - 21:36DROPS Design ha risposto:
Dag Marianne,
Als je het vest alleen langer wilt maken zou ik 5 cm later beginnen met meerderen. Als je hem ook breder wilt maken aan de onderkant zou ik inderdaad meer steken opzetten en eerder beginnen met minderen zodat je daarmee de extra opgezette steken mindert.
22.03.2020 - 11:32
![]() Sheila ha scritto:
Sheila ha scritto:
Hi I'm picking up stitches on right band. Do I pick up from bottom or top edge, it says pick up inside 1edge st mid front so I'm a bit confused. Thanks,
20.11.2019 - 18:23DROPS Design ha risposto:
Dear Sheila, you will knit up the stitches from RS, ie from bottom to top on right front piece and from top to bottom on left front piece. The stitches are picked up inside the first stitch on edge - see for example this video showing how to pick stitches inside 1 edge stitch. Happy knitting!
21.11.2019 - 08:48
![]() Wietske Baars ha scritto:
Wietske Baars ha scritto:
Hallo, is het ook mogelijk dit vest op gewone pennen te breien ipv op een rondbreipen? Als dat inderdaad ook zou kunnen, kan u mij dan ook uitleggen hoe? Alvast hartelijk dank.
05.10.2019 - 22:20DROPS Design ha risposto:
Dag Wietske,
Ja, dat zou wel kunnen bij dit patroon. We hebben een instructie gemaat waarin staat hoe je een patroon aanpast om met rechte naalden te kunnen breien. Deze vindt je hier.
06.10.2019 - 16:30
![]() Anita Monsieur ha scritto:
Anita Monsieur ha scritto:
Ikben bezig met de mouwen bij de minderingen moet ik dan aan de beide kanten minderen? Hoeveel steken blijven er over op het einde? Ik brei maat M Alvast bedankt
11.09.2019 - 10:46DROPS Design ha risposto:
Dag Anita,
Voor maat M minder je 1 keer 4 st + 4 keer 2 st. + 1 keer 1 st aan beide zijden. Dit zijn in totaal 26 steken waardoor je 50 steken over houd. Dan minder je steeds 2 steken aan beide kanten tot het werk 55 cm meet, waarna je nog een keer 3 steken afkant, voordat je de overgebleven steken afkant. Hoeveel steken je over houdt, hangt dus een beetje af van wanneer je op die 55 cm zit (dus je stekenverhouding in de hoogte)
13.09.2019 - 10:16
|
|
Seascapes#seascapescadigan |
|
 |
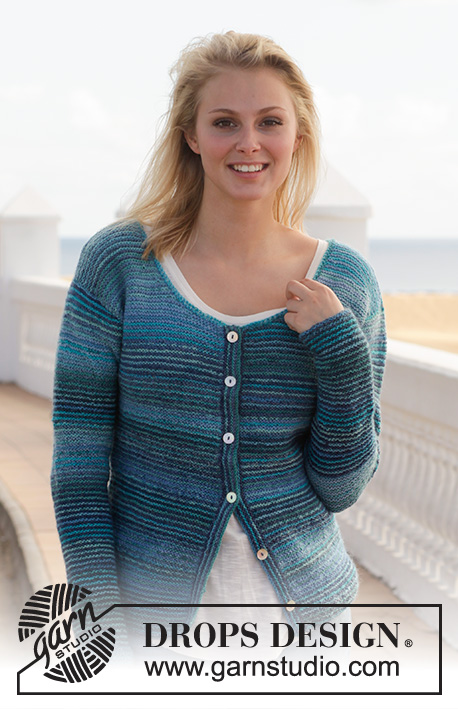 |
Giacca DROPS ai ferri, a punto legaccio, in "Fabel" e "Delight". Taglie: Dalla S alla XXXL.
DROPS 153-7 |
|
|
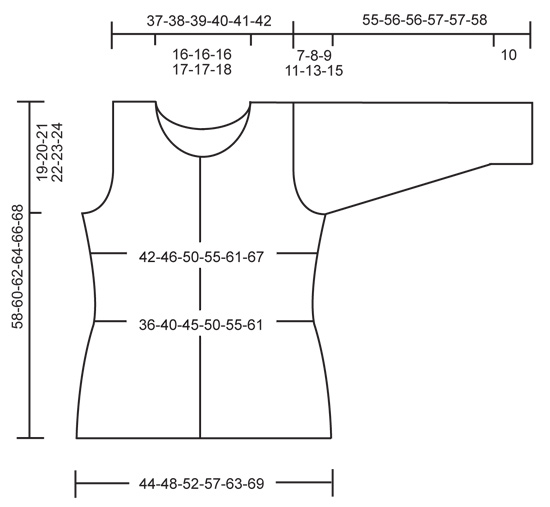
PUNTO LEGACCIO (avanti e indietro sui ferri): Lavorare tutti i ferri a dir. 1 “costa” a legaccio = 2 ferri a dir. STRISCE: * 1 costa a legaccio in Fabel, 1 costa a legaccio in Delight *, ripetere da *-* per tutto il lavoro. SUGGERIMENTO PER LE DIMINUZIONI: Diminuire 1 m prima del segno, come segue: lavorare finché non rimangono 2 m prima del segno, passare 1 m a dir senza lavorarla, 1 m dir, accavallare la m passata sulla m lavorata. Diminuire 1 m dopo il segno, come segue: lavorare 2 m insieme a dir. SUGGERIMENTO PER GLI AUMENTI: Aumentare 1 m da ciascun lato di ogni segno, come segue: Lavorare finché non rimane 1 m prima del segno, 1 m gettata, 2 m dir (il segno si trova tra queste m), 1 m gettata. Nel corso del ferro successivo, lavorare le m gettate a dir ritorto (lavorare quindi le m nell’asola posteriore e non in quella anteriore) per evitare che si formi un buco. -------------------------------------------------------- GIACCA: Si lavora avanti e indietro sui ferri circolari. Avviare 184-200-220-240-264-288 m sui ferri circolari n° 4 con il filato Delight. Lavorare a PUNTO LEGACCIO e a STRISCE - vedere le spiegazioni sopra. Inserire 2 segni nel lavoro; il primo dopo le prime 46-50-55-60-66-72 m ed il secondo prima delle ultime 46-50-55-60-66-72 m (dietro = 92-100-110-120-132-144 m). RICORDARSI LA TENSIONE DEL LAVORO! Quando il lavoro misura 4 cm, diminuire 1 m da ciascun lato di ognuno dei due segni - VEDERE IL SUGGERIMENTO PER LE DIMINUZIONI SOPRA ! Ripetere queste diminuzioni ogni 2 cm per un totale di 8 volte = 152-168-188-208-232-256 m. Quando il lavoro misura 24 cm, aumentare 1 m da ciascun lato di ognuno dei due segni - VEDERE IL SUGGERIMENTO PER GLI AUMENTI SOPRA. Ripetere questi aumenti ogni 2-2-2½-2½-3-3 cm 6 volte in tutto = 176-192-212-232-256-280 m. Quando il lavoro misura 39-40-41-42-43-44 cm, intrecciare 6 m da ciascun lato per gli scalfi (intrecciare quindi le 3 m che precedono e le 3 m che seguono ogni segno), e finire ogni parte separatamente. DIETRO: = 82-90-100-110-122-134 m. Intrecciare ora per gli scalfi da ciascun lato all’inizio di ogni ferro, come segue: 2 m 1-2-4-6-8-10 volte e 1 m 0-1-1-1-2-3 volte = 78-80-82-84-86-88 m. Quando il lavoro misura 54-56-58-59-61-63 cm, intrecciare le 30-30-30-32-32-34 m centrali per il collo e finire ciascun lato separatamente. Al ferro successivo, intrecciare 2 m per il collo = per la spalla rimangono 22-23-24-24-25-25 m. Intrecciare le m quando il lavoro misura 58-60-62-64-66-68 cm. DAVANTI SINISTRO: = 41-45-50-55-61-67 m. Intrecciare per lo scalfo al lato come indicato per il dietro = 39-40-41-42-43-44 m. Quando il lavoro misura 47-49-50-52-53-55 cm, intrecciare le m per il collo. Intrecciare 8-8-8-9-9-10 m 1 volta, poi intrecciare 3 m 1 volta, 2 m 2 volte e 1 m 2 volte = per la spalla rimangono 22-23-24-24-25-25 m. Intrecciare le m quando il lavoro misura 58-60-62-64-66-68 cm. DAVANTI DESTRO: = 41-45-50-55-61-67 m. Lavorare come indicato per il davanti sinistro ma a specchio. MANICHE: Si lavorano avanti e indietro sui ferri circolari. Avviare 46-48-50-52-54-56 m sui ferri circolari n° 4 con il filato Delight. Lavorare a punto legaccio e a strisce come prima. Quando il lavoro misura 10 cm, aumentare 1 m a 1 m vivagno dal bordo da ciascun lato. Ripetere questi aumenti ogni 3-2½-2½-2-1½-1½ cm 12-14-15-17-19-20 volte in tutto = 70-76-80-86-92-96 m. Quando il lavoro misura 48-48-47-46-44-43 cm (ATTENZIONE! misure più corte per le taglie più grandi perché l’arrotondamento della manica è più lungo e le spalle sono più larghe), intrecciare, all’inizio di ogni ferro, per l’arrotondamento delle maniche, come segue: 4-4-4-3-3-3 m 1 volta, 2 m 3-4-4-4-4-4 volte, 1 m 0-1-1-3-8-11 volte; intrecciare poi 2 m da ciascun lato finché il lavoro non misura 54-55-55-56-56-57 cm. Intrecciare ora 3 m da ciascun lato; intrecciare poi le rimanenti m. Il lavoro misura ca.55-56-56-57-57-58 cm. CONFEZIONE: Cucire le spalle. Attaccare le maniche e cucire i lati delle maniche. COLLO: Con i ferri circolari n° 4 ed il filato Fabel, riprendere, sul diritto del lavoro, da 94 a 108 m intorno al collo. Lavorare 1 costa a legaccio e intrecciare lavorando le m a dir sul rovescio del lavoro. BORDO DAVANTI DESTRO: Lavorare avanti e indietro sui ferri a punto legaccio e a strisce. Con il filato Delight, riprendere 98-102-106-110-112-114 m all’interno di 1 m vivagno lungo il bordo davanti destro. Lavorare 1 ferro a dir sul rovescio del lavoro. Al ferro successivo sul diritto del lavoro, intrecciare le m per 6-6-6-7-7-7 asole come segue: lavorare 7-6-5-8-4-6 m dir, * 2 m insieme a dir, fare 1 m gettata morbida, 15-16-17-14-15-15 m dir *, ripetere da *-* altre 4-4-4-5-5-5 volte (= 5-5-5-6-6-6 volte in tutto) e finire con 2 m insieme a dir, 1 m gettata e 4 m dir. Al ferro successivo lavorare le m gettate a dir. Proseguire a punto legaccio e a strisce finché il bordo davanti non misura ca.2-2-2-3-3-3 cm. Intrecciare tutte le m senza stringere troppo il filo. BORDO DAVANTI SINISTRO: Lavorare come il bordo davanti destro ma senza le asole. Attaccare i bottoni. |
|
 |
|
Avete terminato questo modello?Allora taggate le vostre foto con #dropspattern #seascapescadigan o inviatele alla #dropsfan gallery. Avete bisogno di aiuto con questo modello?Troverete 18 video tutorial, una sezione per i commenti/domande e molto altro guardando il modello su www.garnstudio.com © 1982-2026 DROPS Design A/S. Ci riserviamo tutti i diritti. Questo documento, compreso tutte le sue sotto-sezioni, è protetto dalle leggi sul copyright. Potete leggere quello che potete fare con i nostri modelli alla fine di ogni modello sul nostro sito. |
|


Con oltre 40 anni di esperienza nel design di modelli di maglia e uncinetto, DROPS Design offre la più estesa collezione di modelli gratuiti su internet - tradotti in 17 lingue. Ad oggi vi possiamo fornire 324 cataloghi e 12290 modelli - 9561 dei quali sono tradotti in Italiano.
Ci stiamo impegnando molto per darvi il meglio che vi possiamo offrire in termini di maglia e uncinetto, ispirazioni e consigli così come filati di grande qualità ad un prezzo incredibile! Volete utilizzare i nostri modelli per qualcosa d'altro oltre al vostro uso personale? Potete leggere tutto ciò che è consentito nel testo sul Copyright in basso su tutte le pagine dei nostri modelli. Buon lavoro!
Lasciare un commento sul modello DROPS 153-7
Noi saremmo felici di ricevere i tuoi commenti e opinioni su questo modello!
Se vuoi fare una domanda, fai per favore attenzione a selezionare la categoria corretta nella casella qui sotto per velocizzare il processo di risposta. I campi richiesti sono indicati da *.