
Categorie popolari
State cercando un filato?


Commenti / Domande (85)
![]() Marcia Gilliam ha scritto:
Marcia Gilliam ha scritto:
Is there a way to import this pattern into Knit Companion? Your web interface informs me I'm using a forbidden word and I can't post the complete question.
30.11.2018 - 17:09DROPS Design ha risposto:
Dear Mrs Gilliam, our pattern can only be printed or saved as a .pdf with a virtual printer, this maybe the reason why you cannot import them into Knit Companion. Happy knitting!
03.12.2018 - 10:56
![]() Linda Medvic ha scritto:
Linda Medvic ha scritto:
Wondering if there’s a printable version somewhere?
25.10.2018 - 15:28DROPS Design ha risposto:
Dear Mrs Medvic, you just have to click on the icon with the printer to launch printing. Happy knitting!
25.10.2018 - 15:44
![]() MEAGHAN MORIARTY ha scritto:
MEAGHAN MORIARTY ha scritto:
Thank you for the clarification! The instructions "Now work A.2, but continue with K and P as in A.1 in the orange section." confused me - I read that as knit A2 but using the A1 pattern when working in the orange.
10.10.2018 - 02:33DROPS Design ha risposto:
Dear Mrs Moriary, you are right, I missed that part from the pattern, work A.2 as explained previously but continue working the st in garter st from A.1 as before (alternately K and P every other round). Happy knitting!
10.10.2018 - 09:54
![]() MEAGHAN MORIARTY ha scritto:
MEAGHAN MORIARTY ha scritto:
I\'m struggling with the A2 pattern. Is the green stitch in addition to the orange or take the place of one it? In other words, in the first line, for example, does it start green K, then orange KKKPKK, OR is it green K, then orange KKPKK with the green taking the place of the first orange K? Thanks!
09.10.2018 - 02:50DROPS Design ha risposto:
Dear Mrs Moriarty, A.2 is a stranded chart, ie you will alternately work with orange and green, on first row for example work: (K1 with green, K8 with orange) and repeat from (to) the whole round. On round 2, work (K2 with greeen, K5 with orange, K1 with green) and repeat from (to) the whole round. Happy knitting!
09.10.2018 - 09:55
![]() Cindy ha scritto:
Cindy ha scritto:
So when starting A1 is it knitt three then purl one then knitting 5 purl one knit 5 and continue that until you finish all the way around. Then next round is straight knit all the way around?
18.09.2018 - 02:50DROPS Design ha risposto:
Dear Cindy, when repeating A.1 in the round you will work: (K3, P1, K2), ie it will look at: K3 at the beg of round, repeat (P1, K5) and finish with K2. On round 2, knit all sts. Happy knitting!
18.09.2018 - 09:22
![]() Lorelei Schnabler ha scritto:
Lorelei Schnabler ha scritto:
Are the instructions for both A1 and A2 per row, or are they to be repeated over and over within one row? This pattern is beautiful, but I'm unclear on this point. Thank you for your quick response.
25.08.2018 - 20:44DROPS Design ha risposto:
Hi Lorelei, You repeat A.1 both within the round and in height to the reqired length, then you work A.2, repeated within the round, but only once in height. Happy knitting!
26.08.2018 - 07:58
![]() Giulia ha scritto:
Giulia ha scritto:
Grazie per l’immediata risposta, sempre nel diagramma ogni riga corrisponde a 1 ferro interamente lavorato vero? Esempio per il primo ferro farò 3 dritti, 1 rovescio e 2 dritti a ripetizione per tutto il ferro mentre nel secondo ferro lavorerò tutto a diritto?
09.02.2018 - 14:43DROPS Design ha risposto:
Buongiorno Giulia, esattamente così, una riga un ferro/giro. I diagrammi mostrano semprd tutti i ferri/giri. Buon lavoro!
09.02.2018 - 16:11
![]() Giulia ha scritto:
Giulia ha scritto:
Buongiorno, Chiedo scusa ma sono alle prime armi e non so come si legge lo schema A1 della cuffia sweet pumpkin. So che di solito si parte dall’angolo in basso a dx e sotto vedo un 6 che non so che significa, significano ripetizioni da 6? Ogni riga va ripetuta per tutto il ferro? Chiedo consiglio su come leggerlo grazie.
08.02.2018 - 16:12DROPS Design ha risposto:
Buongiorno Giulia, 6 è il numero delle maglie del motivo, e il motivo va ripetuto per tutto il giro. Buon lavoro!
08.02.2018 - 16:34
![]() Giulia ha scritto:
Giulia ha scritto:
Buongiorno, Chiedo scusa ma sono alle prime armi e non so come si legge lo schema A1 della cuffia sweet pumpkin. So che di solito si parte dall’angolo in basso a dx e sotto vedo un 6 che non so che significa, significano ripetizioni da 6? Ogni riga va ripetuta per tutto il ferro? Chiedo consiglio su come leggerlo grazie.
08.02.2018 - 08:21DROPS Design ha risposto:
Buongiorno Giulia. I diagrammi si leggono dal basso verso l'alto e da destra verso sinistra. Il numero indicato, in questo caso 6, indica che ogni ripetizione del motivo è di 6 maglie. Ripete queste sei maglie su tutte le maglie presenti sui ferri. Ci riscriva se ancora in difficltà. Buon lavoro!
08.02.2018 - 08:48
![]() Edie McRoberts ha scritto:
Edie McRoberts ha scritto:
Dear Jeanette; I have to let you know how much I enjoyed making this delightful Pumpkin cap. We haven't had a baby in the family for quite some time, so it was a treat to be able to get back into the baby knitting. The instructions were very clear and easy to follow. I found the trick was to use the markers rather than just to try counting! Thank you so much for making this available over the internet. It is very much appreciated. Sincerely, Edie McRoberts.
07.10.2017 - 17:50
|
||||||||||
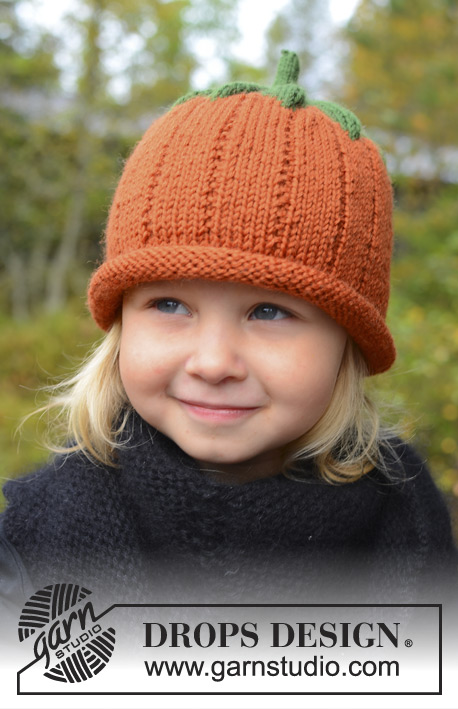
Sweet Pumpkin#sweetpumpkinhat |
||||||||||
 |
 |
|||||||||
Cappello a forma di zucca per neonati e bambini lavorato ai ferri in DROPS Karisma. Taglie: 0 - 8 anni. Tema: Halloween
DROPS Extra 0-966 |
||||||||||
|
MOTIVO: Vedere i diagrammi A.1 e A.2. Il motivo dei diagrammi è visto dal diritto del lavoro. ---------------------------------------------------------- CAPPELLO: Avviare 84-90-96-102-108 m. con l’arancione con i f. a doppia punta o ferri circolari n° 3,5 mm. Lavorare 1 giro rov., poi lavorare a m. rasata. Fare attenzione alla tensione del lavoro! Quando il lavoro misura 6 cm, inserire 1 segnapunti (= bordo arrotolato), ora misurare il lavoro da qui e lavorare secondo il diagramma A.1. Quando il lavoro misura 7-8-9-10-12 cm, distribuire 3-0-6-3-0 diminuzioni in modo uniforme = 81-90-90-99-108 m. Poi inserire 9-10-10-11-12 segnapunti nel lavoro con 9 m. tra i segnapunti. La 1° m. dopo il 1° segnapunti = 1° m. in A.2. Ora lavorare A.2, ma continuare a lavorare a dir. e e rov. come in A.1 nella sezione arancione. Alla fine di A.2 lavorare con il verde foresta fino alla fine del lavoro – ALLO STESSO TEMPO diminuire a giri alterni: 1 m. sul lato destro di tutti i segnapunti fino a quando rimangono 9-10-10-11-12 m. sul f. Passare ai f. a doppia punta n° 2 mm e lavorare 3 cm su queste m. per il gambo. Far passare il filo attraverso le m. rimaste e affrancare. |
||||||||||
Spiegazioni del diagramma |
||||||||||
|
||||||||||
 |
||||||||||
Avete terminato questo modello?Allora taggate le vostre foto con #dropspattern #sweetpumpkinhat o inviatele alla #dropsfan gallery. Avete bisogno di aiuto con questo modello?Troverete 11 video tutorial, una sezione per i commenti/domande e molto altro guardando il modello su www.garnstudio.com © 1982-2026 DROPS Design A/S. Ci riserviamo tutti i diritti. Questo documento, compreso tutte le sue sotto-sezioni, è protetto dalle leggi sul copyright. Potete leggere quello che potete fare con i nostri modelli alla fine di ogni modello sul nostro sito. |
||||||||||


Con oltre 40 anni di esperienza nel design di modelli di maglia e uncinetto, DROPS Design offre la più estesa collezione di modelli gratuiti su internet - tradotti in 17 lingue. Ad oggi vi possiamo fornire 324 cataloghi e 12252 modelli - 9522 dei quali sono tradotti in Italiano.
Ci stiamo impegnando molto per darvi il meglio che vi possiamo offrire in termini di maglia e uncinetto, ispirazioni e consigli così come filati di grande qualità ad un prezzo incredibile! Volete utilizzare i nostri modelli per qualcosa d'altro oltre al vostro uso personale? Potete leggere tutto ciò che è consentito nel testo sul Copyright in basso su tutte le pagine dei nostri modelli. Buon lavoro!
Lasciare un commento sul modello DROPS Extra 0-966
Noi saremmo felici di ricevere i tuoi commenti e opinioni su questo modello!
Se vuoi fare una domanda, fai per favore attenzione a selezionare la categoria corretta nella casella qui sotto per velocizzare il processo di risposta. I campi richiesti sono indicati da *.