
Categorie popolari
State cercando un filato?


Commenti / Domande (118)
![]() Carol Cooley ha scritto:
Carol Cooley ha scritto:
Is there either another similar pattern or has this one being rewritten please? *Cassie by DROPS Design Knitted DROPS bolero with lace pattern in ”Big Merino”. Size: S - XXXL* I use mainly acrylic as wool can irritate, alpaca-etc are ok. Any low cost substitutes for wool are welcomed for a practice piece. Maybe garter and st.st to start off then go ahead for lace. Thank you.
14.05.2019 - 13:29DROPS Design ha risposto:
Dear Carol, you can find many patterns for bloeros on our site with the search word "bolero". https://www.garnstudio.com/search.php?action=search&w=bolero&c=0&k=0&y=0&lang=en You have to understand that these patterns are written to suppoirt DROPS yarns, we cannot make alterations or suggestions for other yarns, sorry. Happy Crafting!
25.05.2019 - 10:27
![]() Pam ha scritto:
Pam ha scritto:
I'm having trouble with row 15 could you please write it in full for me
10.05.2019 - 20:07DROPS Design ha risposto:
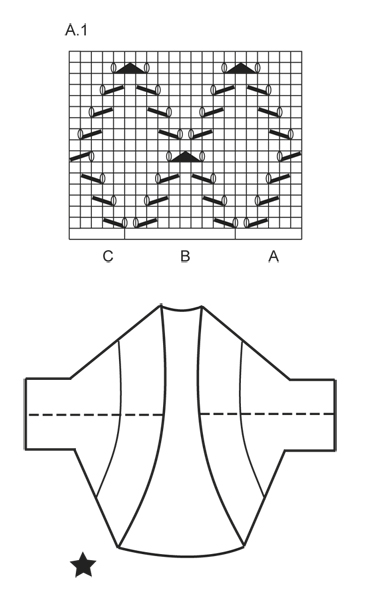
Hi Pam, Row 15 reading from right to left, so from the right side, - K4, 1 yarn over, slip 1 stitch, knit 2 together and pass the slipped stitch over the knitted together stitches, 1 yarn over, K7, 1 yarn over, slip 1 stitch, K2 together and pass the slipped stitch over the knitted together stitches, 1 yarn over and finally K4. Happy knitting!
11.05.2019 - 11:47
![]() Ava Goei-Vujovich ha scritto:
Ava Goei-Vujovich ha scritto:
I have tried a sample swatch: using 21 stitches and interpreting A1. Its a total of 21 stitches but using your explanation above: first row in A: K3, K2 tog, YO - then B: YO, slip 1 as if to K, K1, psso, K5, K2 tog, YO, K1, and C: YO, slip 1 as if to K, K1, psso, K3. I end up with 23 sts and not 21 sts
07.03.2019 - 12:40DROPS Design ha risposto:
Dear Mrs Goei-Vujovich, on first row A.1A is worked as follows: K3, K2 tog, YO, K1 (= 6 sts), then work B over the next 10 sts: YO, slip 1 as if to K, K1, psso, K5, K2 tog, YO, K1, then work C: YO, slip 1 as if to K, K1, psso, K3 (= 5 sts) = 21 sts in total. You can insert a marker between each repeat to make sure you always get the correct number of sts in each part of the diagram. Happy knitting!
07.03.2019 - 14:19
![]() Ava Goei-Vujovich ha scritto:
Ava Goei-Vujovich ha scritto:
I don't understand why a K1 is added at the end of section B - there isn't a K1 added at the end of section A if I am to read the diagram explanation as shown in A1 Row 1. I understand B is a 10 sts repeat: *YO, slip 1 as if to K, K1, psso, K5, K2 tog, YO, K1*, repeat from *-*.
07.03.2019 - 12:35
![]() Ava Goei-Vujovich ha scritto:
Ava Goei-Vujovich ha scritto:
First row in A: K3, K2 tog, YO = 6sts. then B: YO, slip 1 as if to K, K1, psso, K5, K2 tog, YO, K1 = 12 sts (repeat B), and work C: YO, slip 1 as if to K, K1, psso, K3 = 5sts. B should only be multiples of 10, not 12.
07.03.2019 - 11:35DROPS Design ha risposto:
Dear Mrs Goei-Vujovich, when working B you decrease 1 stitch 2 times (slip 1, K1, psso + K2 tog) and increase with 2 YOs = number of sts is the same = 10 sts. See previous answer for whole repeats on the row. Happy knititng!
07.03.2019 - 12:19
![]() Ava Goei-Vujovich ha scritto:
Ava Goei-Vujovich ha scritto:
I believe your reply at 9:43 is incorrect. I have just tried in in a total of 21 stitches for a A,B,C section. It makes the entire section of section B : 12 stitches for a standard repeat when it should be 10! Standard repeat of 10 stitches and section C is 5.
07.03.2019 - 11:27DROPS Design ha risposto:
Dear Mrs Goei-Vujovich, B is a 10 sts repeat: *YO, slip 1 as if to K, K1, psso, K5, K2 tog, YO, K1*, repeat from *-*. And you will work: 3 sts in garter st, A.1A (= 6 sts), repeat A.1B a total of 9-10-11-12 times (= over the 90-100-110-112 next sts), work A.1C (= 5 sts) and finish with 3 sts in garter st. Happy knitting!
07.03.2019 - 12:18
![]() Ava Goei-Vujovich ha scritto:
Ava Goei-Vujovich ha scritto:
In section B, row 1, I start off with a *1 YO, sl1, K1, psso, k5, k2tog, 2 YO*, and then repeat from* to * for the next 90-100-etc stitches, until the last 5 stitches of that row?
07.03.2019 - 06:16DROPS Design ha risposto:
Hi Ava, You are right, apart from at the end of the sequence it is 1 YO, K1, 1 YO, not 2 YOs. This sequence is repeated until the last 8 stitches, finishing with A.1 C (5 stitches) and 3 stitches in garter stitch. Happy knitting!
07.03.2019 - 08:06
![]() Ava Goei-Vujovich ha scritto:
Ava Goei-Vujovich ha scritto:
Agree not a well worded pattern & diagram explanations. In section A, I K2tog (4 & 5th stitch together), then immediately following: do I do 2 times YO followed by a sl1, K1, psso?
07.03.2019 - 06:07DROPS Design ha risposto:
Dear Mrs Goei-Vujovich, on first row in A.1, work A.1A as follows: K3, K2 tog, YO - then work B: YO, slip 1 as if to K, K1, psso, K5, K2 tog, YO, K1 (repeat B), and work C: YO, slip 1 as if to K, K1, psso, K3. On row 15, work the last 2 sts in A tog with the next st in B, then work the last 2 sts in B with next st in next B / in C. Happy knitting!
07.03.2019 - 09:43
![]() Marcia Ebert ha scritto:
Marcia Ebert ha scritto:
I have started knitting this pattern and realize that there are directions for knitting the RS but not for wrong side. Is this done in stockinette stitch except for pattern stitches? Garter stitch is the border stitches but what do you do on the wrong side in the middle. It looks like every other row of the pattern stitch on the diagram is plain so is it purl on the wrong side. Is this correct?
21.01.2019 - 04:51DROPS Design ha risposto:
Hi Marcia, All the rows in the diagram show the stitches from the right side, so between the lace pattern you work stocking stitch (knit from the right side and purl from the wrong side). Happy knitting!
21.01.2019 - 07:01
![]() Marcia Ebert ha scritto:
Marcia Ebert ha scritto:
The pattern calls for knitting A then B then C That would be following the pattern right to left. Is this correct? It would be much easier to follow it left to right. I find this confusing. It is a pretty sweater.
15.01.2019 - 04:08DROPS Design ha risposto:
Dear Mrs Ebert, diagrams are worked top down, from RS read from the right towards the left and from WS from the left towards the right. Work A, then repeat B and finish row with C. On row 15, work the last 2 sts in A/B together with the first st B/next B/C. Happy knitting!
15.01.2019 - 09:39
|
|||||||||||||||||||
Cassie#cassiebolero |
|||||||||||||||||||
 |
 |
||||||||||||||||||
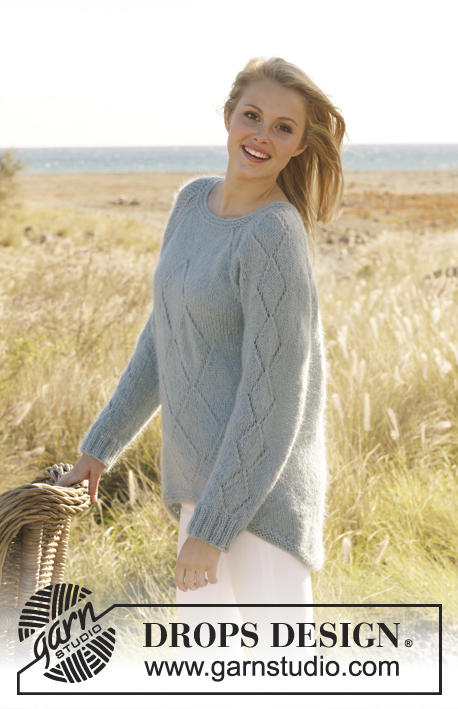
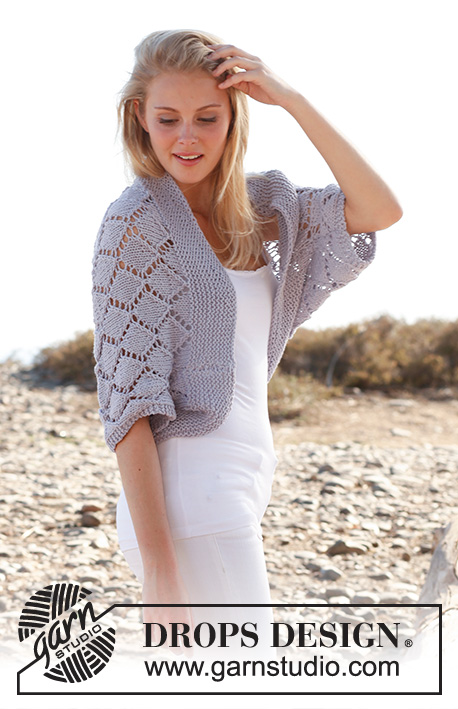
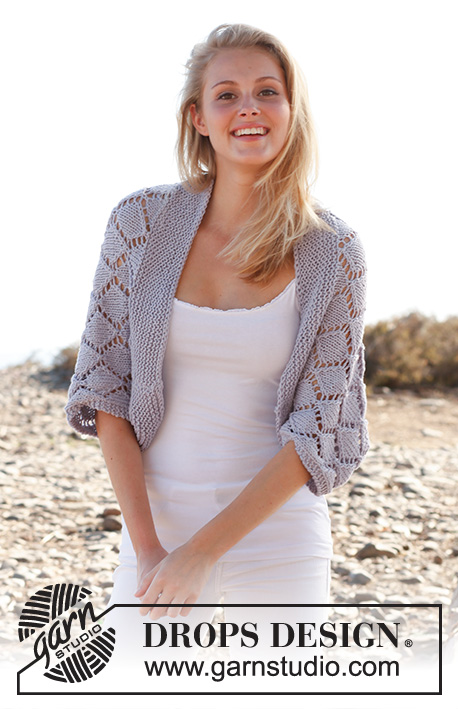
Bolero DROPS ai ferri, con motivo traforato, in "Big Merino". Taglie: Dalla S alla XXXL.
DROPS 146-16 |
|||||||||||||||||||
|
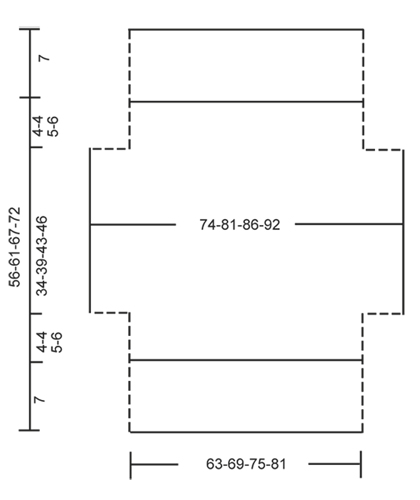
PUNTO LEGACCIO (avanti e indietro sui ferri): Lavorare tutti i ferri a dir. 1 “costa” a legaccio = 2 ferri a dir. MOTIVO: Vedere il diagramma A.1. Il diagramma mostra tutti i ferri del motivo, visti sul diritto del lavoro. --------------------------------------------------------- BOLERO: Si lavora avanti e indietro sui ferri circolari per avere sufficiente spazio per tutte le m. Avviare 107-117-127-137 m sui ferri circolari n° 5 con il filato Big Merino. Lavorare a punto legaccio finché il lavoro non misura 7 cm. Proseguire come segue, sul diritto del lavoro: 3 m a PUNTO LEGACCIO - vedere le spiegazioni sopra, diagramma A.1A (= 6 m), diagramma A.1 B sulle 90-100-110-120 m successive, finire con il diagramma A.1 C (= 5 m) e 3 m a PUNTO LEGACCIO. Proseguire con il diagramma A.1 e 3 m a punto legaccio da ciascun lato. RICORDARSI LA TENSIONE DEL LAVORO! Quando il lavoro misura 11-11-12-13 cm, avviare 10 nuove m alla fine dei 2 ferri successivi per le maniche = 127-137-147-157 m. Lavorare come segue: 3 m a punto legaccio, diagramma A.1A (= 6 m), diagramma A.1 B sulle 110-120-130-140 m successive, finire con il diagramma A.1 C (= 5 m) e 3 m a PUNTO LEGACCIO. ATTENZIONE! Lavorare il diagramma A.1 in modo che prosegua correttamente sulla parte del corpo e proseguirlo sulle maniche. Quando il lavoro misura 45-50-55-59 cm, intrecciare 10 m all’inizio dei 2 ferri successivi = 107-117-127-137 m. Lavorare come segue: 3 m a punto legaccio, diagramma A.1A (= 6 m), diagramma A.1 B sulle 90-100-110-120 m successive, finire con il diagramma A.1 C (= 5 m) e con 3 m a punto legaccio. Quando il lavoro misura 49-54-60-65 cm, lavorare a punto legaccio tutte le m. Intrecciare le m quando il lavoro misura 56-61-67-72 cm. CONFEZIONE: Cucire i lati delle maniche e del corpo all’interno della m vivagno - vedere la linea tratteggiata nel diagramma. |
|||||||||||||||||||
Spiegazioni del diagramma |
|||||||||||||||||||
|
|||||||||||||||||||
 |
|||||||||||||||||||
 |
|||||||||||||||||||
Avete terminato questo modello?Allora taggate le vostre foto con #dropspattern #cassiebolero o inviatele alla #dropsfan gallery. Avete bisogno di aiuto con questo modello?Troverete 15 video tutorial, una sezione per i commenti/domande e molto altro guardando il modello su www.garnstudio.com © 1982-2026 DROPS Design A/S. Ci riserviamo tutti i diritti. Questo documento, compreso tutte le sue sotto-sezioni, è protetto dalle leggi sul copyright. Potete leggere quello che potete fare con i nostri modelli alla fine di ogni modello sul nostro sito. |
|||||||||||||||||||


Con oltre 40 anni di esperienza nel design di modelli di maglia e uncinetto, DROPS Design offre la più estesa collezione di modelli gratuiti su internet - tradotti in 17 lingue. Ad oggi vi possiamo fornire 324 cataloghi e 12190 modelli - 9461 dei quali sono tradotti in Italiano.
Ci stiamo impegnando molto per darvi il meglio che vi possiamo offrire in termini di maglia e uncinetto, ispirazioni e consigli così come filati di grande qualità ad un prezzo incredibile! Volete utilizzare i nostri modelli per qualcosa d'altro oltre al vostro uso personale? Potete leggere tutto ciò che è consentito nel testo sul Copyright in basso su tutte le pagine dei nostri modelli. Buon lavoro!
Lasciare un commento sul modello DROPS 146-16
Noi saremmo felici di ricevere i tuoi commenti e opinioni su questo modello!
Se vuoi fare una domanda, fai per favore attenzione a selezionare la categoria corretta nella casella qui sotto per velocizzare il processo di risposta. I campi richiesti sono indicati da *.