
Categorie popolari
State cercando un filato?


Commenti / Domande (200)
![]() Patricia ha scritto:
Patricia ha scritto:
Bonjour. Si j'ai bien compris pour les diminutions de A1 je commence à partir du 3eme rang ? Merci de votre réponse
02.01.2021 - 17:04DROPS Design ha risposto:
Bonjour Patricia, c'est exact. Bon tricot!
04.01.2021 - 15:45
![]() Linda Faucher ha scritto:
Linda Faucher ha scritto:
J'ai oublié de vous demander si les diminitions se font toujours dans le même sens. Donc 2m ens à l'endroit. (même si nous sommes rendu à la fin du rang) Merci
27.11.2020 - 16:04DROPS Design ha risposto:
Re- Tout à fait, pour diminuer 1 maille, tricotez 2 mailles ensemble à l'endroit. Bon tricot!
27.11.2020 - 16:19
![]() Linda Faucher ha scritto:
Linda Faucher ha scritto:
Bonjour, j'ai lue quelques explications, mais j'aimerais bien confirmer le tout. Je suis rendu à la partie ou je dois commencer les diminutions. Ca nous dit de faire 3 dim réparties sur les rangs end. Donc, est-ce que cela veut dire que nous ne sommes pas obligé de les faire au début et à la fin du rang ?(si nous utilons la méthode de calcul ca les disperse). Merci beaucoup de votre aide.
27.11.2020 - 16:01DROPS Design ha risposto:
Bonjour Mme Faucher, tout à fait, on va ici diminuer ces 3 mailles à intervalles réguliers (voir cette leçon) sur un même rang. Bon tricot!
27.11.2020 - 16:18
![]() Ivonne Klöser ha scritto:
Ivonne Klöser ha scritto:
Hallo ich komme mit dem Poncho gut voran. Ich muss jetzt mit der Abnahme der Maschen beginnen. Ich verstehe es so, das ich in 7 Hinrunden verteilt jeweils 4 Maschen abnehmen muss. Muss ich auch in A1 Maschen in den Runden mit den Umschlägen abnehmen. Vielen Dank für Ihre Hilfe.
16.09.2020 - 19:46DROPS Design ha risposto:
Liebe Frau Klöser, die Abnahmen werden nur auf eine Hinreihe rechts, dh bei der 3., 5., 9. und 11. Reihen (und nicht bei der 1. und 7. Reihe = die mit dem Löchern). Viel Spaß beim stricken!
17.09.2020 - 09:54
![]() Sarah ha scritto:
Sarah ha scritto:
Hi it says I should have 111 sitches but I only have 96, what should i do?
13.07.2020 - 22:16DROPS Design ha risposto:
Hi Sarah. Then you need to find out where you have made mistakes and start from there again. Are probably some increases you have missed. Happy knitting!
14.07.2020 - 07:04
![]() Jennifer Gonzalez ha scritto:
Jennifer Gonzalez ha scritto:
All sizes: Work A.1 2-3-3 times vertically in total (= 24-36-36 rows A.1, 30-42-42 rows worked in total Hello, i am a begginer in knitting so this is quite a challenge. I don´t understand what i'm suppose to do here, especialy (Work A.1 2-3-3 times vertically) . And can you please explain why there are dashes between the numbers? Tank you! :)
13.07.2020 - 01:49DROPS Design ha risposto:
Hi Jennifer, Repeat vertically means that when you have worked all of A.1 it is repeated one more time in size S/M and two more times in Sizes L/XL etc. The dashes between the numbers separate the different sizes, so if you are working size S/M you use the first number in all sequences. Hope this helps and happy knitting!
13.07.2020 - 07:25
![]() Victoria ha scritto:
Victoria ha scritto:
Dzień dobry. Mam wątpliwości czy dobrze czytam wzór. Po zakończeniu wzoru A2, zrobiłam 2 rzędy ściągaczem francuskim i teraz mam odejmować po 4 oczka równomiernie. Mam 111 oczek. Czyli w rzędzie 3 (bo po prawej stronie bez ażuru) mam co 28 oczko robić 2 razem na prawo, potem w 5 co 27, w 9 (7 pomijam bo ażur) co 26 oczek itp? Czy dobrze to odczytuje? Będę wdzięczna za pomoc. Pozdrawiam serdecznie :)
13.05.2020 - 21:36DROPS Design ha risposto:
Witaj Wiktorio! bardzo dobrze czytasz wzór, masz zamykać równomiernie 4 o. w każdym rzędzie na prawo schematu A.1 na prawej stronie robótki w sumie 7 razy (tj. w rzędach 3,5,9 i 11 i znów 3,5,9 schematu A.1). Równomiernie tzn. co mniej więcej taką samą liczbę oczek, nie musi być dokładnie tyle samo, ponieważ przy 4 zamykanych o. nie będzie to wcale widoczne. Pozdrawiamy!
15.05.2020 - 16:49
![]() Kim ha scritto:
Kim ha scritto:
Bonjour. Si on souhaite réaliser un modèle plus petit (XXS/XS) pensez vous que commencer avec 31-33m (au lieu des 35-37-39m pour taille S/M, L/XL, XXL/XXXL) va marcher ? ou sinon, quel sont vos conseils ? Merci.
30.04.2020 - 22:00DROPS Design ha risposto:
Bonjour Kim, nous ne sommes malheureusement pas en mesure de pouvoir adapter chacun de nos modèles à chaque demande. Merci de bien vouloir vous adresser à votre magasin DROPS pour toute assistance complémentaire. Merci pour votre compréhension. Bon tricot!
04.05.2020 - 09:48
![]() Birgit ha scritto:
Birgit ha scritto:
In Größe S/M am Bild deutlich zu erkennen nur 20R in A.1 nach A.2. Ebenso nach A.3. Leider passen dadurch die Abnahmen lt. Anleitung nicht dazu.
09.02.2020 - 10:26
![]() Irene ha scritto:
Irene ha scritto:
I can't determine the sizes from the diagram. Could you tell me the equivalent chest sizes please.
21.07.2019 - 17:30DROPS Design ha risposto:
Dear Irene, the best way to find the matching size is to measure a similar garment you have and like the shape, then compare these measurements to the ones from the chart. Read more here about sizing. Happy knitting!
06.08.2019 - 09:07
|
|||||||||||||||||||
Blue breeze#bluebreezeponcho |
|||||||||||||||||||
 |
 |
||||||||||||||||||
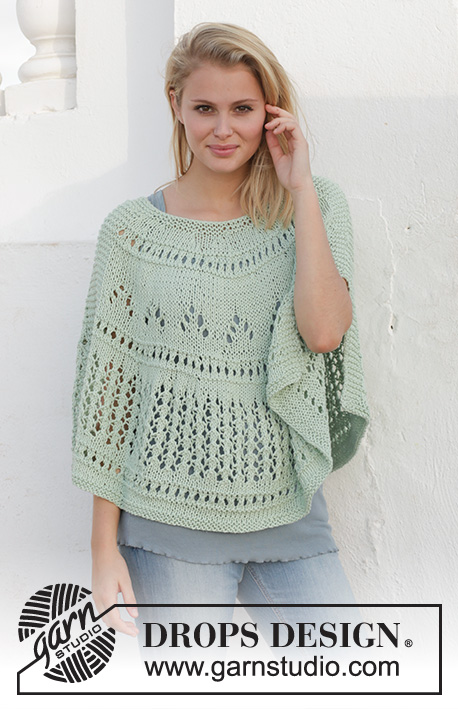
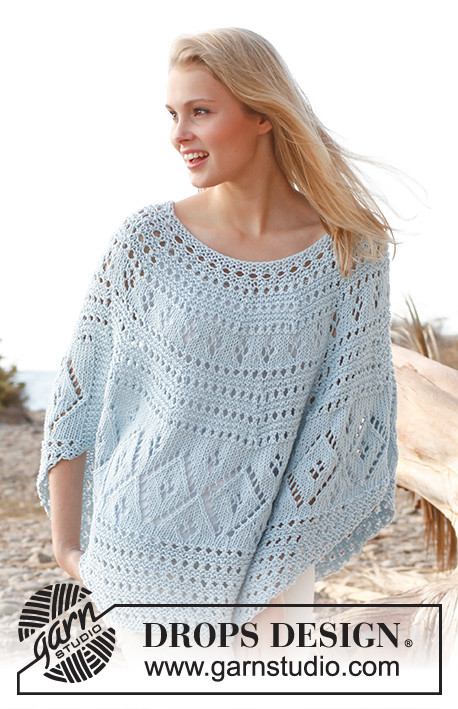
DROPS poncho in "Paris". Taglia dalla S alla XXXL.
DROPS 145-18 |
|||||||||||||||||||
|
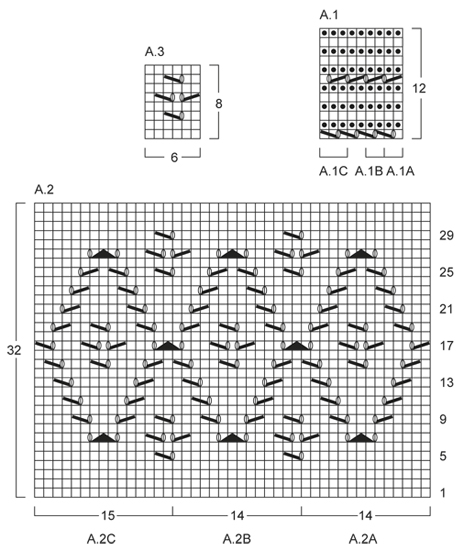
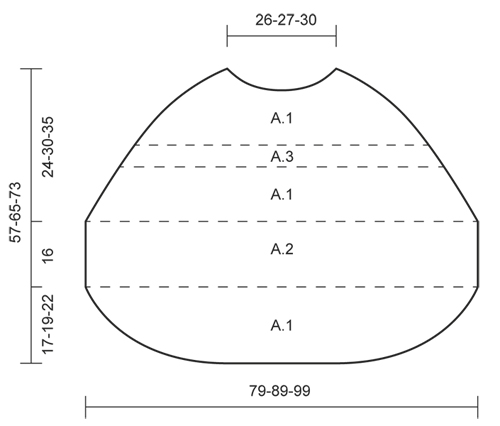
PUNTO LEGACCIO (avanti e indietro sul f): Lavorare tutti i ferri sul diritto. 1 “cresta” legaccio = 2 ferri a dir. MOTIVO: Vedere i diagrammi A.1 - A.3. I diagrammi mostrano tutti i motivi sul diritto. DIMINUZIONI: Tutte le diminuzioni si fanno nel punto fantasia A.1 ai ferri lavorati a diritto (non sui ferri con il punto traforato), vuol dire che ci saranno 4 ferri di diminuzioni in ogni ripetizione di A.1 (= 12 f). Per diminuire 1 m, lavorare 2 m insieme a dir. -------------------------------------------------------- DIETRO: Si lavora avanti e indietro sui ferri circolari. Avviare 35-37-39 m con Paris e ferri circolari 6. Lavorare 6 ferri al PUNTO LEGACCIO - vedere le spiegazioni sopra - ALLO STESSO TEMPO, avviare 2 nuove maglie alla fine di ogni ferro = 47-49-51 m (12 nuove maglie). Lavorare poi così: Lavorare le 2 m nuove a dir, poi A.1A 1 volta, ripetere A.1B finché non rimangano 3 m, terminare con A.1C e avviare 2 nuove m alla fine del ferro. Continuare con A.1 e avviare 2 nuove m alla fine di ogni ferro. RICORDARSI DELLA TENSIONE DELLA MAGLIA! Tutte le tagli: Lavorare A.1 in totale 2-3-3 volte in altezza (= 24-36-36 ferri A.1, 30-42-42 ferri lavorati i totale). Taglie S/M e XXL/XXXL: Lavorare poi i ferri 1 ad 8 di A.1, allo stesso tempo, avviare 2 nuove maglie alla fine di ogni ferro. Taglie L/XL: Lavorare poi i ferri 1 a 2 di A.1, allo stesso tempo, avviare 2 nuove maglie alla fine di ogni ferro. Tutte le taglie: = 111-125-139 m sul ferro (38-44-50 ferri lavorati in totale). Il lavora misura ora ca 17-19-22 cm. Al ferro seguente sul diritto, lavorare A.2 così: 6 m punto legaccio, lavorare A.2A 1 volta, ripetere A.2B 5-6-7 volte, poi A.2C 1 volta, terminare con 6 m punto legaccio. Continuare con A.2 e 6 m punto legaccio ad ogni lato. LEGGERE ATTENTAMENTE TUTTO IL SEGUITO PRIMA DI CONTINUARE! Quando A.2 è stato lavorato 1 volta in altezza (il lavoro misura ca 33-35-38 cm) lavorare 2 ferri punto legaccio sopra tutte le m (= 2 f). Lavorare poi A.1 con 1 m vivagno a punto legaccio ad ogni lato (iniziare con il 1° f di A.1) - ALLO STESSO TEMPO distribuire 4-3-3 diminuzioni in modo uniforme su ogni ferro diritto sul diritto - VEDERE DIMINUZIONI - in totale 7-9-11 volte. Al ferro seguente sul dir, distribuire 2-5-1 diminuzioni uniformemente = 81-93-105 m sul f, lavorare 1 f dir sul rovescio (in totale 24-30-36 f di A.1 dopo A.2). Il lavoro misura ca 43-48-53 cm. Continuare a lavorare A.3 così: 1 m vivagno a punto legaccio, A.3 in totale 13-15-17 volte in larghezza, terminare con la 1° m di A.3 e 1 m vivagno a punto legaccio. Continuare con A.3 e 1 m vivagno ad ogni lato. Dopo aver lavorato A.3 1 volta in altezza (il lavoro misura ca 47-52-57 cm) lavorare 2 ferri punto legaccio sopra tutte le m (= 2 f). Lavorare poi A.1 con 1 m vivagno a punto legaccio ad ogni lato fino alla fine (iniziare con il 1° ferro di A.1) - ALLO STESSO TEMPO, distribuire 5 diminuzioni uniformemente ad ogni ferro diritto sul diritto in totale 7-9-12 volte. Al ferro seguente sul diritto distribuire 7-7-0 diminuzioni uniformemente = 39-41-45 m sul p, lavorare 1 f sul rovescio (in totale 24-30-36 f di A.1 dopo A.3). Il lavoro misura ca 57-65-73 cm. Intrecciare tutte le m senza stringere. DAVANTI: Avviare e lavorare allo stesso modo come il dietro. CONFEZIONE: Cucire i lati nella m a vivagno. |
|||||||||||||||||||
Spiegazioni del diagramma |
|||||||||||||||||||
|
|||||||||||||||||||
 |
|||||||||||||||||||
 |
|||||||||||||||||||
Avete terminato questo modello?Allora taggate le vostre foto con #dropspattern #bluebreezeponcho o inviatele alla #dropsfan gallery. Avete bisogno di aiuto con questo modello?Troverete 10 video tutorial, una sezione per i commenti/domande e molto altro guardando il modello su www.garnstudio.com © 1982-2026 DROPS Design A/S. Ci riserviamo tutti i diritti. Questo documento, compreso tutte le sue sotto-sezioni, è protetto dalle leggi sul copyright. Potete leggere quello che potete fare con i nostri modelli alla fine di ogni modello sul nostro sito. |
|||||||||||||||||||


Con oltre 40 anni di esperienza nel design di modelli di maglia e uncinetto, DROPS Design offre la più estesa collezione di modelli gratuiti su internet - tradotti in 17 lingue. Ad oggi vi possiamo fornire 324 cataloghi e 12290 modelli - 9561 dei quali sono tradotti in Italiano.
Ci stiamo impegnando molto per darvi il meglio che vi possiamo offrire in termini di maglia e uncinetto, ispirazioni e consigli così come filati di grande qualità ad un prezzo incredibile! Volete utilizzare i nostri modelli per qualcosa d'altro oltre al vostro uso personale? Potete leggere tutto ciò che è consentito nel testo sul Copyright in basso su tutte le pagine dei nostri modelli. Buon lavoro!
Lasciare un commento sul modello DROPS 145-18
Noi saremmo felici di ricevere i tuoi commenti e opinioni su questo modello!
Se vuoi fare una domanda, fai per favore attenzione a selezionare la categoria corretta nella casella qui sotto per velocizzare il processo di risposta. I campi richiesti sono indicati da *.