
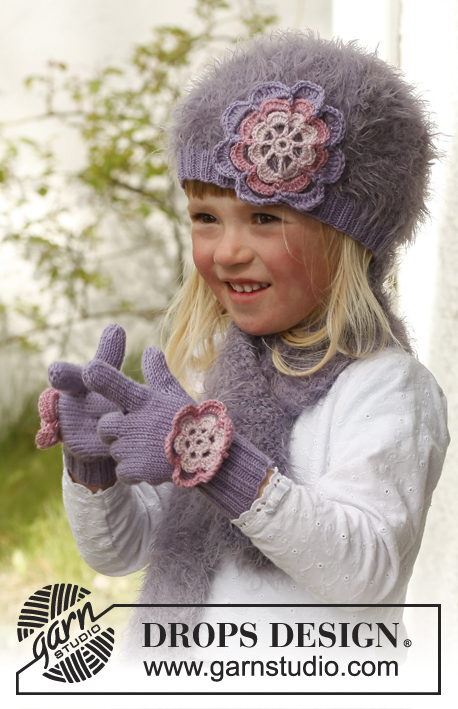
Categorie popolari
State cercando un filato?


Commenti / Domande (80)
![]() FLO ha scritto:
FLO ha scritto:
Bonjour. Je ne sais pas tricoter avec des aiguilles circulaires, serait-il possible d'avoir les explications pour tricoter avec 2 aiguilles n°5. Merci. Cordialement. FLO
23.11.2015 - 17:06DROPS Design ha risposto:
Bonjour Flo, vous trouverez ici quelques informations sur l'adaptation des modèles - et sous l'onglet "vidéos" à droite de la photo, différents tutoriels pour vous apprendre de nouvelles techniques telle que tricoter en rond. Bon tricot!
24.11.2015 - 09:03
![]() CORENTHIN Christine ha scritto:
CORENTHIN Christine ha scritto:
Je ne comprends pas le système de fermeture du tour de coup . Pouvez vous m apporter des précisions .
29.10.2015 - 23:23DROPS Design ha risposto:
Bonjour Mme Corenthin, on fait une fausse patte de boutonnage en montant 10-12 m en fin de tour et en continuant en allers et retours pendant quelques rangs. Cette patte est ensuite cousue à l'intérieur du tour de cou et le bouton cousu en piquant dans les 2 épaisseurs. Bon tricot!
30.10.2015 - 10:19
![]() GOUDY Brigitte ha scritto:
GOUDY Brigitte ha scritto:
Bonjour, Est-il possible d'avoir le patron coté en centimètres de ces modèles (tour de cou et bonnet) ? Avec tous mes remerciements
26.10.2015 - 14:44DROPS Design ha risposto:
Bonjour Mme Goudy, pour le bonnet, vous trouverez la taille (et circonférence de tour de tête) à droite de la photo, sous l'onglet "fournitures" - Sur la base de 17 m = 10 cm, le tour de cou va mesurer approx. 72 - 80 - 86 cm de circonférence en bas et 43 - 52 - 57 cm en haut. Bon tricot!
27.10.2015 - 14:11
![]() Maria Rosa Ricci ha scritto:
Maria Rosa Ricci ha scritto:
Ho realizzato lo scaldacollo ma non capisco come devo unire l'avvio con le nuove maglie. Ho provato ma lo scaldacollo non viene come nell'immagine. Avete un video potete d'armi una mano? Grazie
04.10.2015 - 16:20DROPS Design ha risposto:
Buongiorno Maria Rosa, in questo modello non c'è una vera e propria asola, l'asola e il bottone sono solo decorativi, il bordo con le nuove maglie avviate serve per cucire il bottone, qui viene indicato di mettere il nuovo bordo all'interno dello scaldacollo e cucirlo al bordo di avvio, ma può anche cucirlo all'esterno se le piace di più, e poi affrancare il bottone attraverso entrambi gli strati. Buon lavoro!!
05.10.2015 - 10:06
![]() Mariana ha scritto:
Mariana ha scritto:
Was bedeutet in der 5. Runde gleichmäßig 12 Maschen abnehmen? Muss ich jetzt selbst rausfinden, nach wievielten Maschen ich das tun muss? Heißt abnehmen in diesem Fall, 2 Masche rechts zusammen Stricken? Und es wäre schön wenn man wüsste, ob das Diagramm von oben nach unten oder unten nach oben gelesen wird. Wie ist es denn richtig rum?
14.09.2015 - 13:31DROPS Design ha risposto:
Diagramme/Strickschriften werden grundsätzlich (nicht nur bei uns) immer von unten nach oben gelesen. Sie beginnen rechts unten, lesen nach links (= Hin-R) und lesen dann von links nach rechts die Rück-R usw. An welchen Stellen Sie die Abnahmen machen müssen, müssen Sie tatsächlich selbst errechnen, das ist auch üblich so: Bei Größe S wären das 84 M durch 18 abzunehmende M = 4,66, d.h. Sie stricken abwechselnd ca. jede 3. und 4. und jede 4. und 5. M re zusammen. Wenn es nicht genau hinkommt bzw. nicht ganz aufgeht, ist das nicht so schlimm, wichtig ist, dass die Abnahmen nicht gehäuft an einer Stelle vorkommen, sondern einigermaßen verteilt, damit sich die Rundung ergibt.
20.09.2015 - 11:12Selam ha scritto:
Can I do this pattern with baby merino/Fabel? Will that work?
30.06.2015 - 14:49DROPS Design ha risposto:
Dear Selam, Alpaca and Kid-Silk both belongs to yarn group A, so that you can use Baby Merino /Fabel instead, just remember you will then get another texture/look. Click here to calculate new amount of yarn. And remember your DROPS store will help you if required. Happy knitting!
30.06.2015 - 16:24
![]() Lone Battle ha scritto:
Lone Battle ha scritto:
Thank you for your response. How do you knit the new cast on stiches on the circular needle, without stretching the stiches on the row below, as the previous row is joined in the round. The new cast on stiches overlap on the previous row. I have tries and have now stretched the stockinet stiches on the previous two rows.
21.03.2015 - 17:49DROPS Design ha risposto:
Dear Mrs Battle, when you have cast on the new sts at the end of the round, you don't work anymore in the round, turn and continue in rows (first st worked on this 1st row is the last of the new st you just cast on) knitting all sts (garter st = K every row) for a total of 12-14 rows. Happy knitting!
23.03.2015 - 09:05
![]() Katrin D. ha scritto:
Katrin D. ha scritto:
Sehr geehrte Damen und Herren, mir ist bei der Anleitung nicht klar, wann welches MAterial Verwendung findet. Kann ich die Mütze in Alpaca ODER kid silk stricken oder wird mit 2 Fäden jeder Qualität gearbeitet (xy Maschen JEDER QUALITÄT anschlagen?) Danke!
28.01.2015 - 09:13DROPS Design ha risposto:
"Mit 1 Faden jeder Qualität anschlagen" bedeutet, dass Sie beide Fäden zusammenlegen. Sie stricken die ganze Mütze also durchweg mit Alpaca und Kid-Silk zusammen, also zweifädig.
28.01.2015 - 09:15
![]() Marilyn Edmondson ha scritto:
Marilyn Edmondson ha scritto:
Thank you for the clarification. Makes sense now.
18.12.2014 - 14:51
![]() Marilyn Edmondson ha scritto:
Marilyn Edmondson ha scritto:
I have completed the item, but do not understand the assembly. I'm not sure where to: "Sew cast on edge on the new sts to the inside of neck. Sew a button on to flap." I understand the "cast on edge on the new sts", but not sure where on the inside. Does it make a buttonhole?
12.12.2014 - 14:56DROPS Design ha risposto:
Dear Mrs Edmondson, there is no really buttonhole, but the new cast on edge sts are for the button band (where button will be then sewn through both thickness) - so slip the new cast on sts inside neckwarmer and sew it from WS (inside the neckwarmer). Happy knitting!
12.12.2014 - 16:56
|
|||||||||||||
Mini Me#minimeset |
|||||||||||||
|
|
|||||||||||||
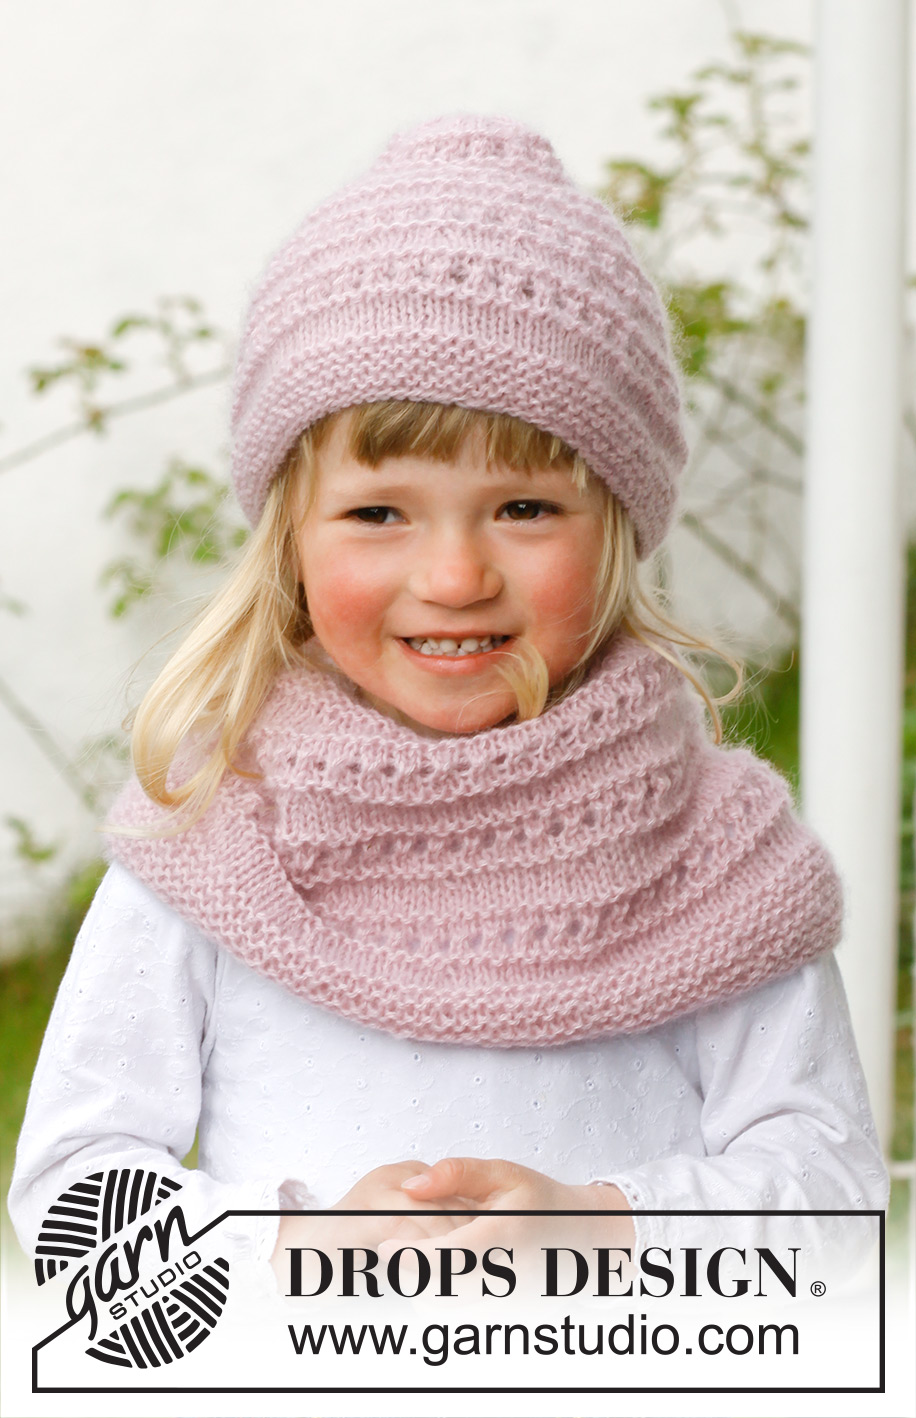
Cappello e scaldacollo lavorati ai ferri con motivo traforato in DROPS Alpaca e DROPS Kid-Silk. Taglie: Da 3 a 12 anni.
DROPS Children 23-11 |
|||||||||||||
|
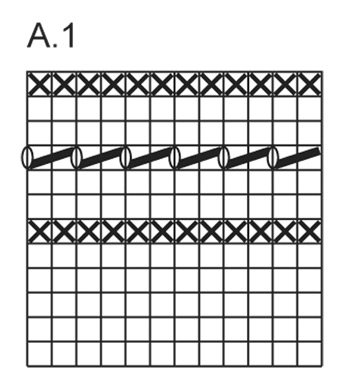
BERRETTO: PUNTO LEGACCIO (in tondo sui ferri circolari): 1 “costa a legaccio” = 2 giri: lavorare * 1 giro a dir, 1 giro a rov *, ripetere da *-* MOTIVO: Vedere il diagramma A.1 - Il diagramma mostra il motivo sul diritto del lavoro. --------------------------------------------------------- Si lavora in tondo prima sui ferri circolari e poi sui ferri a doppia punta. Avviare 84-88-92 m sui ferri circolari n° 5 con 1 capo del filato Alpaca e 1 capo del filato Kid-Silk . Lavorare 8 giri a PUNTO LEGACCIO – vedere le spiegazioni sopra. Lavorare poi il diagramma A-1 una volta in verticale. Proseguire seguendo il diagramma A.1; ALLO STESSO TEMPO, al 5° giro, diminuire 18-14-14 m in modo uniforme = 66-74-78 m. Lavorare il diagramma A-1 altre 2-3-3 volte, con le diminuzioni al 5° giro = 30-32-36 m. Lavorare 5 giri a dir; lavorare poi tutte le m a 2 a 2 insieme a dir; tagliare il filo, passarlo attraverso le m rimaste, stringere e fermare il filo. --------------------------------------------------------- SCALDACOLLO: PUNTO LEGACCIO (in tondo sui ferri circolari): 1 “costa a legaccio” = 2 giri: lavorare * 1 giro a dir, 1 giro a rov *, ripetere da *-* PUNTO LEGACCIO (avanti e indietro sui ferri): Lavorare tutti i ferri a dir. 1 “costa a legaccio” = 2 ferri a dir. MOTIVO: Vedere il diagramma A.1 - Il diagramma mostra il motivo sul diritto del lavoro. --------------------------------------------------------- Avviare 122-136-146 m sui ferri circolari n° 5 con 1 capo del filato Alpaca e 1 capo del filato Kid-Silk. Lavorare 14-14-16 giri a punto legaccio. Lavorare poi seguendo il diagramma A-1; ALLO STESSO TEMPO, al 5° giro del diagramma A-1, diminuire 12-12-10 m in modo uniforme. Lavorare il diagramma A-1 altre 2-2-3 volte con le diminuzioni = 86-100-106 m. Lavorare 5 giri a dir e ALLO STESSO TEMPO, durante il 5° giro, diminuire 12-12-10 m in modo uniforme = 74-88-96 m. Inserire un segno all’inizio del giro. Lavorare il giro successivo come segue: lavorare 1 giro a dir su tutte le m, avviare 10-10-12 nuove m alla fine del giro, girare e lavorare a dir = 84-98-108 m. Lavorare avanti e indietro sul ferro; lavorare tutti i ferri a dir. Proseguire finché non sono state lavorati 12-12-14 ferri a punto legaccio; chiudere le m. CONFEZIONE: Cucire il bordo di avvio alle nuove m. avviate all’interno dello scaldacollo. Cucire 1 bottone sul lembo. |
|||||||||||||
Spiegazioni del diagramma |
|||||||||||||
|
|||||||||||||
 |
|||||||||||||
Avete terminato questo modello?Allora taggate le vostre foto con #dropspattern #minimeset o inviatele alla #dropsfan gallery. Avete bisogno di aiuto con questo modello?Troverete 6 video tutorial, una sezione per i commenti/domande e molto altro guardando il modello su www.garnstudio.com © 1982-2026 DROPS Design A/S. Ci riserviamo tutti i diritti. Questo documento, compreso tutte le sue sotto-sezioni, è protetto dalle leggi sul copyright. Potete leggere quello che potete fare con i nostri modelli alla fine di ogni modello sul nostro sito. |
|||||||||||||


Con oltre 40 anni di esperienza nel design di modelli di maglia e uncinetto, DROPS Design offre la più estesa collezione di modelli gratuiti su internet - tradotti in 17 lingue. Ad oggi vi possiamo fornire 324 cataloghi e 12290 modelli - 9561 dei quali sono tradotti in Italiano.
Ci stiamo impegnando molto per darvi il meglio che vi possiamo offrire in termini di maglia e uncinetto, ispirazioni e consigli così come filati di grande qualità ad un prezzo incredibile! Volete utilizzare i nostri modelli per qualcosa d'altro oltre al vostro uso personale? Potete leggere tutto ciò che è consentito nel testo sul Copyright in basso su tutte le pagine dei nostri modelli. Buon lavoro!
Lasciare un commento sul modello DROPS Children 23-11
Noi saremmo felici di ricevere i tuoi commenti e opinioni su questo modello!
Se vuoi fare una domanda, fai per favore attenzione a selezionare la categoria corretta nella casella qui sotto per velocizzare il processo di risposta. I campi richiesti sono indicati da *.