
Categorie popolari
State cercando un filato?


Commenti / Domande (98)
![]() Angie ha scritto:
Angie ha scritto:
Bonjour Je souhaiterais réaliser ce modèle avec un mélange A Cotton 54 % Viscose 46 % Aiguilles circulaires 3.5 Que me conseillez vous comme numéro d'aiguilles ? Merci
12.04.2026 - 10:09
![]() Angie ha scritto:
Angie ha scritto:
Bonjour Je souhaiterais réaliser ce modèle avec un mélange A Cotton 54 % Viscose 46 % Aiguilles circulaires 3.5 Que me conseillez vous comme numéro d'aiguilles ? Merci
12.04.2026 - 10:08DROPS Design ha risposto:
Bonjour Angie, indépendamment de la composition de votre fil, vous devez avoir ici 21 mailles x 28 rangs point fantaisie = 10 x 10 cm; si vous voulez comparer votre fil à celui du modèle, vous pouvez consulter le nuancier de Cotton Light, ici. Bon tricot!
13.04.2026 - 10:06
![]() Lisa ha scritto:
Lisa ha scritto:
Näst sista raden i framstyckebeskrivningen står det att "nu sätts det i 1 tråd (= mitt på axeln)", jag förstår inte. Ska man markera i en maska med en tråd för att skapa en markering? Eller ska man sätta i en tråd hela det varvet? Och sist ska man sticka de 2 näst sita v av M1, menar ni då de 2 översta som är slätstickning? De kommer alltså efter denna tråd? Tacksam för förklaring
16.02.2026 - 15:48DROPS Design ha risposto:
Hei Lisa. Nu sätts det i 1 tråd (= mitt på axeln) = Ja,for att skapa en markering (= HÄRIFRÅN MÄTS NU ARB). De 2 näst siste = 1 varv med rm från avigsidan og 1 varv rm från rätsidan. mvh DROPS Design
03.03.2026 - 11:38
![]() Karin Öhlén ha scritto:
Karin Öhlén ha scritto:
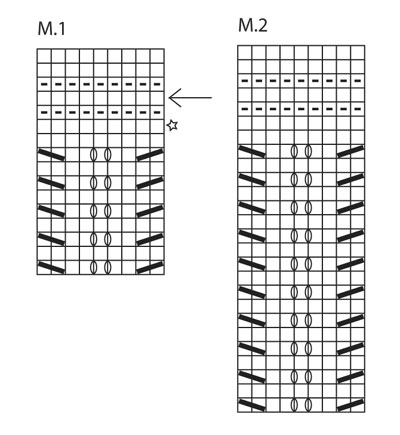
Hej, hittar ingen förklaring till vad stjärnan och pilen i diagram M1 betyder. Tacksam för snabbt svar.
15.11.2025 - 07:45DROPS Design ha risposto:
Hei Karin. Forklaring til pilen og stjernen fins i selve oppskriften. Et godt tips er å lese igjennom en oppskrift før man begynner å strikke. mvh DROPS Design
17.11.2025 - 20:59
![]() Jo ha scritto:
Jo ha scritto:
I cannot understand the M1 pattern. After I complete the 9 stitch grid I have lost a number of stitches, I'm sure this occurs after I complete the symbol which tells me to k2 tog.
22.03.2025 - 00:07DROPS Design ha risposto:
Dear Jo, row 1 of M.1 is worked as: Knit 2 together, knit 2, yarn over, knit 1, yarn over, knit 2, slip 1 st as if to K, K 1, psso . So you decrease 2 stitches but you also increase 2 stitches. Due to this, the number of stitches in the round remains the same, so you shouldn't lose any stitches. Happy knitting!
23.03.2025 - 20:41
![]() Barbara Mede ha scritto:
Barbara Mede ha scritto:
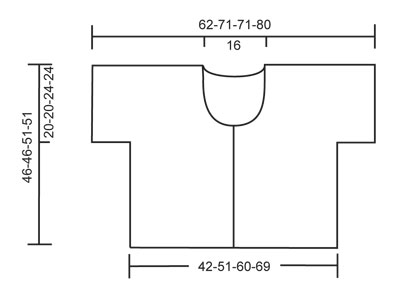
Hello . i am doing the NECK EDGE. Knit up approx. 38-41 sts (from RS, incl sts on stitch holders) on circular needle size 4 mm along neckline of RIGHT FRONT PIECE until begin of BACK PIECE (= the 34 new stitches in garter st) . K 3 rows back and forth, then bind off. How do i join the Right Front Piece Neck Edge to the Back Piece Neck Edge? Thank you.
23.12.2023 - 08:44DROPS Design ha risposto:
Dear Barbara, you don't work the neck edge in the back piece; you have already worked it before. When working the front neck edges you join them to the back piece by sewing. Happy knitting!
28.12.2023 - 23:18
![]() Barbara ha scritto:
Barbara ha scritto:
How do you incorporate the extra 34 stitches at the back into the pattern…. When the stitch repeat is 9 stitches ie; 34 is not divisible by 9. Thank you
07.11.2023 - 12:42DROPS Design ha risposto:
Dear Barbara, you will now work the edge stitches on each front piece and the 34 new stitches in M.1 = 36 sts / 9 = 4 repeats, ie work 3 edge stitches in garter stitch, repeat M.1 until 3 sts remain and end with 3 edge stitches in garter stitch. Happy knitting!
07.11.2023 - 13:41
![]() Gerda ha scritto:
Gerda ha scritto:
Hallo, ik ben dit leuke vestje aan het breien en heb een vraag over de mouw. Ik moet voor mijn maat maar 11 steken erbij opzetten. Worden de mouwen dan niet erg kort in verhouding tot de 20 steken die je erbij opzet voor de kleinere maten? Vr. Groeten Gerda
19.06.2023 - 20:53
![]() Barb ha scritto:
Barb ha scritto:
Right Front Piece.\\r\\nThe instruction says \\\"Then bind off at beg of every row from mid front: 2 sts 2 times and 1 st 4 times = 49-58-58-67 sts remain on shoulder.\\\"\\r\\nDoes that mean bind off every row or every 2nd row?
17.06.2023 - 14:05DROPS Design ha risposto:
Dear Barb, it means to bind off on every row that starts from the mid front (so technically it would be every other/2nd row). Happy knitting!
17.06.2023 - 16:36
![]() Barbara ha scritto:
Barbara ha scritto:
Hello. I cannot see anywhere on this pattern where it mentions the gauge ? Regards, Barbara
24.04.2023 - 14:00DROPS Design ha risposto:
Dear Barbara, you will find the tension in the upper part of the pattern together with the sizes, yarn and amount of yarn and needle size + buttons. Happy knitting!
24.04.2023 - 16:27
|
||||||||||||||||
Mystic River#mysticrivercardigan |
||||||||||||||||
 |
 |
|||||||||||||||
Giacchino DROPS lavorato ai ferri con maniche corte e motivo a pizzo in "Cotton Light" o in "Belle". Taglie: dalla S alla XXXL
DROPS 136-6 |
||||||||||||||||
|
MOTIVO: Vedere i diagrammi M.1 e M.2 – i diagrammi mostrano il motivo sul diritto del lavoro. 1 diagramma = 1 ripetizione = 9 m. in larghezza. Lavorare il davanti come segue (dal basso verso l’alto): Diagramma M.1: 2-2-3-3 volte, diagramma M.2: 1 volta, diagramma M.1: 1 volta, diagramma M.2: 1 volta e diagramma M.1: 2 volte. Lavorare il dietro come segue (dall’alto verso il basso): Diagramma M.1: 2 volte, diagramma M.2: 1 volta, diagramma M.1: 1 volta, diagramma M.2: 1 volta e diagramma M.1: 2-2-3-3 volte. M. A LEGACCIO (avanti e indietro sui ferri): Lavorare a dir. tutti i f. -------------------------------------------------------- GIACCHINO: Per prima cosa lavorare il davanti dx. e aumentare per la manica, quindi lavorare il davanti sx. e la manica, poi trasferirli insieme e lavorare il dietro. Lavorato avanti e indietro sui ferri circolari per avere spazio per tutte le m. DAVANTI DX.: Con i ferri misura 4 mm e il filato Cotton Light o il filato Belle avviare 49-58-67-76 m. (compresa 1 m. di vivagno a lato e 3 m. per il bordo verso il centro davanti). Lavorare 4 f. a dir. (1° f. = rovescio del lavoro), quindi lavorare 1 f. rov dal rovescio del lavoro. Lavorare il f. successivo come segue: 3 m. per il bordo a M. LEGACCIO – leggere la spiegazione sopra, MOTIVO – leggere la spiegazione sopra – fino a quando rimane 1 m. di vivagno, lavorarla a m. legaccio. Continuare in questo modo. FARE ATTENZIONE ALLA TENSIONE DEL LAVORO! Allo stesso tempo quando il lavoro misura 26-26-27-27 cm, avviare 20-20-11-11 nuove m. per la manica alla fine del f. successivo verso il lato (meno m. per le taglie più grandi a causa dell’ampiezza maggiore delle spalle) = 69-78-78-87 m. LEGGERE TUTTA LA SEZIONE SEGUENTE PRIMA DI CONTINUARE! Lavorare le m. della manica secondo il motivo ma lavorare le 3 m. più esterne a m. legaccio. ALLO STESSO TEMPO quando il lavoro misura 27-27-29-29 cm, intrecciare per 1 asola lavorando insieme a dir. la 2° e la 3° m. dal bordo e facendo 1 gettato. Ripetere l’intreccio per l’asola quando il lavoro misura 30-30-32-32 cm. Quando il lavoro misura 31-31-33-33 cm, trasferire le 12 m. più esterne verso il centro davanti su un ferro ausiliario per il collo. Quindi intrecciare all’inizio di ogni f. dal centro davanti: 2 m. 2 volte e 1 m. 4 volte = 49-58-58-67 m. rimaste sulla spalla. Continuare a lavorare come prima con 1 m. verso il centro davanti a m. legaccio fino a quando il lavoro misura circa 46-46-51-51 cm – aggiustarlo in modo che l’ultimo f. sia lavorato dal diritto del lavoro e sia il f. indicato con una freccia nel diagramma M.1. Ora inserire un segnapunti (= centro sulla sommità della spalla). ORA MISURARE IL LAVORO DA QUI! Lavorare i 2 f. successivi fino all’ultimo f. secondo il digramma M.1, mettere il lavoro da parte. DAVANTI SX.: Avviare e lavorare come per il davanti dx. ma al contrario. NOTA: Non intrecciare per le asole. DIETRO: 1° f. = rovescio del lavoro (= ultimo f. del diagramma M.1). Lavorare le m. dal davanti dx. sui ferri circolari misura 4 mm, avviare 34 nuove m. (= dietro del collo) e lavorare le m. dal davanti sx. sui ferri circolari = 132-150-150-168 m. in totale. Continuare con il MOTIVO come spiegato sopra, ma lavorare 4 ferri di maglia legaccio sopra le 34 nuove maglie prima che anche esse vengono incluse nel motivo! Quando il lavoro misura 20-20-24-24 cm dal segnapunti sulla spalla, intrecciare le 20-20-11-11 m. per la manica a ogni lato (intrecciare all’inizio dei 2 f. successivi) = 92-110-128-146 m. rimaste sul ferro. Continuare il motivo con 1 m. di vivagno a m. legaccio a ogni lato. Quando lavorate il diagramma M.1 per l’ultima volta, finire con il f. indicato con una stella. Il lavoro misura ora circa 45-45-50-50 cm dal segnapunti sulla spalla. Ora lavorare 3 f. (1° f. = rovescio del lavoro). Quindi intrecciare SENZA STRINGERE a dir. dal diritto del lavoro – NOTA: E’ importante evitare un margine di chiusura stretto. BORDO DEL COLLO: Con i ferri circolari n° 4 mm, riprendere ca.38-41 m (sul diritto del lavoro, comprese le maglie messe in attesa sul ferma maglie) lungo la linea dello scollo del DAVANTI DESTRO fino all’inizio del DIETRO (= le 34 nuove m a punto legaccio). Lavorare 3 ferri a dir avanti e indietro, poi intrecciare le m. Ripetere lungo il DAVANTI SINISTRO. CONFEZIONE: Cucire le maniche e i lati all’interno della m. di vivagno. Attaccare i bottoni. |
||||||||||||||||
Spiegazioni del diagramma |
||||||||||||||||
|
||||||||||||||||
 |
||||||||||||||||
 |
||||||||||||||||
Avete terminato questo modello?Allora taggate le vostre foto con #dropspattern #mysticrivercardigan o inviatele alla #dropsfan gallery. Avete bisogno di aiuto con questo modello?Troverete 12 video tutorial, una sezione per i commenti/domande e molto altro guardando il modello su www.garnstudio.com © 1982-2026 DROPS Design A/S. Ci riserviamo tutti i diritti. Questo documento, compreso tutte le sue sotto-sezioni, è protetto dalle leggi sul copyright. Potete leggere quello che potete fare con i nostri modelli alla fine di ogni modello sul nostro sito. |
||||||||||||||||


Con oltre 40 anni di esperienza nel design di modelli di maglia e uncinetto, DROPS Design offre la più estesa collezione di modelli gratuiti su internet - tradotti in 17 lingue. Ad oggi vi possiamo fornire 324 cataloghi e 12290 modelli - 9561 dei quali sono tradotti in Italiano.
Ci stiamo impegnando molto per darvi il meglio che vi possiamo offrire in termini di maglia e uncinetto, ispirazioni e consigli così come filati di grande qualità ad un prezzo incredibile! Volete utilizzare i nostri modelli per qualcosa d'altro oltre al vostro uso personale? Potete leggere tutto ciò che è consentito nel testo sul Copyright in basso su tutte le pagine dei nostri modelli. Buon lavoro!
Lasciare un commento sul modello DROPS 136-6
Noi saremmo felici di ricevere i tuoi commenti e opinioni su questo modello!
Se vuoi fare una domanda, fai per favore attenzione a selezionare la categoria corretta nella casella qui sotto per velocizzare il processo di risposta. I campi richiesti sono indicati da *.