
Categorie popolari
State cercando un filato?


Commenti / Domande (6)
![]() Jackie ha scritto:
Jackie ha scritto:
Make sure you have the stitch markers in place. Think of M1a chart as the 1st stitch, then repeat M1b 3 times, so you reach the 2nd stitch marker or the half way point. Now M1a becomes your next stitch and then repeat M1b another 3 times. When you come to the 6th row of the pattern remember to put in that stitch from M1a after each stitch marker. The M1a chart is the line of stitches you will use to crochet into when you make the border. Good luck. Jackie
14.11.2023 - 17:54
![]() Kelly Robertson ha scritto:
Kelly Robertson ha scritto:
I would call myself an intermediate knitter. I understood the pattern right away. I am not putting anyone down in anyway, I just want to help. I am taking pictures as I progress if they are any use to you. I think people just need to see the start of it in picture form. And then they will say ahhhh now I get it!!! So easy and cute. I want others to be able to whip these up :)
10.01.2023 - 23:42
![]() Paula ha scritto:
Paula ha scritto:
I have tried all ways to use this pattern but cannot make any sense. I have even tried to mark out on a graph.
14.12.2019 - 18:34DROPS Design ha risposto:
Dear Paula, should you need any individual assistance, you are welcome to contact the store where you bought the yarn, even per mail or telephone. Happy knitting!
16.12.2019 - 09:40
![]() Patti ha scritto:
Patti ha scritto:
I am an experienced knitter, but this pattern does not make sense. I understand that it is double side, but it does work woth the diagram. Is there just a written pattern for row to row and you could just sew both sides together or crochet them together with the crochet edging?
11.12.2019 - 03:02DROPS Design ha risposto:
Dear Patti, you will work the potholder in the round, ie cast on 74 stitches and then work the diagrams in the round as follows: M.1A (= first stitch at beg of each round = side of piece), repeat M.1B a total of 3 times (= snowmenn) = 1 st + 3x 12 sts= 37 sts. Then repeat one more time M.1A (= 38th stitch = other side of potholder) and M.1B. When piece is knitted, just crochet the 2 rounds for the edge around whole potholder (working in cast-on edge, sides and cast off edge). But you can just sew bottom and top without crochet edge if your rather. Happy knitting!
11.12.2019 - 08:45
![]() Salli Bordfeld ha scritto:
Salli Bordfeld ha scritto:
Is there a tutorial for this pattern? I am an experienced knitter but can’t figure out the pattern whatsoever! How can you knit a circular way for a flat cloth? Also casting on 74 stitches doesn’t seem To work out w the graph of stitches!
07.09.2019 - 06:24DROPS Design ha risposto:
Dear Sali, this is a double-side pot holder, so you'll knit it in the round, then fold it and work a crochet finishing border through both layers. Happy crafting!
08.09.2019 - 10:47
![]() Marit Haug ha scritto:
Marit Haug ha scritto:
Jeg forsøker å strikke disse grytelappene, men jeg sliter med å forstå mønsteret.Jeg får det ikke til å stemme.For det første , er det " snømenn" på begge sider av grytekluter? For det andre, skal både mønster M1A og M1B fortsette rundt det hele.For hvis jeg starter på M1A på 6 omgang blir det fire hvite masker først.Er det riktig? Gjentar jeg dette omgangen rundt ,stemmer det ikke på neste omgang. Jeg er ingen dreven strikker.😄
05.01.2019 - 15:37DROPS Design ha risposto:
Hei Marit. Ja, det er snømenn på begge sider: Du strikker M.1A (=1 m) og så gjentas M.1B 3 ganger = 37 m (den ene siden av grytekluten). Så gjentar du dette mønsteret 1 gang til. Du fortsetter slik oppover, med M.1A over maskene med merker i. På 6 omgang vil du få 4 m med hvit etter hverandre akkurat i overgangen mellom A.1A og A.1B (starten og midten av omgangen). Du vil avslutte 6 omgang med 3 hvite og 1 rød m, og videre starte 7 omgang med 1 hvit, 1 rød, 1 hvit, 3 rød osv. mønsteret vil derfor «brytes» i overgangen mellom A.1A og A.1B. Husk at du skal brette arbeidet ved merkene så dette vil ikke synes like godt når det er ferdig. God fornøyelse.
07.01.2019 - 09:56
|
||||||||||||||||
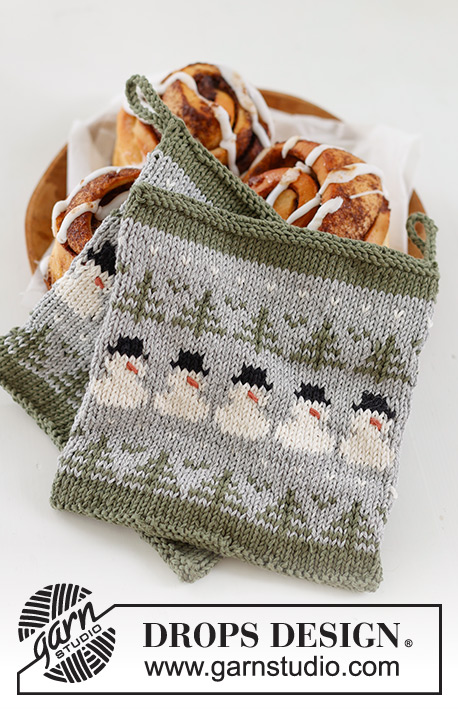
3 Little Snowmen#3littlesnowmenpotholders |
||||||||||||||||
 |
 |
|||||||||||||||
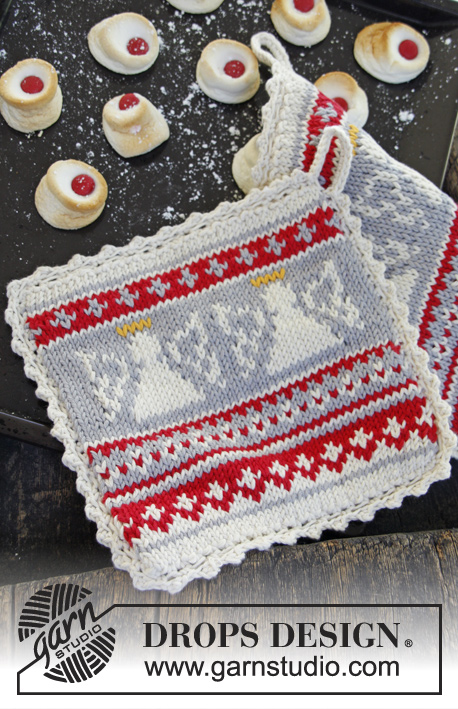
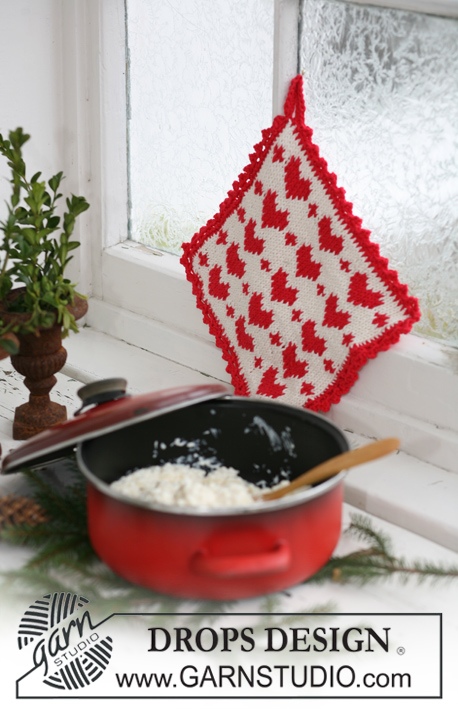
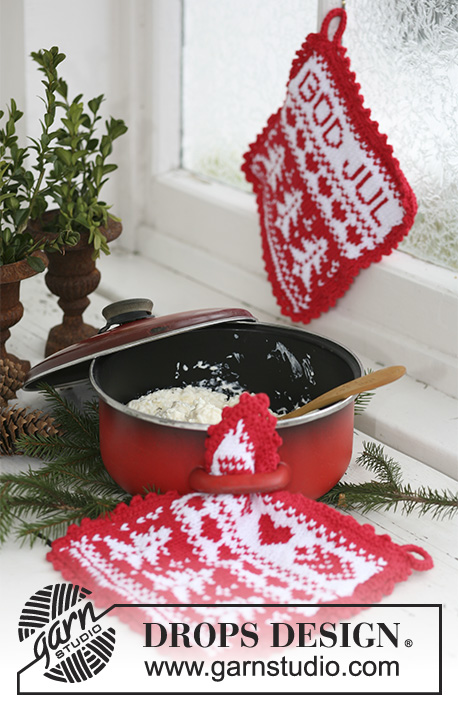
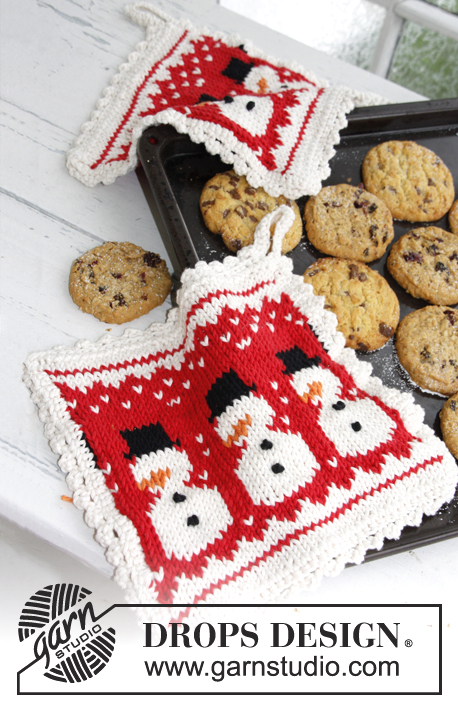
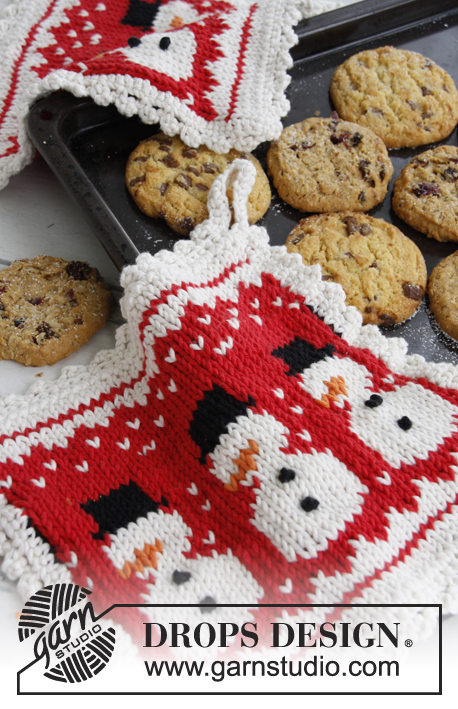
Presine DROPS ai ferri con motivo natalizio in "Paris".
DROPS Extra 0-792 |
||||||||||||||||
|
-------------------------------------------------------- MOTIVO: Vedere i diagrammi M.1A e M.1B. NODO FRANCESE: Passare l'ago da cucito dal rovescio del lavoro al diritto, nella m in cui si deve ricamare il nodo francese. Posizionare la punta dell'ago vicino al lavoro e avvolgere il filo stretto 2 volte attorno alla punta. Tirare l'ago attraverso il filo così avvolto in modo che si formi un doppio nodo sul filo. Inserire l'ago più vicino possibile al punto in cui era stato estratto l'ago precedentemente (non nello stesso punto, altrimenti il filo non resterebbe fermato); tagliare e fermare il filo sul dietro - vedere Fig. 1. -------------------------------------------------------- PRESINA: Si lavora in tondo sui ferri circolari. Avviare 74 m sui ferri circolari n° 4 con il filato panna. Inserire 1 segno nella 1a m all'inizio del giro e 1 segno nella 38a m (= lati). Proseguire come segue: * lavorare 1 volta il diagramma M.1A, 3 volte il diagramma M.1B *, ripetere da *-* per un totale di 2 volte. Proseguire finché i diagrammi M.1A e M.1B non sono stati completati 1 volta in verticale. Chiudere le m con il filato panna. Ricamare i nodi francesi con il filato nero dove c’è una stella nel diagramma. Piegare in due la presina in modo che i segni siano ai lati. BORDO ALL’UNCINETTO: Lavorare tutto il bordo con il filato panna con l’uncinetto n° 4. Lavorare sul diritto del lavoro attraverso entrambi gli strati. Iniziare nell’angolo in alto a sinistra e lavorare lungo tutto il bordo della presina come segue: GIRO 1: Lavorare 1 m.b nell’angolo, 1 m.b in ogni m lungo tutto il bordo e finire con 14 cat per il gancino. Cucire il gancino con 1 m.bss nella m.b iniziale. GIRO 2: Lavorare * 3 cat, 1 m.b nella 1° delle 3 cat (= 1 pippiolino), saltare 2 m.b, 1 m.b nella m.b successiva *, ripetere da *-* e finire con 14 m.b attorno al gancino e 1 m.bss nella m.bss del giro precedente. Tagliare e fermare il filo. |
||||||||||||||||
Spiegazioni del diagramma |
||||||||||||||||
|
||||||||||||||||
 |
||||||||||||||||
Avete terminato questo modello?Allora taggate le vostre foto con #dropspattern #3littlesnowmenpotholders o inviatele alla #dropsfan gallery. Avete bisogno di aiuto con questo modello?Troverete 13 video tutorial, una sezione per i commenti/domande e molto altro guardando il modello su www.garnstudio.com © 1982-2026 DROPS Design A/S. Ci riserviamo tutti i diritti. Questo documento, compreso tutte le sue sotto-sezioni, è protetto dalle leggi sul copyright. Potete leggere quello che potete fare con i nostri modelli alla fine di ogni modello sul nostro sito. |
||||||||||||||||


Con oltre 40 anni di esperienza nel design di modelli di maglia e uncinetto, DROPS Design offre la più estesa collezione di modelli gratuiti su internet - tradotti in 17 lingue. Ad oggi vi possiamo fornire 324 cataloghi e 12290 modelli - 9561 dei quali sono tradotti in Italiano.
Ci stiamo impegnando molto per darvi il meglio che vi possiamo offrire in termini di maglia e uncinetto, ispirazioni e consigli così come filati di grande qualità ad un prezzo incredibile! Volete utilizzare i nostri modelli per qualcosa d'altro oltre al vostro uso personale? Potete leggere tutto ciò che è consentito nel testo sul Copyright in basso su tutte le pagine dei nostri modelli. Buon lavoro!
Lasciare un commento sul modello DROPS Extra 0-792
Noi saremmo felici di ricevere i tuoi commenti e opinioni su questo modello!
Se vuoi fare una domanda, fai per favore attenzione a selezionare la categoria corretta nella casella qui sotto per velocizzare il processo di risposta. I campi richiesti sono indicati da *.