
Categorie popolari
State cercando un filato?


Commenti / Domande (67)
![]() Ina ha scritto:
Ina ha scritto:
Und wie bekomme ich die Ärmel an das Strickteil. Die Ärmel stricke ich doch extra und dann???
23.04.2026 - 17:21DROPS Design ha risposto:
Liebe Ina, dann werden die Ärmel + Vorder- und Rückenteil-Teil auf der Rundnadel gelegt und die Passe wird in der Runde gestrickt; in diesem Video zeigen wir, wie man so macht, das kann Ihnen wahrscheinlich helfen. Viel Spaß beim Stricken!
24.04.2026 - 08:09
![]() Lucia ha scritto:
Lucia ha scritto:
Buongiorno,posso usare lo schema M2 da donna sul modello da uomo.
02.09.2025 - 19:12DROPS Design ha risposto:
Buongiorno Lucia, può apportare le modifiche che preferisce ai modelli. Buon lavoro!
07.09.2025 - 15:26
![]() Jackie Greenhalgh ha scritto:
Jackie Greenhalgh ha scritto:
I have watched the video many times, and I am still at a loss. Since I finished the body and I am where the stitches on my left hand needle are the 8 bind off stitches. I knit 1/2 the sleeve stitches onto my main needle. Now, I am at the bind off stitches on the sleeve. I have no idea what to do next. The video doesn't really represent the structure of the pieces I am working with. So I am confused! Any other suggestions?
05.03.2025 - 01:58DROPS Design ha risposto:
Dear Mrs Greenhalgh, on body you cast off 8 sts on each side of piece for armholes (placement for sleeves), on sleeve you will also cast off 8 sts mid under sleeve, this means cast off the first 4 sts at the beg of the last round, work until 4 sts remain on round and cast off the last 4 sts, cut the yarn and pull it through the last stitch, put aside = you have cast off 8 sts mid under sleeve. Can this help? Happy knitting!
05.03.2025 - 08:35
![]() Jackie ha scritto:
Jackie ha scritto:
I am at the point where I am to add the sleeves to the same needle as the body. I am very confused as to how to do this. Is there a video or a tutorial that illustrates this process? Thank you, Jackie
04.03.2025 - 01:38DROPS Design ha risposto:
Hi Jackie, Here is a link to our video which shows you how to place the sleeves and body on the same circular needle: https://www.garnstudio.com/video.php?id=335&lang=no Happy knitting!
04.03.2025 - 06:38
![]() Hilde Steindal Larsen ha scritto:
Hilde Steindal Larsen ha scritto:
Lurte på om drops karisma klør? Det står 100 ull
03.05.2024 - 07:56DROPS Design ha risposto:
Hei Hilde. Om det klør eller ikke er ganske personlig, noen vil mene at det klør litt andre ikke. Men vi mener DROPS Karisma er myk og komfortabel mot huden :) mvh DROPS Design
06.05.2024 - 08:31
![]() Miriam ha scritto:
Miriam ha scritto:
Kan ik van dit patroon, de mouw ook breien met een rondbreinaald, net als het lijf, de trui zelf? Krijg het niet voor elkaar met 5 naalden de mouwen te breien.
06.04.2024 - 19:52DROPS Design ha risposto:
Dag Miriam,
Jazeker, ja kan in plaats van sokkenbreinaalden gewoon een rondbreinaald daarvoor gebruiken.
07.04.2024 - 18:44
![]() Lene H ha scritto:
Lene H ha scritto:
Strikker M. Slå 216 m op. Efter rib tages 28 m ind til 188. Ok. MEN er det så efter denne indtagnings-pind at mønstret starter??? Og i mønstret tages der også ind??? Der står flere steder i mønstret at to masker skal strikkes sammen. Det er jo mange indtagninger. Jeg kan simpelthen ikke gennemskue mønstret og hvornår jeg skal starte på mønstret.
11.09.2023 - 15:42DROPS Design ha risposto:
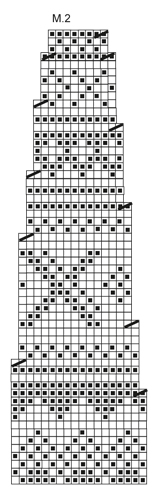
Hei Lene. Når du har strikket vrangborden og har felt 28 masker har du 188 masker. Med dette maskeantallet skal du strikke til arbeidet måler 15 cm. Så skal du øke 2 masker i hver side (der du satte merketrådene) 4 ganger hver 5 cm = 204 masker. Fell 8 masker i hver side til ermhull = 188 masker. Strikk ermene og sett de på samme rundpinne = 340 masker, strikk 1 omgang der det felles 16 masker jevnt fordelt = 324 masker. NÅ skal du begynne på mønstret og her skal det strikkes 2 og 2 masker sammen som diagram M.2 viser. Du strikker M.2 18 ganger = 18 fellinger, bortsett fra når 4. siste omgang strikkes, da felles det 36 ganger. mvh DROPS Design
18.09.2023 - 11:16
![]() Ingrid ha scritto:
Ingrid ha scritto:
Når jeg strikker bærestykket bliver det ikke pænt mellem slutning på omgangen midt bag og starten på ny omgang. Hvordan kan jeg udligne springet til ny omgang. Ideen hvor man undgår hak ved stribemønster virker ikke ved mønsterstrik.
10.02.2023 - 00:14DROPS Design ha risposto:
Hej Ingrid, jo det er samme teknik man bruger ved striber og ved mønsterstrik. :)
10.02.2023 - 11:51
![]() Nicolette ha scritto:
Nicolette ha scritto:
Bij het lijf staat ‘meerder bij 15 cm’. Is dit bij 15 cm van het totale werk of bij 15 na de 8 cm van de boord?
05.11.2021 - 14:32DROPS Design ha risposto:
Dag Nicolette,
Dit is vanaf het begin, dus vanaf de opzetrand.
11.11.2021 - 07:54
![]() Mette Foss ha scritto:
Mette Foss ha scritto:
Hvor får jeg kjøpt garn te setesdalgenser i Dropsgarn
05.06.2021 - 20:57
|
||||||||||
Susan#susansweater |
||||||||||
 |
 |
|||||||||
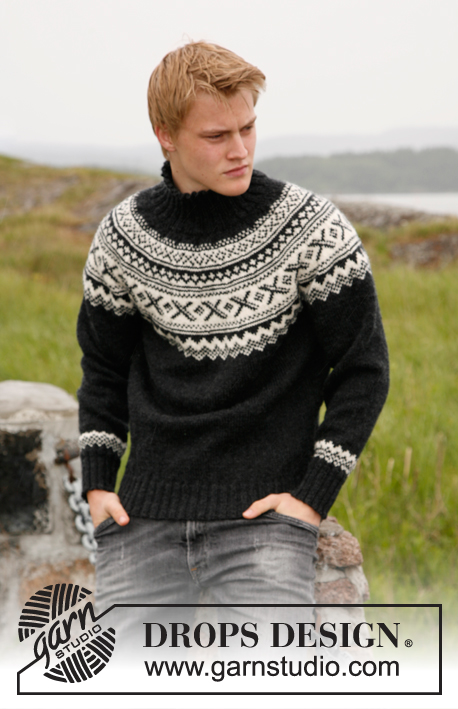
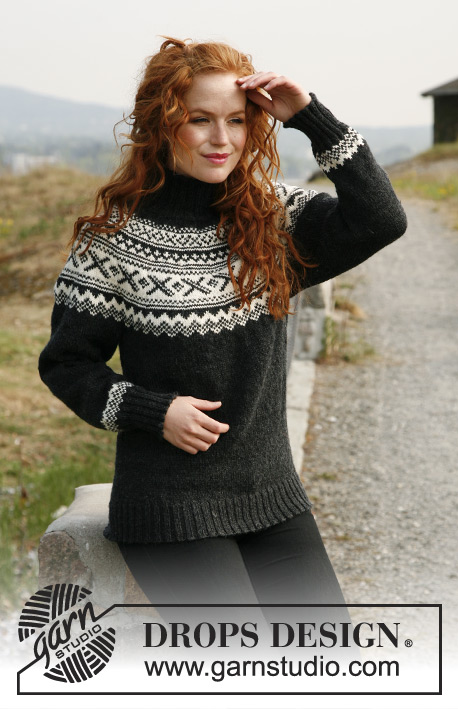
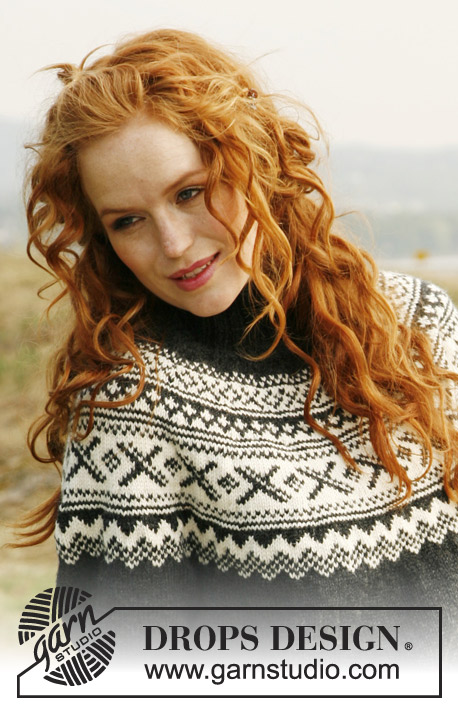
Maglione lavorato ai ferri con sprone rotondo e motivo nordico in DROPS Karisma. Taglie dalla S alla XXXL.
DROPS 135-5 |
||||||||||
|
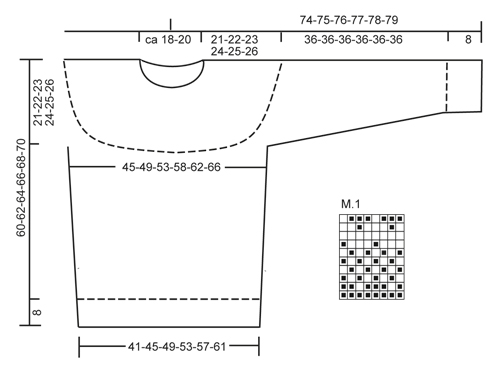
MOTIVO: Vedere diagrammi M.1 e M.2 – i diagrammi sono lavorati a m rasata e mostrano 1 ripetizione del motivo. -------------------------------------------------------- DAVANTI E DIETRO: Si lavorano in tondo sui ferri circolari. Avviare 196-216-236-256-276-292 m sul ferro circolare n° 3 con il filato antracite. Lavorare a coste = 2 m a dir/2 m a rov per 8 cm. Proseguire con il ferro circolare n° 4 e lavorare 1 ferro a dir; allo stesso tempo diminuire 24-28-32-32-36-36 m in modo uniforme = 172-188-204-224-240-256 m. Inserire un segno all’inizio del giro e un segno dopo 86-94-102-112-120-128 m (i segni corrispondono ai lati del maglione). Proseguire a m rasata. RICORDARSI LA TENSIONE DEL LAVORO! Quando il lavoro misura 15 cm, aumentare 1 m da ciascun lato di entrambi i segni. Ripetere gli aumenti ogni 5 cm per 4-4-5-5-5-5 volte = 188-204-224-244-260-276 m. Quando il lavoro misura 39-40-41-42-43-44 cm, chiudere 8-8-8-10-10-10 m da ciascun lato per gli scalfi (chiudere quindi le 4-4-4-5-5-5 m che precedono e le 4-4-4-5-5-5 m che seguono ciascun segno) = sul ferro rimangono 172-188-208-224-240-256 m. Lasciare il lavoro in sospeso e proseguire con le maniche. MANICHE: Si lavorano in tondo sui ferri a doppia punta. Avviare 56-56-56-60-60-64 m sui ferri a doppia punta n° 3 con il filo antracite. Lavorare a coste = 2 m a dir/2 m a rov per 8 cm. Proseguire con i ferri a doppia punta n° 4 e lavorare 1 giro a dir; allo stesso tempo diminuire 4 m in modo uniforme = 52-52-52-56-56-60 m. Inserire 1 segno nella m centrale, sotto la manica. Proseguire seguendo il diagramma M.1, poi lavorare con il filato antracite fino alla fine. ALLO STESSO TEMPO, quando il lavoro misura 12-12-11-11-13-13 cm, aumentare 1 m da ciascun lato del segno centrale, sotto la manica. Ripetere gli aumenti ogni 6°-5°-5°-5°-4°-4° giro per 14-16-18-18-19-19 volte = 80-84-88-92-94-98 m. Quando il lavoro misura 44 cm per tutte le taglie, chiudere le 8-8-8-10-10-10 m centrali sotto la manica (chiudere quindi le 4-4-4-5-5-5 m che precedono e le 4-4-4-5-5-5 m che seguono il segno) = sul ferro rimangono 72-76-80-82-84-88 m. Lasciare il lavoro in sospeso e proseguire con l’altra manica. SPRONE: Inserire le m delle maniche sul ferro circolare usato per lavorare il dietro e il davanti, in corrispondenza degli scalfi = 316-340-368-388-408-432 m. Inserire un segno in corrispondenza della m centrale sul dietro, lavorare fino al segno: da adesso in avanti, il giro inizia da questo punto! Lavorare 1 giro a dir con il filato antracite e ALLO STESSO TEMPO diminuire 10-16-8-10-12-18 m in modo uniforme = 306-324-360-378-396-414 m. Lavorare 0-1-4-7-10-12 giri a dir con il filo antracite; proseguire poi seguendo il diagramma M.2 (= il motivo viene ripetuto 17-18-20-21-22-23 volte sulle m del giro). Terminato il diagramma M.2, sul ferro ci sono 119-126-140-147-154-161 m e il lavoro misura ca. 60-62-64-66-68-70 cm fino alla spalla. Lavorare con il filo antracite fino alle misure necessarie. Lavorare 1 giro a dir e allo stesso tempo diminuire 31-34-44-43-46-49 m in modo uniforme = 88-92-96-104-108-112 m. Lavorare poi un’alzata sul dietro come segue: lavorare 7 m dopo il segno, girare il lavoro, stringere il filo e lavorare 14 m a rov, girare il lavoro, stringere il filo e lavorare 21 m a dir. Proseguire lavorando 7 m a m rasata in più ad ogni giro finché non sono state lavorate 70-70-70-84-84-84 m dopo aver girato il lavoro per l’ultima volta. Girare il lavoro e lavorare 1 giro a dir su tutte le m fino alla m centrale sul dietro. COLLO: Lavorare con i ferri circolari n° 3. Lavorare 1 giro a dir e allo stesso tempo aumentare 16-16-16-12-12-12 m in modo uniforme = 104-108-112-116-120-124 m. Proseguire a coste = 2 m a dir / 2 m a rov per 10 cm, chiudere poi le m lavorandole come si presentano. CONFEZIONE: Cucire insieme le aperture sotto le maniche. |
||||||||||
Spiegazioni del diagramma |
||||||||||
|
||||||||||
 |
||||||||||
 |
||||||||||
Avete terminato questo modello?Allora taggate le vostre foto con #dropspattern #susansweater o inviatele alla #dropsfan gallery. Avete bisogno di aiuto con questo modello?Troverete 13 video tutorial, una sezione per i commenti/domande e molto altro guardando il modello su www.garnstudio.com © 1982-2026 DROPS Design A/S. Ci riserviamo tutti i diritti. Questo documento, compreso tutte le sue sotto-sezioni, è protetto dalle leggi sul copyright. Potete leggere quello che potete fare con i nostri modelli alla fine di ogni modello sul nostro sito. |
||||||||||


Con oltre 40 anni di esperienza nel design di modelli di maglia e uncinetto, DROPS Design offre la più estesa collezione di modelli gratuiti su internet - tradotti in 17 lingue. Ad oggi vi possiamo fornire 324 cataloghi e 12290 modelli - 9561 dei quali sono tradotti in Italiano.
Ci stiamo impegnando molto per darvi il meglio che vi possiamo offrire in termini di maglia e uncinetto, ispirazioni e consigli così come filati di grande qualità ad un prezzo incredibile! Volete utilizzare i nostri modelli per qualcosa d'altro oltre al vostro uso personale? Potete leggere tutto ciò che è consentito nel testo sul Copyright in basso su tutte le pagine dei nostri modelli. Buon lavoro!
Lasciare un commento sul modello DROPS 135-5
Noi saremmo felici di ricevere i tuoi commenti e opinioni su questo modello!
Se vuoi fare una domanda, fai per favore attenzione a selezionare la categoria corretta nella casella qui sotto per velocizzare il processo di risposta. I campi richiesti sono indicati da *.