
Categorie popolari
State cercando un filato?


Commenti / Domande (63)
![]() Thea ha scritto:
Thea ha scritto:
Weet iemand antwoord op mijn vraag? Bij het voorpand, als de voorbies op de hulpvraag staat, beginnen met meerderen voor de hals. Er staat tot 64 steken. Zijn dit alleen de steken van het meerderen? Er staan toch veel meer steken op de naald, ook van de mouwen. Ik begrijp niet wat ik moet tellen. Graag hulp!
03.05.2022 - 20:18DROPS Design ha risposto:
Dag Thea,
Na het meerderen voor de mouw heb je 84 steken op de naald in totaal. Je zet bij een hoogte van 27 cm de 24 voorbiessteken op een hulpdraad, dus dan heb je nog 60 steken op de naald staan om mee te breien. Je meerdert in totaal 4 steken, dus heb je daarna 64 steken op de naald staan.
10.05.2022 - 09:20
![]() Mindy ha scritto:
Mindy ha scritto:
How do I "mirror" the right front? Do I knit backwards, or do I exchange purl for knit stitches (and vice versa)?
26.02.2022 - 01:13DROPS Design ha risposto:
Dear Mindy, for example, if the first row of the shortened rows is worked on the wrong side in the left front, you need to work the first row on the right side in the right front. When you cast on new stitches for the sleeve, in the left front you cast on at the end of every row on the wrong side, while on the right front you cast on at the end of every row on the right side. Happy knitting!
27.02.2022 - 17:46
![]() Lena ha scritto:
Lena ha scritto:
Hallo, ich habe eine Frage zum Rückenteil. „Das li Vorderteil auf eine Nadel legen und … M anschlagen“, also nach den 2x2 neuen Maschen am Ende der Seitenteile die neuen M anschlagen? Was bedeutet „Glatt mit den Krausrippen unten an den Ärmeln…“? Ist hiermit das Ende d. Ärmels, also das Bündchen gemeint? Ich kann mir glaube ich das fertige Rückenteil nicht vorstellen. Stricke ich quasi ab der Schultermarkierung „umgeklappt“ einfach das Rückenteil herunter? Vielen Dank!
21.02.2022 - 15:57DROPS Design ha risposto:
Bonjour Lena, Sie sind gerade beim Rückenteil, richtig? Jezt stricken Sie die Maschen vom linken Vorderteil, schlagen Sie neue Maschen für den Halsausschnitt an (siehe hier und stricken die Maschen vom rechten Vorderteil; jezt stricken Sie das Rückenteil von oben nach unten, mit den 10 krausrechten Maschen beidseitig wie zuvor und glatt rechts inzwischen. Nach 8,5-11 cm beginnen Sie, die Maschen der Ärmel beidseitig abzuketten. Viel Spaß beim stricken!
22.02.2022 - 09:59
![]() Grace ha scritto:
Grace ha scritto:
Hi, just wondered if you could tell me about leaving a marker in middle of shoulder, where exactly is the middle of the shoulder, could you tell me how many stitches in the marker would be, thanks grace
19.08.2021 - 12:52DROPS Design ha risposto:
Dear Grace, the marker should be in the middle of the row, this marker will be used later to measure from, ie this row should be on the top of shoulder, the number of stitches doesn't matter, it just will be used to measure from. Happy knitting!
19.08.2021 - 14:40
![]() Helen McInnes ha scritto:
Helen McInnes ha scritto:
I am needing help with the short rows. (i have just started the leftside) Are they worked on the garter stitch section or the bit that is at the side with the stocking stitch? Do I start the short row from the wrong side or the right side?
23.05.2021 - 19:55DROPS Design ha risposto:
Dear Helen, the hsort rows are only knitted on the collar stitches knitted with GARTER stitch, They always start from the outside (the front edge), please read the desciption in the pattern as well. Happy Knitting!
24.05.2021 - 03:25
![]() Ulla Lindblad ha scritto:
Ulla Lindblad ha scritto:
Jag antar att ni egentligen menar att man lägger upp 51 maskor och 26 av dem stickas i rätstickning . Dvs 77 maskor totalt. Om man lägger upp 51 + 26 stämmer inte maskantalet när det är dax att lägga arbetet åt sidan och koftan blir väldigt bred.
07.03.2021 - 07:06
![]() Véronique Kuyle ha scritto:
Véronique Kuyle ha scritto:
Bonjour , Je me permets de vous demander comment avoir 89 mailles ( pour la taille 6/9 mois ) car 24 de point mousse +47 de jersey +2 fois 6+8+22 : j'arrive à un total de 113 mailles !!!!! j'ai beau essayer de comprendre , je reviens toujours à mes 113 mailles ! En vous remerciant par avance , cordialement . Véronique .
22.02.2021 - 21:26DROPS Design ha risposto:
Bonjour Mme Kuyle, les 24 m point mousse de la bordure devant sont comprises dans les 47 m à monter et ne doivent pas être montées en plus, autrement dit, vous montez 47 m (et tricotez ensuite avec 24 m point mousse pour la bordure du devant, 22 m jersey et 1 m lis au point mousse); puis vous monterez 2 x 6 m + 1 x 8 m + 1 x 22 m = 47+12+8+22=89 mailles. Bon tricot!
23.02.2021 - 08:44
![]() Lancerotto Sylvie ha scritto:
Lancerotto Sylvie ha scritto:
Bonsoir ! J’ai mis les 28 mailles en attente mais je ne comprends pas où je monte 2 mailles à la fin du rang ???? Merci de votre réponse
10.01.2021 - 20:42DROPS Design ha risposto:
Bonjour Mme Lancerotto, ces 2 mailles sont pour l'encolure dos, pour le devant gauche, vous tricotez les 28 mailles de la bordure devant sur l'envers, et vous les glissez en attente, vous terminez votre rang sur l'envers comme avant, tournez et à la fin du rang suivant (= sur l'endroit), vous montez 2 mailles, tournez, tricotez toutes les mailles, tournez et montez 2 mailles à la fin du rang suivant (= sur l'endroit de nouveau). Bon tricot!
11.01.2021 - 10:11
![]() Liliana ha scritto:
Liliana ha scritto:
Quisiera saber si cuando describes las vueltas cortas te refieres a 2 idas y 2 vueltas en 26 puntos y 2 idas y 2 vueltas en los 13 puntos, o simplemente ida y vuelta en 26 y luego ida y vuelta en 13.
05.10.2020 - 21:41DROPS Design ha risposto:
Hola Liliana, las vueltas acortadas se trabajan de la siguiente manera: 1 ida y vuelta con 26 puntos y 1 ida y vuelta con 13.
20.11.2020 - 23:11
![]() Julie Adams ha scritto:
Julie Adams ha scritto:
How do you knit the shortened rows on the collar if you are doing 2 rows of 26 stitches and 2 rows of 13 stitches but the band is only 26 stitches, do I knit the 2 rows of 13 stitches and skip the other shortened row or make that one 13 stitches as well?
18.09.2020 - 06:33DROPS Design ha risposto:
Dear Mrs Adams, on the collar work: 2 rows over the 26 sts = over all stitches, then 2 rows over the first 13 sts (starting from RS on right collar/from WS on left collar, ie the short rows should be worked from the beg of row towards mid front).Happy knitting!
18.09.2020 - 08:49
|
|
DROPS Baby 20-11 |
|
 |
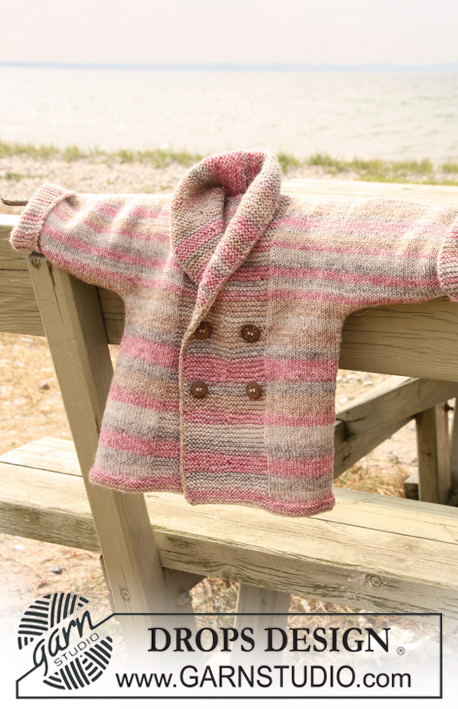 |
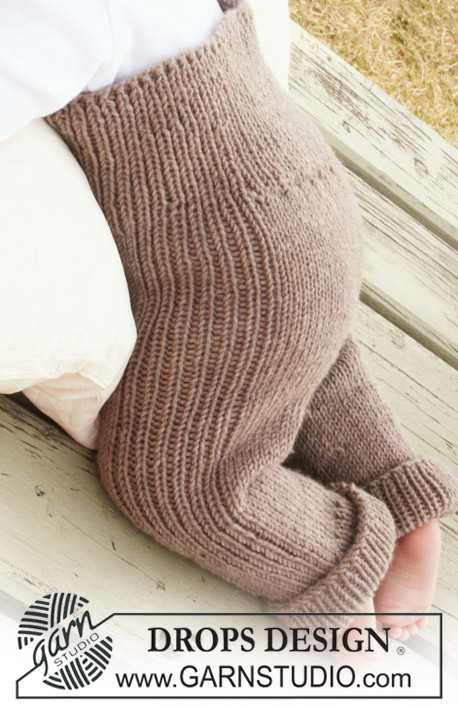
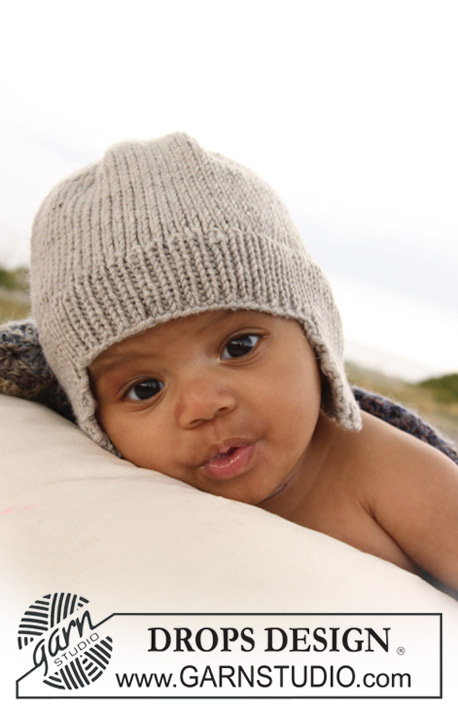
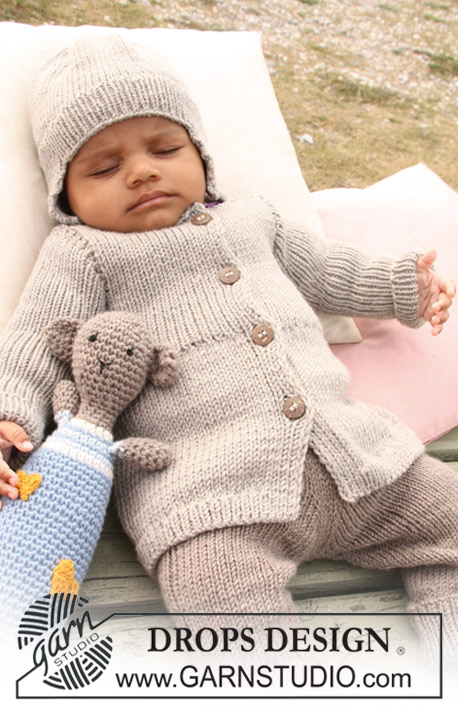
Cardigan lavorato ai ferri a doppio petto con collo a scialle per neonati e bambini in DROPS Fabel.
DROPS Baby 20-11 |
|
|
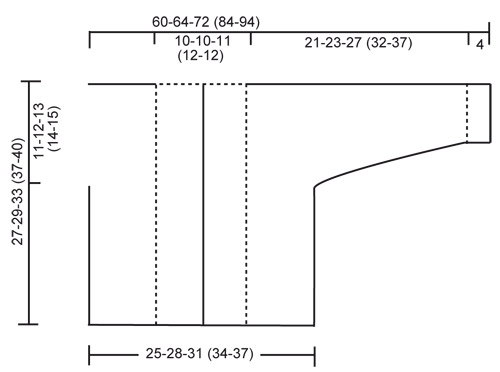
M LEGACCIO (avanti e indietro sui f): lavorare tutti i f a dir. FERRI ACCORCIATI: * lavorare 2 f avanti e indietro su 24-24-26 (28-28) m per il bordo davanti, lavorare 2 f solo sulle prime 12-12-13 (14-14) m *. NOTA: Quando si gira al centro del lavoro, passare la 1° m, tirare il filo e tornare indietro. Ciò viene fatto per evitare un buco nel punto di passaggio. ASOLE: Il cardigan è a doppio petto con 4 asole sul bordo davanti destro. 1 ASOLA = lavorare insieme a dir la 4° e la 5° m dal bordo e fare 1 gettato. Sullo stesso f lavorare anche insieme la quart'ultima e quint'ultima m sul bordo davanti e fare 1 gettato. Fare 2 asole quando il lavoro misura: TAGLIA 1/3 mesi: 10 e 14 cm. TAGLIA 6/9 mesi: 11 e 15 cm. TAGLIA 12/18 mesi: 14 e 18 cm. TAGLIA 2 anni: 17 e 21 cm. TAGLIA 3/4 anni: 19 e 23 cm. -------------------------------------------------------- CARDIGAN: Lavorato avanti e indietro sui f circolari. Iniziare con il davanti, aumentare le m per le maniche e lavorare fino alla spalla. Lavorare il secondo davanti, mettere le 2 parti davanti insieme e lavorare il dietro. DAVANTI SINISTRO: LEGGERE TUTTA LA SEZIONE SEGUENTE PRIMA DI CONTINUARE! Avviare 43-47-51 (56-59) m (compresa 1 m di vivagno a lato e 24-24-26 (28-28) m per il bordo davanti verso il bordo davanti) con i f n° 2,5 mm con Fabel. Lavorare 6 f a m legaccio - leggere la spiegazione sopra. Passare ai f circolari n° 3 mm e lavorare a m rasata, ma 24-24-26 (28-28) m per il bordo davanti a m legaccio verso il bordo davanti. Quando il lavoro misura 4 cm lavorare a FERRI ACCORCIATI - leggere sopra (ferro 1 = dal rovescio del lavoro). Ripetere *-* 1 volta ogni 4 cm fino a quando il lavoro misura 19-21-24 (27-30) cm, poi ripetere *-* 1 volta ogni 2 cm fino alla lunghezza finale. ALLO STESSO TEMPO quando il lavoro misura 16-17-20 (23-25) cm avviare nuove m alla fine di ogni f dal rovescio del lavoro (verso il lato per la manica): 6 m 2-2-3 (3-3) volte, 8 m 1-1-1 (2-3) volte e 21-22-22 (25-26) m 1 volta = 84-89-99 (115-127) m per la spalla/manica. Gli aumenti vengono lavorati a m rasata. Quando sono state avviate tutte le m continuare a m rasata e a m legaccio come prima e ALLO STESSO TEMPO anche le ultime 10 m sulla manica sono lavorate a m legaccio. Quando il lavoro misura 27-29-33 (37-40) cm inserire 1 segnapunti = centro della spalla. Ora trasferire le 24-24-26 (28-28) m del bordo davanti su un fermamaglie. Poi avviare 2 nuove m alla fine del f dal diritto del lavoro (verso il collo), ripetere gli aumenti sul f successivo verso il collo = 64-69-77 (91-103) m sul f. Lavorare 1 f dal rovescio del lavoro. Mettere il lavoro da parte. DAVANTI DESTRO: Avviare e lavorare come per il davanti sinistro ma a specchio. Inoltre intrecciare per le ASOLE sul bordo davanti - leggere sopra. NOTA! Trasferire le m su un fermamaglie dopo l'ultimo f di aumenti (cioè ultimo f = dal rovescio del lavoro). DIETRO: Lavorare il davanti sinistro sui f circolari, avviare 16-16-18 (20-20) nuove m (= dietro del collo) e lavorare il davanti destro sul f circolare = 144-154-172 (202-226) m. ORA MISURARE IL LAVORO DAI SEGNAPUNTI SULLE SPALLE! Continuare a m rasata e m legaccio alla fine di ogni manica avanti e indietro sui f. Quando il lavoro misura 8½-9½-10 (10-11) cm iniziare ad intrecciare le m delle maniche. Intrecciare all'inizio di ogni f a ogni lato come segue: 21-22-22 (25-26) m 1 volta, 8 m 1-1-1 (2-3) volte e 6 m 2-2-3 (3-3) volte = 62-70-76 (84-90) m sul f. Lavorare a m rasata con 1 m di vivagno a ogni lato. Quando il lavoro misura circa 26-28-32 (36-39) cm – piegare il lavoro a metà all'altezza dei segnapunti sulle spalle e controllare se il dietro è della stessa lunghezza del davanti fino alla m legaccio. Passare ai f n° 2,5 mm e lavorare 6 f a m legaccio. Intrecciare. COLLO A SCIALLE: Riportare 24-24-26 (28-28) m dal segnapunti sul davanti sinistro sul f di lavoro. Lavorare a m legaccio e continuare con i ferri accorciati ogni 2 cm fino a quando il collo misura 7-7-8 (9-9) cm (misurati nel punto più corto). Intrecciare. Ripetere con le m sul fermamaglie sul davanti destro. CONFEZIONE: Cucire la manica e i margini dei lati all'interno della m di vivagno. Attaccare i bottoni. Cucire il collo dietro e attaccarlo alla scollatura. BORDO ALL'UNCINETTO: Lavorare un bordo all'uncinetto lungo il bordo davanti, lungo il bordo del collo e giù lungo il bordo davanti sull'altro lato. Iniziare in basso sul davanti destro e lavorare con l'uncinetto n° 2 mm come segue: lavorare 1 m.b, * 1 cat, saltare circa ½ cm, 1 m.b nella m successiva *, ripetere *-*. |
|
 |
|
Avete terminato questo modello?Allora taggate le vostre foto con #dropspattern o inviatele alla #dropsfan gallery. Avete bisogno di aiuto con questo modello?Troverete 11 video tutorial, una sezione per i commenti/domande e molto altro guardando il modello su www.garnstudio.com © 1982-2026 DROPS Design A/S. Ci riserviamo tutti i diritti. Questo documento, compreso tutte le sue sotto-sezioni, è protetto dalle leggi sul copyright. Potete leggere quello che potete fare con i nostri modelli alla fine di ogni modello sul nostro sito. |
|


Con oltre 40 anni di esperienza nel design di modelli di maglia e uncinetto, DROPS Design offre la più estesa collezione di modelli gratuiti su internet - tradotti in 17 lingue. Ad oggi vi possiamo fornire 325 cataloghi e 12298 modelli - 9569 dei quali sono tradotti in Italiano.
Ci stiamo impegnando molto per darvi il meglio che vi possiamo offrire in termini di maglia e uncinetto, ispirazioni e consigli così come filati di grande qualità ad un prezzo incredibile! Volete utilizzare i nostri modelli per qualcosa d'altro oltre al vostro uso personale? Potete leggere tutto ciò che è consentito nel testo sul Copyright in basso su tutte le pagine dei nostri modelli. Buon lavoro!
Lasciare un commento sul modello DROPS Baby 20-11
Noi saremmo felici di ricevere i tuoi commenti e opinioni su questo modello!
Se vuoi fare una domanda, fai per favore attenzione a selezionare la categoria corretta nella casella qui sotto per velocizzare il processo di risposta. I campi richiesti sono indicati da *.