
Categorie popolari
State cercando un filato?


Commenti / Domande (58)
![]() Lise Nielsen ha scritto:
Lise Nielsen ha scritto:
Stavekontrol er ikke altid en fordel - jeg mente selvfølgelig: Organic Cotton ! Vh Lise N
23.04.2019 - 17:25
![]() Lise Nielsen ha scritto:
Lise Nielsen ha scritto:
Kan jeg erstatte garnet med krea de luxe, organisation Cottonfield ? I så fald, hvordan skal strikkefastheden reguleres/kontrolleres ? Skal strikkes til str 6 / 9 mdr Vh Lise N
23.04.2019 - 17:20DROPS Design ha risposto:
Hei Lise. Jeg kjenner ikke så godt til Krea Delux og deres garn, men det enkleste er å strikke med et garn der du kan overholde den angitte strikkefastheten. Lag edg en strikkeprøve å se. Hvis strikkefastheten stemmer kan du helt fint bytte garnet og følge oppskriften som vanlig. Om du vil strikke med en annen strikkefasthet må hele oppskriften regnes om, for at målene skal bli riktige. Det er selvfølgelig ikke noe i veien for at du gjør det, om du ønsker, men vi har dessevrre ikke mulighet til å regne den om for deg. God fornøyelse
26.04.2019 - 14:20
![]() Maria Chiara ha scritto:
Maria Chiara ha scritto:
Salve, non capisco come e quando devo unire le parti dietro del cappello e cosa significa che il giro comincia 10 m prima del centro dietro. Inoltre intrecciare significa in questo caso lavorare le maglie normalmente? Grazie a chi mi risponderà!
08.04.2019 - 15:12DROPS Design ha risposto:
Buongiorno Maria Chiara, il cappello è lavprato in tondo senza cuciture: l'ultima parte spiega come lavorare i paraorecchie, si chiudono le maglie del davanti e del dietro che non servono, si lavora su un lato, mettendo in sospeso le maglie dell'altro lato e poi si completa l'altro paraorecchie. Buon lavoro!
08.04.2019 - 16:00
![]() Michele ha scritto:
Michele ha scritto:
So glad to find a top-down hat with earflaps -- something every baby needs -- can't wait to start it. Thank you very much for posting, and making it free! It will be much appreciated by my friend's newborn grandchild.
19.03.2019 - 21:32
![]() Johanna ha scritto:
Johanna ha scritto:
Beginne ich mit dem Bündchen nach 11 cm Gesamtlänge ab Beginn oder 11 cm ab dem Zeitpunkt, wo die 6 Zunahmerunden fertig sind?
14.03.2019 - 23:55DROPS Design ha risposto:
Liebe Johanna, die 11 cm sind vom Anfang an gemessen. Viel Spaß beim stricken!
15.03.2019 - 08:56
![]() Krystyna ha scritto:
Krystyna ha scritto:
Is it any chance to have this hat done on video from the beginning to the end?
29.01.2019 - 18:05DROPS Design ha risposto:
Dear Krystyna, it might be quicker to help you if you explain us for which part you need help. Please feel free to ask your question. Remember your DROPS store will also provide you any individual asssistance. Happy knitting!
30.01.2019 - 07:47
![]() Frida Sandman ha scritto:
Frida Sandman ha scritto:
Hej När arbetet mäter 11 cm ska det ökas maskor. Hur mäter jag?
23.10.2018 - 21:15DROPS Design ha risposto:
Hei Frida. Mål fra oppleggskanten (toppen av luen) og frem til der du er nå, med strikkeretningen. God fornøyelse.
24.10.2018 - 07:53
![]() Kristina ha scritto:
Kristina ha scritto:
Hallo, ich versuche gerade diese Mütze für ein etwas anderes Garn (50g /135m) umzurechnen und komme an meine (Anfänger)Grenzen: Ich möchte die Mütze für einen Kopfumfang von 52 stricken und habe eine Maschenprobe von 26 M / 10cm und 34 R auf 10cm Höhe. Ich weiß, dass ich nach den Aufnahmen auf eine Gesamtmaschenzahl von 135 kommen muss. Aber wie berechne ich den Anfang neu? Die ersten Maschen und die regelmäßigen Aufnahmen? Ich würde mich riesig über Unterstützung freuen!
08.10.2018 - 21:44DROPS Design ha risposto:
Liebe Kristina, wir bitten um Verständnis, dass wir nicht jede unserer Anleitung nach jeder individuellen Anfrage anpassen können. Diese Mütze wird hier mit einem Garn der Garngruuppe B gestrickt, dh Maschenprobe 21 M x 28 R = 10 x 10 cm. Am besten schauen Sie ein Modell mit Ihrer eigenen Maschenprobe. Viel Spaß beim stricken!
09.10.2018 - 09:58
![]() Teresa ha scritto:
Teresa ha scritto:
"am Anfang jeder R. je 1 M. abk. und auf beiden Seiten total 9-10-13 (14-16) Mal wiederholen", heißt das, dass ich sowohl in der Hin- als auch in der Rückreihe die erste Masche abkette, also insgesamt 20 Reihen brauche, um auf 7 Maschen zu kommen? Danke!
16.10.2016 - 10:19DROPS Design ha risposto:
Liebe Teresa, genau, so wird es gemacht.
17.10.2016 - 09:55
![]() Stefanie ha scritto:
Stefanie ha scritto:
Hallo Wie funktioniert das Zusammenziehen der zuerst angeschlagenen Maschen um die Mütze zu schließen? Danke
13.01.2016 - 06:50DROPS Design ha risposto:
Sie nehmen das Fadenende vom Anschlag, fädeln es in eine Näh- oder Stopfnadel und ziehen es durch die Anschlagsmaschen, einmal rundum. Dann ziehen Sie an dem Faden und das Loch zieht sich zusammen, den Faden vernähen Sie dann gut.
29.01.2016 - 10:40
|
|
Sky High#skyhighhat |
|
|
|
|
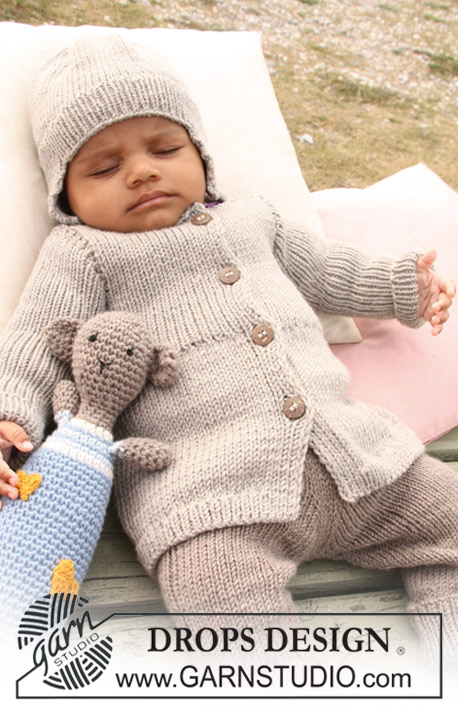
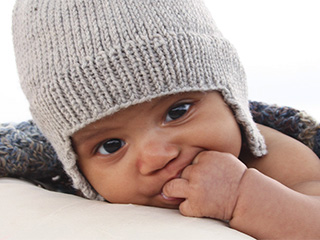
Cappello lavorato ai ferri a coste con paraorecchi per bambini e neonati in DROPS Merino Extra Fine.
DROPS Baby 20-9 |
|
|
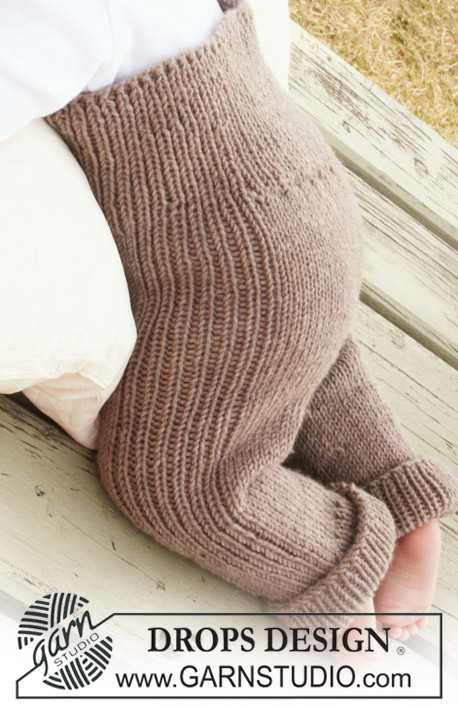
SUGGERIMENTO PER GLI AUMENTI: Per aumentare 1 m, lavorare 2 maglie in 1 maglia. ---------------------------------------------------------- CAPPELLINO: Si lavora in tondo con i ferri a doppia punta, dall’alto verso il basso. Avviare 8-10-13 (15-18) m con i ferri a doppia punta 4 (lasciare un po’ di filo all’inizio per stringere le maglie alla fine). Lavorare 1 giro a maglia rasata ALLO STESSO TEMPO, distribuire 7-10-12 (15-17) m aumenti uniformemente – VEDERE AUMENTI! = 15-20-25 (30-35) m. Inserire 5 segnapunti/fili nel lavoro con 3-4-5 (6-7) m tra ogni segno. Lavorare 1 giro a maglia rasata. Al giro successivo aumentare 1 m ad ogni lato del segnapunti/filo. Ripetere questi aumenti ogni 2 giri in totale 6 volte = 75-80-85 (90-95) m. Continuare con il ferro circolare 4. RICORDARSI LA TENSIONE DEL LAVORO! Continuare a maglia rasata. Quando il lavoro misura 11-12-13 (14-15) cm, distribuire 25-26-29 (30-31) m aumenti uniformemente (aumentare approssimativamente ogni 3 maglie) = 100-106-114 (120-126) m. Continuare con il ferro circolare 3,5 e lavorare a coste 1 m dir/1 m rov sopra tutte le maglie. Quando le coste misurano 3 cm, intrecciare al f successivo così. NOTA! Il giro comincia 10-10-8 (8-7) m prima del centro dietro. Intrecciare 21-21-17 (17-15) m con il dir sopra il dir e il rov sopra il rov (= in mezzo dietro). Mettere in attesa le 25-27-33 (35-39) m seguenti su un filo per i paraorecchi. Intrecciare le 29-31-31 (33-33) m seguenti (= fronte). Lavorare poi il paraorecchi avanti e indietro sulle ultime 25-27-33 (35-39) m così: Continuare a coste 1 m dir/1 m rov ALLO STESSO TEMPO, diminuire 1 m all’inizio di ogni f in totale 9-10-13 (14-16) volte ad ogni lato (intrecciare con il dir sopra il dir ed il rov sopra il rov) = 7 m. Al ferro successivo, intrecciare le m rimanenti con il dir sopra il dir ed il rov sopra il rov. Il paraorecchi misura ca 6-7-9 (10-11) cm. Lavorare il 2° paraorecchi nella stessa maniera. Stringere in alto, fissare bene il filo. CORDONCINI: Tagliare 2 fili di ca 75 cm, attorcigliarli insieme fino a non riuscirci più. Infilare il cordoncino in basso del paraorecchi, piegare il filo in 2 e poi, lasciarlo attorcigliare di nuovo su se stesso. Fare un nodo all’estremità del cordoncino. Ripetere per l'altro paraorecchi. |
|
Avete terminato questo modello?Allora taggate le vostre foto con #dropspattern #skyhighhat o inviatele alla #dropsfan gallery. Avete bisogno di aiuto con questo modello?Troverete 19 video tutorial, una sezione per i commenti/domande e molto altro guardando il modello su www.garnstudio.com © 1982-2026 DROPS Design A/S. Ci riserviamo tutti i diritti. Questo documento, compreso tutte le sue sotto-sezioni, è protetto dalle leggi sul copyright. Potete leggere quello che potete fare con i nostri modelli alla fine di ogni modello sul nostro sito. |


Con oltre 40 anni di esperienza nel design di modelli di maglia e uncinetto, DROPS Design offre la più estesa collezione di modelli gratuiti su internet - tradotti in 17 lingue. Ad oggi vi possiamo fornire 324 cataloghi e 12291 modelli - 9562 dei quali sono tradotti in Italiano.
Ci stiamo impegnando molto per darvi il meglio che vi possiamo offrire in termini di maglia e uncinetto, ispirazioni e consigli così come filati di grande qualità ad un prezzo incredibile! Volete utilizzare i nostri modelli per qualcosa d'altro oltre al vostro uso personale? Potete leggere tutto ciò che è consentito nel testo sul Copyright in basso su tutte le pagine dei nostri modelli. Buon lavoro!
Lasciare un commento sul modello DROPS Baby 20-9
Noi saremmo felici di ricevere i tuoi commenti e opinioni su questo modello!
Se vuoi fare una domanda, fai per favore attenzione a selezionare la categoria corretta nella casella qui sotto per velocizzare il processo di risposta. I campi richiesti sono indicati da *.