
Categorie popolari
State cercando un filato?


Commenti / Domande (163)
![]() Sue Knight ha scritto:
Sue Knight ha scritto:
At the end of the Back Piece paragraph; why am I only getting 16 dec when it says I should have 58? Thank you.
03.10.2012 - 19:25
![]() Sue Knight ha scritto:
Sue Knight ha scritto:
Having the same confusion as Barb Smith. No way am I getting 58 dec. after piece measures 4 3/4 and inc 22 times.
03.10.2012 - 19:23
![]() Barb Smith ha scritto:
Barb Smith ha scritto:
I am very confused about the instructions, specifically where it says to "repeat the dec on every row from RS a total of 46 times and when all inc for sleeve edges are complete (piece measures approx 4 3/8")" I have 4 inches after completing the 9 increases but I have only done 7 rows of the decreases. Please help! Thank you.
18.09.2012 - 19:14DROPS Design ha risposto:
Dear Mrs Smith, you increase for the sleeves each side of the piece -to create sleeve edges. But you dec each side of the marker until sleeve edges are completed, then you put aside, you work front piece the same way and then you work both part together, and at the same time, you continue the dec each side of the marker. Happy Knitting !
12.11.2012 - 14:22
![]() Camilla Pedersen ha scritto:
Camilla Pedersen ha scritto:
Jeg har strikket ca 50 cm og har nu kun 136 masker tilbage... jeg har taget ind på hver pind midt foran og bagpå... Det står der i opskriften jeg har printet ud jeg skal, men nu kan jeg se der er ændret til at jeg kun skal tage ind på hver 2. pind. men der står også at jeg skal tage ind på retsiden og det bliver jeg ved med at være på eftersom jeg er på rundpinde...
13.03.2012 - 21:07DROPS Design ha risposto:
Du skal fortsætte med at tage ind på hver 2.p som du har gjort hele tiden. God fornøjelse!
15.03.2012 - 09:51
![]() Camilla ha scritto:
Camilla ha scritto:
Jeg har samme problem som Kirsten Leth, men jeg kan ikke finde fejlen?? Nogen der kan hjælpe??
11.03.2012 - 21:13DROPS Design ha risposto:
Jeg kan ikke regne ud hvor du får problemer. Hvor langt er du kommet i opskriften?
13.03.2012 - 15:50
![]() Maria De Sousa ha scritto:
Maria De Sousa ha scritto:
Love it!
29.12.2011 - 19:01
![]() Drops Design ha scritto:
Drops Design ha scritto:
Jo du fortsætter bare indtagningerne på hver 2.p efter at du har sat arbejdet på rundpind. Udtagningerne til ærmekant er nu færdig: "når alle udtagninger til ærmekant er færdig (arb måler ca 10-11-12 cm i højden) afsluttes der med 1 p fra vrangen. Læg arb til side."
22.09.2011 - 15:01
![]() Heidi ha scritto:
Heidi ha scritto:
Hej. Kan ikke forstå den del af opskriften, hvor der står man skal lave 58 indtagninger på retsiden og at arb. samtidig kun skal være 12 cm?? Skal man stoppe udtagningerne og fortsætte indtagningerne til ialt 58 gange eller hvad?? v. Heidi
22.09.2011 - 12:29
![]() DROPS Design ha scritto:
DROPS Design ha scritto:
Marianne: Det er ikke feil i oppskriften. Etter man har satt sammen delene og strikker rund økes det på hver 2. pinne som før.
12.09.2011 - 09:27
![]() DROPS Design ha scritto:
DROPS Design ha scritto:
Wenche: Alpaca brukes bare til halsen og nederst på erme. Denne oppskriften strikkes ofte og vi har ikke fått noe tilbakemeldinger ang. garn mengde.
12.09.2011 - 09:24
|
|
Hometown |
|
 |
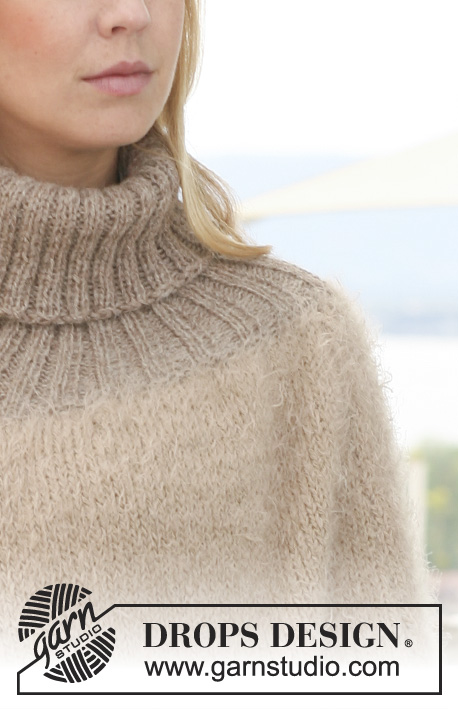 |
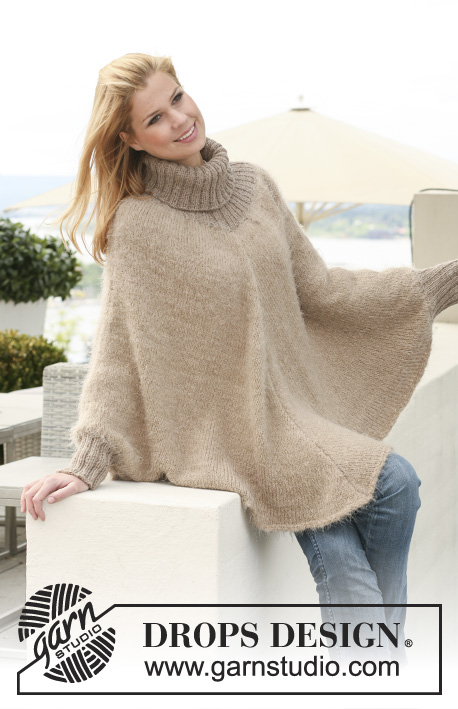
Poncho DROPS lavorato a maglia con 1 capo del filato "Symphony" oppure con 1 capo del filato Melody o 1 capo del filato "Brushed Alpaca Silk" + 1 capo del filato "Alpaca", con coste in "Alpaca". Dalla S alla XXXL.
DROPS 123-28 |
|
|
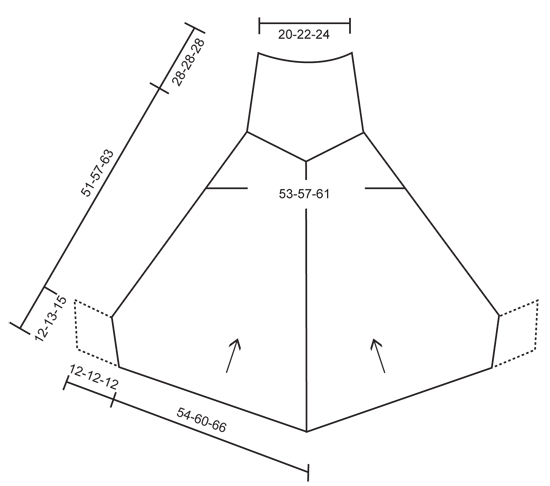
PUNTO LEGACCIO (avanti e indietro sul ferro): Lavorare tutti i ferri a diritto. CONSIGLIO DIMINUZIONI 1 (in mezzo davanti e in mezzo dietro): Diminuire sul diritto ad ogni lato del segno così: 3 m PRIMA del segno: 2 m insieme a dir, 1 m dir. DOPO il segno: 1 m dir, passare 1 m a dir senza lavorarla, 1 m a dir, accavallare la m passata sopra quella lavorata. CONSIGLIO DIMINUZIONI 2 (i lati): Diminuire lavorando 2 m insieme a dir prima del segno e 2 m insieme ritorte a dir dopo il segno. -------------------------------------------------------- PONCHO: Si lavora in 2 parti, poi riprese insieme per lavorare le 2 parti in tondo su tutte le maglie. Le frecce nello schema indicano il senso della maglia. DIETRO: Si lavora avanti e indietro sul ferro circolare. Avviare 162-180-198 m con il ferro circolare 6 con 1 capo del filato Symphony oppure 1 capo del filato Melody oppure 1 capo del filato Brushed Alpaca Silk + 1 capo del filato Alpaca. Lavorare 4 ferri a PUNTO LEGACCIO - ved spieg sopra! Lasciare 1 segno in mezzo del lavoro, dopo 81-90-99 m. LEGGERE TUTTO IL PARAGRAFO PRIMA DI CONTINUARE: RICORDATI DELLA TENSIONE DELLA MAGLIA! Continuare a maglia rasata, ALLO STESSO TEMPO, avviare per i bordi delle maniche, 2 m alla fine dei 2 ferri seguenti. Ripetere questi aumenti alla fine di ogni f in totale 9-10-11 volte ad ogni lato (= 18-20-22 m aumentate per i bordi delle maniche ad ogni lato). ALLO STESSO TEMPO, quando il lavoro misura 3 cm, diminuire 1 m ad ogni lato del segno – VEDERE CONSIGLIO DIMINUZIONI 1! Ripetere queste diminuzioni ogni f sul dir in totale 46-52-58 volte, ma, quando tutti gli aumenti del bordo delle maniche sono fatti (il lavoro misura ca 10-11-12 cm in altezza) terminare con 1 f sul rovescio. Mettere il lavoro da parte in attesa. DAVANTI: Si lavora come il dietro. PONCHO: Riprendere tutte le m sullo stesso ferro circolare e continuare in tondo. Lasciare 1 segno all’inizio del giro e 1 segno dopo la metà delle maglie (segnano i lati). Continuare a diminuire m in mezzo davanti ed in mezzo dietro come prima. ALLO STESSO TEMPO, quando il lavoro misura 12-12-13 cm, diminuire 1 m ad ogni lato del segno in ogni lato del lavoro – VEDERE CONSIGLIO DIMINUZIONI 2! Ripetere queste diminuzioni ai lati ogni 6 giri (ogni 3 cm) in totale 13-15-17 volte (= fino alla fine). Quando tutte le diminuzioni sono fatte, rimangono 160-172-184 m sul f. Continuare fino a quando il lavoro non misuri 51-57-63 cm. COLLO: Continuare con il ferro circolare 4 e 2 fili Alpaca. Lavorare 1 giro dir, ALLO STESSO TEMPO, lavorare tutte le m insieme, 2 alla volta insieme a dir = 80-86-92 m. Lavorare 1 giro rov e 1 giro dir, ALLO STESSO TEMPO, distribuire uniformemente 20-22-24 aumenti = 100-108-116 m. Lavorare a punto coste 2 m dir/2 m rov su tutte le m. Quando le coste misurano 28 cm, intrecciare SENZA STRINGERE TROPPO con dir sopra dir e rov sopra rov. BORDI DELLE MANICHE: Si lavorano in tondo. Attaccare i giri di punto legaccio in basso del dietro e del davanti con qualche punto ad ogni lato (il bordo delle maniche ha una circonferenza di ca 24-26-30 cm). Riprendere 44-48-52 m intorno al bordo con i ferri a doppia punta 4 e 2 fili Alpaca. Lavorare 1 giro rov e continuare in coste 2 m dir/2 m rov su tutte le m. Quando le coste misurano 12 cm, intrecciare con dir sopra dir e rov sopra rov. |
|
 |
|
Avete terminato questo modello?Allora taggate le vostre foto con #dropspattern o inviatele alla #dropsfan gallery. Avete bisogno di aiuto con questo modello?Troverete 18 video tutorial, una sezione per i commenti/domande e molto altro guardando il modello su www.garnstudio.com © 1982-2026 DROPS Design A/S. Ci riserviamo tutti i diritti. Questo documento, compreso tutte le sue sotto-sezioni, è protetto dalle leggi sul copyright. Potete leggere quello che potete fare con i nostri modelli alla fine di ogni modello sul nostro sito. |
|


Con oltre 40 anni di esperienza nel design di modelli di maglia e uncinetto, DROPS Design offre la più estesa collezione di modelli gratuiti su internet - tradotti in 17 lingue. Ad oggi vi possiamo fornire 324 cataloghi e 12290 modelli - 9561 dei quali sono tradotti in Italiano.
Ci stiamo impegnando molto per darvi il meglio che vi possiamo offrire in termini di maglia e uncinetto, ispirazioni e consigli così come filati di grande qualità ad un prezzo incredibile! Volete utilizzare i nostri modelli per qualcosa d'altro oltre al vostro uso personale? Potete leggere tutto ciò che è consentito nel testo sul Copyright in basso su tutte le pagine dei nostri modelli. Buon lavoro!
Lasciare un commento sul modello DROPS 123-28
Noi saremmo felici di ricevere i tuoi commenti e opinioni su questo modello!
Se vuoi fare una domanda, fai per favore attenzione a selezionare la categoria corretta nella casella qui sotto per velocizzare il processo di risposta. I campi richiesti sono indicati da *.