Commenti / Domande (40)
![]() Nicolle ha scritto:
Nicolle ha scritto:
Hi, I was wondering how to do kitchener stitches according to the video tutorial that uses two rows both on knitting needles, when in my knitting the first original row is already off the needle? Then i am left with two pieces, one on the needle (the last row) and the one off the needle (first row) to graft together. Or is there another way of doing it? Thanks in advance, Nicolle
29.08.2024 - 10:01DROPS Design ha risposto:
Dear Nicolle, you have to make a mix of 2 techniques: grafting for the stitches on needle on one side and this technique for the stitches of the cast on edge. Happy knitting!
30.08.2024 - 07:46
![]() Moira ha scritto:
Moira ha scritto:
Hello, could you please help me understand the set of 16 stitches for M1. It says to knit on wrong side in the chart oh, but I don't understand that because I'm still on the right side? Could you please advise right from the start? (After cast on) Continue as follows from RS: 52-58-64 garter sts, 16-16-20 sts in M.1. Insert a marker after st no 42-48-54 from RS. Thank you, I LOVE Drops!
02.03.2021 - 17:07DROPS Design ha risposto:
Dear Moira, on first row you are working from right side of sock: 52-58-64 sts in garter stitch, and 16 or 20 sts as shown in M.1,: *Work 3 sts in first st (= P1, YO, P1), P3 sts, psso 1st st then 2nd st over last st = 1 st remain*, repeat from *to* a total of 8 or 10 times. From WS knit all stitches (= the 16-20 sts of M.1) and the remaining sts (garter stitch). On next row from RS work 3rd row in M.1 over the last 16-20 sts: *P3 sts, psso 1st st then 2nd st over last st , (P1, YO, P1) in next st* repeat from *-* and knit remaining sts. Hope this will help, happy knitting!
03.03.2021 - 06:52
![]() Nicole ha scritto:
Nicole ha scritto:
Ich habe Probleme mit M1. Die erste Reihe habe ich gestrickt, wie angegeben von der Vorderseite. Die nächste Reihe ( also die Rückreihe) zeigt laut Diagramm (x im Kästchen) "re. Von der Vorderseite ". Mir ist unklar, wie ich diese Maschen stricken soll, weil ich mich doch auf der Rückseite befinde.
18.01.2021 - 15:20DROPS Design ha risposto:
Liebe Nicole, hier sollte es "recht bei den Rückreihen" sein, eine Korrektur erfolt so bald wie möglich. D.h. bei den Rückreihen (= Rückseite) stricken Sie alle Maschen in A.1 rechts. Viel Spaß beim stricken!
18.01.2021 - 15:27
![]() Diana ha scritto:
Diana ha scritto:
I have done a lot of patterns but l just can't figure it out. Is there a way you can explain the first paragraph a different or other way? I love the slippers and would like to make them. Thank you for any help.
16.10.2019 - 18:07DROPS Design ha risposto:
Dear Diana, work 4 rows with: 52-58-64 sts garter st, 16-16-20 sts as in M.1, on 5th row (= from RS), start decrease on each side of the marker for the heel. At the same time, you will work short rows for toe: every 4th row (= every other row from WS), work until 8-10-12 sts in garter st remain and turn (= short rows). Hope it helps, happy knitting!
17.10.2019 - 09:51
![]() Odeth ha scritto:
Odeth ha scritto:
El patrón no lo veo claro en la parte del talón gracias
21.09.2019 - 04:39DROPS Design ha risposto:
Hola Odeth. El talón lo formamos trabajando disminuciones (2 puntos juntos de derecho a cada lado del marcapuntos) un total de 10 veces.
17.10.2019 - 19:45
![]() Lyly ha scritto:
Lyly ha scritto:
Je ne comprends pas les explications concernant les rangs raccourcis de la pointe : au 6e rg, sur l\\\'env du travail, on ne tricote pas les 8 dernières mailles pour la taille S ? Combien de fois doit-on laisser ces mailles en attente ? Je ne comprends absolument pas comment faire la pointe du chausson.les rgs raccourcis se font sur l\\\'endroit ou l\\\'envers du travail ?
08.04.2019 - 23:30DROPS Design ha risposto:
Bonjour Lyly, les rangs raccourcis pour la pointe vont se tricoter en commençant sur l'envers: tricotez le rang jusqu'à ce qu'il reste 8 m (= pointe), tournez et tricotez le rang suivant sur l'endroit (diminuez sur l'endroit si besoin), tournez et tricotez le rang suivant sur toutes les mailles, tournez et tricotez le rang suivant sur toutes les mailles - n'oubliez pas les diminutions si besoin - continuez ainsi, les 8 m de la fin du rang ne sont simplement plus travaillées = rangs raccourcis; cf vidéo. Bon tricot!
09.04.2019 - 09:24
![]() Emmah ha scritto:
Emmah ha scritto:
Min socka har väldigt dålig passform (stor) från hälen och hela vägen upp på skaftet. Resten av socken sitter perfekt. Vad har jag gjort för fel?
26.12.2018 - 17:35DROPS Design ha risposto:
hei Emmah. Denne modellen er en del løsere rundt ankelen enn tradisjonelle sokker, du kan se det på bildet også om du ser etter. Så den skal være sånn. Om du gjerne vil ha den strammere kan du feks prøve å feste et bånd som du kan knyte rundt ankelen? God fornøyelse.
08.01.2019 - 14:44Erica ha scritto:
I\'m stuck again 😞 I\'m doing the middle size. Continue until piece measures 15cm. I\'ve done that but no idea how to do the next paragraph: work 38 garter st and 16 sts of m1 and increase for heel. I don\'t know which sue is the heel! I have 44sts of pattern and a separate 10sts of garter stitch for the toe...
13.12.2018 - 13:38DROPS Design ha risposto:
Dear Erica, when piece measures 15 cm from the last dec, work now: the first 38 sts seen from RS in garter st and the last 16 sts in M.1, now increase for heel on each side of the marker placed in the 38th st from RS. Happy knitting!
13.12.2018 - 14:40Erica ha scritto:
Im confused about how to p into same stitch. Pattern = p1, yo, p1 all in same stitch but my sts are decreasing. I did p1, yo and then I slipped the yo onto other needle and purled that. Where am I going wrong?!
07.12.2018 - 11:39DROPS Design ha risposto:
Dear Erica, y ou have to work the same stitch a total of 3 times, purl next stitch on the left needle without dropping this off the needle, make a YO on right needle, then purl the same stitch on left needle one more time and drop it from left needle = you should have now 3 sts on the right needle. The next 3 sts will be purled together = the number of stitches keep constant. Happy knitting!
07.12.2018 - 11:59
![]() Dufour Arlette ha scritto:
Dufour Arlette ha scritto:
Je reviens vers vous, je vous ai posée une question hier je tenais a vous dire qu'après avoir fait et refait j'ai trouvée ,je vous remercie Mme Dufour
27.09.2018 - 08:22
Cotton Patch#cottonpatchsocks |
||||||||||
 |
 |
|||||||||
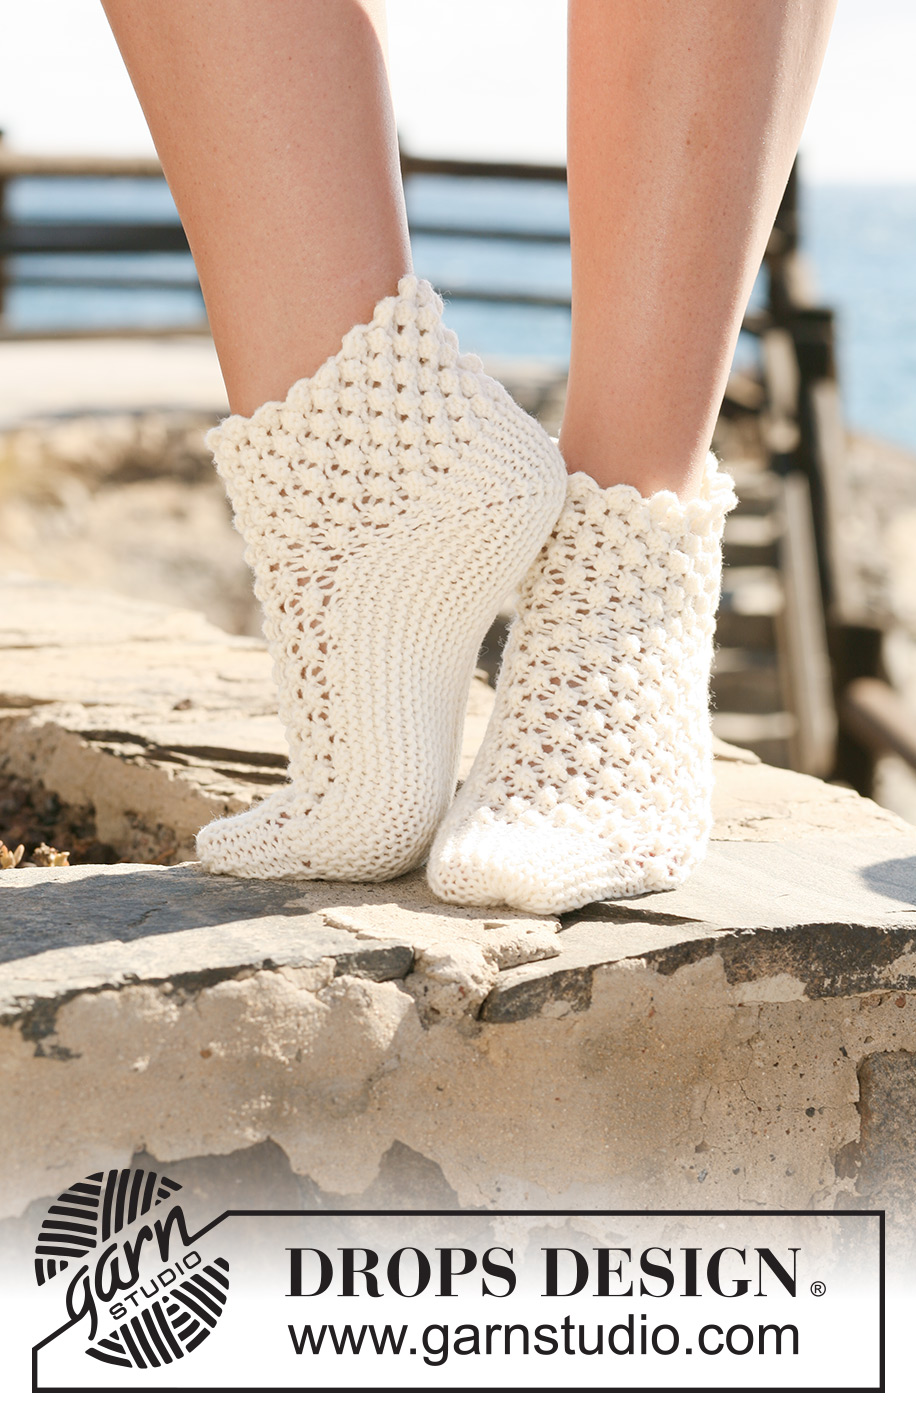
Calzini DROPS lavorati dal lato al lato in punto mimosa, in "Merino Extra Fine".
DROPS 119-32 |
||||||||||
|
PUNTO LEGACCIO (avanti e indietro sui f): Lavorare tutti i ferri a diritto. 1 cresta di legaccio = 2 ferri a dir SUGGERIMENTO MAGLIA: Quando si gira il lavoro in mezzo al ferro, passare la 1° m a dir senza lavorarla. Stringere il filo e lavorare come prima. Questo per evitare un buco nei passaggi. MOTIVO: Vedere il diag M.1. Il diag mostra il motivo sul diritto. 1° f = sul diritto. SUGGERIMENTO CONFEZIONE: Inserire un filo nella maglia più esterna della punta e lasciare questo filo seguire il lavoro. Alla fine servirà per stringere la punta. -------------------------------------------------------- CALZINO: RICORDARSI DELLA TENSIONE DELLA MAGLIA! I calzini si lavorano avanti e indietro, a partire dal centro sotto il piede. Si lavora poi il sopra del piede per terminare al centro sotto il piede. Quando si fanno le diminuzioni o gli aumenti, lavorare lo stesso a ferri accorciati sulle maglie della punta così: Ogni 2 ferri (sul lato della punta) (vuol dire ogni 4 ferri), girare quando rimangono 8-10-12 m e lavorare il ferri seguente – VEDERE I SUGGERIMENTI MAGLIA! La punta si trova all’inizio del ferro visto sul diritto. Avviare 68-74-84 m con i f 4 ed il filato Merino. Lavorare così – sul diritto: 52-58-64 m punto legaccio, 16-16-20 m M.1. Inserire 1 segnapunti dopo il 42°-48°-54° m sul diritto. Lavorare 4 f. Continuare con questo motivo, ALLO STESSO TEMPO, al 5° ferro, diminuire per il tallone così (non dimenticare i ferri accorciati dalla parte della punta): Lavorare 2 m insieme a dir ad ogni lato del segnapunti e 2 ferri in totale 10 volte = 48-54-64 m. Lavorare poi così – sul diritto (non lavorare i ferri accorciati sopra la punta): 8-10-12 m punto legaccio (= punta), M.1 sulle m rimanenti. Continuare a punto legaccio e M.1 finché il lavoro non misuri 13-15-17 cm dall’ultima diminuzione, NOTA – misurare in mezzo sopra le diminuzioni. Lavorare poi 32-38-44 m punto legaccio, 16-16-20 m del M.1. Aumentare per il tallone così (lavorare a ferri accorciati sopra la punta): Inserire 1 segnapunti dopo la 32°-38°-44° m sul diritto. Aumentare 1 m ad ogni lato del segnapunti ogni 2 ferri in totale 10 volte, aumentare facendo 1 gettato, al ferro successivo, lavorare il gettato a dir ritorto, lavorare gli aumenti a punto legaccio = 68-74-84 m. Lavorare 4 f sopra tutte le m con 52-58-64 m punto legaccio, 16-16-20 m di M.1. Inserire tutte le m su un filo. Lavorare 1 altro calzino. CONFEZIONE: Cucire le m dal filo e dal bordo d’avvio insieme con i punti maglia. La cucitura sarà sotto il piede e sale su dietro la gamba. Stringere la punta e fissare bene il filo. |
||||||||||
Spiegazioni del diagramma |
||||||||||
|
||||||||||
 |
||||||||||
Avete terminato questo modello?Allora taggate le vostre foto con #dropspattern #cottonpatchsocks o inviatele alla #dropsfan gallery. Avete bisogno di aiuto con questo modello?Troverete 17 video tutorial, una sezione per i commenti/domande e molto altro guardando il modello su www.garnstudio.com © 1982-2026 DROPS Design A/S. Ci riserviamo tutti i diritti. Questo documento, compreso tutte le sue sotto-sezioni, è protetto dalle leggi sul copyright. Potete leggere quello che potete fare con i nostri modelli alla fine di ogni modello sul nostro sito. |
||||||||||


Lasciare un commento sul modello DROPS 119-32
Noi saremmo felici di ricevere i tuoi commenti e opinioni su questo modello!
Se vuoi fare una domanda, fai per favore attenzione a selezionare la categoria corretta nella casella qui sotto per velocizzare il processo di risposta. I campi richiesti sono indicati da *.