
Categorie popolari
State cercando un filato?


Commenti / Domande (68)
![]() Carin ha scritto:
Carin ha scritto:
Kan ik dit patroon ook op een rondbrei pen maken in plats van naalden zonder know. Ik kan daar moeilijk mee breien.
13.04.2026 - 01:47
![]() Mathilde ha scritto:
Mathilde ha scritto:
Hej. Jeg har svært ved at forstå afsnittet "DRAGT". Har i mulighed for at skære det mere ud i pap? Lige nu har jeg begge ben på rundpind men det skaber jo et hul mellem benene. Også når I skriver "strik frem og tilbage" hvorfor kan man ikke bare strikke rundt? I forhold til "Sæt 1 mærke 25 m ind fra hver side ( =48 m imellem mærkerne på rygstk)" så kan jeg ikke regne ud hvor de mærker skal være? Håber I kan hjælpe :-) Kh Mathilde
15.10.2023 - 01:24
![]() Maite Fabregat ha scritto:
Maite Fabregat ha scritto:
Hello! I have a question regarding the buttonholes. When following the instructions the hole seems to not be centered but moved to the left. Is that correct? To center it i would need to 2nd and 3rd from mid. Thanks for the help!
27.11.2022 - 08:31DROPS Design ha risposto:
Dear Maite, yes, the holes are slightly moved to the left. You could move them towards the center if you want. Happy knitting!
27.11.2022 - 16:06
![]() Marissa Kanewske ha scritto:
Marissa Kanewske ha scritto:
Under the instructions for BACK PIECE, for the 1/3 MONTHS size: it says you will have 98 sts after all of the increases. Then you bind off 16 sts in the middle for the neck. Then it says "complete each shoulder/sleeve separately" with no other instructions on how to do so. 98 sts minus 16 sts should equal 82 sts but instead it says to bind off the remaining 41 sts. What happens to the other 41 sts?
16.11.2021 - 05:45DROPS Design ha risposto:
Dear Mrs Kanewske, each shoulder/sleeve will be worked separately means that you will first work one set of 41 sts (one side/shoulder/sleeve) leaving the other set of 41 sts unworked; and after these 2 rows over the first 41 sts on one side, cast off, cut the yarn. Join it to the other set of 41 sts for the other shoulder/sleeve and work the same way. Happy knitting!
16.11.2021 - 09:15
![]() Anne Stecker ha scritto:
Anne Stecker ha scritto:
I used twice as much yarn as the pattern called for. I used 2 strands of Cascade 220. Gauge was good, sizzle was good. Anyone else use much more yarn?
12.10.2021 - 02:32
![]() Betty Wagner ha scritto:
Betty Wagner ha scritto:
It looks like a pretty pattern
20.08.2020 - 19:58
![]() Ivana ha scritto:
Ivana ha scritto:
Hi, I am looking for a crochet pattern for this amazing romper overal.... please, have you got anything similar for the crocheters???
04.06.2020 - 07:45DROPS Design ha risposto:
Dear Ivana, you will find our crocheted overalls for babies here. Happy crocheting!
04.06.2020 - 09:09
![]() Diane Jackson ha scritto:
Diane Jackson ha scritto:
Hello, I am interested in knitting the pattern, My First Christmas by DROPS Design. I have a friend who is going to have a baby right before Christmas this year and I was wondering if the smallest size (1-3 mo) would be too large for a brand new baby. I looked at the bust measurement and it said 20 1/2" and I was wondering if that is the measurement for the garment or if that is the infant measurement? Thank you for any assistance you can provide. Kind regards, Diane
02.06.2020 - 00:44DROPS Design ha risposto:
Dear Mrs Jackson, the measurements are the finished one when pieces is laying flat (read more here. This might help you to find out the matching size -or you can find more overall patterns here. Happy knitting!
02.06.2020 - 10:35
![]() Nicole Groß ha scritto:
Nicole Groß ha scritto:
Schönen guten Tag, ich habe eine Frage zu den Übergang von bein und Strampler! Da steht das die Beine auf eine rundstricknadel kommen damit man dann mit den Strampler anfangen kann. Die Frage ist jetzt werden die Beine in rund oder als hin und rückgestrickt? Und wenn sie in rund gestrickt werden kommen dann beide Beine auf einer Nadel? LG Nicole
12.08.2019 - 06:47DROPS Design ha risposto:
Liebe Frau Groß, Strampler wird hin und zurück gestrickt, es wird bei der 1. Reihe 3 M angeschlagen, dann die Maschen der 1. Beine gestrickt, dann die Maschen der 2. Beine gestrickt, und schliesslich 3 M angeschlagen. Vile Spaß beim stricken!
12.08.2019 - 08:56
![]() Nancy Crosier ha scritto:
Nancy Crosier ha scritto:
Want to print off free knitted patterns do not find any place to be able to do it
20.07.2019 - 12:46DROPS Design ha risposto:
Dear Nancy, you can easily print every our pattern for free whenever you like - see symbol of printer just under the header of pattern and tab with material. Happy knitting!
20.07.2019 - 17:38
|
|
My First Christmas#myfirstchristmasonesie |
|
|
|
|
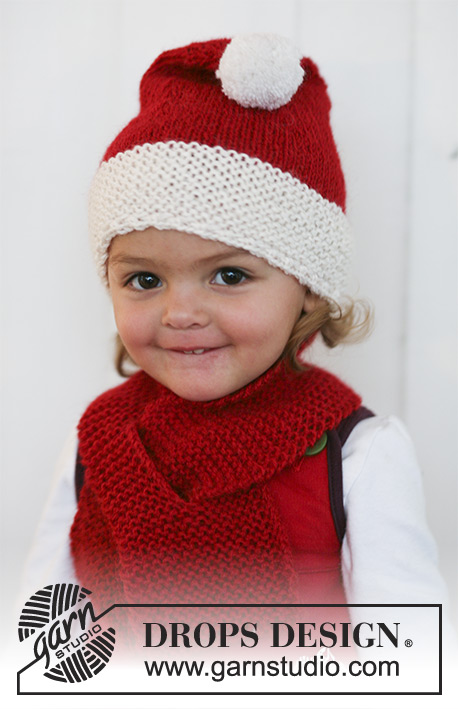
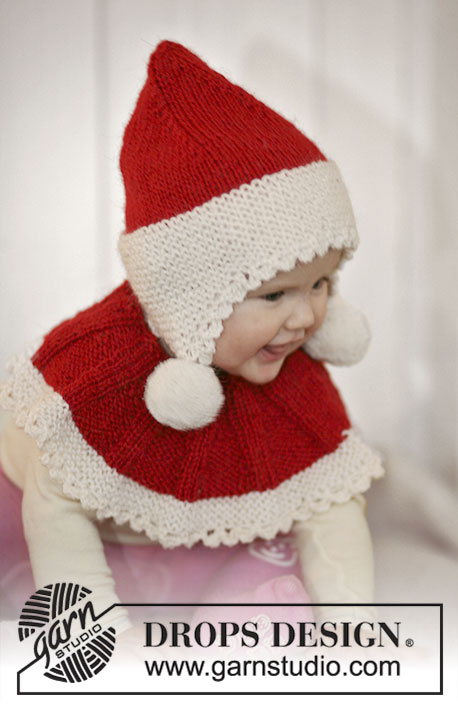
Tutina di Natale con cappuccio per neonati e bambini con 2 capi di DROPS Alpaca.
DROPS Baby 19-16 |
|
|
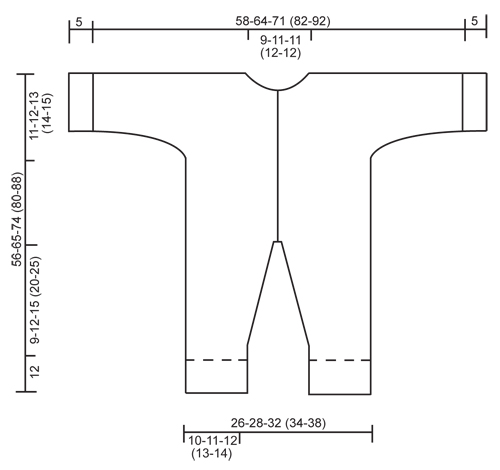
GRANA DI RISO: 1° giro: * 1 m a dir, 1 m a rov *, ripetere da *-*. 2° giro: lavorare a dir le m a rov, e a rov le m a dir. Ripetere sempre il 2° giro. PUNTO LEGACCIO (avanti e indietro sul ferro): Lavorare tutti i ferri a dir. ASOLE: chiudere per le asole sul davanti destro. 1 ASOLA = lavorare insieme a dir la 3a e la 4a m dall'inizio del bordo e inserire 1 m gettata. Chiudere per le asole quando il lavoro misura: TAGLIA 1/3 Mesi: 23, 30, 37, 44, 51 cm TAGLIA 6/9 Mesi: 28, 36, 44, 52, 60 cm TAGLIA 12/18 Mesi: 31, 38, 46, 53, 61, 68 cm TAGLIA 2 Anni: 34, 42, 50, 58, 66, 74 cm TAGLIA 3/4 Anni: 39, 48, 56, 65, 73, 82 cm ---------------------------------------------------------- GAMBA: Si lavora in tondo sui ferri a doppia punta. Avviare 34-36-40 (44-48) m LENTE sui ferri a doppia punta n° 4,5 con 2 capi del filato bianco. Lavorare 1 giro a dir e proseguire poi a GRANA DI RISO - vedere le spiegazioni sopra. Quando il lavoro misura 12 cm, passare ai ferri n°5 e proseguire a maglia rasata con 2 capi del filato rosso. Inserire un segno all'inizio del giro = interno della gamba. RICORDARSI LA TENSIONE DEL LAVORO! Quando il lavoro misura 14 cm, aumentare 1 m da ciascun lato del segno, e ripetere questi aumenti ogni 2-2-3 (4-5) giri per un totale di 7-8-9 (9-10) volte = 48-52-58 (62-68) m. Quando il lavoro misura 21-24-27 (32-37) cm, chiudere 4 m all'interno della gamba ( = diminuire le 2 m che precedono e le 2 m che seguono il segno) = 44-48-54 (58-64) m. Lasciare il lavoro in sospeso e proseguire con l'altra gamba. DAVANTI E DIETRO: Mettere le m delle 2 gambe sullo stesso ferro circolare n° 5 in modo che la parte interna delle gambe sia una di fronte all'altra = 88-96-108 (116-128) m. Proseguire avanti e indietro sul ferro circolare iniziando dal centro sul davanti come segue (1° ferro = diritto del lavoro): avviare 3 nuove m, lavorare a dir tutte le m sul ferro, avviare 3 nuove m alla fine del ferro = 94-102-114 (122-134) m. Inserire un segno dopo le prime 25-27-30 (32-35) m e un segno prima delle ultime 25-27-30 (32-35) m (= tra i due segni ci sono 44-48-54 (58-64) m per il dietro). Proseguire a maglia rasata e lavorare le prime/ultime 5 m ai lati a punto legaccio (= bordi sul davanti). ALLO STESSO TEMPO, quando il lavoro misura 23-28-31 (34-39) cm chiudere per le asole sul bordo davanti destro – VEDERE LE SPIEGAZIONI SOPRA! Quando il lavoro misura 45-53-61 (66-73) cm dividere il lavoro in 2, in corrispondenza dei segni e completare il davanti e il dietro separatamente. DIETRO: = 44-48-54 (58-64) m. Proseguire a maglia rasata e ALLO STESSO TEMPO avviare nuove m alla fine di ogni ferro, da ciascun lato, per le maniche come segue: 3 m per 2-1-3 (1-2) volte, 5 m per 1-2-1 (2-2) volte, 7 m per 1-1-1 (2-2) volta e 9-10-12 (14-16) m per 1 volta = sul ferro ci sono 98-108-120 (140-156) m. Quando il lavoro misura 55-64-73 (79-87) cm, chiudere le 16-18-18 (20-20) m centrali per il collo e terminare ogni spalla/manica separatamente. Lavorare 2 ferri a maglia rasata sulle rimanenti 41-45-51 (60-68) m e chiudere tutte le m senza stringere troppo il filo. DAVANTI SINISTRO: = 25-27-30 (32-35) m. Proseguire a maglia rasata e lavorare le 5 m del bordo verso il centro a punto legaccio come prima. ALLO STESSO TEMPO, avviare le nuove m alla fine di ogni ferro, verso il lato esterno, per le maniche, come decritto per il dietro = 52-57-63 (73-81) m. Quando il lavoro misura 52-61-69 (75-83) cm, chiudere 5-6-6 (7-7) m per 1 volta verso il centro, per il collo; chiudere poi per lo scollo, all'inizio di ogni ferro dal centro come segue: 2 m per 2 volte e 1 m per 2 volte = sul ferro rimangono 41-45-51 (60-68) m per la spalla/manica. Proseguire finché il lavoro non misura 56-65-74 (80-88) cm. Chiudere tutte le m senza stringere troppo il filo. DAVANTI DESTRO: Si lavora come il davanti sinistro, ma a specchio - ricordarsi le asole sul bordo al centro. CONFEZIONE: Cucire le spalle, bordo contro bordo nell'asola più esterna della m. Sovrapporre il bordo centrale destro a quello sinistro e cucirli insieme nella parte inferiore. Cucire sotto le maniche, bordo contro bordo, nell'asola più esterna della m. Cucire i bottoni. POLSINI: Con i ferri a doppia punta n° 4,5 e 2 capi del filato bianco, riprendere, tutto intorno il bordo della manica, 32-36-36 (40-40) m . Lavorare a grana di riso finché il polsino non misura 5 cm; chiudere le m senza stringere troppo il filo, lavorando le m come si presentano. Lavorare un bordo uguale attorno all'altra manica. Piegare i bordi delle maniche e delle gambe verso il diritto del lavoro. CAPPUCCIO: Con i ferri circolari n° 5 e 2 capi del filato rosso, riprendere intorno al collo ca. 40 - 50 m sul diritto del lavoro - iniziare dopo le 5 m del bordo centrale del davanti destro e finire prima delle 5 m del bordo centrale del davanti sinistro. Lavorare a maglia rasata avanti e indietro sul ferro; ALLO STESSO TEMPO, durante il secondo ferro (= sul diritto del lavoro) aumentare in modo uniforme in modo da portare il numero delle m a 66-70-74 (78-82). Proseguire finché il cappuccio non misura 21-23-25 (27-28) cm e chiudere le m. Cucire il cappuccio insieme nella parte superiore, nell'asola esterna delle m. Lavorare ora un bordo attorno al cappuccio come segue: con i ferri n° 4,5 e 2 capi del filato bianco, riprendere ca 81-89-97 (105-109) m, sul diritto del lavoro, tutto intorno l'apertura del cappuccio. Lavorare a grana di riso avanti e indietro sul ferro finché il bordo non misura 6 cm; chiudere le m senza stringere troppo il filo lavorando le m come si presentano. Piegare il bordo verso il diritto del lavoro e cucire i lembi alle 5 m a punto legaccio da entrambe le parti. Preparare un pompon di ca. 4-5 cm di diametro e cucirlo in cima al cappuccio. |
|
 |
|
Avete terminato questo modello?Allora taggate le vostre foto con #dropspattern #myfirstchristmasonesie o inviatele alla #dropsfan gallery. Avete bisogno di aiuto con questo modello?Troverete 22 video tutorial, una sezione per i commenti/domande e molto altro guardando il modello su www.garnstudio.com © 1982-2026 DROPS Design A/S. Ci riserviamo tutti i diritti. Questo documento, compreso tutte le sue sotto-sezioni, è protetto dalle leggi sul copyright. Potete leggere quello che potete fare con i nostri modelli alla fine di ogni modello sul nostro sito. |


Con oltre 40 anni di esperienza nel design di modelli di maglia e uncinetto, DROPS Design offre la più estesa collezione di modelli gratuiti su internet - tradotti in 17 lingue. Ad oggi vi possiamo fornire 324 cataloghi e 12290 modelli - 9561 dei quali sono tradotti in Italiano.
Ci stiamo impegnando molto per darvi il meglio che vi possiamo offrire in termini di maglia e uncinetto, ispirazioni e consigli così come filati di grande qualità ad un prezzo incredibile! Volete utilizzare i nostri modelli per qualcosa d'altro oltre al vostro uso personale? Potete leggere tutto ciò che è consentito nel testo sul Copyright in basso su tutte le pagine dei nostri modelli. Buon lavoro!
Lasciare un commento sul modello DROPS Baby 19-16
Noi saremmo felici di ricevere i tuoi commenti e opinioni su questo modello!
Se vuoi fare una domanda, fai per favore attenzione a selezionare la categoria corretta nella casella qui sotto per velocizzare il processo di risposta. I campi richiesti sono indicati da *.