
Categorie popolari
State cercando un filato?


Commenti / Domande (94)
![]() Sandrine ha scritto:
Sandrine ha scritto:
Merci pour votre réponse si rapide! Oui, je connais ce système d'aug, mais alors on part de la pointe et pas du haut (grande largeur). De plus, les explications disent de faire 3 m mousse de chaque côté et pour la fig 1, c'est du jersey envers. (???) Merci encore d'avance
09.01.2017 - 16:42DROPS Design ha risposto:
Bonjour Sandrine, les 3 m de chaque côté se tricote au point mousse comme indiqué dans le diagramme soit: à l'endroit sur l'endroit (= case blanche) et à l'endroit sur l'envers (case avec une croix). Bon tricot!
10.01.2017 - 08:51
![]() Sandrine ha scritto:
Sandrine ha scritto:
Bonjour, je suis un peu perdue... les explications commencent avec 10m et la fig 1 avec des dizaines de mailles... Merci de m'aider.
09.01.2017 - 10:35DROPS Design ha risposto:
Bonjour Sandrine, le châle se tricote de haut en bas, avec des augmentations au milieu devant (le long du milieu du châle) et de chaque côté (comme indiqué dans les explications et indiqué dans la fig. 1). Bon tricot!
09.01.2017 - 11:56
![]() Iris ha scritto:
Iris ha scritto:
Merci, je tricote les autres mailles de chaque côté jusqu'à avoir 21 m pour rajouter un motif du point fantaisie. Grâce à votre aide je vais pouvoir terminer ce très beau modèle. Merci beaucoup !
12.04.2016 - 15:15DROPS Design ha risposto:
Bonjour Iris, les nouvelles mailles de chaque côté (début, fin de rang et de chaque côté des m centrales se tricotent en jersey), le nombre de mailles dans chaque M.3 passera automatiquement à 21 m au dernier rang de M.3. Bon tricot!
12.04.2016 - 16:27
![]() Iris ha scritto:
Iris ha scritto:
Oui,merci, le motif M3 je l'avais compris. Mais je ne sais pas où démarrer les 3*2m ens, au début du 7°rg, est-ce juste après le jeté qui suit les 3m point mousse? Doit-on refaire la figure 1 en début de rg, rajouter des m end sur chaque rg endroit jusqu'à avoir 21m ?
11.04.2016 - 18:21DROPS Design ha risposto:
Bonjour Iris, le dernier rang de M3 commence au même niveau que les rangs précédents, chaque motif doit se répéter en hauteur l'un au-dessus de l'autre. Tricotez les autres mailles de chaque côté comme avant, et continuez à augmenter comme avant aussi. Bon tricot!
12.04.2016 - 08:56
![]() Iris ha scritto:
Iris ha scritto:
Bonjour, me voici arrivée au motif M3. Au 6ème rang de M3, j'obtiens 2 fois 201m. Au rang suivant, dernier rang de M3, comment démarrer : 3m au point mousse, 1 jeté, et là combien de m end avant le motif M3 ? Merci
11.04.2016 - 14:36DROPS Design ha risposto:
Bonjour Iris, au dernier rang de M.3, on va augmenter 2 m par motif ainsi: *3 fois 2 m ens à l'end, puis *1 jeté, 1 m end*, répétez de *-* 7 fois au total, 1 jeté, puis 3 fois 2 m ens à l'end = 21 m par motif de M.3 en largeur. Bon tricot!
11.04.2016 - 16:03
![]() Iris ha scritto:
Iris ha scritto:
Bonjour, je ne comprends pas les 2 "triangles" de la figure 1. Comment est construit ce châle ? Avec 10 mailles au départ, comment obtenir une largeur d'encolure suffisante ? Faut-il assembler plusieurs morceaux ? Je le trouve tellement joli ! D'autant que je voudrais le faire en 2 couleurs Merci de m'éclairer :)
21.01.2016 - 16:02DROPS Design ha risposto:
Bonjour Iris, le châle se tricote de haut en bas, en commençant par 10 m, et par le biais des augmentations de chaque côté + au milieu, on va obtenir ce grand triangle. Suivez bien les indications écrites pour les augmentations et les diagrammes à tricoter. Bon tricot!
21.01.2016 - 17:04
![]() Anna ha scritto:
Anna ha scritto:
Thank you so much for your help))Now I understand why my previous shawl is bigger than on the picture:)))) One more question please)I don't understand this: Work 1 vertical repeat of M.3, and now continue in M.4. Work inc sts not fitting into pattern in stockinette st until there are enough new sts for a full repeat. So I knit 7 rows of M3 and what next?
17.12.2014 - 05:22DROPS Design ha risposto:
Dear Anna, after you have worked the 7 rows of M3, repeat M4 until wave pattern measures 18 cm. At the same time while working M4, you continue inc as before and work new sts (inc) that cannot be worked as in the diagram in st st until you have enough to work a full repeat of diagram in width. Happy knitting!
17.12.2014 - 08:56
![]() Anna ha scritto:
Anna ha scritto:
*Continue from previous comment* Then 3 garter sts, 1 YO, K2, M.2 on the next 136 sts, K2, 1 YO, K2 (= middle sts), 1 YO, K2, M.2 on the next 136 sts, K2, 1 YO, 3 garter sts. ..... 3 garter sts, 1 YO, K17, M.2 on the next 136 sts, K17, 1 YO, K2 (= middle sts), 1 YO, K17, M.2 on the next 136 sts, K17, 1 YO, 3 garter sts. So we always increase sts that go at the beginning, both sides of the middle and at the end. When I reach 17 sts how should I knit next? thank you in advance:))))
13.12.2014 - 05:35DROPS Design ha risposto:
You will work M2 over the same 136 sts until the end of diagram in height - the inc at beg and end of row + each side of middle st are worked in st st, ie when M2 is finished in height, you will have 17 sts in st st before and after the 136 sts in M2 each side of mid st. Happy kniting!
13.12.2014 - 18:21
![]() Anna ha scritto:
Anna ha scritto:
Hello Drops Design:) Please explain me M2 fig. So first, as I understood right, it's only RS rows are showed in this diagramбis this correct? And then 3 garter sts, 1 YO, K1, M.2 on the next 136 sts, K1, 1 YO, K2 (= middle sts), 1 YO, K1, M.2 on the next 136 sts, K1, 1 YO, 3 garter sts.
13.12.2014 - 05:34DROPS Design ha risposto:
Dear Anna, diagrams shows all rows, RS and WS rows - 1 square = 1 st x 1 row in each of the diagrams. click here to read more about diagrams - when you work M2 over the next 136 sts, you will repeat M2 a total of 8 times in width. Happy knitting!
13.12.2014 - 18:17
![]() Ulrika Nielsen ha scritto:
Ulrika Nielsen ha scritto:
Möjligen har jag semesterhjärnan påkopplad. Är mönsterdiagrammen lagda på sidan på mönstret, eller tänker jag fel?
05.08.2014 - 16:57DROPS Design ha risposto:
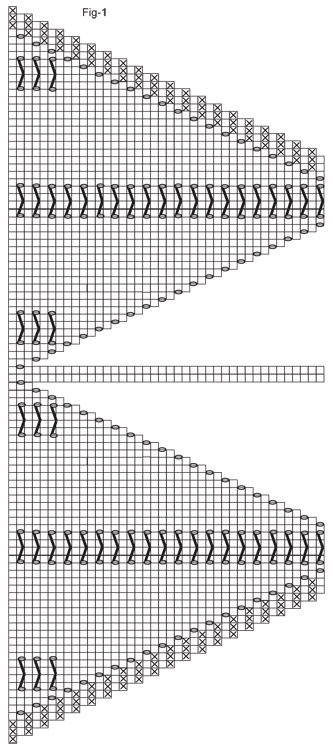
Hej Ulrika. Ja, det er rigtigt. Fig-1 ligger på højkant. Starten er til højre - begynd da nedefra og læs op.
07.08.2014 - 12:22
|
||||||||||||||||||||||
Wisteria |
||||||||||||||||||||||
|
|
||||||||||||||||||||||
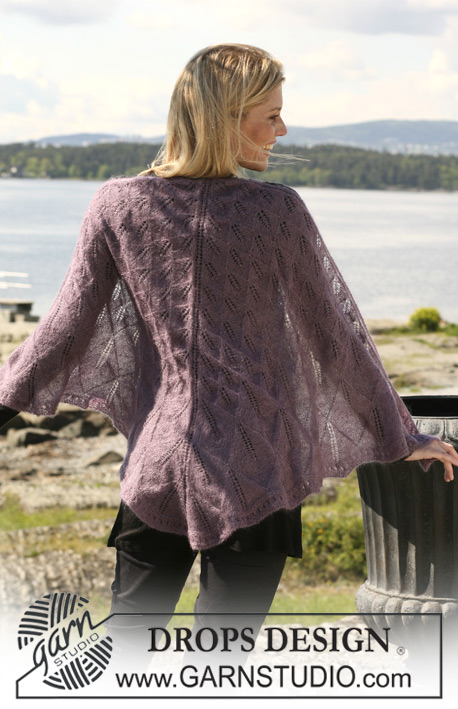
Scialle DROPS lavorato ai ferri con motivo a pizzo in "Kid-Silk".
DROPS 108-47 |
||||||||||||||||||||||
|
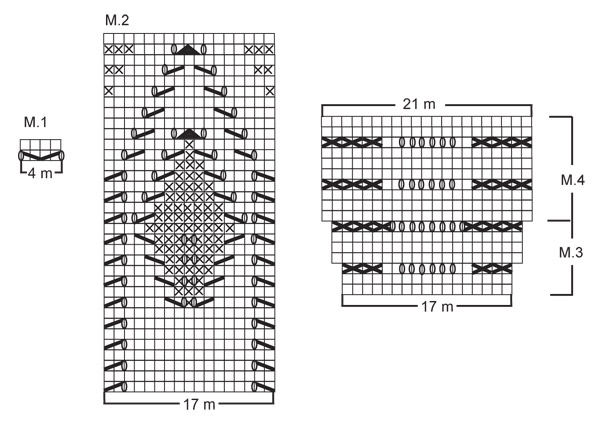
MOTIVO: vedere i diagrammi M.1 - M.4. Il diagramma mostra il motivo dal diritto del lavoro. La Fig-1 mostra come lavorare l’inizio dello scialle. M. a legaccio, avanti e indietro sui ferri: lavorare a dir. tutti i f. SUGGERIMENTO PER IL LAVORO: fare tutti gli aumenti dal diritto del lavoro. Aumentare 4 m. ogni 2 ferri per tutto il lavoro come segue: Aumentare 1 m. all’inizio del f.: 3 m. a m. legaccio, 1 gettato. Lavorare il gettato a rov. sul f. di ritorno. Aumentare 2 m. al centro del lavoro: 1 gettato, 2 m. a m. rasata (= m. centrali), 1 gettato, lavorare il gettato a rov. sul f. di ritorno. Aumentare 1 m. alla fine del f.: 1 gettato, 3 m. a m. legaccio. Lavorare il gettato a rov. sul f. di ritorno. SCIALLE: Lavorato avanti e indietro con i ferri circolari (per avere spazio per tutte le m.). Iniziare sul collo al centro dietro. Nota! Iniziare il nuovo gomitolo sempre all’inizio del f. e non al centro del lavoro. Avviare 10 m. con i ferri circolari misura 3 mm e il filato Kid-Silk. Inserire un segnapunti dopo la 5° m. (indica il centro dello scialle). Lavorare il 1° f. come segue (= diritto del lavoro): 3 m. a m. legaccio, 1 gettato, 4 m. a m. legaccio, 1 gettato, 3 m. a m. legaccio = 12 m. Ora continuare a m. rasata con 3 m. a m. legaccio da ogni lato, allo stesso tempo aumentare 4 m. ogni 2 ferri – leggere il suggerimento per gli aumenti. Fare attenzione alla tensione del lavoro! Continuare in questo modo fino a quando ci sono 20 m. sul f. Ora continuare come segue dal diritto del lavoro: 3 m. a m. legaccio, 1 gettato, 1 m. dir., M.1, 1 m. dir., 1 gettato, 2 m. dir. (= m. centrali), 1 gettato, 1 m. dir., M.1 e finire con 1 m. dir., 1 gettato, 3 m. a m. legaccio. Continuare con gli aumenti ai lati e al centro dietro – vedere la Fig 1. Dopo 17 ripetizioni di M.1 (= 88 m.) lavorare il f. successivo come segue dal diritto del lavoro: 3 m. a m. legaccio, 1 gettato, 1 m. dir., * M.1, 13 m. dir. *, ripetere da *-* per un totale di 2 volte, M.1, 1 m. dir., 1 gettato, 2 m. dir. (= m. centrali), 1 gettato, 1 m. dir., * M.1, 13 m. dir. *, ripetere da *-* per un totale di 2 volte, M.1,1 m. dir., 1 gettato, 3 m. a m. legaccio. Lavorare 17 ripetizioni verticali di M.1 in questo modo (= 6 ripetizioni lungo il f.) = 156 m. Ora lavorare il f. successivo come segue dal diritto del lavoro: 3 m. a m. legaccio, 1 gettato, 1 m. dir., * M.1, 13 m. dir. *, ripetere da *-* per un totale di 4 volte, M.1, 1 m. dir., 1 gettato, 2 m. dir. (= m. centrali), 1 gettato, 1 m. dir., * M.1, 13 m. dir. *, ripetere da *-* per un totale di 4 volte, M.1, 1 m. dir., 1 gettato, 3 m. a m. legaccio. Lavorare 17 ripetizioni verticali di M.1 in questo modo (= 10 ripetizioni lungo il f.) = 224 m. Ora lavorare il f. successivo come segue dal diritto del lavoro: 3 m. a m. legaccio, 1 gettato, 1 m. dir., * M.1, 13 m. dir. *, ripetere da *-* per un totale di 6 volte, M.1, 1 m. dir., 1 gettato, 2 m. dir. (= m. centrali), 1 gettato, 1 m. dir. * M.1, 13 m. dir. *, ripetere da *-* per un totale di 6 volte, M.1, 1 m. dir., 1 gettato, 3 m. a m. legaccio. Lavorare 15 ripetizioni verticali di M.1 in questo modo (= 14 ripetizioni lungo il f.) = 284 m. Ora lavorare il f. successivo come segue dal diritto del lavoro: 3 m. a m. legaccio, 1 gettato, 1 m. dir., M.2 sulle successive 136 m., 1 m. dir., 1 gettato, 2 m. dir. (= m. centrali), 1 gettato, 1 m. dir., M.2 sulle successive 136 m., 1 m. dir., 1 gettato, 3 m. a m. legaccio. Lavorare 1 ripetizione verticale di M.2 = 352 m. Ora lavorare il f. successivo come segue dal diritto del lavoro: 3 m. a m. legaccio, 1 gettato, 1 m. dir., M.3 sulle successive 170 m., 1 m. dir., 1 gettato, 2 m. dir. (= m. centrali), 1 gettato, 1 m. dir., M.3 sulle successive 170 m., 1 m. dir., 1 gettato, 3 m. a m. legaccio. Lavorare 1 ripetizione verticale di M.3, e ora continuare con M.4. Lavorare le m. aumentare che non rientrano nel motivo a m. rasata fino a quando ci sono abbastanza m. per una ripetizione intera del motivo. Continuare con M.4 e con gli aumenti ai lati e al centro fino a quando il motivo a onde misura circa 18 cm. Intrecciare senza stringere. |
||||||||||||||||||||||
Spiegazioni del diagramma |
||||||||||||||||||||||
|
||||||||||||||||||||||
 |
||||||||||||||||||||||
 |
||||||||||||||||||||||
Avete terminato questo modello?Allora taggate le vostre foto con #dropspattern o inviatele alla #dropsfan gallery. Avete bisogno di aiuto con questo modello?Troverete 12 video tutorial, una sezione per i commenti/domande e molto altro guardando il modello su www.garnstudio.com © 1982-2026 DROPS Design A/S. Ci riserviamo tutti i diritti. Questo documento, compreso tutte le sue sotto-sezioni, è protetto dalle leggi sul copyright. Potete leggere quello che potete fare con i nostri modelli alla fine di ogni modello sul nostro sito. |
||||||||||||||||||||||


Con oltre 40 anni di esperienza nel design di modelli di maglia e uncinetto, DROPS Design offre la più estesa collezione di modelli gratuiti su internet - tradotti in 17 lingue. Ad oggi vi possiamo fornire 324 cataloghi e 12290 modelli - 9561 dei quali sono tradotti in Italiano.
Ci stiamo impegnando molto per darvi il meglio che vi possiamo offrire in termini di maglia e uncinetto, ispirazioni e consigli così come filati di grande qualità ad un prezzo incredibile! Volete utilizzare i nostri modelli per qualcosa d'altro oltre al vostro uso personale? Potete leggere tutto ciò che è consentito nel testo sul Copyright in basso su tutte le pagine dei nostri modelli. Buon lavoro!
Lasciare un commento sul modello DROPS 108-47
Noi saremmo felici di ricevere i tuoi commenti e opinioni su questo modello!
Se vuoi fare una domanda, fai per favore attenzione a selezionare la categoria corretta nella casella qui sotto per velocizzare il processo di risposta. I campi richiesti sono indicati da *.