
Categorie popolari
State cercando un filato?


Commenti / Domande (44)
![]() Maristela Machado ha scritto:
Maristela Machado ha scritto:
Oi...o que significa na receita a sequência de números e ms/pts
09.06.2020 - 16:48DROPS Design ha risposto:
A sequência de números é separada por um - e cada número é dado para cada tamanho. Por exemplo: 10-12-14-16-18 ms/pts (números para tamanhos S-M-L-XL-XXL). A abreviatura ms/pts significa malhas ou pontos. Bons tricôs!
10.06.2020 - 23:11
![]() Roselyne De Baets ha scritto:
Roselyne De Baets ha scritto:
Bonjour, j'ai terminé la cape et j'en suis aux emmanchures. Je dois relever 28 mailles là où j'en ai rabattu 21. Dois-je en relever sur les bords de la fente pour faire le compte?
31.05.2019 - 22:18DROPS Design ha risposto:
Bonjour Mme De Baets, les 28 mailles doivent être relevées le long de l'emmanchure - dans les mailles rabattues/montées (en fonction du côté du devant), mais pas sur les bords de la fente. Comme vous allez tricoter ensuite en côtes, vous pouvez relever les mailles un peu plus serrées (entre les mailles) pour en avoir 28, au rang suivant, vous devez encore augmenter pour qu'il y en ait 36. Bon tricot!
03.06.2019 - 08:28Margaet Dawson ha scritto:
Sorry to upset you I am not a scammer but a lady in her 80s trying to understand the pattern. sincerely hope you can help I just love the pattern & being all plain knitting it is good for an old girl. if you can please explain what you mean by (1 repeat = 8 rows at the top & 2 rows at the bottom ) also there are no 2 ** to go back to. Margaret PS don't know what web site you mean not good with computers either.
25.09.2018 - 10:01DROPS Design ha risposto:
Dear Mrs Dawson, you work short rows as follows: 2 rows over 40-49 sts (see size), 2 rows over 60-69 sts, 2 rows over 75-84 sts, 2 rows over all sts = you have worked a total of 8 rows on the bottom of the cape, but only 2 rows on the top of the cape (towards neck). Happy knitting!
25.09.2018 - 10:28
![]() LAURENT ha scritto:
LAURENT ha scritto:
Bonjour, pour les rangs raccourcis, il est noté "tricoter 2 rangs sur toutes les mailles" : est ce qu'il faut tricoter les rangs raccourcis tout les deux rangs, ou faire uniquement deux rangs raccourcis ? Et pour le point mousse : 1 rang = 2 rangs envers ou 1 rang endroit ? Merci pour ces précisions cordialement
20.10.2017 - 07:49DROPS Design ha risposto:
Bonjour Laurent, dans les rangs raccourcis, quand il est indiqué de "tricoter 2 rangs sur toutes les mailles", terminez la série de rangs raccourcis par 2 rangs endroit sur toutes les mailles (= 1 aller et retour) et reprenez la série de *-*, vous avez ainsi tricoté 8 rangs en bas de la cape (= au plus large) et 2 rangs en haut (= au plus étroit). Bon tricot!
20.10.2017 - 09:22
![]() Jane ha scritto:
Jane ha scritto:
I found this pattern and thought i would give it a try, hope i am right that it is knitted sideways. anyway the question i have is i noted you are using 2 different colours of wool and need 350g in brown and 200g in blue. (2nd size) so 550g needed i only want to use one colour so am i right in thinking i will have enough wool with 350g?
07.01.2017 - 13:32DROPS Design ha risposto:
Dear Jane, you will find here how to calculate new amount of yarn if you rather work this with 1 strand yarn group C instead of 2 strands yarn group A. Happy knitting!
09.01.2017 - 09:02
![]() Chevrot ha scritto:
Chevrot ha scritto:
En taille M/L, combien de rang au total se trouve dans le bas de la cape, et dans le haut de la cape ? Merci
07.11.2016 - 19:34DROPS Design ha risposto:
Bonjour Mme Chevrot, vous pouvez calculer le nombre de rangs en haut et en bas de la cape en fonction de votre tension en hauteur sur la base des informations du schéma ou de celles des explications, avec 1 série de rangs raccourcis = 8 rangs en bas et 2 rangs en haut. Bon tricot!
08.11.2016 - 09:17
![]() Carol ha scritto:
Carol ha scritto:
What exactly does it mean to cast on "1 thread of each quality"?
29.09.2016 - 11:16DROPS Design ha risposto:
Dear Carol, the cape is here worked with 1 strand Vivaldi + 1 strand Fabel hold tog as just 1 - so that you will cast on and work with 2 strands of yarn (= 1 of each quality) all the way. Happy knitting!
29.09.2016 - 13:06Norma Lambert ha scritto:
The pattern says that when the piece measures 40cm along bottom edge to bind off for armhole on next row worked from bottom edge towards the top. Is the bottom edge the bottom of the poncho or the bottom of my knitting which is the mid front. I might be able to work out my problem if I know this because I have been taking it from the bottom of my knitting which is the mid front and 40cm is a very long way to make the armhole and makes the garment exceptionally wide.Thanks Norma
28.04.2015 - 13:52DROPS Design ha risposto:
Dear Mrs Lambert, that's correct, the bottom edge is the bottom of the poncho (where you worked more rows). Happy knitting!
28.04.2015 - 14:28
![]() Zwanie Van Der Veen ha scritto:
Zwanie Van Der Veen ha scritto:
Vivaldi nr.04 blauw wil ik graag bestellen. Dit is nu niet mogelijk. Komt vivaldi 04 blauw weer in de collectie ?
27.06.2014 - 16:01DROPS Design ha risposto:
Hoi Zwanie. Helaas hebben wij daar op dit moment geen plannen voor.
01.07.2014 - 14:32
![]() Elma ha scritto:
Elma ha scritto:
Ik zou deze ponco/cape langer maken, ik ben een vrouw van 180cm en dan wordt deze zo kort, hoeveel steken zou ik extra op kunnen zetten en hoe zou ik de verkorten toeren dan kunnen breien met vriendelijke groet, elma mulder
04.01.2014 - 11:42DROPS Design ha risposto:
Hoi Elma. Voor deze soort vragen kan je beter contact opnemen met je verkooppunt. Ze helpen je graag verder met het aanpassen van het patroon.
06.01.2014 - 13:21
|
|
Lady Jessica |
|
 |
 |
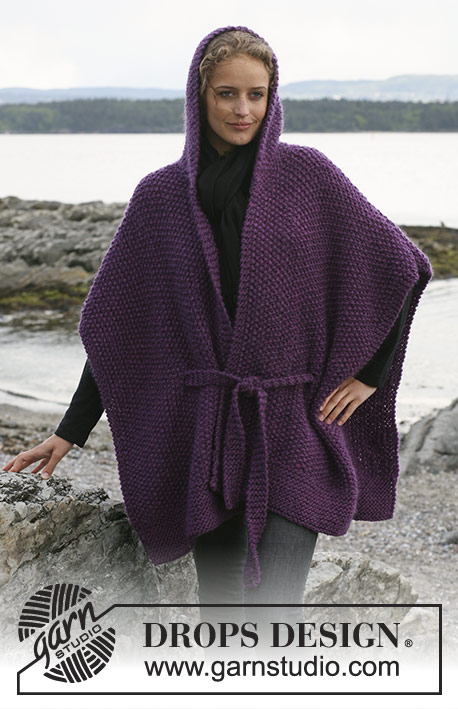
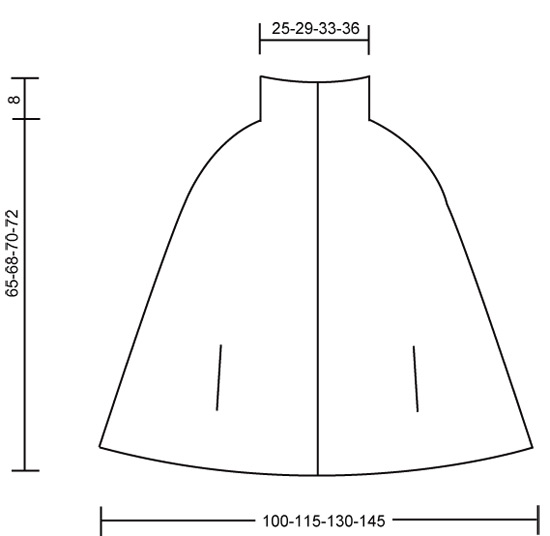
Mantella DROPS lavorata ai ferri in Vivaldi o Brushed Alpaca Silk e Fabel. Taglie: S - XXXL.
DROPS 110-19 |
|
|
M LEGACCIO (avanti e indietro sui f): Lavorare tutti i f a dir. FERRI ACCORCIATI: Per rendere la mantella più ampia nella parte inferiore lavorare a ferri accorciati come segue: * lavorare 40-43-46-49 m, girare il lavoro, tirare il filo e lavorare il f di ritorno, lavorare 60-63-66-69 m, girare il lavoro, tirare il filo e lavorare il f di ritorno, lavorare 75-78-81-84 m, girare il lavoro, tirare il filo e lavorare il f di ritorno, lavorare 2 f su tutte le m *, ripetere *-*. (1 ripetizione = 8 f in basso e 2 f in alto). SUGGERIMENTO PER LE MISURAZIONI: Mettere il lavoro disteso su un piano per tutte le misurazioni. -------------------------------------------------- MANTELLA: Lavorata a m legaccio dal centro davanti al centro davanti, e per avere spazio per tutte le m lavorare avanti e indietro sui f circolari. Avviare 85-88-91-94 m senza stringere sui f circolari n° 7 mm con 1 capo di ogni filato. Lavorare 10 f a m legaccio su tutte le m = bordo davanti. FARE ATTENZIONE ALLA TENSIONE DEL LAVORO! Continuare a m legaccio con ferri accorciati – leggere sopra. Quando il lavoro misura 30-35-40-45 cm lungo il bordo inferiore – leggere il SUGGERIMENTO PER LE MISURAZIONI – intrecciare per lo scalfo sul f successivo lavorato dal bordo inferiore verso l’alto come segue: lavorare 15-17-19-21 m, intrecciare le 20 m successive, lavorare le m rimaste sul f. Sul f di ritorno avviare 20 nuove m sulle 20 m intrecciate. Continuare a m legaccio a ferri accorciati fino a quando il lavoro misura 100-115-130-145 cm lungo il bordo inferiore (= circa 25-29-33-36 cm in cima). Inserire un segnapunti nel lavoro = centro dietro, e ora misurare il lavoro da qui! Continuare come prima. Quando il lavoro misura 70-80-90-100 cm lungo il bordo inferiore dal segnapunti al centro dietro intrecciare per lo scalfo come descritto per l’altro lato. Quando il lavoro misura 96-111-126-141 cm dal segnapunti al centro dietro, interrompere i ferri accorciati e lavorare il bordo davanti su tutte le m come segue: 2 f a m legaccio su tutte le m, sul f successivo intrecciare per 5 asole: lavorare 24-27-30-33 m, intrecciare 2 m, * lavorare 12 m, intrecciare 2 m *, ripetere *-* per un totale di 4 volte, lavorare le 3 m rimaste. Sul f di ritorno avviare 2 nuove m sulle m intrecciate. Ora lavorare 6 f a m legaccio su tutte le m e intrecciare senza stringere. BORDO DELLO SCALFO: Lavorare un bordo lungo entrambi gli scalfi. Riprendere le m nel f di avvio del 1° scalfo, e riprendere le m nel f di chiusura sull’altro scalfo. Riprendere 28 m lungo lo scalfo con i f n° 4 mm con 2 capi di Fabel. Lavorare 1 f dir dal rovescio del lavoro, ALLO STESSO TEMPO aumentare in modo uniforme a 36 m. Continuare a coste, 2 m dir/2 m rov con 1 m a m legaccio a ogni lago fino a quando il bordo misura 4 cm e intrecciare a coste. Cucire il bordo ai lato. Ripetere lungo l’altra apertura. SCOLLATURA: Riprendere 1 m circa a f alterni con i f n° 4 mm con 2 capi di Fabel in cima alla mantella. Lavorare 1 f dir, ALLO STESSO TEMPO aumentare in modo uniforme a 92-100-108-116 m. Continuare a coste, 2 m dir/2 m rov con 5 m a m legaccio a ogni lato verso il centro davanti. ALLO STESSO TEMPO dopo 4 cm intrecciare per 1 asola in linea con le altre sul bordo davanti – intrecciare la 3° e la 4° m dal centro davanti e avviare 2 nuove m sul f di ritorno. Quando la scollatura misura 7 cm aumentare tutte le sezioni con 2 m rov a 3 m rov. Quando le coste misurano 15 cm, lavorare 2 f dir su tutte le m e intrecciare. Piegare la scollatura verso il diritto del lavoro quando si indossa la mantella. CONFEZIONE: Attaccare i bottoni. |
|
 |
|
Avete terminato questo modello?Allora taggate le vostre foto con #dropspattern o inviatele alla #dropsfan gallery. Avete bisogno di aiuto con questo modello?Troverete 15 video tutorial, una sezione per i commenti/domande e molto altro guardando il modello su www.garnstudio.com © 1982-2026 DROPS Design A/S. Ci riserviamo tutti i diritti. Questo documento, compreso tutte le sue sotto-sezioni, è protetto dalle leggi sul copyright. Potete leggere quello che potete fare con i nostri modelli alla fine di ogni modello sul nostro sito. |
|


Con oltre 40 anni di esperienza nel design di modelli di maglia e uncinetto, DROPS Design offre la più estesa collezione di modelli gratuiti su internet - tradotti in 17 lingue. Ad oggi vi possiamo fornire 324 cataloghi e 12290 modelli - 9561 dei quali sono tradotti in Italiano.
Ci stiamo impegnando molto per darvi il meglio che vi possiamo offrire in termini di maglia e uncinetto, ispirazioni e consigli così come filati di grande qualità ad un prezzo incredibile! Volete utilizzare i nostri modelli per qualcosa d'altro oltre al vostro uso personale? Potete leggere tutto ciò che è consentito nel testo sul Copyright in basso su tutte le pagine dei nostri modelli. Buon lavoro!
Lasciare un commento sul modello DROPS 110-19
Noi saremmo felici di ricevere i tuoi commenti e opinioni su questo modello!
Se vuoi fare una domanda, fai per favore attenzione a selezionare la categoria corretta nella casella qui sotto per velocizzare il processo di risposta. I campi richiesti sono indicati da *.