
Categorie popolari
State cercando un filato?


Commenti / Domande (238)
![]() Judith ha scritto:
Judith ha scritto:
Last question I hope- on row where all sts are knit we are to pearl 20? InnerMost in circle. When does this occur?
13.09.2014 - 03:33
![]() Judith ha scritto:
Judith ha scritto:
Are the short rows 3 and 4?
11.09.2014 - 03:26
![]() Judith ha scritto:
Judith ha scritto:
Where is reduction of stitches-does this shift pattern?
10.09.2014 - 03:06DROPS Design ha risposto:
Dear Judith, you reduce number of sts worked when working short rows. Pattern won't be shifted, but you will then work more rows on the outer edge of circle and less on the middle (inwards) of the circle to get the correct shape. Happy knitting!
10.09.2014 - 09:31
![]() Judy ha scritto:
Judy ha scritto:
So the pattern shows two rows of right side?
09.09.2014 - 23:06DROPS Design ha risposto:
Dear Judy, in diagrams, 1 square = 1 st x 1 row, so that you see the 4 first rows over the first 16-20 sts + 2 rows (1 row from RS + 1 row from WS) over the last sts. Happy knitting!
10.09.2014 - 09:32
![]() Judy ha scritto:
Judy ha scritto:
Can't get started. Does the printed pattern show two rows? Which end do I decrease at.
09.09.2014 - 03:13DROPS Design ha risposto:
Dear Judy, start the pattern on the bottom corner on the right side from RS (with the 18-16-20-20 sts for edge) towards the left side (towards middle of circle), and from WS work from the mid of circle towards the outer edge. Pattern is a 4 rows repeat on the first sts from RS, and a 2 rows repeat on the other sts. Reduce the number of sts worked every time you work row 1 (from RS). Happy knitting!
09.09.2014 - 09:06
![]() Hanne Korsbæk ha scritto:
Hanne Korsbæk ha scritto:
Når man vender for 24.gang (svare til 2 pind i jeres forklaring) på pind nr.94 få jeg en vending efter 16 masker. Skal jeg da skrikke pind 95 og 96 som 3.og 4. pind jf. jeres forklaring? Da får jeg jo 2 vendinger i samme mellemrum og huldet bliver stort. Kan dette passe?
05.09.2014 - 20:53
![]() Tina ha scritto:
Tina ha scritto:
Teil 2 d. Frage: Bedeutet das, dass ich nun keine verkürzten Reihen mehr stricken soll? Also geradeaus in kompletten Reihen nach oben? Aber dann würde es sicher kein Kreis, oder? Ab wann soll ich dann wieder verkürzte Reihen stricken? Beginne ich wieder genau von vorn, also wieder 2 M kürzer (10 mal), 4 M weniger (9 mal) usw.? Vielen Dank schon mal!
01.09.2014 - 21:54DROPS Design ha risposto:
Genau, wenn Sie die verkürzten R 1x wie beschrieben gestrickt haben und nur noch 16 M ganz außen übrig sind, beginnen Sie mit den verkürzten R wieder von vorn, d.h. Sie wiederholen wie zuvor die 1.-4. R. wie beschrieben. Beachten Sie, wenn Sie wieder über alle M stricken, den Stricktipp 2.
01.09.2014 - 22:57
![]() Tina ha scritto:
Tina ha scritto:
Hallo! Ich bin jetzt soweit, dass ich die verkürzten Reihen soweit gestrickt habe "bis aussen am Kreis nur noch 16 M. übrig sind. Jetzt wieder über alle M. stricken." Teil 2 d. Frage folgt
01.09.2014 - 21:52Michelle ha scritto:
Yes, this part I can totally understand. The problem happened when I was making the last st reduce by 8 stitches ( starting the 45th row), I was turning at the outmost 18 sts, where I just made a turn for last 3rd/ 4th rows. And if I do make a turn here, knit back the remained 18 sts (the 46th row), and knit 47th & 48th (3&4 on M.1) rows to finish this last round of short rows, the hole between st 18th and 19th would be quite big. How can I fix it?
20.01.2014 - 17:09DROPS Design ha risposto:
Dear Michelle, after reducing number of sts to the outermost 18 sts, just work 2 rows on these and start again short rows over all sts from beg. Happy knitting!
21.01.2014 - 08:55Michelle ha scritto:
Hi, I'm at the end of making the first piece of circle, and I found that when I made the 5th 8st-reduce turning, I was actually turning at the 18 outermost st of circle, where I just made a 3rd/ 4th turning last round. And if I continued to work with chart M.1, I was actually making 3 consecutive turns here and it's becoming a really huge hole. Was I counting incorrectly? How do I do to prevent from a huge hole here?
20.01.2014 - 05:24DROPS Design ha risposto:
Dear Michelle, you work M.1 at the same time as short rows, so after first 4 rows, repeat rows 1 & 2 with 2 sts less, then repeat rows 3 & 4 on 18 sts, ie rows 5&6 are worked on 100 sts, and 7&8 on 18 sts, and so on. Happy knitting!
20.01.2014 - 10:48
|
||||||||||||||||
Blue Moon |
||||||||||||||||
 |
 |
|||||||||||||||
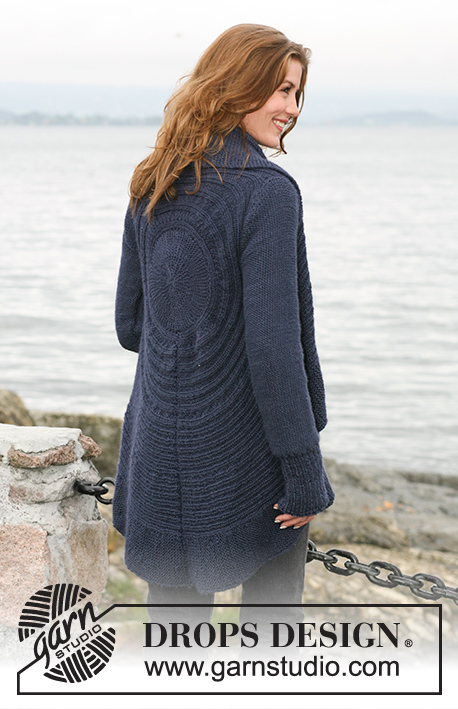
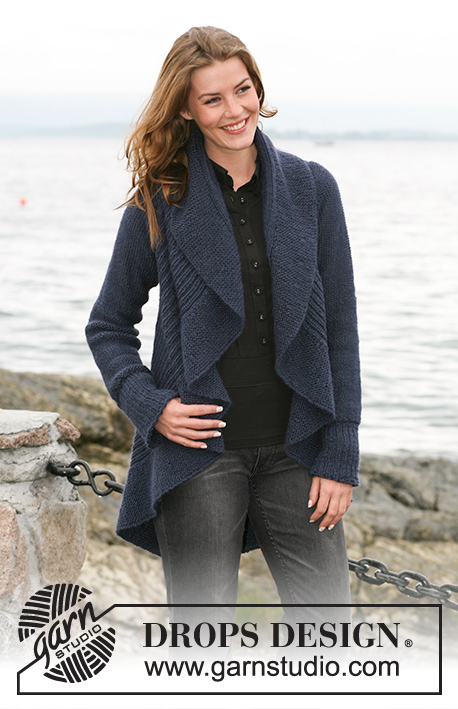
Giacchino circolare DROPS in "Silke Alpaca" con motivo a tessuto. Taglia: dalla S alla XXXL
DROPS 102-6 |
||||||||||||||||
|
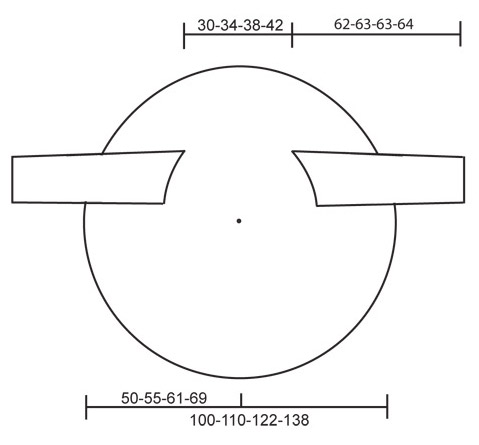
Campione: 17 m. x 22 f. a m. rasata = 10 x 10 cm MOTIVO: vedere il diagramma M.1. I diagrammi sono visti dal diritto del lavoro. NOTA: ogni taglia ha il suo diagramma. FERRI ACCORCIATI: lavorare a f. accorciati per ottenere la forma circolare del lavoro come segue: 1° / 2° f.: 102-112-124-140 m. dir., girare il lavoro e lavorare il f. di ritorno. 3° / 4° f.: lavorare avanti e indietro sulle prime 18-16-20-20 m. sul f. (queste m. = esterno del cerchio) – leggere il suggerimento per il lavoro 1 sotto. Ripetere i ferri 1 - 4, ma a ogni ripetizione del 1° / 2° f., lavorare 2 m in meno prima di girare il lavoro – ripeterlo per 10-10-12-12 volte in totale. Poi, lavorare 4 maglie in meno prima di girare il lavoro – ripeterlo 6-9-8-12 volte in totale. Lavorare poi 8 m in meno prima di girare il lavoro – ripetere 5-5-6-6 volte in totale, finché non ce ne siano soltanto le 18-16-20-20 m. più esterne sul cerchio. Iniziare ancora da capo su tutte le m. – leggere il suggerimento per il lavoro 2 sotto.  SUGGERIMENTO per il lavoro 1: Quando girate il lavoro passare la 1° m. a dir. senza lavorarla e tirate il filo stretto prima di continuare a lavorare. Viene fatto per evitare buchi quando girate. Non è applicato alle 20-20-24-24 m. più interne del cerchio – quando il lavoro viene girato lavorare su tutte le m. come al solito. SUGGERIMENTO per il lavoro 2: Sui ferri dove sono lavorate tutte le m., lavorare a rov. le 20-20-24-24 m. più interne del cerchio (visto sul diritto del lavoro). Poi continuare lo schema M.1 come prima. SUGGERIMENTO per le misurazioni: Tutte le misurazioni sul cerchio vengono fatte con il lavoro disteso. Non misurare la diagonale! Le misure seguono la curva fino alla 63°-69°-73°-81° m. CERCHIO: Lavorare avanti e indietro sui ferri per avere spazio per tutte le m. Avviare 102-112-124-140 m. con i ferri circolari misura 4,5 mm con il filato Silke Alpaca. Inserire un segnapunti dopo 63-69-73-81 m., fare tutte le misurazioni da questo punto. Lavorare il diagramma M.1 (vedere il diagramma per la vostra taglia) da destra a sinistra (cioè dall’esterno verso l’interno sul cerchio). 1° f. = diritto del lavoro. Allo stesso tempo, insieme al diagramma M.1 lavorare a f. accorciati – leggere la spiegazione sopra – per modellare il cerchio. Quando il lavoro misura 37-40-49-57 cm dal segnapunti – leggere il suggerimento per le misurazioni – lavorare gli scalfi. SCALFO: trasferire le 63-69-73-81 m. più esterne su un altro ferro misura 4,5 mm (ferro circolare per avere spazio per tutte le m.). Continuare e intrecciare le 2 m. successive (= scalfo). Inserire 1 segnapunti tra le 2 m. intrecciate. Lasciare le m. rimaste sul f. Continuare, lavorare le 2 parti (m. prima e dopo lo scalfo) in modo separato, ma lavorarle contemporaneamente su 2 ferri separati con gomitoli separati. Viene fatto in modo che i ferri accorciati siano corretti su entrambi i lati dello scalfo. Continuare con il motivo e i ferri accorciati come prima. Quando lo scalfo misura 18-21-23-25 cm avviare 2 nuove m. sullo scalfo (cioè tra le 2 parti). Continuare, trasferire tutte le m. su un ferro = 102-112-124-140 m. Inserire 1 segnapunti dopo 63-69-73-81 m. Continuare, misurare il lavoro da questo punto.Ora lavorare il diagramma M.1 e i ferri accorciati su tutte le m. Continuare in questo modo fino a quando il lavoro misura circa 15-17-19-21 cm, dovrebbe essere metà del cerchio. Continuare fino a quando il lavoro misura circa 30-34-38-42 cm dal segnapunti – leggere il suggerimento per il lavoro. Ora fare gli scalfi nello stesso modo. Quando tutte le m. sono ancora sullo stesso f. di lavoro inserire 1 segnapunti dopo 63-69-73-81 m. Continuare a misurare da qui. Continuare con M.1 e i ferri accorciati fino a quando il lavoro misura circa 37-40-49-57 cm dal segnapunti (aggiustarlo a un’intera ripetizione del motivo a f. accorciati). Intrecciare senza stringere. MANICA: Lavorata avanti e indietro con i ferri circolari. Avviare 56-59-65-68 m. (compresa 1 m. di vivagno da ogni lato) con i ferri misura 4,5 mm con il filato Silke Alpaca. Lavorare 1 f. a rov. dal rovescio del lavoro. Continuare a coste 2 m. dir./1 m. rov. e 1 m. di vivagno per ogni lato. Quando le coste misurano 13-13-14-14 cm lavorare 1 f. a dir. dal rovescio del lavoro e allo stesso tempo distribuire 10-11-13-14 diminuzioni in modo uniforme = 46-48-52-54 m. Continuare a m. rasata con il rovescio del lavoro in fuori fino alla lunghezza finale. Quando il lavoro misura 16 cm aumentare 1 m. da ogni lato ogni 9-4,5-3,5-3 cm 5-9-11-13 volte in totale = 56-66-74-80 m. Quando il lavoro misura 56 cm intrecciare per modellare il sopra della manica da ogni lato a f. alterni: 4 m. 1-2-2-2 volte. Continuare, intrecciare 2 m. da ogni lato fino a quando il lavoro misura circa 61-62-62-63 cm. Poi intrecciare 4 m. 1 volta da ogni lato. Il lavoro misura circa 62-63-63-64 cm. Intrecciare le rimanenti m. CONFEZIONE: Cucire il cerchio nel bordo più esterno delle m. di avvio e di chiusura. Attaccare le maniche in modo che le cuciture si incontrino al centro del segnapunti posizionato in basso sullo scalfo e il centro dell’alto della manica incontri il segnapunti posizionato sull’alto dello scalfo. Cucire i margini delle maniche. |
||||||||||||||||
Spiegazioni del diagramma |
||||||||||||||||
|
||||||||||||||||
 |
||||||||||||||||
 |
||||||||||||||||
Avete terminato questo modello?Allora taggate le vostre foto con #dropspattern o inviatele alla #dropsfan gallery. Avete bisogno di aiuto con questo modello?Troverete 15 video tutorial, una sezione per i commenti/domande e molto altro guardando il modello su www.garnstudio.com © 1982-2026 DROPS Design A/S. Ci riserviamo tutti i diritti. Questo documento, compreso tutte le sue sotto-sezioni, è protetto dalle leggi sul copyright. Potete leggere quello che potete fare con i nostri modelli alla fine di ogni modello sul nostro sito. |
||||||||||||||||


Con oltre 40 anni di esperienza nel design di modelli di maglia e uncinetto, DROPS Design offre la più estesa collezione di modelli gratuiti su internet - tradotti in 17 lingue. Ad oggi vi possiamo fornire 324 cataloghi e 12245 modelli - 9515 dei quali sono tradotti in Italiano.
Ci stiamo impegnando molto per darvi il meglio che vi possiamo offrire in termini di maglia e uncinetto, ispirazioni e consigli così come filati di grande qualità ad un prezzo incredibile! Volete utilizzare i nostri modelli per qualcosa d'altro oltre al vostro uso personale? Potete leggere tutto ciò che è consentito nel testo sul Copyright in basso su tutte le pagine dei nostri modelli. Buon lavoro!
Lasciare un commento sul modello DROPS 102-6
Noi saremmo felici di ricevere i tuoi commenti e opinioni su questo modello!
Se vuoi fare una domanda, fai per favore attenzione a selezionare la categoria corretta nella casella qui sotto per velocizzare il processo di risposta. I campi richiesti sono indicati da *.