
Categorie popolari
State cercando un filato?


Commenti / Domande (238)
![]() Andrea ha scritto:
Andrea ha scritto:
Hallo, eine Frage: Wenn ich mit den verkürzten Reihen fertig bin, muss ich dann direkt wieder über alle 124M (Gr.xxl) stricken, oder nach dem selben Schema wie beim verkürzen die Reihen wieder verlängern? LG
23.02.2026 - 16:37DROPS Design ha risposto:
Liebe Andrea, Sie beginnen erneut mit den verkürzten Reihen (die ersten 2 Runden stricken Sie über alle Maschen) , um den Kreis weiter zu erweitern. Viel Spaß beim Stricken!
24.02.2026 - 09:02
![]() Lotta ha scritto:
Lotta ha scritto:
Äh glöm min fråga, repar upp & använder ett för mig mer begripligt mönster.
27.11.2025 - 17:23
![]() Lotta ha scritto:
Lotta ha scritto:
Hej igen! Storlek XL/XXL totalt antal maskor 124 st och märktråden sitter på maska 73. Just nu är stickningen bananformad, maska 73 sitter närmare innercirkeln och fattar att det är från den jag ska mäta. Men hur ska jag mäta, mot vad? Ska fortsätta med att minska med 8 maskor för första gången. Vi hörs!
25.11.2025 - 16:04DROPS Design ha risposto:
Hei Lotta. Da har vi "glemt" ditt spørsmål og ønsker deg lykke til på ditt neste prosjekt :) mvh DROPS Design
01.12.2025 - 11:27
![]() Lotta ha scritto:
Lotta ha scritto:
Begriper inte hur jag ska mäta från märktråden för ärmhål!? Skickar gärna en bild men det går ju inte i detta formulär. Kontakta gärna mig via e-post. Tack på förhand!
24.11.2025 - 18:29DROPS Design ha risposto:
Hej Lotta, skriv hvilken størrelse du strikker. Skriv hvor mange masker og cm du har og skriv den sætning du ikke forstår, så skal vi prøve at hjælpe dig her :)
25.11.2025 - 13:58
![]() Lisa ha scritto:
Lisa ha scritto:
Hi, Just trying to clarify; on the second row, do I leave 2 stitches on needle and turn, work 14 stitches then turn and work 16 stitches? Then repeat row 1 and do I leave 4 stitches unworked or just 2 again?
11.11.2025 - 19:16
![]() Lisa ha scritto:
Lisa ha scritto:
Pattern instructions far too difficult. I love the jacket and I love a challenge but this? What happened to row 1 all the way through to last row with specific instructions such as ask or dec or s1k1. Etc? I give up😞
27.07.2025 - 20:09
![]() Lisa ha scritto:
Lisa ha scritto:
So, am I leaving the the uncorked stitches on the needle or just not knitting them?
27.07.2025 - 19:38DROPS Design ha risposto:
Dear Lisa, work the first 2 rows over all 112 stitches. In the 3rd row work only over the first 16 sts of the row. Now, start working the next row over all stitches but turn when you have worked 110 stitches. Work the next row back over all stitches, but turn when you have worked 108; so you work 2 less stitches on each side. Repeat rows 3 and 4 exactly as before. Continue working 2 less stitches on each side on the "long" rows 9 more times, then 4 less stitches 9 times and 8 less stitches 5 times. The stitches are simply left unworked until we "start at the beginning" the short rows technique. Happy knitting!
27.07.2025 - 20:36
![]() Lisa ha scritto:
Lisa ha scritto:
Where do I start the pattern? At the top of page or where it says circle? Also, what does it mean under the short row section to start again from beginning over all stitches? How many sections is this piece? I’m reading cast on 112 sts. Twice and under short row section start over from beginning? So, cast on another 112sts?
27.07.2025 - 19:06DROPS Design ha risposto:
Dear Lisa, yes, the written instructions start at "Circle"; all of the instructions above are tips for when you are crochetting. In the short rows you work by turning the piece (but not decreasing) in order to get the correct circle shape. After reaching the remaining 18-16-20-20 outermost sts of circle, you will now work over all stitches again (not the pattern from the beginning); they were not decreased, just left behind. You work a single circle: you cast on 112 stitches, over which you will work the chart and short rows. Then you work the armholes, and continue working the other half-circle on the other side. Then you work the sleeves. Happy knitting!
27.07.2025 - 19:25
![]() Lisa ha scritto:
Lisa ha scritto:
Is there a row by row instruction for this pattern (ie, row 1, row 2 etc)? I find this really confusing
27.07.2025 - 15:44DROPS Design ha risposto:
Dear Lisa, this is the only version of the pattern available, with both charts and written instructions. If you have any doubts as you read and work the pattern you can write us a comment here and we will try to answer all of your questions as clearly as possible. Happy knitting!
27.07.2025 - 18:59
![]() Patricia Alexandra Caruso Reis ha scritto:
Patricia Alexandra Caruso Reis ha scritto:
Caros, os diagramas M1 já não estão nítidos. Existe alguma nova versão desses diagramas que possam ser melhor vistos? Está tudo opaco, talvez pelo tempo. Grata
07.06.2024 - 03:36DROPS Design ha risposto:
Bom dia, Vamos comunicar à equipa de web design. Obrigado!
07.06.2024 - 09:17
|
||||||||||||||||
Blue Moon |
||||||||||||||||
 |
 |
|||||||||||||||
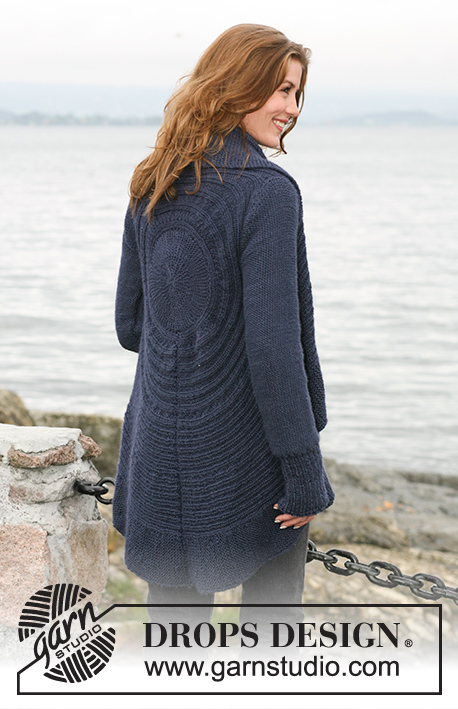
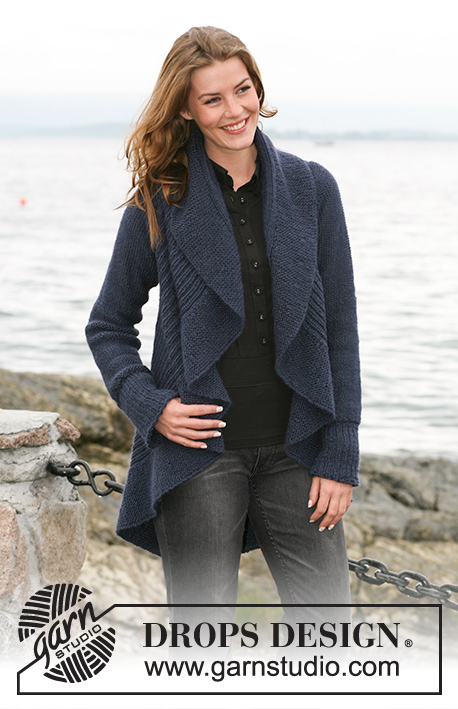
Giacchino circolare DROPS in "Silke Alpaca" con motivo a tessuto. Taglia: dalla S alla XXXL
DROPS 102-6 |
||||||||||||||||
|
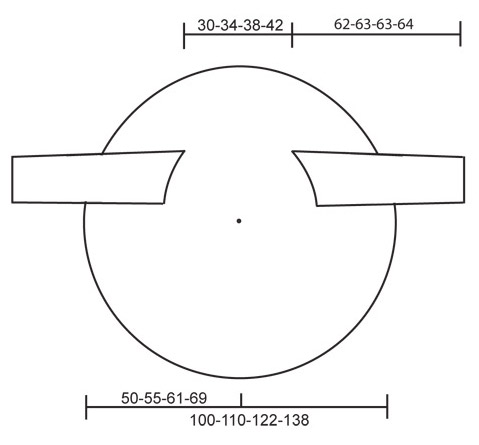
Campione: 17 m. x 22 f. a m. rasata = 10 x 10 cm MOTIVO: vedere il diagramma M.1. I diagrammi sono visti dal diritto del lavoro. NOTA: ogni taglia ha il suo diagramma. FERRI ACCORCIATI: lavorare a f. accorciati per ottenere la forma circolare del lavoro come segue: 1° / 2° f.: 102-112-124-140 m. dir., girare il lavoro e lavorare il f. di ritorno. 3° / 4° f.: lavorare avanti e indietro sulle prime 18-16-20-20 m. sul f. (queste m. = esterno del cerchio) – leggere il suggerimento per il lavoro 1 sotto. Ripetere i ferri 1 - 4, ma a ogni ripetizione del 1° / 2° f., lavorare 2 m in meno prima di girare il lavoro – ripeterlo per 10-10-12-12 volte in totale. Poi, lavorare 4 maglie in meno prima di girare il lavoro – ripeterlo 6-9-8-12 volte in totale. Lavorare poi 8 m in meno prima di girare il lavoro – ripetere 5-5-6-6 volte in totale, finché non ce ne siano soltanto le 18-16-20-20 m. più esterne sul cerchio. Iniziare ancora da capo su tutte le m. – leggere il suggerimento per il lavoro 2 sotto.  SUGGERIMENTO per il lavoro 1: Quando girate il lavoro passare la 1° m. a dir. senza lavorarla e tirate il filo stretto prima di continuare a lavorare. Viene fatto per evitare buchi quando girate. Non è applicato alle 20-20-24-24 m. più interne del cerchio – quando il lavoro viene girato lavorare su tutte le m. come al solito. SUGGERIMENTO per il lavoro 2: Sui ferri dove sono lavorate tutte le m., lavorare a rov. le 20-20-24-24 m. più interne del cerchio (visto sul diritto del lavoro). Poi continuare lo schema M.1 come prima. SUGGERIMENTO per le misurazioni: Tutte le misurazioni sul cerchio vengono fatte con il lavoro disteso. Non misurare la diagonale! Le misure seguono la curva fino alla 63°-69°-73°-81° m. CERCHIO: Lavorare avanti e indietro sui ferri per avere spazio per tutte le m. Avviare 102-112-124-140 m. con i ferri circolari misura 4,5 mm con il filato Silke Alpaca. Inserire un segnapunti dopo 63-69-73-81 m., fare tutte le misurazioni da questo punto. Lavorare il diagramma M.1 (vedere il diagramma per la vostra taglia) da destra a sinistra (cioè dall’esterno verso l’interno sul cerchio). 1° f. = diritto del lavoro. Allo stesso tempo, insieme al diagramma M.1 lavorare a f. accorciati – leggere la spiegazione sopra – per modellare il cerchio. Quando il lavoro misura 37-40-49-57 cm dal segnapunti – leggere il suggerimento per le misurazioni – lavorare gli scalfi. SCALFO: trasferire le 63-69-73-81 m. più esterne su un altro ferro misura 4,5 mm (ferro circolare per avere spazio per tutte le m.). Continuare e intrecciare le 2 m. successive (= scalfo). Inserire 1 segnapunti tra le 2 m. intrecciate. Lasciare le m. rimaste sul f. Continuare, lavorare le 2 parti (m. prima e dopo lo scalfo) in modo separato, ma lavorarle contemporaneamente su 2 ferri separati con gomitoli separati. Viene fatto in modo che i ferri accorciati siano corretti su entrambi i lati dello scalfo. Continuare con il motivo e i ferri accorciati come prima. Quando lo scalfo misura 18-21-23-25 cm avviare 2 nuove m. sullo scalfo (cioè tra le 2 parti). Continuare, trasferire tutte le m. su un ferro = 102-112-124-140 m. Inserire 1 segnapunti dopo 63-69-73-81 m. Continuare, misurare il lavoro da questo punto.Ora lavorare il diagramma M.1 e i ferri accorciati su tutte le m. Continuare in questo modo fino a quando il lavoro misura circa 15-17-19-21 cm, dovrebbe essere metà del cerchio. Continuare fino a quando il lavoro misura circa 30-34-38-42 cm dal segnapunti – leggere il suggerimento per il lavoro. Ora fare gli scalfi nello stesso modo. Quando tutte le m. sono ancora sullo stesso f. di lavoro inserire 1 segnapunti dopo 63-69-73-81 m. Continuare a misurare da qui. Continuare con M.1 e i ferri accorciati fino a quando il lavoro misura circa 37-40-49-57 cm dal segnapunti (aggiustarlo a un’intera ripetizione del motivo a f. accorciati). Intrecciare senza stringere. MANICA: Lavorata avanti e indietro con i ferri circolari. Avviare 56-59-65-68 m. (compresa 1 m. di vivagno da ogni lato) con i ferri misura 4,5 mm con il filato Silke Alpaca. Lavorare 1 f. a rov. dal rovescio del lavoro. Continuare a coste 2 m. dir./1 m. rov. e 1 m. di vivagno per ogni lato. Quando le coste misurano 13-13-14-14 cm lavorare 1 f. a dir. dal rovescio del lavoro e allo stesso tempo distribuire 10-11-13-14 diminuzioni in modo uniforme = 46-48-52-54 m. Continuare a m. rasata con il rovescio del lavoro in fuori fino alla lunghezza finale. Quando il lavoro misura 16 cm aumentare 1 m. da ogni lato ogni 9-4,5-3,5-3 cm 5-9-11-13 volte in totale = 56-66-74-80 m. Quando il lavoro misura 56 cm intrecciare per modellare il sopra della manica da ogni lato a f. alterni: 4 m. 1-2-2-2 volte. Continuare, intrecciare 2 m. da ogni lato fino a quando il lavoro misura circa 61-62-62-63 cm. Poi intrecciare 4 m. 1 volta da ogni lato. Il lavoro misura circa 62-63-63-64 cm. Intrecciare le rimanenti m. CONFEZIONE: Cucire il cerchio nel bordo più esterno delle m. di avvio e di chiusura. Attaccare le maniche in modo che le cuciture si incontrino al centro del segnapunti posizionato in basso sullo scalfo e il centro dell’alto della manica incontri il segnapunti posizionato sull’alto dello scalfo. Cucire i margini delle maniche. |
||||||||||||||||
Spiegazioni del diagramma |
||||||||||||||||
|
||||||||||||||||
 |
||||||||||||||||
 |
||||||||||||||||
Avete terminato questo modello?Allora taggate le vostre foto con #dropspattern o inviatele alla #dropsfan gallery. Avete bisogno di aiuto con questo modello?Troverete 15 video tutorial, una sezione per i commenti/domande e molto altro guardando il modello su www.garnstudio.com © 1982-2026 DROPS Design A/S. Ci riserviamo tutti i diritti. Questo documento, compreso tutte le sue sotto-sezioni, è protetto dalle leggi sul copyright. Potete leggere quello che potete fare con i nostri modelli alla fine di ogni modello sul nostro sito. |
||||||||||||||||


Con oltre 40 anni di esperienza nel design di modelli di maglia e uncinetto, DROPS Design offre la più estesa collezione di modelli gratuiti su internet - tradotti in 17 lingue. Ad oggi vi possiamo fornire 324 cataloghi e 12245 modelli - 9515 dei quali sono tradotti in Italiano.
Ci stiamo impegnando molto per darvi il meglio che vi possiamo offrire in termini di maglia e uncinetto, ispirazioni e consigli così come filati di grande qualità ad un prezzo incredibile! Volete utilizzare i nostri modelli per qualcosa d'altro oltre al vostro uso personale? Potete leggere tutto ciò che è consentito nel testo sul Copyright in basso su tutte le pagine dei nostri modelli. Buon lavoro!
Lasciare un commento sul modello DROPS 102-6
Noi saremmo felici di ricevere i tuoi commenti e opinioni su questo modello!
Se vuoi fare una domanda, fai per favore attenzione a selezionare la categoria corretta nella casella qui sotto per velocizzare il processo di risposta. I campi richiesti sono indicati da *.