
Categorie popolari
State cercando un filato?


Commenti / Domande (29)
![]() Uyter Hoeven Nancy ha scritto:
Uyter Hoeven Nancy ha scritto:
Hallo, Heeft u ook het patroon om met 2 breinaalden te breien. Met een rondbreinaald kan ik niet overweg. Bedankt alvast. Groetjes, Nancy
03.11.2019 - 10:53DROPS Design ha risposto:
Hi :) Please send us your question in English :)
05.11.2019 - 09:44
![]() Marilyn ha scritto:
Marilyn ha scritto:
Appeals that the correction for the back (size 9/10) has not been corrected as far as I can see. However, there appears to be a second error, this time for the instructions for the left side ( which will affect the right one as well). Your instructions - "Continue with Wide garter sts over 14-16-17-17-19 sts on each side". I believe you mean - ... on the armhole side.
21.09.2019 - 19:56
![]() Marilyn ha scritto:
Marilyn ha scritto:
I'm about to finish the back (Havsbris - size 9/10). The back has 84 sts. If I bind off 26 in the center, I will have 58/2 = 29 sts left for each shoulder minus 2 to shape the neckline leaving 27 nog 25 as indicated in the pattern. To get 27 for each shoulder before shaping, I would need to bind off 30 sts in the middle for the neckline or 27 not 25 for the shoulder (which also means changing the 2 front panels. What's the correct number of sts for the center bindoff and the shoulders. Thanks
20.09.2019 - 00:04DROPS Design ha risposto:
Dear Marilyn, there is actually a mistake in the English pattern, you are supposed to decrease 1 stitch for neck a total of 4 times (not a total of 2 times), pattern will be edited asap, thanks for your feedback. Happy knitting!
20.09.2019 - 08:56
![]() Marilyn ha scritto:
Marilyn ha scritto:
Thanks for the quick reply, however, reading charts is not a problem. I've made a number of sweaters using charts much more complicated than this one. Since my granddaughter is very slender, I already dropped down one size to 9/10 and am using a smaller needle, but am puzzled why you don't adjust the pattern to reduce the sts increase from 44, the largest increase for any size; does it really need more than 2 extra wave patterns, especially since Wide garter stitch is used as a fill in anyway.
09.09.2019 - 18:06DROPS Design ha risposto:
Dear Marilyn, you need more stitches in width when working the wave pattern than when working garter stitch for the same width, that's the reason why you have to increase 44 sts in the 3rd size. Happy knitting!
10.09.2019 - 09:48
![]() Marilyn ha scritto:
Marilyn ha scritto:
In the comments section, the Drops Design response to a question from Bernadett 03.04.2016 - 16:49, mentions in " newer instructions, we mention this in each case." How do I find the newer version of the instructions?
09.09.2019 - 15:49DROPS Design ha risposto:
Dear Marilyn, this was meant in the lattest uploaded patterns - This might help you to understand how to read knitting diagrams. Happy knitting!
09.09.2019 - 15:53Bernadett ha scritto:
Hallo! Bis zu den Abnahmen an dem linken Vorderteil hat alles bestens funktioniert. Jetzt klappt aber die Abnahme im Wellenmuster einfach nirgendwie. (In jeder 2. Reihe soll abgenommen werden, aber spätestens bei der 4. Reihe kommt ein Muster mit Zusammenstricken und Umschlägen bei einer Maschenzahl, die nicht mehr durch 20 teilbar ist (Größe 9/10).) Meine Drops-Händlerin kann mir auch nicht weiterhelfen. Vielen Dank im Voraus!
03.04.2016 - 16:49DROPS Design ha risposto:
Liebe Bernadette, die Maschen, die nicht mehr ins Muster aufgehen, stricken Sie glatt rechts (in den neueren Anleitungen erwähnen wir das jeweils so). Achten Sie darauf, dass Sie nicht innerhalb des Mustersatzes aufhören und dann durch die Umschläge die Maschenzahl nicht mehr stimmt.
04.04.2016 - 10:01
![]() Sija ha scritto:
Sija ha scritto:
Ik heb precies volgens patroon gebreid, maat 9/10 jaar, maar kom een bol te kort. Dit is bij een ander patroon ook het geval! Balen, 2x verzendkosten...
01.04.2016 - 20:25
![]() Stefanie ha scritto:
Stefanie ha scritto:
Hallo, :-) ich verstehe einfach nicht, wie das breite Krausrippenmuster gemeint ist. Re auf re , re auf li...das ist okay, aber wie komme ich dann zu re auf re, wenn ich zurückstricke.? das ist doch dann re auf li. Oder stehe ich ganz auf dem Schlauch? Danke für eine Antwort. Vielleicht können Sie das Muster für mich so beschreiben, wie es von der Vorderseite aus betrachtet, aussieht. Auf dem Bild ist es nicht so gut zu erkennen. VG, Stefanie
10.06.2014 - 17:15DROPS Design ha risposto:
Liebe Stefanie, das Muster ist so gemeint: 1. R (= Hin-R): re stricken, 2. R (= Rück-R): re stricken, 3. R (= Hin-R): re stricken, 4. R (= Rück-R): li stricken. Gutes Gelingen!
13.06.2014 - 15:17
![]() Stien ha scritto:
Stien ha scritto:
Ik brei liever met 2 pennen en geen rondbrei naalden luk niet
15.03.2014 - 14:51
![]() Suzanne ha scritto:
Suzanne ha scritto:
Bonjour, J'ai trouvé une erreur pour la taille 7/8 ans : le M2 ne correspond pas mais le M1 (17 m) 3 fois pour retrouver la totalité des mailles.
17.01.2014 - 16:42DROPS Design ha risposto:
Bonjour Suzanne, c'est tout à fait exact, la taille 7/8 ans a été corrigée, merci. Bon tricot!
18.01.2014 - 09:59
|
|||||||||||||
Havsbris#havsbriscardigan |
|||||||||||||
 |
 |
||||||||||||
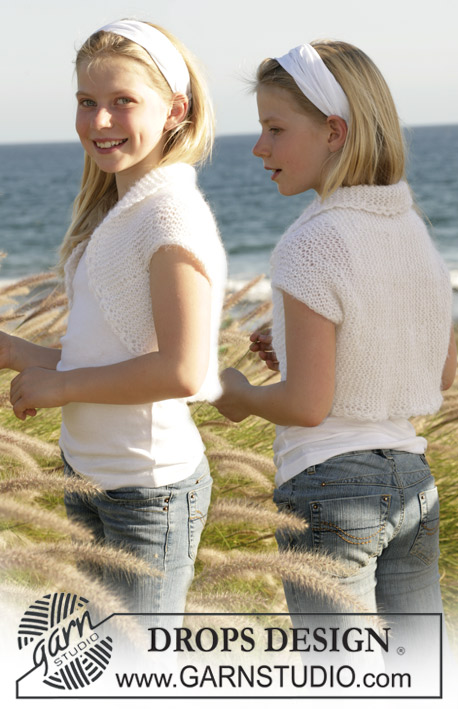
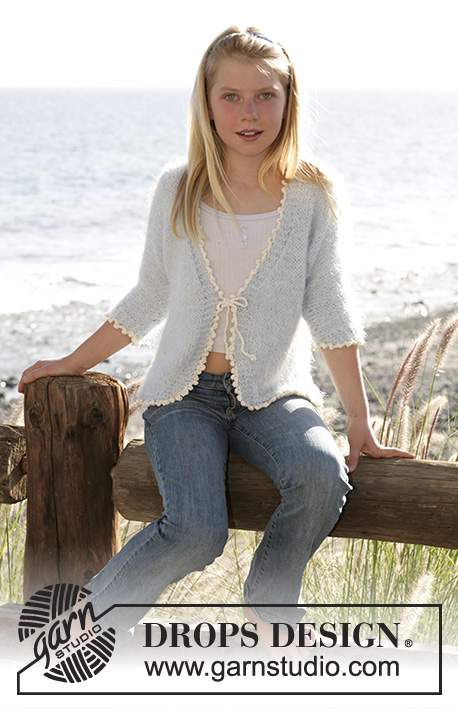
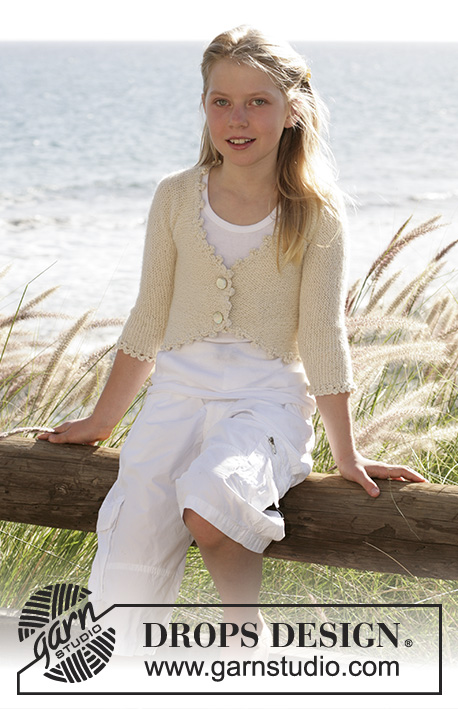
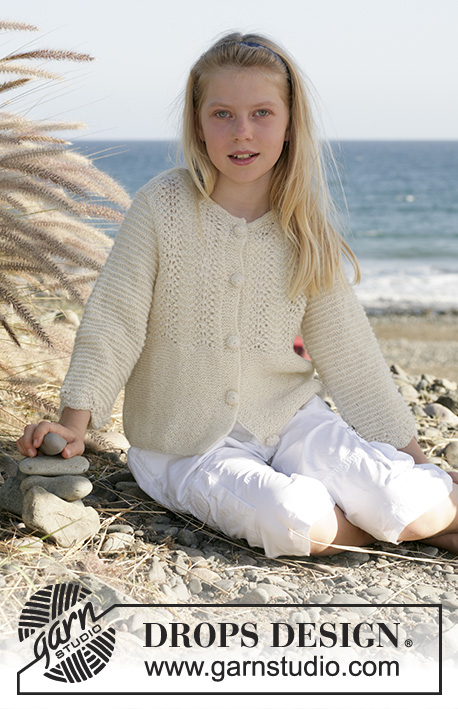
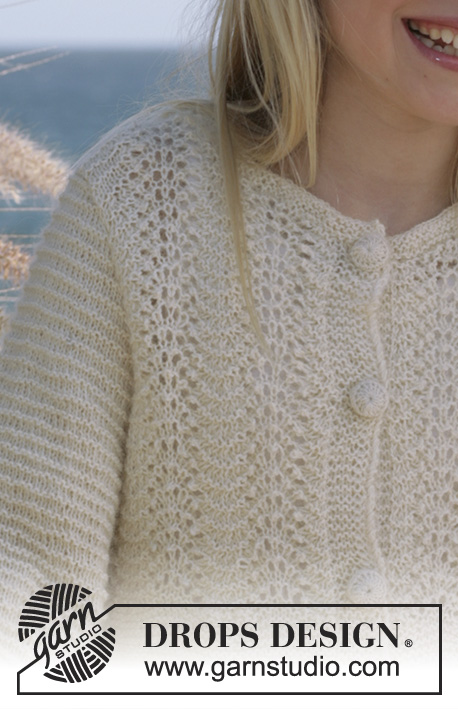
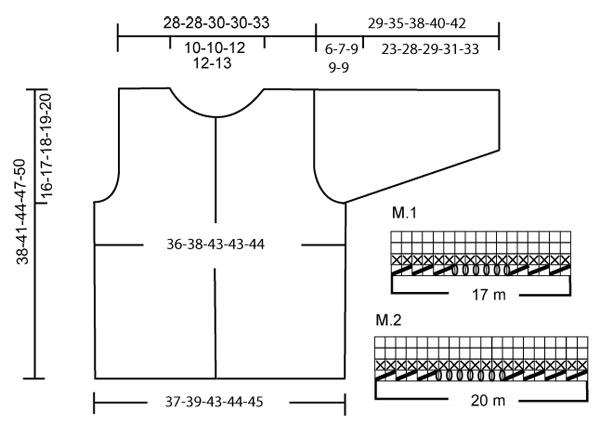
Cardigan lavorato ai ferri in DROPS Alpaca con maniche a ¾, motivo ad onde e bottoni all'uncinetto. Taglie: bambini da 5 a 14 anni.
DROPS Children 15-10 |
|||||||||||||
|
CAMPIONE: 23 m x 46 f con i f n° 3,5 mm con Alpaca a m legaccio = 10 x 10 cm e 28 m con il motivo ad onde =10 cm in larghezza. BORDO DAVANTI: Lavorare 6 m rov su tutti i f per il bordo davanti. MOTIVO AD ONDE: Vedere il diagramma M.1 e M.2. I diagrammi sono visti dal diritto del lavoro. Nota: 1 m dir tra i gettati. M LEGACCIO (avanti e indietro sui f): Lavorare tutti i f a dir. M LEGACCIO AMPIA: *1° ferro: dir dal diritto del lavoro 2° ferro: dir dal rovescio del lavoro. 3° ferro: dir dal diritto del lavoro 4° ferro: rov dal rovescio del lavoro*. Ripetere *-*. ASOLE: 1 asola = intrecciare la 3° e la 4° m dal bordo davanti e avviare 2 nuove m sul f successivo. Intrecciare per le asole quando il lavoro misura: TAGLIA 5/6 anni: 1, 8, 15, 22 e 29 cm. TAGLIA 7/8 anni: 2, 10, 17, 24 e 32 cm. TAGLIA 9/10 anni: 2, 10, 18, 26 e 34 cm. TAGLIA 11/12 anni: 2, 9, 16, 23, 30 e 37 cm. TAGLIA 13/14 anni: 2, 9, 17, 25, 33 e 40 cm. -------------------------------------------------------- DAVANTI E DIETRO: Lavorare avanti e indietro sui f circolari dal centro davanti. Avviare 220-230-249-259-264 m con i f circolari n° 3,5 mm con DROPS Alpaca. Lavorare il 1° f come segue: * 4 m dir, 2 m insieme a dir *, ripetere *-* e finire con 4-2-3-1-0 m dir = 184-192-208-216-220 m (comprese 6 m per il bordo davanti - leggere sopra - a ogni lato), ciò viene fatto in modo che l'avvio non rimanga stretto. Lavorare a m legaccio – leggere la spiegazione sopra - fino a quando il lavoro misura 16-18-19-20-22 cm (assicurarsi che il f successivo sia dal rovescio del lavoro). Nota: intrecciare per le asole sul bordo davanti destro – leggere la spiegazione sopra. Continuare con 1 f a m legaccio dal rovescio del lavoro e ALLO STESSO TEMPO distribuire 32-32-44-36-40 aumenti in modo uniforme (cioè aumentare circa ogni 5-6 m) = 216-224-252-252-260 m (non aumentare sulle 6 m per il bordo davanti a ogni lato). Inserire 1 segnapunti all'interno di 57-59-66-66-68 m da ogni lato (= centro dei lati) = 102-106-120-120-124 m sul dietro. Lavorare il f successivo come segue: TAGLIA 5/6 anni: 6 m per il bordo davanti, diagramma M.1 (= 17 m) ripetuto 12 volte e finire con 6 m per il bordo davanti. TAGLIA 7/8 anni: 6 m per il bordo davanti, diagramma M.1 (= 17 m) ripetuto 3 volte, 4 m a M LEGACCIO AMPIA – leggere la spiegazione sopra – (il segnapunti è posizionato al centro di queste m), diagramma M.1 (= 17 m) ripetuto 6 volte, 4 m a M LEGACCIO AMPIA (il segnapunti è posizionato al centro di queste m), diagramma M.1 (= 17 m) ripetuto 3 volte, finire con 6 m per il bordo davanti. TAGLIE 9/10 + 11/12 anni: 6 m per il bordo davanti, diagramma M.2 (= 20 m) ripetuto 12 volte e finire con 6 m per il bordo davanti. TAGLIA 13/14 anni: 6 m per il bordo davanti, diagramma M.2 (= 20 m) ripetuto 3 volte, 4 m a M LEGACCIO AMPIA – leggere la spiegazione sopra – (il segnapunti è al centro di queste m), diagramma M.2 (= 20 m) ripetuto 6 volte, 4 m a M LEGACCIO AMPIA (il segnapunti è al centro di queste m), diagramma M.2 (= 20 m) ripetuto 3 volte, finire con 6 m per il bordo davanti. Tutte le taglie: Continuare in questo modo fino a quando il lavoro misura 22-24-26-28-30 cm. Ora intrecciare 6 m a ogni lato per lo scalfo (cioè 3 m a ogni lato del segnapunti). Continuare a lavorare il davanti e il dietro in modo separato. DIETRO: = 96-100-114-114-118 m. Continuare a m legaccio ampia su 14-16-17-17-19 m a ogni lato (lavorare le m rimaste come prima). ALLO STESSO TEMPO intrecciare per lo scalfo a ogni lato a f alterni: 2 m 3-4-5-5-5 volte e 1 m 3-3-5-4-4 volte = 78-78-84-86-90 m. Quando il lavoro misura 36-39-42-45-48 cm intrecciare le 20-20-26-26-28 m centrali per la scollatura. Continuare a lavorare come prima ma lavorare a m legaccio ampia sulle m rimaste nella ripetizione del motivo sulla scollatura. ALLO STESSO TEMPO intrecciare 1 m per modellare la scollatura a f alterni 4 volte = 25-25-25-26-27 m ancora su ogni spalla. Lavorare fino a quando il lavoro misura 38-41-44-47-50 cm. Intrecciare senza stringere. DAVANTI SINISTRO: = 54-56-63-63-65 m. Continuare a m legaccio ampia su 14-16-17-17-19 m a lato (lavorare le m rimaste come prima). ALLO STESSO TEMPO intrecciare per lo scalfo a lato come sul dietro = 45-45-48-49-51 m. Continuare fino a quando il lavoro misura 30-33-35-38-41 cm. Ora trasferire 14 m al centro davanti su un filo di scarto o fermamaglie per il collo. Intrecciare per la scollatura a f alterni 2 m 1 volta e 1 m 4-4-7-7-8 volte = 25-25-25-26-27 m rimaste sulla spalla. Continuare fino a quando il lavoro misura 38-41-44-47-50 cm. Intrecciare senza stringere. DAVANTI DESTRO: Lavorare come per il sinistro ma a specchio. Ricordarsi delle asole sul bordo davanti – leggere la spiegazione sopra. MANICA: Avviare 84-84-98-98-98 m sui f n° 3,5 mm con DROPS Alpaca. Lavorare il 1° f come segue: * 4 m dir, 2 m insieme a dir *, ripetere *-* e finire con 0-0-2-2-2 m dir = 70-70-82-82-82 m (compresa 1 m di vivagno a ogni lato), questo per evitare di avere un bordo di avvio troppo tirato. Lavorare il f successivo come segue: TAGLIE 5/6 +7/8 anni: 1 m di vivagno davanti, diagramma M.1 (= 17 m) ripetuto 4 volte e finire con 1 m di vivagno. TAGLIE 9/10 + 11/12 + 13/14 anni: 1 m di vivagno davanti, diagramma M.2 (= 20 m) ripetuto 4 volte e finire con 1 m di vivagno. Continuare come segue fino a quando M.1/M.2 è stato lavorato 3 volte in altezza. Continuare con 1 f a m legaccio dal diritto del lavoro e ALLO STESSO TEMPO distribuire (lavorare 2 m insieme a dir) 12-12-14-14-14 diminuzioni in modo uniforme (cioè lavorare insieme la 5° e 6° m circa) = 58-58-68-68-68 m. Lavorare 1 f dir dal rovescio del lavoro. Continuare a m legaccio ampia – leggere la spiegazione sopra, fino alla fine del lavoro. ALO STESSO TEMPO quando il lavoro misura 5-5-5-5-7 cm aumentare 1 m a ogni lato ogni 2,5-2,5-4-4-2,5 cm 7-9-6-7-10 volte in totale = 72-76-80-82-88 m. Quando il lavoro misura 23-28-29-31-33 cm intrecciare per modellare l'arrotondamento della manica come segue: 4 m 2 volte, 2 m 3-3-3-3-4 volte e 1 m 0-1-5-5-3 volte. Continuare a intrecciare 2 m a ogni lato fino a quando il lavoro misura 28-34-37-39-41 cm, poi intrecciare 4 m 1 volta a ogni lato. Intrecciare le m rimaste, il lavoro misura circa 29-35-38-40-42 cm. CONFEZIONE: Cucire i margini delle spalle. Cucire i margini delle maniche all'interno delle m di vivagno e attaccare le maniche. COLLO: Riprendere 76-92 m (comprese le m sul fermamaglie o filo di scarto) attorno alla scollatura (anche sui bordi davanti). Lavorare 6 f a m legaccio. Intrecciare senza stringere. BOTTONI ALL'UNCINETTO: Lavorare dei copribottoni per 5-5-5-6-6 bottoni con l'uncinetto n° 2 mm con Alpaca come segue: Avviare 2 cat, poi lavorare 16 m.a nella 1° di queste cat, finire con 1 m.bss nella 1° m.a sul giro (= 1° giro). 2° giro: lavorare 1 m.b in ogni m.a e finire con 1 m.bss nella 1° m.b sul giro (= 16 m.b). 3° giro: Lavorare le prime 3 cat e poi 1 m.a nella m.b a m.b alterne e finire con 1 m.bss nella 3° cat sul giro = 8 m.a. Mettere il bottone all'interno del copribottone, cucire attorno al bordo e tirare. CONFEZIONE: Attaccare i bottoni sul davanti sinistro. |
|||||||||||||
Spiegazioni del diagramma |
|||||||||||||
|
|||||||||||||
 |
|||||||||||||
Avete terminato questo modello?Allora taggate le vostre foto con #dropspattern #havsbriscardigan o inviatele alla #dropsfan gallery. Avete bisogno di aiuto con questo modello?Troverete 14 video tutorial, una sezione per i commenti/domande e molto altro guardando il modello su www.garnstudio.com © 1982-2026 DROPS Design A/S. Ci riserviamo tutti i diritti. Questo documento, compreso tutte le sue sotto-sezioni, è protetto dalle leggi sul copyright. Potete leggere quello che potete fare con i nostri modelli alla fine di ogni modello sul nostro sito. |
|||||||||||||


Con oltre 40 anni di esperienza nel design di modelli di maglia e uncinetto, DROPS Design offre la più estesa collezione di modelli gratuiti su internet - tradotti in 17 lingue. Ad oggi vi possiamo fornire 324 cataloghi e 12290 modelli - 9561 dei quali sono tradotti in Italiano.
Ci stiamo impegnando molto per darvi il meglio che vi possiamo offrire in termini di maglia e uncinetto, ispirazioni e consigli così come filati di grande qualità ad un prezzo incredibile! Volete utilizzare i nostri modelli per qualcosa d'altro oltre al vostro uso personale? Potete leggere tutto ciò che è consentito nel testo sul Copyright in basso su tutte le pagine dei nostri modelli. Buon lavoro!
Lasciare un commento sul modello DROPS Children 15-10
Noi saremmo felici di ricevere i tuoi commenti e opinioni su questo modello!
Se vuoi fare una domanda, fai per favore attenzione a selezionare la categoria corretta nella casella qui sotto per velocizzare il processo di risposta. I campi richiesti sono indicati da *.