
Categorie popolari
State cercando un filato?


Commenti / Domande (28)
![]() Christine Di Iorio ha scritto:
Christine Di Iorio ha scritto:
Bonjour Les couleurs des laines sont beaucoup beaucoup plus foncées que sur la photo!!
10.01.2026 - 15:03
![]() Claudia ha scritto:
Claudia ha scritto:
Hallöchen zusammen. Mein Mann möchte gerne den Pollover von mir gestrickt haben. Er hat aber die Konfektionsgrösse XXL, was kann ich tun?
11.11.2025 - 16:53DROPS Design ha risposto:
Liebe Claudia, die Größen damals waren etwas "oversize" so am besten ¨schauen Sie diese Seite, dh ein Pullover (den er gerne trägt) messen und mit der Maßnahmen in der Skizze vergleichen, das kann Ihnen helfen die Größe zu wählen bzw anzupassen (schauen Sie mal ein ähnliches Modell in der gewünschten Größe als Inspiration). Viel Spaß beim Stricken!
21.11.2025 - 14:45
![]() Katarina ha scritto:
Katarina ha scritto:
Hej, förstår inte hur jag ska starta v2 vid helpatent! Står att det varvet startar med "sticka omsl och lyfta m" direkt men jag har en rätmaska först från v1? Vad ska jag göra med den?
17.04.2025 - 12:11DROPS Design ha risposto:
Hej Katarina, kantmaskerne strikkes ret, vi har videoer som viser hvordan du strikker helpatent frem og tilbage og helpatent rundt. Se på dem ved at klikke på videoer øverst i opskriften :)
30.04.2025 - 10:24
![]() Luigina Grilli ha scritto:
Luigina Grilli ha scritto:
Non ho trovato spiegazione su come fare una cucitura invisibile su come unire le spalle in un capo lavorato a costa inglese o brioche. Grazie!
20.10.2024 - 08:49
![]() Carina ha scritto:
Carina ha scritto:
Hej, jag får inte ihop det med att börja med en rät maska på första varvet ”helpatent med omslag på rundsticka ”. Tittar jag på videon hur man stickar helpatent med omslag på rundsticka så börjar de med ett omslag!!! Är det fel i mönstret?
04.09.2024 - 00:53DROPS Design ha risposto:
Hej Carina, i helpatent skal hver 2.maske strikkes ret sammen med omslaget og hver 2.maske løftes løst af sammen med omslaget på hver pind. På første pind i opskriften er omslaget ikke lavet endnu, så følg opskriften og fortsæt ifølge forklaringen :)
06.09.2024 - 13:52
![]() Carina ha scritto:
Carina ha scritto:
Hej! Jag får inte ihop det med att börja första varvet med 1 rät maska på ”helpatent med omslag på rundsticka”. Tittar jag på videon för att sticka helpatent med omslag på rundsticka så börjar man där med ett omslag!!! Är det fel i mönstret.
04.09.2024 - 00:48
![]() Liz ha scritto:
Liz ha scritto:
I am wanting to make this for my husband and am just doing a test square for tension. But I am a little confused with the english rib which doesn't seem to be working out right. In your description in the pattern it says to slip a stitch as if to K but in the lesson and video all the slipped stitches are done pearlwise. Is this a mistake in the pattern description? Also are there any measurements for what the sizes are - the M-L in particular --- or do I just have to use the diagram / chart
04.07.2024 - 08:48DROPS Design ha risposto:
Dear Liz, you are right, you should slip 1 stitch as if to purl, just as shown in the video, English pattern will be fixed, thanks for noticing. You will find all finished measurements in the chart at the bottom of the pattern. REad more here. Happy knitting!
04.07.2024 - 09:25
![]() Claudia ha scritto:
Claudia ha scritto:
Hallo, sehr schöner Pulli, bin bis jetzt auch gut klargekommen, verstehe aber leider nicht recht wie ich am Halsrand abketteln soll. Also erst 1x 2M gleichzeitig, und dann jede 2. R 3x 1M? Viel Dank schon mal im Voraus :) Claudia
06.12.2023 - 15:00DROPS Design ha risposto:
Liebe Claudia, am Anfang jeder Reihe vom Hals (Hin-Reihe beim rechten Vorderteil/Rückreihe beim linken Vorderteil) ketten Sie die Maschen für den Hals ab, so 2 Maschen 1 Mal und 1 Masche 3 Mal. Viel Spaß beim stricken!
06.12.2023 - 16:11
![]() Bob ha scritto:
Bob ha scritto:
For size Large, the body is 184 stitches. The English rib is 3 stitches (K2TOG, YO, Slip). 184 is not divisible by 3 so wouldn't this get misaligned quickly? I must be missing something.
12.11.2023 - 03:29DROPS Design ha risposto:
Dear Bob, the yarn overs are not counted in the stitches. For example, after decreasing in the first round, you will have 184 stitches and 92 yarn overs. Then, you will knit one stitch together with its yarn over, make another yarn over and slip the next stitch as to knit. So, in truth, you need to divide 184 stitches by 2 and not 3, because the yarn overs are not counted here. One side note, there seems to be a mistake in the pattern. When working the English rib in the round, the stitches are purled on the 2nd round and the stitches are knitted in the 3rd round: https://www.garnstudio.com/video.php?id=188&lang=en. Happy knitting!
12.11.2023 - 22:41
![]() Beate ha scritto:
Beate ha scritto:
Når jeg forstørrer bildet ser det ut som om vrangborder er i vridd rett.. Kan det stemme? Beklager feil i tidligere spørsmål ! Jeg mente å skrive ‘38’ og fant at den fargen nå het Drue 😊
17.10.2023 - 14:57DROPS Design ha risposto:
Hej Beate, fint at du fandt farven :) Den er strikket med almindelig ribkant
18.10.2023 - 07:24
|
|||||||||||||
DROPS 14-15 |
|||||||||||||
|
|
|||||||||||||
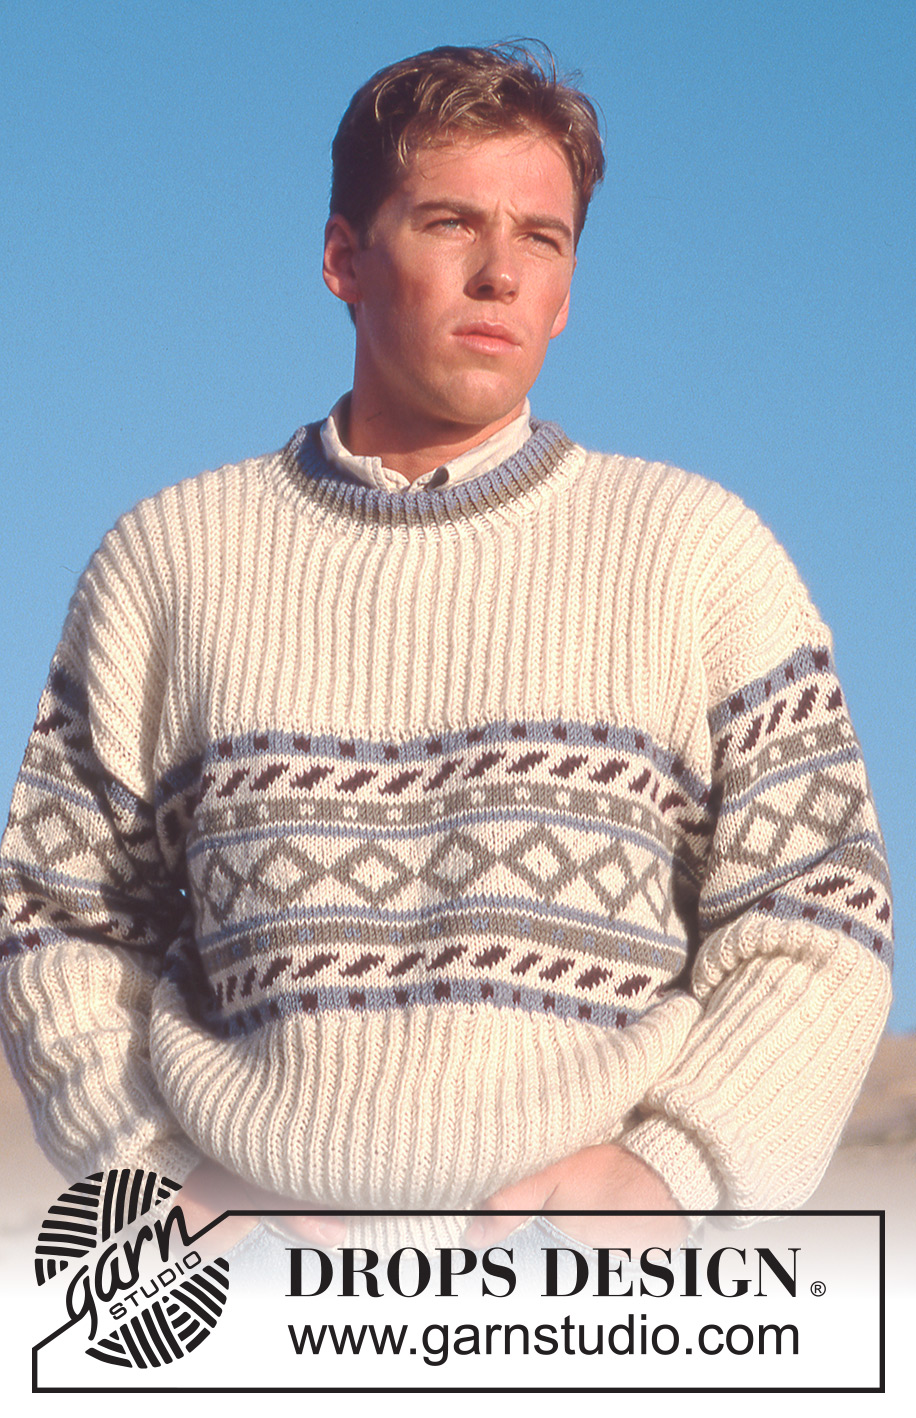
Maglione da uomo a coste inglesi con motivi sui bordi in DROPS Karisma.
DROPS 14-15 |
|||||||||||||
|
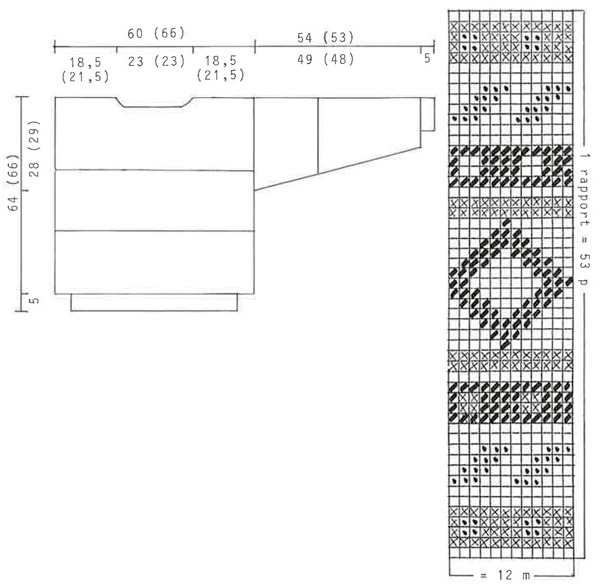
MOTIVO: Vedere il diagramma. Il diagramma mostra il motivo dal diritto del lavoro e tutto il motivo è a maglia rasata. COSTE INGLESI, in piano sui ferri: Ferro 1: 1 maglia di vivagno, * 1 maglia diritto, 1 gettato, passare 1 maglia a rovescio *, ripetere *-*, 2 maglie di vivagno. Ferro 2: 1 maglia di vivagno, * lavorare insieme a diritto il gettato e la maglia passata, 1 gettato, passare 1 maglia a rovescio *, 1 maglia di vivagno. Ripetere i ferri 1 e 2. COSTE INGLESI, in tondo: GIRO 1: * 1 maglia diritto, 1 gettato, passare 1 maglia a rovescio *, ripetere *-*. GIRO 2: * lavorare insieme a rovescio il gettato e la maglia passata, 1 gettato, passare 1 maglia a rovescio *. GIRO 3: * lavorare insieme a diritto il gettato e la maglia passata, 1 gettato, passare 1 maglia a rovescio *. Ripetere i giri 2 e 3. COSTE: * 1 maglia diritto, 1 maglia rovescio *, ripetere *-*. CORPO: Lavorare il maglione in tondo con i ferri circolari. Avviare 220-240 maglie con i ferri circolari n° 3 mm con il panna e lavorare 5 cm. Passare ai ferri circolari n° 5 mm e continuare a coste inglesi in tondo – leggere le spiegazioni sopra – allo stesso tempo diminuire 52-56 maglie in modo uniforme sul 1° giro = 168-184 maglie. Fare attenzione alla tensione del lavoro. Quando il lavoro misura 23-24 cm passare ai ferri n° 4,5 mm e lavorare 1 giro a maglia rasata, allo stesso tempo aumentare 60-68 maglie in modo uniforme sul giro = 228-252 maglie. Continuare con il motivo, allo stesso tempo quando il lavoro misura 36-37 cm dividerlo in 2 parti e finire il davanti e il dietro in modo separato. DAVANTI: = 114-126 maglie. Continuare con il motivo. Alla fine dell’ultimo ferro del motivo, lavorare 1 ferro con il panna, allo stesso tempo diminuire 30-34 maglie in modo uniforme sul ferro = 84-92 maglie. Passare ai ferri n° 5 mm e continuare a coste inglesi. Quando il lavoro misura 60-62 cm intrecciare le 22-22 maglie centrali per il collo e finire ogni lato in modo separato. Intrecciare per modellare la scollatura a ferri alterni: 2 maglie 1 volta e 1 maglia 3 volte. Intrecciare le maglie rimaste sulla spalla quando il lavoro misura 64-66 cm. DIETRO: = 114-126 maglie. Continuare con il motivo e a coste inglesi come descritto per il davanti. Quando il lavoro misura 60-62 cm intrecciare le 28-28 maglie centrali per il collo e diminuire 2 maglie sulla scollatura sul ferro successivo. Intrecciare le maglie rimaste come descritto per il davanti. MANICA: Avviare 46-50 maglie con i ferri a doppia punta n° 3 mm con il panna e lavorare 5 cm a coste. Passare ai ferri a doppia punta n° 5 mm e continuare a coste inglesi, allo stesso tempo diminuire 6-10 maglie sul 1° giro = 40-40 maglie. Ora aumentare 2 maglie al centro sotto il braccio per un totale di 12 volte su ogni 8° giro = 64-64 maglie. Quando il lavoro misura 33-32 cm passare ai ferri n° 4,5 mm, lavorare 1 giro a maglia rasata, allo stesso tempo aumentare in modo uniforme le maglie a 85-85 maglie e ora continuare con il motivo. Aumentare 2 maglie al centro sotto il braccio per un totale di 11-13 volte ogni 4° e 5° giro in modo alternato per la taglia S/M e ogni 4° giro per la taglia M/L = 107-111 maglie. Dopo l’ultimo giro del motivo il lavoro misura circa 54-53 cm. Intrecciare. CONFEZIONE: Cucire i margini delle spalle. Riprendere circa 120 maglie attorno al collo con i ferri n° 3 mm con il panna e lavorare a coste come segue: 1 cm con il panna, 1,5 cm con il beige, 5,5 cm con il blu, intrecciare. Piegare il bordo a metà verso il rovescio del lavoro e affrancare. Attaccare le maniche. |
|||||||||||||
Spiegazioni del diagramma |
|||||||||||||
|
|||||||||||||
 |
|||||||||||||
Avete terminato questo modello?Allora taggate le vostre foto con #dropspattern o inviatele alla #dropsfan gallery. Avete bisogno di aiuto con questo modello?Troverete 28 video tutorial, una sezione per i commenti/domande e molto altro guardando il modello su www.garnstudio.com © 1982-2026 DROPS Design A/S. Ci riserviamo tutti i diritti. Questo documento, compreso tutte le sue sotto-sezioni, è protetto dalle leggi sul copyright. Potete leggere quello che potete fare con i nostri modelli alla fine di ogni modello sul nostro sito. |
|||||||||||||


Con oltre 40 anni di esperienza nel design di modelli di maglia e uncinetto, DROPS Design offre la più estesa collezione di modelli gratuiti su internet - tradotti in 17 lingue. Ad oggi vi possiamo fornire 324 cataloghi e 12290 modelli - 9561 dei quali sono tradotti in Italiano.
Ci stiamo impegnando molto per darvi il meglio che vi possiamo offrire in termini di maglia e uncinetto, ispirazioni e consigli così come filati di grande qualità ad un prezzo incredibile! Volete utilizzare i nostri modelli per qualcosa d'altro oltre al vostro uso personale? Potete leggere tutto ciò che è consentito nel testo sul Copyright in basso su tutte le pagine dei nostri modelli. Buon lavoro!
Lasciare un commento sul modello DROPS 14-15
Noi saremmo felici di ricevere i tuoi commenti e opinioni su questo modello!
Se vuoi fare una domanda, fai per favore attenzione a selezionare la categoria corretta nella casella qui sotto per velocizzare il processo di risposta. I campi richiesti sono indicati da *.