
Categorie popolari
State cercando un filato?


Commenti / Domande (11)
![]() Nicola ha scritto:
Nicola ha scritto:
Wird das Muster 1 von links nach rechts oder von rechts nach links gestrickt? Ich verstehe das mit dem Anfang (Pfeil) nicht. Und ich möchte das Modell als Jacke stricken: wie viele extra Maschen für die Steeknaht in der Mitte brauche ich?
01.07.2025 - 16:25DROPS Design ha risposto:
Lieber Nicola, die Hinreihen lesen Sie rechts nach links, die Rückreihen lesen Sie links nach rechts. Damit ein Muster zentriert wird, wird das Diagram unterschiedlich anfangen: beginnen Sie mit dem Pfeil für Ihre Größe, dann stricken Sie das Diagram bis zur Ende, stricken/wiederholen Sie alle Maschen vom Diagram bis die Steek-Maschen für Armausschnitt und 2. Teil stricken Sie genauso gleich. Für Steek strickt man üblicherweise 5 Maschen. Siehe Video hier. Viel Spaß beim Stricken!
02.07.2025 - 16:14
![]() Pierangela Borroni ha scritto:
Pierangela Borroni ha scritto:
Vorrei realizzare questo modello, ma ho visto che il viola non è più nella cartella colori. Secondo voi con cosa potrei sostituirlo? Non ho trovato nulla se non il viola scuro che però non mi convince. Per favore datemi un consiglio.
12.02.2025 - 14:01DROPS Design ha risposto:
Buonasera Pierangela, può provare con il colore 9023; in ogni caso può rivolgersi al suo rivenditore DROPS di fiducia per un'assistenza più personalizzata. Buon lavoro!
13.02.2025 - 22:26
![]() Sarah Kavaljian ha scritto:
Sarah Kavaljian ha scritto:
Hi! I've just finished knitting M.1. And I've made it to this point: "After M.1 work M.2, at the same time bind off the middle 35-37 (34-37) sts mid front for neck and complete piece back and forth on needle. Bind off to shape the neckline on every other row: 4 sts 1 time, 2 sts 1 time, 1 st 1 time. Bind off remaining sts after M.2. " I'm a little confused. Do I knit all ten rows of M.2 and then start binding off? Is it not worked in the round at this point?
21.02.2024 - 06:01DROPS Design ha risposto:
Hi Sarah, At the same time as beginning M.2, bind off the middle stitches mid-front for the neckline. Then continue back and forth, binding off on each side of the neck as described in the text. Remember to bind off 4 stitches once on each side, then 2 sts twice on each side and finally 1 st once on each side, every 2nd row. You finish M.2 then bind off the remaining stitches. Hope this helps and happy knitting!
21.02.2024 - 06:42
![]() Marlene Sandow ha scritto:
Marlene Sandow ha scritto:
On chart one where do I start for a men sz m/l. U have two starting points d or h
23.08.2023 - 21:50DROPS Design ha risposto:
Hi Marlene, H is the men's starting point (H for herre (men)) in Norwegian. Happy knitting!
24.08.2023 - 06:46
![]() Sen Scott ha scritto:
Sen Scott ha scritto:
There is a D-M/L and a H-M/L. Which one should I start at. The D or the H?
01.12.2020 - 19:26DROPS Design ha risposto:
Dear Mr Scott, if you are working a lady size, follow D then size S/M or M/L - if you are working a man size, follow H then men size either S/M or M/L. Happy knitting!
02.12.2020 - 07:35
![]() Sen Scott ha scritto:
Sen Scott ha scritto:
When starting the M1 pattern, it says to start from the arrow but there are 2 arrows indicated. Which one is the right one.
29.11.2020 - 20:19DROPS Design ha risposto:
Hi, the difference is in the size you are working - choose arrow or you size (S/M = Small/Medium, M/l = Medium/large). Happy knitting!
30.11.2020 - 06:24
![]() Marianne Grønby ha scritto:
Marianne Grønby ha scritto:
Det er svært at se hvordan halsen er på trøjen. Har modellen en sort rullekravesweater på indenunder trøjen?
27.08.2017 - 17:36DROPS Design ha risposto:
Hei Marianne. Ja, her har modellen en høyhalset sort genser under strikke genseren. Om du ser på målskissen (helt nederst) ser du sånn ca hvordan halsen vil bli på denen modellen. God Fornøyelse!
28.08.2017 - 10:17
![]() Bente Mikkelborg ha scritto:
Bente Mikkelborg ha scritto:
Tusinde tak for hjælpen :-)
10.01.2017 - 19:32
![]() Bente Mikkelborg ha scritto:
Bente Mikkelborg ha scritto:
Hej Jeg er igang med at strikke 15-23 herre str 298 masker - mønstret går over 32 masker jeg kan ikke få det til at passe hvad gør jeg galt Venlig hilsen Bente Mikkelborg
09.01.2017 - 23:19DROPS Design ha risposto:
Hej Bente. Du har forstk og rygstk: 149 m paa hver side. Du skal begynde ved pilen for din str. Dvs, du starter med at strikke de sidste 10 m af diagrammet (139 m tilbage til siden), saa strikker du 4 hele gentagelser af diagrammet (32 m per gang) = 10+128 m strikket og du har 11 m tilbage til siden. Du strikker nu de förste 11 m af diagrammet igen = dit mönster er centreret paa forstk. Gentag paa rygstk.
10.01.2017 - 13:33
![]() Malene ha scritto:
Malene ha scritto:
Den kan findes hvis du vælge sprog: norsk :o)
11.08.2010 - 13:09
|
||||||||||
DROPS 15-23 |
||||||||||
|
|
||||||||||
Maglione DROPS con motivo sullo sprone in “Alpaca”. Taglie da uomo e da donna: S-L.
DROPS 15-23 |
||||||||||
|
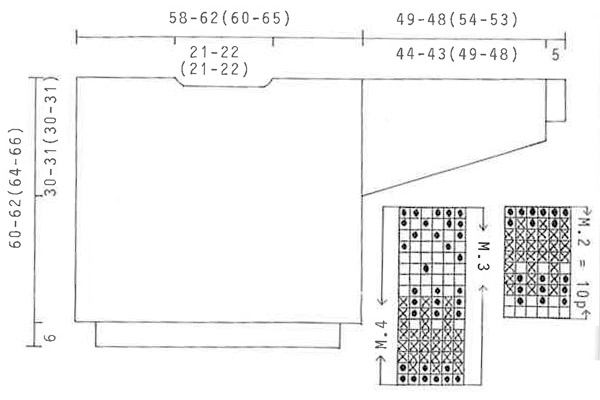
MOTIVO: Vedere il diagramma. Il diagramma mostra il motivo dal diritto del lavoro e tutto il motivo è lavorato a m rasata. NOTA: Lavorare M.4 come M.3, ma lavorare il diagramma dall'alto in basso. COSTE: * 1 m dir, 1 m rov *. Ripetere *-*. ------------------------------------------ CORPO: Il maglione è lavorato in tondo con i f circolari e tagliato per gli scalfi alla fine. I numeri tra le ( ) si riferiscono alle taglie da uomo. Avviare 220-230 (240-250) m con i f circolari n° 2,5 mm con il nero e lavorare 6 cm a coste. Passare ai f circolari n° 3,5 mm e continuare a m rasata, ALLO STESSO TEMPO distribuire 46-56 (36-48) aumenti in modo uniforme sul 1° giro = 266-286 (276-298) m. FARE ATTENZIONE ALLA TENSIONE DEL LAVORO! Quando il lavoro misura 30-31 (34-35) cm aumentare 5 m a ogni lato per lo scalfo (che saranno tagliate per lo scalfo alla fine e non sono comprese nel motivo). Quando il lavoro misura 33-35 (37-39) cm lavorare M.1 (iniziare all'altezza della freccia e lavorare il motivo sul davanti, iniziare ancora all'altezza della freccia e ripetere il motivo sul dietro). Alla fine di M.1 lavorare M.2, ALLO STESSO TEMPO intrecciare le 35-37 (34-37) m centrali al centro davanti per il collo e finire il lavoro avanti e indietro sui f. Intrecciare per modellare la scollatura a f alterni: 4 m 1 volta, 2 m 1 volta, 1 m 1 volta. Intrecciare le m rimaste alla fine di M.2. Il lavoro misura circa 60-62 (64-66) cm. MANICA: Avviare 48-50 (56-58) m con i f a doppia punta n° 2,5 mm con il nero e lavorare 5 cm a coste. Passare ai f a doppia punta n° 3,5 mm, Lavorare 1 giro dir, ALLO STESSO TEMPO distribuire 14-14 (6-6) aumenti in modo uniforme sul giro = 62-64 (62-64) m. Ora lavorare M.3, ALLO STESSO TEMPO aumentare 2 m al centro sotto il braccio per un totale di 38-39 (38-39) volte ogni * 3, 3 e 4 * giri in modo alternato per la taglia S/M da donna, ogni 3 giri per la taglia M/L da donna, e ogni * 3 e 4 * giri in modo alternato per le taglie da uomo = 138-142 (138-142) m. Incorporare gli aumenti nel motivo durante il lavoro. Alla fine di M.3 continuare in nero fino a 6 cm prima della fine del lavoro, e ora lavorare M.4. Il lavoro ora misura circa 49-48 (54-53) cm. Lavorare 2 cm a m rasata rovescia (per attaccare le maniche al corpo). Intrecciare. CONFEZIONE: Inserire un segnapunti al centro degli aumenti per lo scalfo. Fare 2 cuciture a macchina attorno al segnapunti, 1° cucitura = ½ m dal segnapunti, 2° cucitura = ½ m dalla 1° cucitura. Tagliare per gli scalfi. Cucire i margini delle spalle. Riprendere circa 90 m attorno al collo con i f a doppia punta n° 3,5 mm con il nero e lavorare 1 giro rov, M.2, 1 giro rov (= bordo da piegare), 9 giri a m rasata, intrecciare e piegare il bordo a metà verso il rovescio del lavoro e affrancare. Attaccare le maniche come segue: cucire l'ultimo ferro a m rasata sulle maniche a un ferro dopo la cucitura a macchina sullo scalfo. Risvoltare il maglione e attaccare il lavoro a m rasata rovescia sulle maniche al corpo. |
||||||||||
Spiegazioni del diagramma |
||||||||||
|
||||||||||
 |
||||||||||
 |
||||||||||
Avete terminato questo modello?Allora taggate le vostre foto con #dropspattern o inviatele alla #dropsfan gallery. Avete bisogno di aiuto con questo modello?Troverete 27 video tutorial, una sezione per i commenti/domande e molto altro guardando il modello su www.garnstudio.com © 1982-2026 DROPS Design A/S. Ci riserviamo tutti i diritti. Questo documento, compreso tutte le sue sotto-sezioni, è protetto dalle leggi sul copyright. Potete leggere quello che potete fare con i nostri modelli alla fine di ogni modello sul nostro sito. |
||||||||||


Con oltre 40 anni di esperienza nel design di modelli di maglia e uncinetto, DROPS Design offre la più estesa collezione di modelli gratuiti su internet - tradotti in 17 lingue. Ad oggi vi possiamo fornire 324 cataloghi e 12290 modelli - 9561 dei quali sono tradotti in Italiano.
Ci stiamo impegnando molto per darvi il meglio che vi possiamo offrire in termini di maglia e uncinetto, ispirazioni e consigli così come filati di grande qualità ad un prezzo incredibile! Volete utilizzare i nostri modelli per qualcosa d'altro oltre al vostro uso personale? Potete leggere tutto ciò che è consentito nel testo sul Copyright in basso su tutte le pagine dei nostri modelli. Buon lavoro!
Lasciare un commento sul modello DROPS 15-23
Noi saremmo felici di ricevere i tuoi commenti e opinioni su questo modello!
Se vuoi fare una domanda, fai per favore attenzione a selezionare la categoria corretta nella casella qui sotto per velocizzare il processo di risposta. I campi richiesti sono indicati da *.