
Categorie popolari
State cercando un filato?


Commenti / Domande (24)
![]() Susanna ha scritto:
Susanna ha scritto:
There is a mistake in the instructions for the side increases. It says to start them for the back at 5cm and for the sides at 4cm. I checked the original pattern as suggested and it has both starting at 4cm, which makes much more sense.
14.02.2023 - 03:17DROPS Design ha risposto:
Dear Susanna, thanks for noticing, pattern will be edited. Happy knitting!
14.02.2023 - 14:13
![]() Ia ha scritto:
Ia ha scritto:
Hej När jag skall sticka axlarna/på bakstycket och minska maskor mot halsringningen skall jag då sticka en axel åt gången? Dvs sätta maskorna på den ena axeln på en hjälpsticka eller tråd under tiden jag stickar den andra. Hälsnngar Ia
06.01.2023 - 14:00DROPS Design ha risposto:
Hej Ia, ja det stemmer, når du lukket de midterste masker af strikker du hver axel hver for sig :)
10.01.2023 - 11:56
![]() Sylvie PERRIER ha scritto:
Sylvie PERRIER ha scritto:
Bonsoir, Je ne comprends pas les diminutions des emmanchures. Faut-il diminuer après 5 mailles de chaque rang? Et si oui quel est l'intérêt et fait-il faire cela aussi sur les manches? Merci de votre réponse.
12.03.2018 - 22:18DROPS Design ha risposto:
Bonjour Mme Perrier, on rabat pour les emmanchures 1 x 5 mailles de chaque côté (= pour le dos on rabat ces mailles en début de rang sur l'endroit + sur l'envers = des 2 côtés, pour les devants, ces mailles sont rabattues uniquement côté emmanchure). Pour les manches, on commence à rabattre pour l'arrondi des manches par 1 x 3 m de chaque côté. Bon tricot!
13.03.2018 - 09:39
![]() Moira ha scritto:
Moira ha scritto:
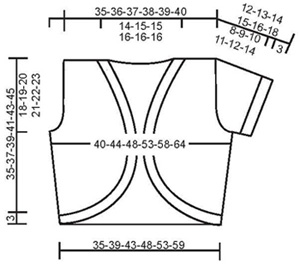
When choosing a size to knit, should we go by the measurements given in the drawn diagram or the written finished measurements? For example, if I read the diagram correctly it suggests that the largest size measures 64" at the bust, but the written instructions say that the same size is 50 3/8" at the bust. Thanks in advance!
18.04.2017 - 09:58DROPS Design ha risposto:
Dear Moira, measurements in chart are taken flat from side to side in cm - you can convert into inches here. Happy knitting!
18.04.2017 - 11:38Catherine Edwards ha scritto:
When you reach the armhole are you suppose to make a 5 stitch garter stitch border on each side? In the main instructions the only mention of garter stitch is one stitch at each side for the seam but the Bind off (for the armhole) instructions make it sound like you're supposed to knit the first 5 stitches each side in garter stitch. Please clarify. Thanks.
26.03.2016 - 01:28DROPS Design ha risposto:
Dear Mrs Edwards, there is only 1 st in garter st on each side, bind off for armhole should be done inside K5 (ie 5 sts in stocking st not in garter st, pattern will be updated asap). Thank you. Best regards!
29.03.2016 - 08:58
![]() Reinagel ha scritto:
Reinagel ha scritto:
Bonjour et merci pour la réponse. Modèle boléro 95-17 A quel usage doit servir le crocher drops n° 5 ?
20.04.2015 - 16:37DROPS Design ha risposto:
Bonjour Mme Reinagel, effectivement, le crochet n'est pas utilisé et a été supprimé. Merci. Bon tricot!
20.04.2015 - 18:02
![]() Chris ha scritto:
Chris ha scritto:
Enjoying the pattern, but I'm wondering if I should bind off 10 stitches on the sleeve armhole before staring on the bind off 3, 2, 1 Is the pattern correct?
05.08.2014 - 23:49DROPS Design ha risposto:
Dear Chris, pattern is correct that way, you start sleeve cap binding off 3 sts 1 time ... Happy knitting!
06.08.2014 - 10:24
![]() Alexandra Thurl ha scritto:
Alexandra Thurl ha scritto:
Hallo Liebes Drops-Team, vielen Dank für die schnelle und genaue Antwort!!
10.05.2012 - 18:00
![]() Alexandra Thurl ha scritto:
Alexandra Thurl ha scritto:
Was bedeutet bei Bolero Drops Nr.95-17 Maschen für die Rundung des Vorderteils "am Schluss jeder Reihe gegen die Mitte zunehmen"? Heißt das, dass man am Schluss der reihe oder in der Mitte zunehmen soll? Der Begriff "gegen die Mitte" ist etwas irreführend. Und wo soll ich genau den Markierungsfaden einziehen, gleich nach der 1.Masche oder in der Mitte vorne?
09.05.2012 - 12:51DROPS Design ha risposto:
Man nimmt am Schluss der Reihe zu (also gegen die Mitte der Arbeit, nicht in der Mitte der Reihe). Der Markierungsfaden wird neben der 1. Masche eingezogen. Die Anleitung wurde zum besseren Verständnis etwas überarbeitet.
10.05.2012 - 07:57
![]() Dorothea Winter ha scritto:
Dorothea Winter ha scritto:
Ich kann nicht verstehen, wo bei Drops Nr. 95-17 Bolero Jacke die Maschen am Vorderteil für die Rundung zugenommen werden. Ist es in der Mitte oder am Ende der Reihe? Vielen Dank im voraus und herzliche Grüße Dorothea Winter
17.04.2012 - 21:16DROPS Design ha risposto:
Am Schluss jeder R. gegen die Mitte.
18.04.2012 - 10:02
|
|
Gypsy Ballad |
|
|
|
|
Cardigan a bolero DROPS in "Alpaca". Taglie: dalla XS alla XXL.
DROPS 95-17 |
|
|
Campione: 23 m. x 30 f. con i f. n° 3,5 mm con il filato Alpaca a m. rasata = 10 x 10 cm. Diminuzioni (per lo scalfo): Diminuire all’interno delle 5 m. di vivagno a m. legaccio. Tutti le diminuzioni dovrebbero essere fatte dal diritto del lavoro. Diminuire come segue dopo 5 m.: passare 1 m. a dir. senza lavorarla, 1 m. dir., accavallare la m. passata sopra quella appena lavorata. Diminuire come segue prima delle 5 m.: lavorare 2 m. insieme a dir. Coste: *2 m. dir., 2 m. rov.*, ripetere *-*. ---------------------------------------------------- Dietro: avviare 82-92-100-112-124-138 m. (compresa 1 m. di vivagno a ogni lato – tutte le m. di vivagno vengono lavorate a m. legaccio per tutto il lavoro) con i f. n° 3,5 mm con il filato Alpaca. Lavorare a m. rasata con 1 m. di vivagno a ogni lato. Quando il lavoro misura 4 cm aumentare 1 m. a ogni lato ogni 2-2-2-2,5-2,5-2,5 cm per un totale di 6 volte = 94-104-112-124-136-150 m. Quando il lavoro misura 17-18-19-20-21-22 cm diminuire a ogni lato per lo scalfo: 5-7-8-10-13-17 m. 1 volta. Continuare a diminuire 1 m. per lo scalfo ogni 4 ferri – vedere il suggerimento per le diminuzioni – 2-4-5-8-10-12 volte = 80-82-86-88-90-92 m. Quando il lavoro misura 33-35-37-39-41-43 cm intrecciare le 28-30-30-32-32-32 m. centrali per il collo. Continuare a intrecciare a ogni lato del collo ogni 2 ferri 1 m. 2 volte = 24-24-26-26-27-28 m. rimaste per ogni spalla. Intrecciare quando il lavoro misura 35-37-39-41-43-45 cm. Davanti sinistro: avviare 22-22-25-26-28-30 m. (compresa 1 m. di vivagno al lato) con i f. n° 3,5 mm con il filato Alpaca. Leggere tutta la sezione seguente prima di continuare! Inserire un segnapunti nella m. più esterna al centro davanti. Continuare a m. rasata – allo stesso tempo aumentare per il bordo arrotondato al centro davanti come segue: avviare nuove m. ogni 2 ferri (cioè alla fine di ogni f. verso il centro davanti) 3 m. 3-4-4-5-5-6 volte, 2 m. 2-3-4-5-7-8 volte e 1 m. 9-9-8-8-8-8 volte – dopo l’ultimo aumento inserire un segnapunti all’interno della m. più esterna al centro davanti. Aumenti al lato: Allo stesso tempo quando il lavoro misura 4 cm aumentare al lato come fatto per il dietro. Alla fine di tutti gli aumenti ci sono 50-55-59-65-71-78 m. sul f. Modellamento del collo: quando il lavoro misura 17-17-18-19-20-21 cm intrecciare per il collo al centro davanti. Intrecciare ogni 4 ferri.: 1 m. 3-3-4-4-5-5 volte, ogni 2 ferri: 1 m. 13-13-12-12-11-11 volte e poi ancora ogni 4 ferri.: 1 m. 3-4-4-5-5-5 volte. Scalfi: Allo stesso tempo quando il lavoro misura 17-18-19-20-21-22 cm intrecciare per lo scalfo come fatto per il dietro. Alla fine di tutte le diminuzioni per il collo ci sono 24-24-26-26-27-28 m. rimaste per la spalla. Intrecciare quando il lavoro misura 35-37-39-41-43-45 cm. Davanti destro: lavorare come per il davanti sinistro, ma a specchio. Manica: avviare 70-74-78-86-90-94 m. (compresa 1 m. di vivagno a ogni lato) con 2 f. n° 3,5 mm con il filato Vivaldi (usare entrambi i f. per assicurarvi che il bordo diventi elastico). Eliminare 1 f. e lavorare 4 f. a m. rasata (= bordo arrotolato). Passare al filato Alpaca e continuare a coste con 1 m. di vivagno a ogni lato. Quando le coste misurano 3 cm lavorare 2 f. a m. legaccio e continuare a m. rasata. Allo stesso tempo dopo i 2 f. a m. legaccio intrecciare per l’arrotondamento della manica a ogni lato ogni 2 ferri come segue: 3 m. 1 volta, 2 m. 3-3-4-4-4-5 volte e 1 m. 4-4-6-6-7-8 volte. Continuare a intrecciare 2 m. a ogni lato fino a quando il lavoro misura 11-12-13-14-15-17 cm. Poi intrecciare a ogni lato 3 m. 1 volta. Intrecciare le m. rimaste quando il lavoro misura 12-13-14-15-16-18 cm. Confezione: cucire le spalle. Attaccare le maniche e poi cucire i lati e le maniche insieme. Coste: riprendere circa 344-368-384-416-440-464 m. (divisibile per 4) lungo tutto il bordo con i f. circolari n° 3,5 mm con il filato Alpaca (iniziare al centro dietro) – Nota: assicurarsi di riprendere abbastanza m. (28-28-30-30-32-32 m.) tra i segnapunti su entrambi i davanti in modo che le coste non diventino troppo strette. Lavorare in tondo come segue: 1 giro a rov., 1 giro a dir. e continuare a coste. Quando le coste misurano 3 cm passare al filato Vivaldi. Lavorare 4 giri a m. rasata e intrecciare senza stringere. Per essere sicuri che il bordo non diventi troppo stretto, fare un gettato ogni 8 maglie durante gli intrecci (lavorare e intrecciare i gettati come le m.). Il cardigan può essere allacciato con una spilla, una spilla da kilt o un fermaglio. |
|
 |
|
Avete terminato questo modello?Allora taggate le vostre foto con #dropspattern o inviatele alla #dropsfan gallery. Avete bisogno di aiuto con questo modello?Troverete 21 video tutorial, una sezione per i commenti/domande e molto altro guardando il modello su www.garnstudio.com © 1982-2026 DROPS Design A/S. Ci riserviamo tutti i diritti. Questo documento, compreso tutte le sue sotto-sezioni, è protetto dalle leggi sul copyright. Potete leggere quello che potete fare con i nostri modelli alla fine di ogni modello sul nostro sito. |


Con oltre 40 anni di esperienza nel design di modelli di maglia e uncinetto, DROPS Design offre la più estesa collezione di modelli gratuiti su internet - tradotti in 17 lingue. Ad oggi vi possiamo fornire 324 cataloghi e 12290 modelli - 9561 dei quali sono tradotti in Italiano.
Ci stiamo impegnando molto per darvi il meglio che vi possiamo offrire in termini di maglia e uncinetto, ispirazioni e consigli così come filati di grande qualità ad un prezzo incredibile! Volete utilizzare i nostri modelli per qualcosa d'altro oltre al vostro uso personale? Potete leggere tutto ciò che è consentito nel testo sul Copyright in basso su tutte le pagine dei nostri modelli. Buon lavoro!
Lasciare un commento sul modello DROPS 95-17
Noi saremmo felici di ricevere i tuoi commenti e opinioni su questo modello!
Se vuoi fare una domanda, fai per favore attenzione a selezionare la categoria corretta nella casella qui sotto per velocizzare il processo di risposta. I campi richiesti sono indicati da *.