
Categorie popolari
State cercando un filato?


Commenti / Domande (51)
![]() Olesia Wagner ha scritto:
Olesia Wagner ha scritto:
Hallo liebes Team, ich habe Schwierigkeiten mit Diagramm. Gibt es Video dafür? Ich habe gesucht, aber nicht gefunden. Mit freundlichen Grüßen, Olesia
17.05.2025 - 17:53DROPS Design ha risposto:
Liebe Olesha, hier lesen Sie mehr über Diagramme; hier werden die Reihen 1, 2, 4,5,6, 8, 9, 10, 12,13, 14 und 16 glatt rechts gestrickt (= Hinreihen rechts, Rückreihen links), bei der 3. und 11. Reihe stricken Sie *1 Umschlag, 1 M abheben, 2 M rechts zusammen, die abgehobene Masche über die gestrickte M ziehen, 1 Umschlag, 3 M rechts*, von * bis* wiederholen; bei der 7. und 15. Reihe stricken Sie *3 M rechts, 1 Umschlag, 1 M abheben, 2 M rechts zusammen, die abgehobene Masche über die gestrickte M ziehen, 1 Umschlag*. Viel Spaß beim Stricken!
19.05.2025 - 08:09
![]() Janet E E ha scritto:
Janet E E ha scritto:
Hi. Im about to knit jacket 94-1. Reading through the pattern Ive come across the increased described below. Could you explain what is meant, on the back by:- Dec for armhole, every other row: 3sts 1 time. 2 sts 3 times and 1st 5 times? Also on the front it says;- increase towards mid front on every other row;- 3 sts 2 times, 2 sts 3 times and 1 st 8 times. I can't imagine I'm to increase 3 sts together. I just can't work out exactly how to follow these instructions. Thanks.
26.03.2025 - 15:24DROPS Design ha risposto:
Dear Janet, the decrease for armholes on back piece (then on front pieces) should be cast off, ie you will cast off 3 sts at the beg of next 2 rows, 2 sts at the beg of next 6 rows and 1 st at the beg of next 10 rows (3+2x3+1x5=14 sts on each side); then for the rounded front piece you will cast on the new stitches at the end of a row towards mid front, ie on right front piece at the end of a row from WS and on left front piece at the end of a row from RS. Happy knitting!
27.03.2025 - 07:53
![]() ZOI ha scritto:
ZOI ha scritto:
Hallo, please can you tell me which colour has been used for the pattern in the picture? In the material section you say it's : colour no. 50, lilac-mix, I can't find that no. Thank you in advance
13.03.2025 - 01:35DROPS Design ha risposto:
Dear Zoi, this colour might be discontinued in the meantime - feel free to request help from your DROPS Store to find the best matching colour from the current shadecard. Happy knitting!
13.03.2025 - 15:49
![]() Anna ha scritto:
Anna ha scritto:
Hallo. Ich habe zwei Fragen: Ließe sich die Jacke auch mit Big Merino stricken? Die Garngruppe ist zwar die gleiche, aber ist das weiche Garn für den Schnitt geeignet? Und Was ist das für ein Verschluss? Knopflöcher sind ja wohl nicht vorgesehen.
05.06.2024 - 17:02DROPS Design ha risposto:
Liebe Anna, gerne kann diese Jacke auch in Big Merino gestrickt werden, da beide Garne verschieden sind, wird auch die Textur verschieden sein; folgen Sie einfach die Empfehlungen für Big Merino in der Farbkarte und beachten Sie (wie immer) daß die Mascheprobe stimmt; Die Jacke wird mit einer Broshe zusammengehalten. Viel Spaß beim Stricken!
06.06.2024 - 07:31
![]() Lisbeth ha scritto:
Lisbeth ha scritto:
Hej. På højre forstykke str. M skal jeg tage ud 3 masker 1 gang , 2 masker 4 gange, 1 maske 8 gange, midt foran. Hvordan tager jeg 3 masker ud, og hvor efter 10 eller 11 maske. Mvh Lisbeth
13.01.2024 - 20:57DROPS Design ha risposto:
Hej Lisbeth, du slår 3 nye masker op sidst på pinden og så 2 masker næste gang osv :)
16.01.2024 - 12:17
![]() Lisbeth ha scritto:
Lisbeth ha scritto:
Jeg forstår ikke, mønstrede rigtigt. Jeg kan ikke får det til at gå op, efter jeg har lukket masker i hvert side, kan jeg ikke strikke 1, kantm, 5 glatstrik og 84 m.1. Mønster, da jeg mangler masker. Skal jeg stadig strikke 1 kantm og 5 glatstrik i hvert side, hele vejen til 30 cm, eller skal jeg fratrække lukkemaskerne fra glatstrik fra 5 til fx 4 osv. Og bevare 84 masker i mønster
23.12.2023 - 20:01DROPS Design ha risposto:
Hej Lisbeth, du fortsætter med mønster, men efterhånden som du tager ind bliver der flere eller færre antal masker i glatstrik (når der ikke er nok masker til mønster, strikkes de øvrige i glatstrik) :)
02.01.2024 - 09:38
![]() Régine ha scritto:
Régine ha scritto:
Bonjour. Si j'ai bien compris pour les premières augmentations dans chaque section de mailles envers (pour les milieux devants) se font seulement sur les coins arrondis et pas sur tout le reste des sections envers ...? Merci . Cordialement à toute l'équipe
09.08.2023 - 17:13DROPS Design ha risposto:
Bonjour Régine, tout à fait, on augmente dans les sections envers des arrondis des devants pour qu'ils gardent une jolie forme arrondie, mais les autres sections envers des côtes se tricotent comme avant en côtes 3 m end/3 m env. Bon tricot!
10.08.2023 - 09:14
![]() Jan Jones ha scritto:
Jan Jones ha scritto:
Hallo Garn Studio, Please can you tell me if it would work to use 2 strands of Drops Loves You 9 (shade grey) instead of Paris yarn. I love your patterns and yarn. I am on my 5th project now and soon to start another. Thank you very much for your help. Best wishes - Jan
04.01.2022 - 08:09DROPS Design ha risposto:
Dear Mrs Jones, correct, you can replace 1 strand Paris (yarn group C) with 2 strands DROPS Loves you 9 (yarn group A). Read how to calculate the new amount here. Happy knitting!
04.01.2022 - 12:20
![]() Marijke Van Santvoort ha scritto:
Marijke Van Santvoort ha scritto:
Hallo, Ik ben begonnen met het rugpand, maar heb de indruk dat de maat niet overeenkomt. Mijn confectiemaat is 46. Het achterpand zou ik 124 steken moeten opzetten, maar dat is veel te breed. Zijn hier meer opmerkingen over binnengekomen ? Groeten Marijke
03.05.2021 - 13:45DROPS Design ha risposto:
Dag Marijke,
Bij de juiste stekenverhouding (17 steken in de breedte = 10 cm) zou je op een breedte van 72 cm moeten komen, wanneer je 124 steken opzet. Controleer even of de stekenverhouding klopt en pas eventueel de naalddikte aan om tot een juiste stekenverhouding te komen.
05.05.2021 - 14:01
![]() Dörge Manuela ha scritto:
Dörge Manuela ha scritto:
Hallo, wie ist die Zunahme am Vorderteil gemeint? In der Mitte der Maschen oder rechts und links. Vielen Dank
30.04.2021 - 16:47DROPS Design ha risposto:
Liebe Frau Dörge, die Zunahmen in der Mitte vorne wird am Anfang einer Hin-Reihe beim rechten Vorderteil/am Ende einer Rückreihe beim linken Vorderteil gestrickt. Viel Spaß beim stricken!
03.05.2021 - 07:22
|
|||||||
DROPS 94-1 |
|||||||
|
|
|||||||
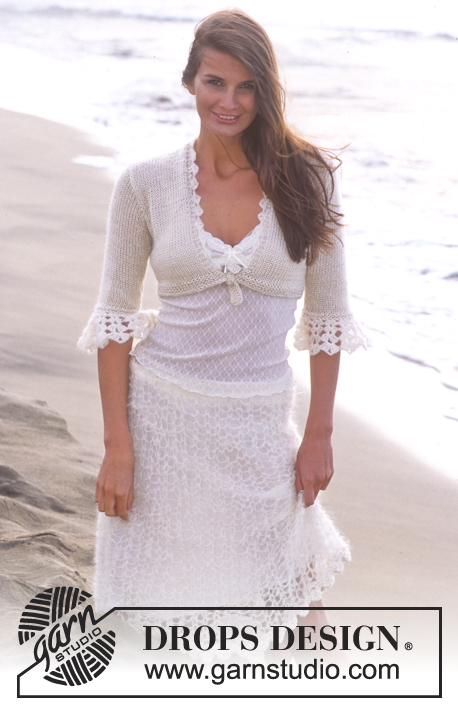
Giacca DROPS in "Paris" con bordi ad onde
DROPS 94-1 |
|||||||
|
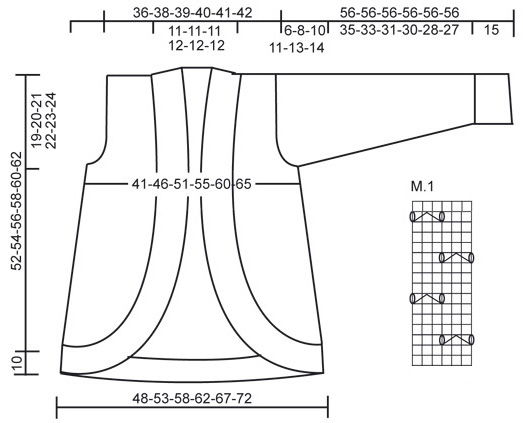
Motivo: Vedere il diagramma M.1. Il diagramma mostra il motivo dal diritto del lavoro. Dietro: Avviare 84-92-100-108-116-124 m. (compresa 1 m. di vivagno a ogni lato, le m. di vivagno sono lavorate a m. legaccio per tutto il lavoro) con i f. n° 5 mm con il Paris lilla-mix. Lavorare a m. rasata con 1 m. di vivagno a ogni lato a m. legaccio. Leggere tutta la sezione seguente prima di continuare: Diminuzioni a lato: Quando il lavoro misura 5 cm diminuire 1 m. a ogni lato ogni 4-4,5-4,5-5-5-5,5 cm per un totale di 6 volte = 72-80-88-96-104-112 m. Allo stesso tempo, quando il lavoro misura 12 cm lavorare il motivo come segue: 1 m. di vivagno, 6-4-5-6-4-5 m. a m. rasata, M.1 sulle 66-78-84-90-102-108 m. successive, 6-4-5-6-4-5 m. a m. rasata, 1 m. di vivagno. Lavorare il motivo fino a quando il lavoro misura 30 cm e poi continuare a m. rasata su tutte le m. Quando il lavoro misura 33-34-35-36-37-38 cm, diminuire per lo scalfo a ogni lato a f. alterni come segue: 3 m. 1 volta, 2 m. 0-1-2-3-4-6 volte e 1 m. 2-3-4-5-6-5 volte = 62-64-66-68-70-72 m. rimaste. Quando il lavoro misura 50-52-54-56-58-60 cm intrecciare le 16-16-16-18-18-18 m. centrali per il collo e diminuire 1 m. all’altezza della scollatura sul f. successivo = 22-23-24-24-25-26 m. rimaste su ogni spalla. Intrecciare quando il lavoro misura 52-54-56-58-60-62 cm. Davanti destro: Avviare 18-20-22-24-26-28 m. (compresa 1 m. di vivagno a lato) con i f. n° 5 mm con il Paris lilla-mix. Leggere tutta la sezione seguente prima di continuare: Lavorare a m. rasata con 1 m. di vivagno a m. legaccio e aumentare verso il centro davanti a f. alterni come segue (inserire un segnapunti dove iniziano e finiscono gli aumenti – importante perché questi segnapunti saranno necessari durante la lavorazione del bordo): 3 m. 0-0-1-2-3-4 volte, 2 m. 3-4-4-3-3-3 volte e 1 m. 9-9-8-8-7-6 volte. Diminuzioni a lato: Allo stesso tempo, quando il lavoro misura 5 cm, diminuire come descritto per il dietro. Allo stesso tempo, quando il lavoro misura 12 cm (ora tutti gli aumenti al centro davanti sono finiti) lavorare il motivo come segue: 1 m. di vivagno, 1 m. a m. rasata, M.1 sulle 21-27-30-33-36-39 m. successive, le m. rimaste a m. rasata. Continuare il motivo in questo modo fino a quando il lavoro misura 30 cm e finire il lavoro a m. rasata. Alla fine di tutti gli aumenti e diminuzioni, ci sono 27-31-35-38-42-46 m. rimaste. Quando il lavoro misura 33-34-35-36-37-38 cm dal f. di avvio, diminuire per lo scalfo come descritto per il dietro = 22-23-24-24-25-26 m. rimaste sulla spalla. Intrecciare quando il lavoro misura 52-54-56-58-60-62 cm.Davanti sinistro: come il davanti destro, ma a specchio. Manica: Avviare 51-51-58-58-58-58 m. (compresa 1 m. di vivagno a ogni lato) usando i f. dritti n° 4 mm e il Paris lilla-mix. Lavorare 2 f. a m. rasata e lavorare il f. successivo come segue dal diritto del lavoro: 1 m. di vivagno, *3 m. dir., 4 m. rov.*, ripetere *-* e finire con 1 m. di vivagno. Quando il lavoro misura 4 cm, diminuire tutte le sezioni a rov. da 4 m. rov. a 3 m. rov. = 44-44-50-50-50-50 m. Continuare a coste fino a quando il lavoro misura 15 cm. Passare ai f. n° 5 mm e continuare a m. rasata. Allo stesso tempo iniziare ad aumentare 1 m. a ogni lato ogni 5-3,5-4-2,5-2-1,5 cm per un totale di 7-9-8-11-13-15 volte = 58-62-66-72-76-80 m. Quando il lavoro misura 50-48-46-45-43-42 cm intrecciare per l’arrotondamento della manica a ogni lato a f. alterni come segue: 4 m. 1 volta, 3 m. 1 volta, 2 m. 2 volte, 1 m. 0-2-4-5-7-9 volte, e 2 m. a ogni lato fino a quando il lavoro misura 55 cm, ora diminuire 3 m. a ogni lato e intrecciare sul f. successivo. La manica misura circa 56 cm. Confezione: Cucire le spalle e i margini dei lati. Bordo: Riprendere circa 330-348-366-384-402-420 m. (divisibile per 6) dal diritto del lavoro usando i f. circolari n° 4 mm e il Paris lilla-mix. Iniziare dal basso del centro dietro e riprendere le m. tutto attorno all’apertura. Lavorare 1 giro rov., 1 giro dir. e continuare a coste: 3 m. dir., 3 m. rov. Quando le coste misurano 4 cm, aumentare tutte le sezioni con 3 m. rov. a 4 m. rov. tra i segnapunti sui davanti. Quando le coste misurano 8 cm, aumentare tutte le sezioni con 4 m. rov. a 5 m. rov. tra i segnapunti (per assicurarsi che il bordo combaci con i davanti arrotondati). Intrecciare quando le coste misurano 12 cm. Bordo all’uncinetto: con l’uncinetto n° 5 mm e il Paris panna lavorare attorno alle coste come segue: 1 m.b. nella 1° m. lavorata, *4 cat., 1 m.a. nella 1° cat., saltare 3 m. lavorate, 1 m.b. nella m. successiva*, ripetere *-*. Lavorare il bordo all’uncinetto attorno ai bordi delle maniche. Cucire i margini delle maniche e attaccarle. |
|||||||
Spiegazioni del diagramma |
|||||||
|
|||||||
 |
|||||||
Avete terminato questo modello?Allora taggate le vostre foto con #dropspattern o inviatele alla #dropsfan gallery. Avete bisogno di aiuto con questo modello?Troverete 26 video tutorial, una sezione per i commenti/domande e molto altro guardando il modello su www.garnstudio.com © 1982-2026 DROPS Design A/S. Ci riserviamo tutti i diritti. Questo documento, compreso tutte le sue sotto-sezioni, è protetto dalle leggi sul copyright. Potete leggere quello che potete fare con i nostri modelli alla fine di ogni modello sul nostro sito. |
|||||||


Con oltre 40 anni di esperienza nel design di modelli di maglia e uncinetto, DROPS Design offre la più estesa collezione di modelli gratuiti su internet - tradotti in 17 lingue. Ad oggi vi possiamo fornire 324 cataloghi e 12290 modelli - 9561 dei quali sono tradotti in Italiano.
Ci stiamo impegnando molto per darvi il meglio che vi possiamo offrire in termini di maglia e uncinetto, ispirazioni e consigli così come filati di grande qualità ad un prezzo incredibile! Volete utilizzare i nostri modelli per qualcosa d'altro oltre al vostro uso personale? Potete leggere tutto ciò che è consentito nel testo sul Copyright in basso su tutte le pagine dei nostri modelli. Buon lavoro!
Lasciare un commento sul modello DROPS 94-1
Noi saremmo felici di ricevere i tuoi commenti e opinioni su questo modello!
Se vuoi fare una domanda, fai per favore attenzione a selezionare la categoria corretta nella casella qui sotto per velocizzare il processo di risposta. I campi richiesti sono indicati da *.