
Categorie popolari
State cercando un filato?


Commenti / Domande (29)
![]() Stine ha scritto:
Stine ha scritto:
Guten Tag DROPS Kid-Silk, 75% Mohair, 25% Seide. Ich würde eine Alternative zum Mohair benötigen. Seide darin ist absolut ok. Ich bin Asthmaikerin und kann nur schlecht mit Mohairwolle. Können Sie mir eine Alternative aufzeigen? Liebe Grüsse aus der Schweiz. Stine
15.02.2026 - 14:38
![]() Nathalie ha scritto:
Nathalie ha scritto:
Je n\'ai pas bien compris à quel endroit commence le début des tours... Il est écrit mettre un marqueur après les 37 premières mailles...? D\'après ma compréhension, je pars du milieu dos et je compte 13m : je mets mon marqueur à cet endroit pour indiquer le début de chaque tour. Est-ce que c\'est bien cela ? Merci par avance pour votre aide, je suis un peu perdue !
19.12.2025 - 14:55DROPS Design ha risposto:
Bonjour Nathalie, les tours commencent au niveau du raglan entre le dos et la manche droite; le marqueur placé après 37 mailles sert de repère pour mesurer (et il doit être au milieu du devant environ), pas pour commencer les tours. Bon tricot!
22.12.2025 - 17:19
![]() Belliere ha scritto:
Belliere ha scritto:
Pourquoi augmenter des mailles pour les cotes du bas pull et des poignees
25.11.2025 - 20:19DROPS Design ha risposto:
Bonjour Mme Belliere, pour la même circonférence, il faudra davantage de mailles en côtes avec les aiguilles 3 qu'en jersey avec les aiguilles 4,5, raison pour laquelle on va augmenter juste avant de faire les côtes. Bon tricot!
26.11.2025 - 09:02
![]() Susana Bastos ha scritto:
Susana Bastos ha scritto:
Boa tarde Estou confusa quanto aos aumentos nos raglans. No tamanho M se o meio da frente e apos 38 malhas onde se coloca o marcador 1? E na 39? E que isso nao me esta a fazer sentido nenhum pq assim fica o marcador 1 do raglan fica no meio da frente. Obrigado pela ajuda que puderem dar
24.11.2025 - 23:43DROPS Design ha risposto:
Bom dia, O 1.º marcador é colocado a meio da frente. Este marcador irá servir para tirar medidas. Os marcadores dos raglans são colocados depois: Continuar com a agulha circular 4,5 mm. Colocar, então, 4 marcadores, sem tricotar - estes marcadores devem ser colocados, cada um, numa malha (e não entre as malhas – estas são as malhas dos raglans e tricotam-se em ponto meia). Ter em atenção de que cada marcador dos raglans deve ser colocado na malha e não entre duas malhas. Bons tricôs!
25.11.2025 - 10:28
![]() Sahra ha scritto:
Sahra ha scritto:
Hallo, Es gibt einen Fehler in der Anleitung. Bei 104 (m) Anschlag Masche (m) muss der 2. Markierer bei 28 gesetzt werden. Das passt aber nicht. Diese Angabe passt für einen Abschlag mit 100 Maschen. (S) Können sie das bitte anpassen. Damit klar ist was zu m und s usw. passt? Vielen Dank! Sahra
06.10.2025 - 17:57DROPS Design ha risposto:
Hi Sahra, it is ok. There are always 22 sts for sleeves in all sizes, the number of stitches for the front and the back increases. Happy knitting!
16.11.2025 - 09:55
![]() Doucet ha scritto:
Doucet ha scritto:
Comment rajouter des rangs raccourcis pour le dos. Merci.
19.08.2025 - 19:51DROPS Design ha risposto:
Bonjour Mme Doucet, vous pouvez vous inspirer d'un modèle similaire de même tension avec rangs raccourcis, et / ou bien vous inspirer de cette vidéo. Bon tricot!
20.08.2025 - 07:52
![]() Vittoria ha scritto:
Vittoria ha scritto:
Buongiorno, vorrei sapere la misura il corpo dalla divisione delle maniche fino in fondo ( compresi quindi i 5cm di coste) . Grazie mille Vittoria
13.08.2025 - 00:28DROPS Design ha risposto:
Buonasera Vittoria, può trovare lo schema delle misure in fondo alla pagina del modello. Buon lavoro!
13.08.2025 - 20:09
![]() Lindy ha scritto:
Lindy ha scritto:
Just so I completely understand, the 1st raglan marker initially was next to the beginning of round marker, butI have increased 4 stitches between the 1st raglan marker and the beginning of the round marker so there are stitches between them. So I'm assuming that now the 1st raglan marker is the beginning of the round. I'm so sorry to keep bothering you, but I don't want to do it wrong and have to open it. Thank you so much!
21.04.2025 - 14:58DROPS Design ha risposto:
Dear Lindy, that's correct. That is why we increase last before marker 1, instead of increasing on each side of the marker at the beginning of the round. The first marker is the first stitch of the round, while the stitches increased before the marker are the last stitches of the round. Happy knitting!
26.04.2025 - 19:59
![]() Lindy ha scritto:
Lindy ha scritto:
Per my previous question regarding rounds 1-4. For round 3, why am I increasing "before raglan stitch 1" last? This means I have to knit past the beginning of the round marker (end of Round 3) to make the yarn over increase before raglan stitch 1. Essentially, I am doing a yarn over increase in Round 4? Please advise. Thank you!
20.04.2025 - 23:48DROPS Design ha risposto:
Dear Lindy, raglan stitch 1 is the first stitch in the round. So if your last yarn over is before raglan stitch 1 then you work 1 yarn over before starting the new round. That is, you work the last yarn over after the last stitch in the round, but before starting the next round. When working the yarn overs on each side of the first stitch of the round, you start the round by working the raglan stitch, then work 1 yarn over and work the whole round as indicated, finishing the round with 1 yarn over (" the yarn over before the marker"). Happy knitting!
21.04.2025 - 00:15
![]() Lindy ha scritto:
Lindy ha scritto:
Little confused on rounds 1-4. Round 3 calls for a yarn overs on 2, 3, 4 and then 1. When repeating round 1 after round 4, I knit past the beginning of the round marker, knit a few stitches and knit the previous yarn over, then YO each side of raglan stitch. Does this make sense please ?
19.04.2025 - 16:11DROPS Design ha risposto:
Dear Lindy, raglan stitch 1 is the first stitch in the round. So if your last yarn over is before raglan stitch 1 then you work 1 yarn over before starting the new round. That is, you work the last yarn over after the last stitch in the round, but before starting the next round. When working the yarn overs on each side of the first stitch of the round, you start the round by working the raglan stitch, then work 1 yarn over and work the whole round as indicated, finishing the round with 1 yarn over (" the yarn over before the marker"). Happy knitting!
21.04.2025 - 00:15
|
|
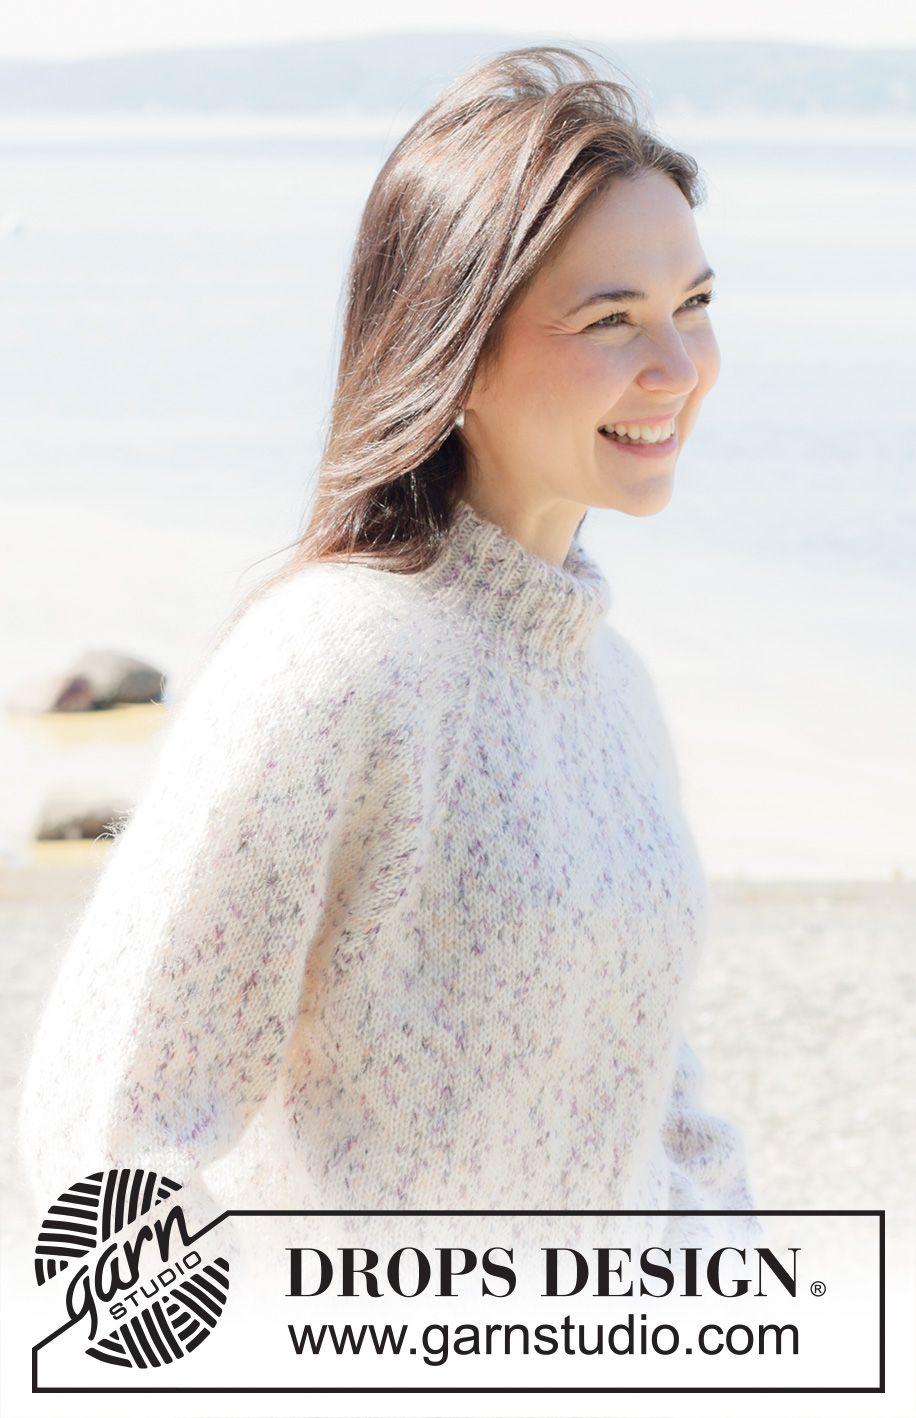
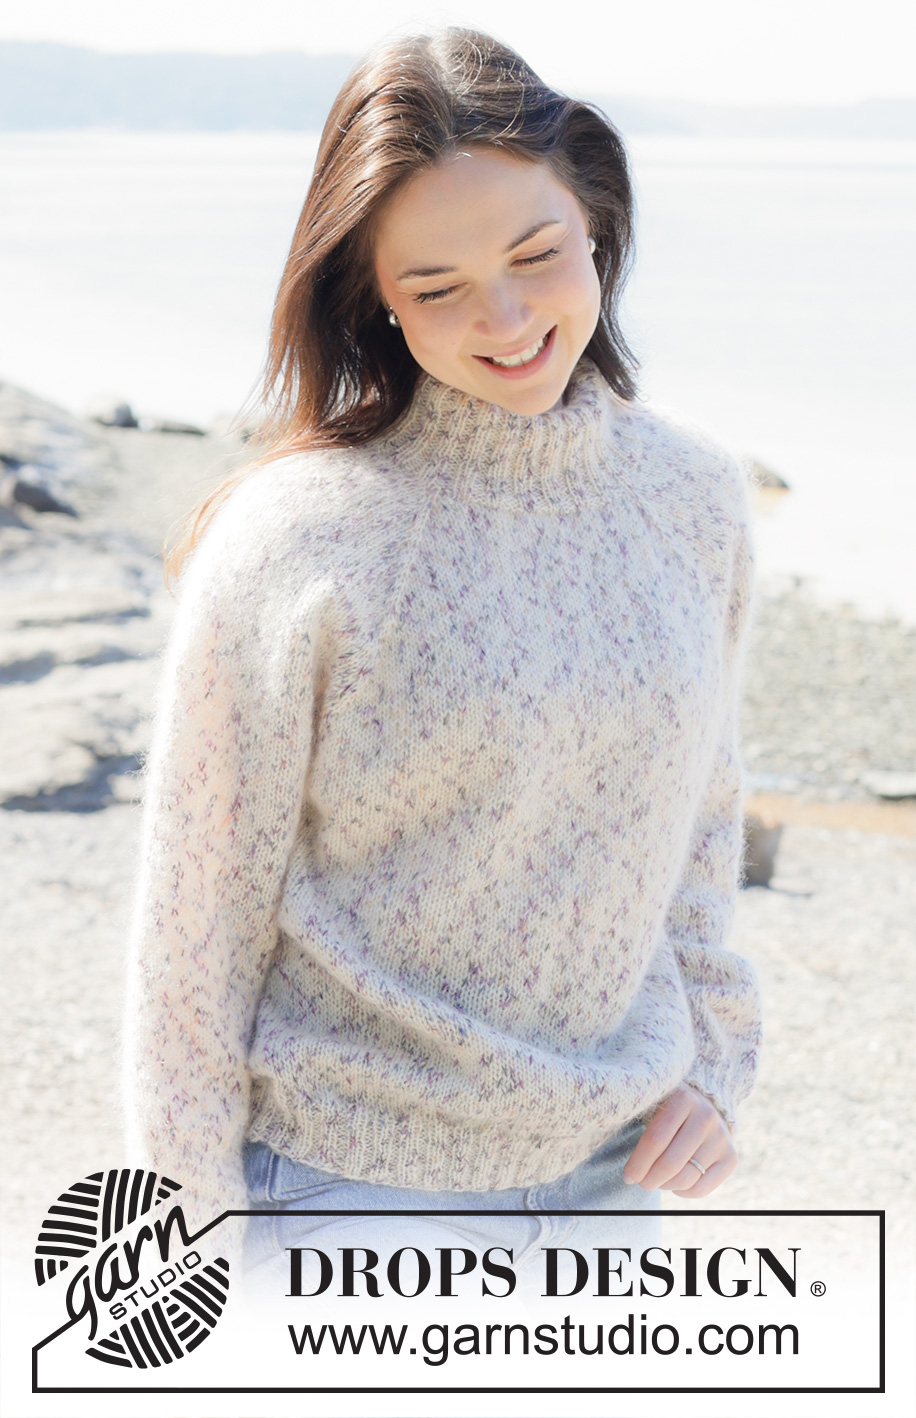
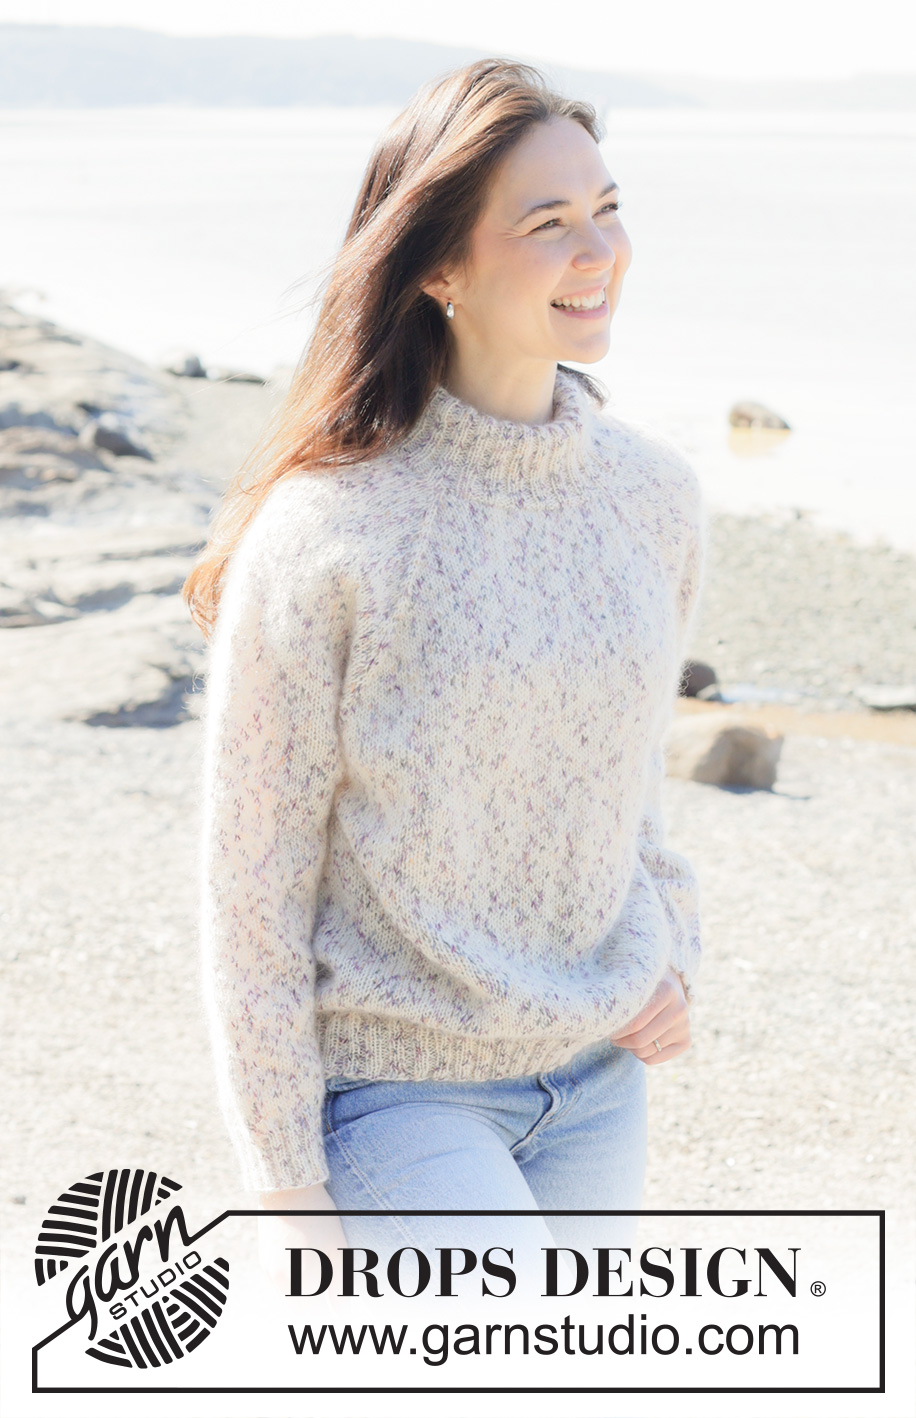
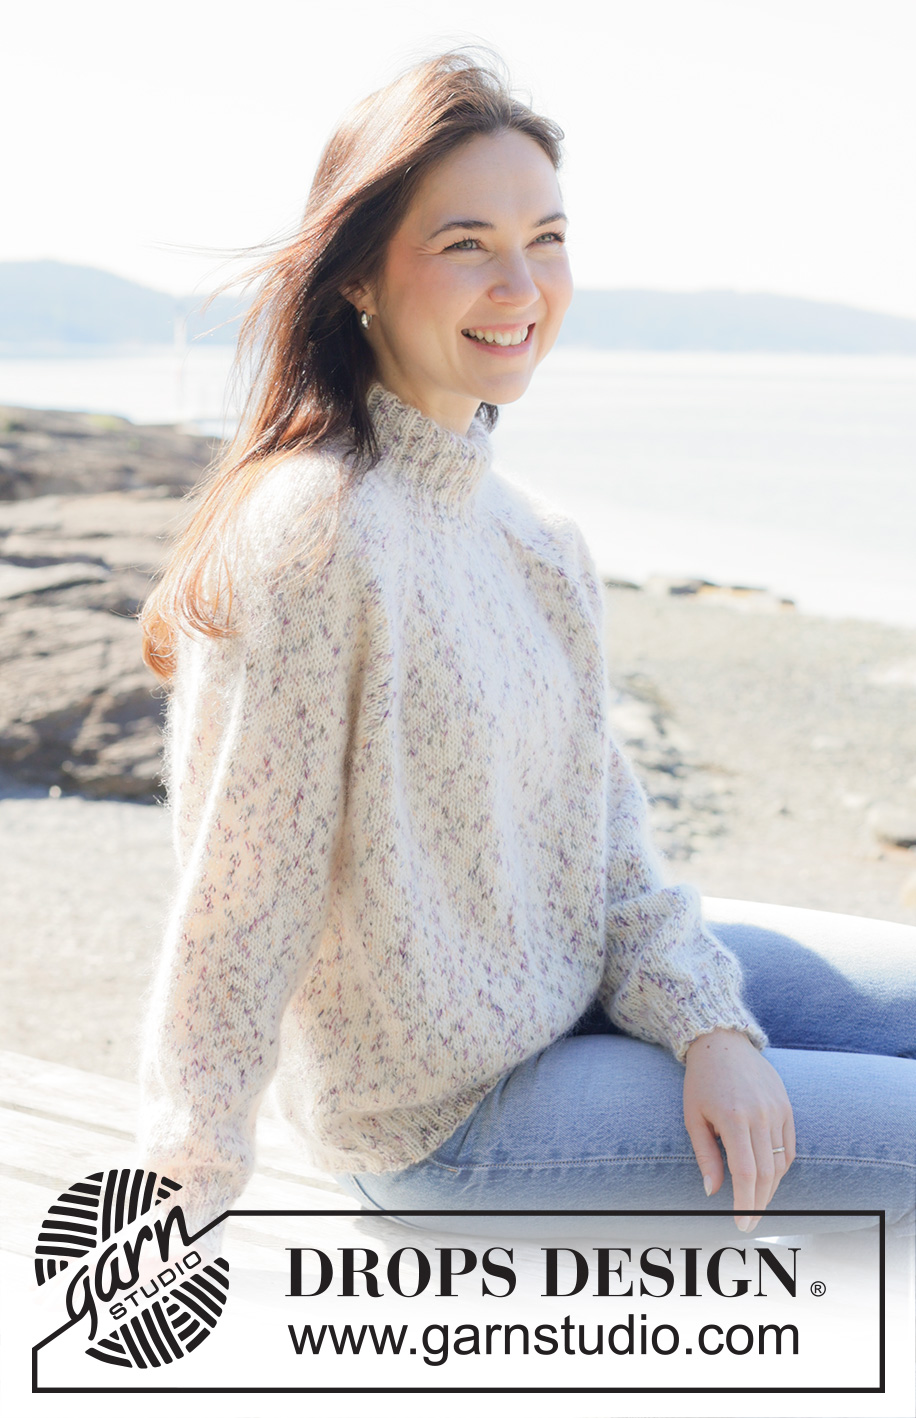
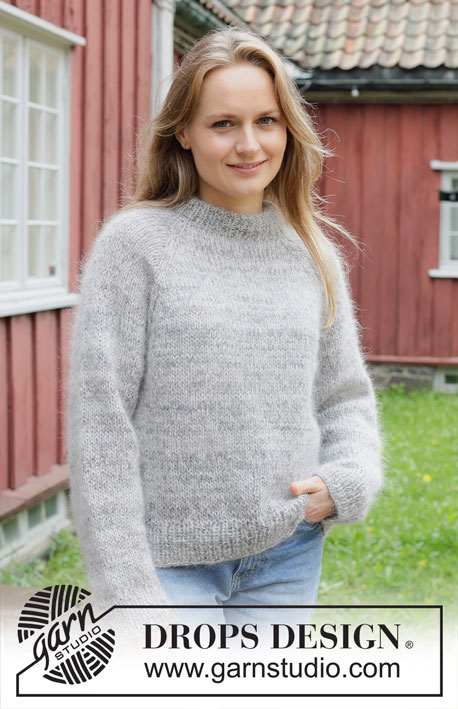
Winter Confetti#winterconfettisweater |
|
 |
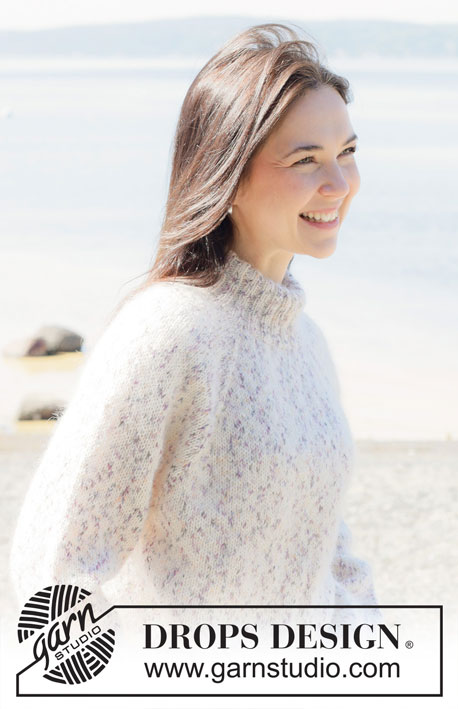 |
Maglione lavorato ai ferri in DROPS Fabel e DROPS Kid-Silk. Lavorato dall’alto in basso con raglan e collo doppio. Taglie: S – XXXL.
DROPS 255-33 |
|
|
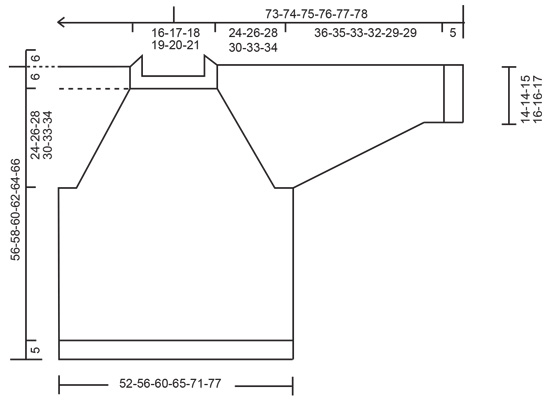
---------------------------------------------------------- TECNICHE IMPIEGATE: ---------------------------------------------------------- RAGLAN: Aumentare 1 maglia facendo 1 gettato, che viene lavorata come segue sul giro successivo: PRIMA DELLA MAGLIA DEL RAGLAN: Prendere la maglia dal ferro sinistro e rimetterla sul ferro sinistro ma nel verso opposto (inserire il ferro sinistro da dietro quando la si rimette sul ferro). Lavorare a diritto nel filo davanti delle maglie (maglia ritorta a destra) per evitare buchi. DOPO LA MAGLIA DEL RAGLAN: Lavorare i gettati nel filo dietro delle maglie (maglia ritorta a sinistra) per evitare buchi. SUGGERIMENTO PER LE DIMINUZIONI: Iniziare 3 maglie prima del segnapunti, 2 maglie insieme a diritto, 2 maglie diritto (il segnapunti è tra queste 2 maglie), passare 1 maglia a diritto senza lavorarla, 1 maglia diritto, accavallare la maglia passata sopra quella appena lavorata (2 maglie diminuite). ---------------------------------------------------------- INIZIO DEL LAVORO: ---------------------------------------------------------- MAGLIONE – BREVE RIASSUNTO DEL LAVORO: In questo modello vengono utilizzati ferri di lunghezze diverse, iniziare con la lunghezza necessaria per il numero di maglie e cambiare quando necessario. Lavorare il collo e lo sprone in tondo e con i ferri circolari dall’alto in basso e dal dietro della spalla destro. Alla fine dello sprone, dividere il lavoro per il corpo e le maniche e lavorare il corpo in tondo, con le maniche in sospeso. Poi lavorare le maniche dall’alto in basso in tondo. Piegare il bordo del collo a metà verso l’interno e affrancare. COLLO DOPPIO: Avviare 100-104-108-112-116-120 maglie con i ferri circolari n° 4,5 mm con 1 capo di DROPS Fabel e 1 capo di DROPS Kid-Silk. Passare ai ferri circolari n° 3 mm (avviare le maglie con i ferri più grandi permette di ottenere un bordo di avvio elastico). Lavorare a coste in tondo (2 maglie diritto/2 maglie rovescio) per 13 cm. Il collo verrà in seguito piegato fino ad un’altezza di circa 6 cm. L’inizio del giro è all’altezza del dietro della spalla destro. Inserire 1 segnapunti dopo le prime 37-38-39-40-41-42 maglie (circa centro davanti), misurare il lavoro da questo segnapunti. SPRONE: Continuare con i ferri circolari n° 4,5 mm. Inserire 4 segnapunti nel lavoro senza lavorare le maglie e inserire i segnapunti nelle maglie (maglie del raglan), che vengono lavorate a maglia rasata. Inserire il segnapunti 1 nella 1° maglia, contare 22 maglie (= manica), Inserire il segnapunti 2 nella maglia successiva, contare 26-28-30-32-34-36 maglie (= davanti), Inserire il segnapunti 3 nella maglia successiva, contare 22 maglie (= manica), Inserire il segnapunti 4 nella maglia successiva, rimangono 26-28-30-32-34-36 maglie (= dietro). Lavorare a maglia rasata in tondo e aumentare per il RAGLAN – leggere la descrizione sopra, come segue: GIRO 1: fare 1 gettato prima e dopo ogni maglia del raglan (= 8 aumenti). GIRO 2: lavorare a maglia rasata su tutte le maglie (ricordarsi di ritorcere i gettati come spiegato sotto RAGLAN). Lavorare i giri 1 e 2 per un totale di 1-1-3-6-5-1 volte (= 2-2-6-12-10-2 giri lavorati) = 108-112-132-160-156-128 maglie. Ricordarsi di mantenere la corretta tensione del lavoro. Continuare a maglia rasata, ora aumentare come segue: GIRO 1: fare 1 gettato prima e dopo ogni maglia del raglan (= 8 aumenti). GIRO 2: lavorare a maglia rasata su tutte le maglie. GIRO 3: fare 1 gettato dopo la maglia del raglan-2, 1 gettato prima della maglia del raglan-3, 1 gettato dopo la maglia del raglan-4 e 1 gettato prima della maglia del raglan-1 (= 4 aumenti che sono solo sul davanti, non sulle maniche). GIRO 4: lavorare a maglia rasata su tutte le maglie. Lavorare i giri 1 -4 per un totale di 14-15-15-15-17-20 volte (56-60-60-60-68-80 giri lavorati = gli aumenti sono stati lavorati 14-15-15-15-17-20 volte sulle maniche e 28-30-30-30-34-40 volte sul davanti e dietro) = 276-292-312-340-360-368 maglie. Tutti gli aumenti per il raglan sono finiti, con un totale di 29-31-33-36-39-41 volte sul davanti e dietro e 15-16-18-21-22-21 volte sulle maniche. Continuare a maglia rasata ma senza ulteriori aumenti, fino a quando lo sprone misura 24-26-28-30-33-34 cm dal segnapunti al centro davanti. Ora dividere lo sprone per il corpo e le maniche. DIVISIONE PER IL CORPO E LE MANICHE: Lavorare il giro successivo come segue: lavorare a diritto la prima maglia, mettere in sospeso le 52-54-58-64-66-64 maglie successive per la manica, avviare 8-8-10-12-14-18 maglie (= a lato al centro sotto la manica), lavorare 86-92-98-106-114-120 maglie diritto (= davanti), mettere in sospeso le 52-54-58-64-66-64 maglie successive per la manica, avviare 8-8-10-12-16-18 maglie (= a lato al centro sotto la manica), lavorare le ultime 85-91-97-105-113-119 maglie a diritto (= dietro). Finire il corpo e le maniche in modo separato, iniziando il nuovo giro a lato sotto la manica. CORPO: = 188-200-216-236-256-276 maglie. Continuare a maglia rasata in tondo fino a quando il lavoro misura 45-47-49-51-53-55 cm dal segnapunti al centro davanti. Passare ai ferri circolari n° 3 mm. Lavorare a coste (2 maglie diritto, 2 maglie rovescio) e ALLO STESSO TEMPO aumentare 20-24-24-24-28-32 maglie in modo uniforme sul 1° giro = 208-224-240-260-284-308 maglie. Quando le coste misurano 5 cm, intrecciare. Il maglione misura 50-52-54-56-58-60 cm dal segnapunti al centro davanti e 56-58-60-62-64-66 cm dalla cima della spalla. MANICHE: Rimettere le 52-54-58-64-66-64 maglie delle maniche da un segnapunti a un lato del lavoro sui ferri circolari n° 4,5 mm e inoltre riprendere 1 maglia in ognuna delle 8-8-10-12-16-18 maglie avviate sotto la manica = 60-62-68-76-80-82 maglie. Inserire 1 segnapunti al centro delle 8-8-10-12-14-18 maglie sotto la manica. Iniziare all’altezza di questo segnapunti e lavorare a maglia rasata in tondo. Quando la manica misura 3 cm, diminuire al centro sotto la manica - leggere il SUGGERIMENTO PER LE DIMINUZIONI. Diminuire in questo modo ogni 6-6-4-3-2-2 cm 5-5-7-10-11-11 volte in totale = 50-52-54-56-58-60 maglie. Lavorare fino a quando la manica misura 36-35-33-32-29-29 cm dalla divisione. Passare ai ferri a doppia punta n° 3 mm. Lavorare a coste (2 maglie diritto, 2 maglie rovescio) e ALLO STESSO TEMPO aumentare 6-8-6-8-6-8 maglie in modo uniforme sul 1° giro = 56-60-60-64-64-68 maglie. Quando le coste misurano 5 cm, intrecciare. La manica misura circa 41-41-38-37-34-34 cm. CONFEZIONE: Piegare il collo a metà verso l’interno del lavoro e affrancare. Per evitare un bordo del collo tirato che spunti verso l’esterno è importante mantenere la cucitura elastica. |
|
 |
|
Avete terminato questo modello?Allora taggate le vostre foto con #dropspattern #winterconfettisweater o inviatele alla #dropsfan gallery. Avete bisogno di aiuto con questo modello?Troverete 28 video tutorial, una sezione per i commenti/domande e molto altro guardando il modello su www.garnstudio.com © 1982-2026 DROPS Design A/S. Ci riserviamo tutti i diritti. Questo documento, compreso tutte le sue sotto-sezioni, è protetto dalle leggi sul copyright. Potete leggere quello che potete fare con i nostri modelli alla fine di ogni modello sul nostro sito. |
|


Con oltre 40 anni di esperienza nel design di modelli di maglia e uncinetto, DROPS Design offre la più estesa collezione di modelli gratuiti su internet - tradotti in 17 lingue. Ad oggi vi possiamo fornire 324 cataloghi e 12290 modelli - 9561 dei quali sono tradotti in Italiano.
Ci stiamo impegnando molto per darvi il meglio che vi possiamo offrire in termini di maglia e uncinetto, ispirazioni e consigli così come filati di grande qualità ad un prezzo incredibile! Volete utilizzare i nostri modelli per qualcosa d'altro oltre al vostro uso personale? Potete leggere tutto ciò che è consentito nel testo sul Copyright in basso su tutte le pagine dei nostri modelli. Buon lavoro!
Lasciare un commento sul modello DROPS 255-33
Noi saremmo felici di ricevere i tuoi commenti e opinioni su questo modello!
Se vuoi fare una domanda, fai per favore attenzione a selezionare la categoria corretta nella casella qui sotto per velocizzare il processo di risposta. I campi richiesti sono indicati da *.