
Categorie popolari
State cercando un filato?


Commenti / Domande (47)
![]() Christine Lynch ha scritto:
Christine Lynch ha scritto:
If you drop down to a US4 needle on the Green Grove Sweater to meet gauge would you drop down to a US0 for the neck or slightly larger?
31.03.2025 - 19:58DROPS Design ha risposto:
Dear Mrs Lynch, you can probably go down to a needle size US0, just make sure it's not too tight when you work neck. Happy knitting!
01.04.2025 - 08:50
![]() Christine Lynch ha scritto:
Christine Lynch ha scritto:
In the Green Grove Sweater, when knitting the graph pattern there are yarn overs. In the tips it refers to a kint in the back loop on increase stitches, would you bo the same in the design pattern listed on the graph? Than you!
31.03.2025 - 19:48DROPS Design ha risposto:
Hi Christine, No, the yarn overs in the diagrams are part of the lace pattern, so are worked through the front loop to leave holes. Happy knitting!
01.04.2025 - 06:45
![]() Christine Lynch ha scritto:
Christine Lynch ha scritto:
I did a swatch for gage and it come up with 18 stitches by 29 rows for the Green Grove Sweater. I went up a needle size and I blocked the piece. I read you don't block I was wondering why. And if I just went by the measurements using the size 6 instead of 7 because I prefer the tighter weave would it work? Thank you
28.03.2025 - 18:21DROPS Design ha risposto:
Dear Christine, if you have a 18 stitches x29 rows gauge you would need to use a smaller needle (you have too few stitches), not a larger needle, to work the pattern tighter. You'd need to try with a US4 needle instead to try a get the correct gauge. This way the weave should look even tighter and the gauge would also be closer to the actual one probably, so you could work the pattern as it is. The gauge should not be blocked if the final piece isn't blocked; otherwise it wouldn't reflect the gauge that you'll have as you work the pattern, so the garment might not have the correct shape/measurements at the end. Happy knitting!
30.03.2025 - 20:28
![]() Ingrid Neven ha scritto:
Ingrid Neven ha scritto:
Beste,ik zij aan het begin van de halsrand met 180 steken,en 5 cm,nu moet ik 36 steken meerderen,waardoor ik gaatjes heb en mog nog 2cm breien, vindt het zo vreselijk,heb al vanalles gedaan maar krijg het niet mooi,,heb uw hulp nodig,gr
18.03.2025 - 11:44DROPS Design ha risposto:
Dag Ingrid,
Bij het meerderen maak je omslagen en deze brei je op de volgende naald gedraaid om een gaatje te voorkomen. Wat je in plaats van omslagen maken ook kunt doen om te meerderen is de draad tussen twee steken opnemen en deze gedraaid recht breien. Zie deze video.
18.03.2025 - 20:08
![]() Anne ha scritto:
Anne ha scritto:
Bonjour, je me demande s'il n'y a pas une erreur sur cette partie du patron : Quand la manche mesure 4-3-3-2 cm depuis la division, diminuer 2 mailles au milieu sous la manche - voir DIMINUTIONS. Diminuer ainsi 2-3-3-3 fois au total tous les 4-3-3-2 cm = 78-84-88-92 mailles. Comment peut-on arriver à 88 mailles pour la taille L après diminution en partant de 82 mailles ? 🤔
17.03.2025 - 14:02DROPS Design ha risposto:
Bonjour, notez que la taille L est la 1ère des 4 tailles dans ce paragraphe (L à XXXL), autrement dit, vous allez diminuer en taille L à partir de 4 cm et 2 fois au total tous les 4 cm = il reste 78 mailles. Bon tricot!
17.03.2025 - 15:36
![]() Ingrid Neven ha scritto:
Ingrid Neven ha scritto:
Beste,ik ben dit truitje aan het maken,maar ben er nog Gene hele in,als je het patroon afprint,dan staat er bij dat er video filmpjes te bekijken zijn,waar kan ik deze vinden,gr
08.03.2025 - 11:13DROPS Design ha risposto:
Dag Ingrid,
Op je mobiel staat vlak onder de foto's een link naar de video's die van toepassing zijn op het patroon. (In de browser rechts naast de foto.)
12.03.2025 - 11:39
![]() Ingrid Neven ha scritto:
Ingrid Neven ha scritto:
Beste,wat wil in dit patroon zeggen,De pas,welk deel van het patroon is dat,en waar kan ik de video's bekijken van dit patroon,gr
01.03.2025 - 14:58DROPS Design ha risposto:
dag Ingrid,
De pas is het bovenste deel van het patroon waarbij het lijf en de mouwen allemaal nog op dezelfde rondbreinaald zitten. Het werk wordt van boven naar beneden gebreid en als je bij de oksels bent, wordt het werk gescheiden om daarna eerst het lijf (voor- en achterpand) naar beneden te breien en daarna de mouwen. Rechts naast de afbeelding van het patroon vindt je video's, lessen en antwoorden op veel gestelde vragen.
02.03.2025 - 10:10
![]() Daria ha scritto:
Daria ha scritto:
Thank you for your previous response. It appears that the latest IOS update via apple is nor compatible with your patterns and will not allow iPads or iPhones with latest update to convert your patterns to pdf format. Have you tried using the latest iOS update in your test? Your site is the only one that I’m having issues converting to pdf. Thanks so much.
23.01.2025 - 19:46DROPS Design ha risposto:
Dear Daria, we usually convert our patterns to PDF by clicking on the print button and then choosing to "Save as PDF" instead of printing it in the printer settings, which should still work regardless of the device. But we will send your request to our tech department, so that they can run the necessary tests. Happy knitting!
25.01.2025 - 19:00
![]() Daria ha scritto:
Daria ha scritto:
I’ve been trying lately to download and print the pdf patterns on your site, which I’ve never had an issue with before, and they come up blank now. Did you change anything on your site as this is the only site I’m having with issue with downloads or printing? Love your patterns but now can’t retrieve them so hoping you can help. Thanks!
22.01.2025 - 18:02DROPS Design ha risposto:
Dear Daria, our patterns can only be printed (saves as a .pdf only if using a virtual printer) - we just tried out and could print this pattern, maybe you should check some settings perhaps browser or printer? Happy knitting!
23.01.2025 - 10:05
![]() Debbie ha scritto:
Debbie ha scritto:
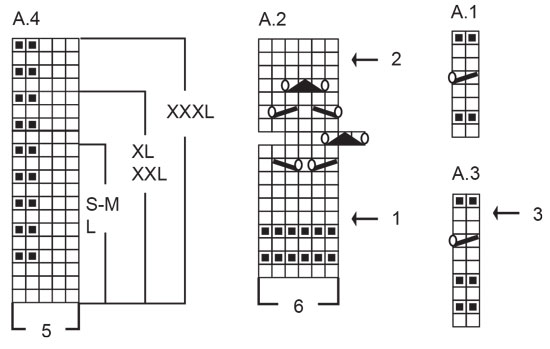
Hi I just finished A-2 and it did not work out to look like a diamond. I notice on the pattern from the largest part of the diamond there are 2 sets of holes and after centre there is only one. Can you please help and explain what I am doing wrong. Row 11 I understand how to do it. Thank you
11.08.2024 - 00:37DROPS Design ha risposto:
Dear Debbie, as you can see in the picture, the pattern is displaced in the 11th row. So the yarn overs are not one over the other, forming a diamond, but connecting the left edge of the previous diamond and the right edge of the current diamond. To match the pattern the beginning of the round is moved 2 stitches backwards. "NOTE! On 11th round in diagram displace beginning of round 2 stitches to the right to make the pattern fit the entire round." Happy knitting!
12.08.2024 - 00:41
|
||||||||||||||||||||||
Green Grove Tee#greengrovetee |
||||||||||||||||||||||
 |
 |
|||||||||||||||||||||
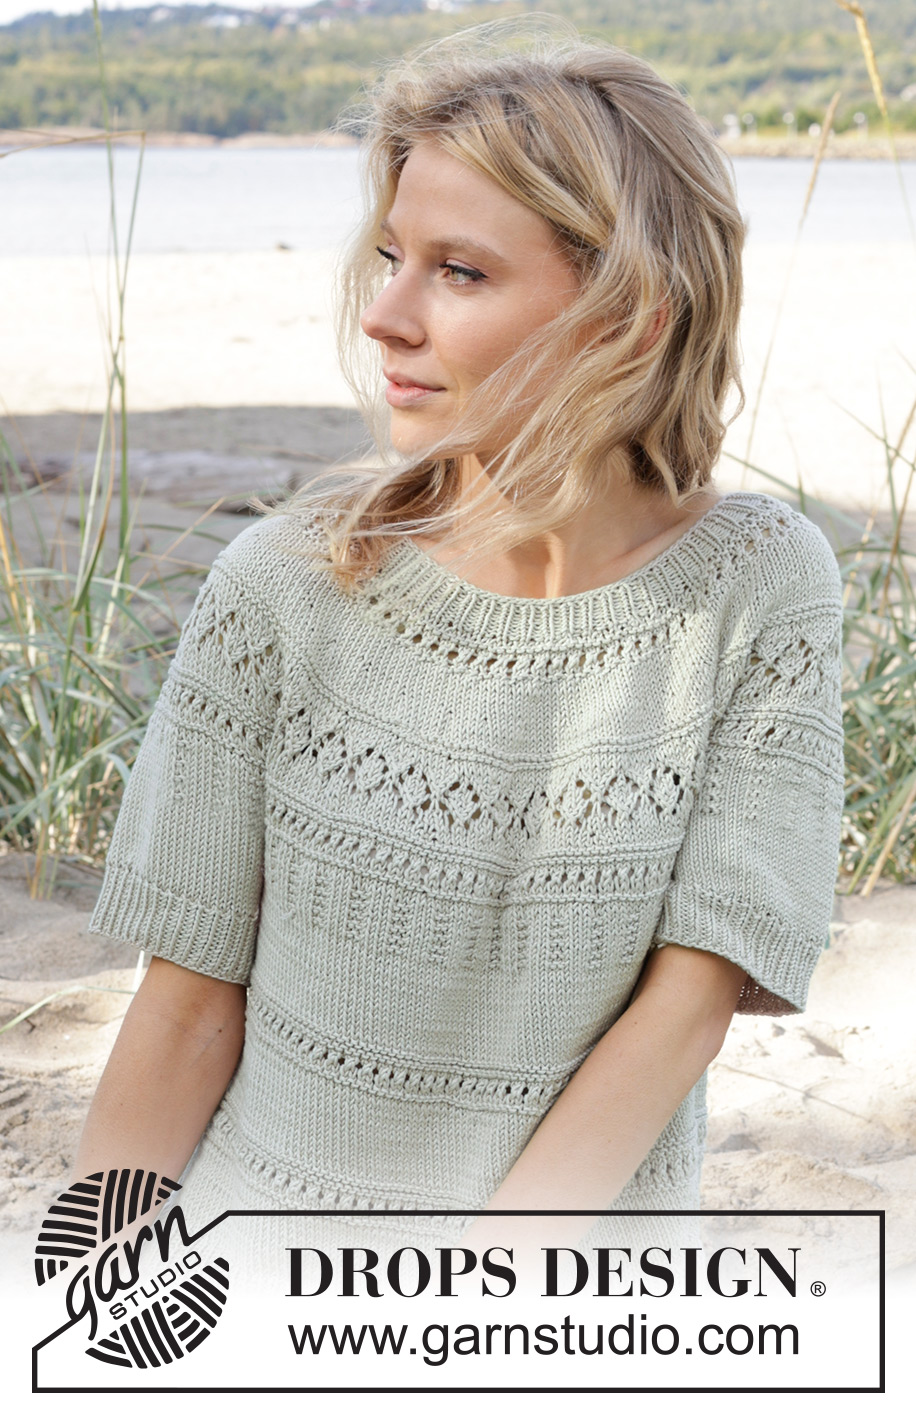
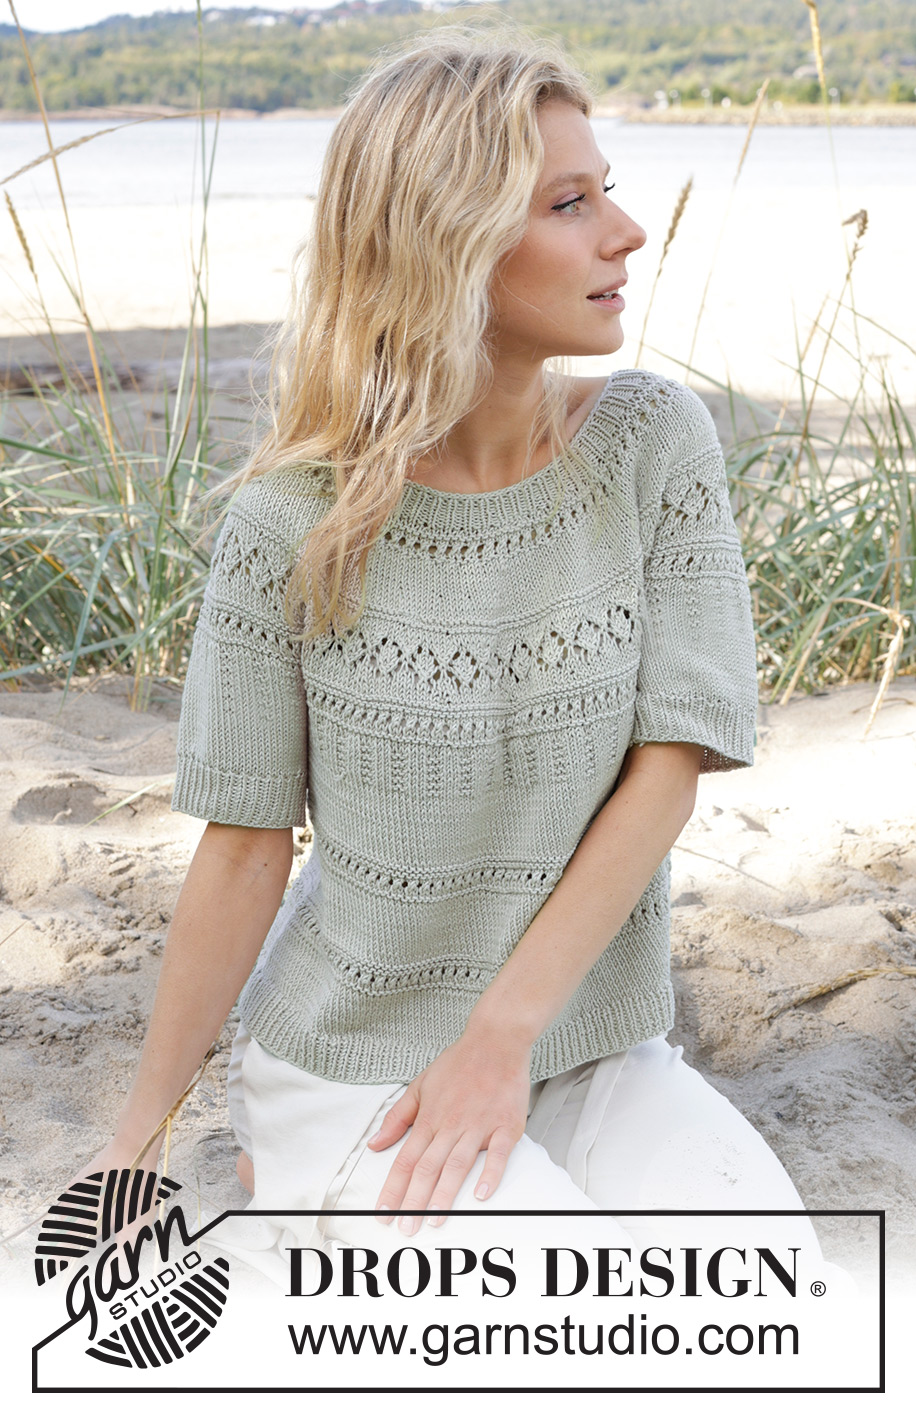
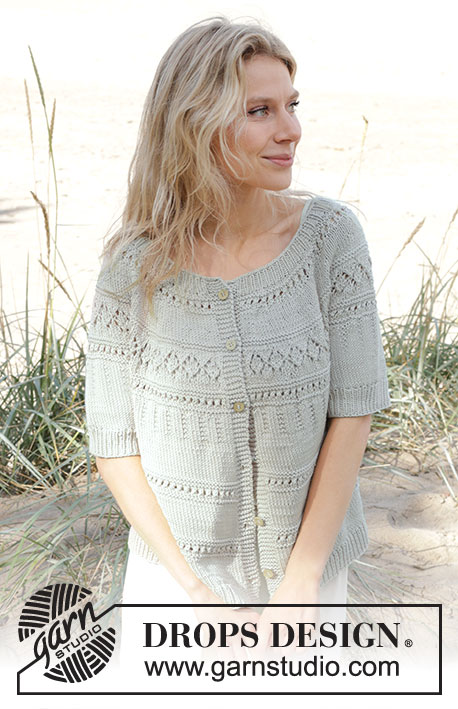
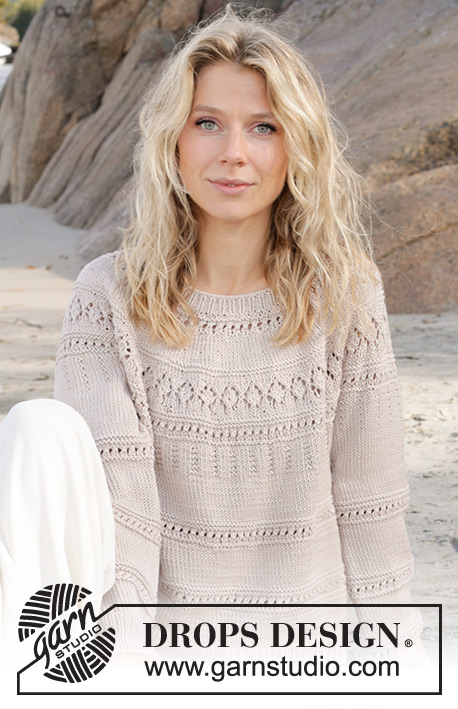
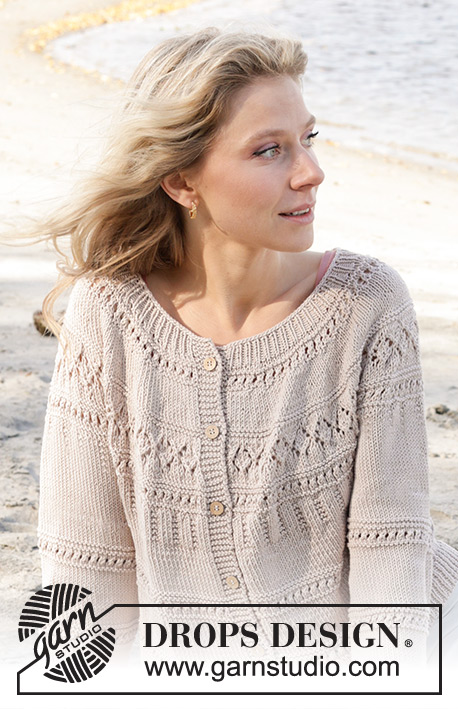
Maglione a maniche corte lavorato ai ferri in DROPS Muskat o DROPS Cotton Merino. Lavorato dall’alto in basso, con sprone rotondo e motivo traforato. Taglie: S - XXXL.
DROPS 239-26 |
||||||||||||||||||||||
|
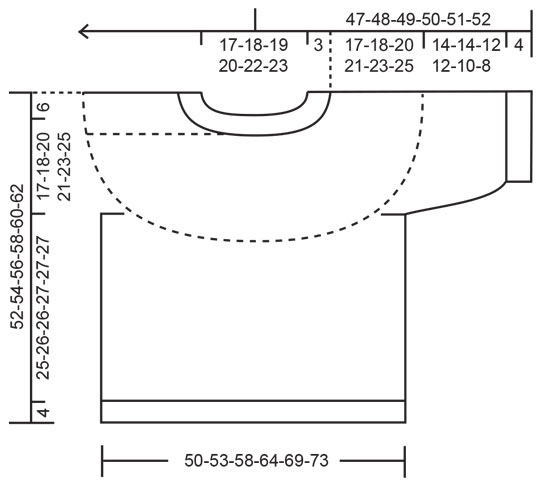
------------------------------------------------------- TECNICHE IMPIEGATE: ------------------------------------------------------- SUGGERIMENTO PER GLI AUMENTI: Aumentare 1 maglia facendo 1 gettato. Sul giro successivo lavorare il gettato a ritorto per evitare buchi. MOTIVO: Vedere i diagrammi A.1 - A.4. I diagrammi mostrano tutti i ferri del motivo visti dal diritto del lavoro. SUGGERIMENTO PER LE DIMINUZIONI (applicato alle maniche, per le taglie L, XL, XXL e XXXL): Diminuire 1 maglia a ogni lato del segnapunti come segue: Lavorare fino a quando rimangono 3 maglie prima del segnapunti, 2 maglie insieme a diritto, 2 maglie diritto (il segnapunti è al centro di queste 2 maglie), passare 1 maglia a diritto senza lavorarla, 1 maglia diritto, accavallare la maglia passata sopra quella appena lavorata (2 maglie diminuite). ------------------------------------------------------- INIZIO DEL LAVORO: ------------------------------------------------------- MAGLIONE – BREVE RIASSUNTO DEL LAVORO: Lavorare il bordo del collo e lo sprone in tondo con i ferri circolari, dal centro dietro e dall’alto in basso. Ora dividere lo sprone per il corpo e le maniche. Lavorare il corpo in tondo con i ferri circolari. Lavorare le maniche in tondo con i ferri circolari corti/ferri a doppia punta. BORDO DEL COLLO: Avviare 122-126-130-136-142-148 maglie con i ferri circolari n° 3 mm e DROPS Muskat o DROPS Cotton Merino. Lavorare 1 giro diritto. Poi lavorare a coste (= 1 maglia diritto/1 maglia rovescio) per 3 cm. Alla fine delle coste, lavorare 1 giro diritto e allo stesso tempo aumentare 36-38-40-44-48-52 maglie in modo uniforme – leggere il SUGGERIMENTO PER GLI AUMENTI = 158-164-170-180-190-200 maglie. Inserire 1 al centro del giro. Misurare lo sprone da questo segnapunti. SPRONE: Passare ai ferri circolari n° 4 mm. Lavorare A.1 in tondo sullo sprone. Alla fine di A.1, continuare a maglia rasata in tondo. FARE ATTENZIONE ALLA TENSIONE DEL LAVORO! Quando lo sprone misura 4-4-5-5-6-6 cm dal segnapunti, aumentare 40-44-50-56-60-64 maglie in modo uniforme – ricordarsi del SUGGERIMENTO PER GLI AUMENTI = 198-208-220-236-250-264 maglie. Quando il lavoro misura 7-7-8-8-9-10 cm dal segnapunti, lavorare A.2 in tondo sullo sprone. NOTA Sull’11esimo giro del diagramma spostare l’inizio del giro di 2 maglie verso destra per fare in modo che il motivo combaci per tutto il giro. Poi iniziare il giro successivo come prima. ALLO STESSO TEMPO su ogni giro indicato con la freccia nel diagramma, aumentare in modo uniforme come segue: Freccia-1: Aumentare 42-46-50-58-62-66 maglie in modo uniforme = 240-252-270-294-312-330 maglie (ora c’è spazio per 40-42-45-49-52-55 ripetizioni di A.2 in tondo sullo sprone). Freccia-2: Aumentare 38-42-46-56-58-58 maglie in modo uniforme = 278-294-318-350-370-388 maglie. Alla fine di A.2, lavorare come A.3 in tondo sullo sprone. ALLO STESSO TEMPO su ogni giro indicato con la freccia aumentare in modo uniforme come segue: Freccia-3: aumentare 32-36-42-50-50-52 maglie in modo uniforme = 310-330-360-400-420-440 maglie. Alla fine di A.3, lavorare come A.4 in tondo sullo sprone. Alla fine di A.4 per la vostra taglia, lavorare a maglia rasata ma notare che per alcune taglie il lavoro viene diviso come spiegato sotto prima della fine di A.4. DIVIDERE IL LAVORO PER IL CORPO E LE MANICHE: Quando il lavoro misura 17-18-20-21-23-25 cm dal segnapunti, dividere il lavoro per il corpo e le maniche. Se A.4 non è finito per la vostra taglia, continuare A.4 sul corpo e sulle maniche. Lavorare 47-51-55-61-65-69 maglie come prima (metà dietro), mettere in sospeso le 60-64-70-78-80-82 maglie successive per la manica, avviare 10-10-12-12-14-16 nuove maglie (a lato sotto la manica), lavorare 95-101-110-122-130-138 maglie a maglia rasata (davanti), mettere in sospeso le 60-64-70-78-80-82 maglie successive per la manica, avviare 10-10-12-12-14-16 nuove maglie (a lato sotto la manica), lavorare le ultime 48-50-55-61-65-69 maglie (metà dietro). Finire il corpo e le maniche in modo separato. Ora misurare il lavoro da qui. CORPO: = 210-222-244-268-288-308 maglie. Se A.4 non è finito per la vostra taglia, finire A.4 (il motivo non combacerà sotto le maniche; fare in modo che il motivo continui correttamente sulle maglie dello sprone e lavorare il motivo fino a quando possibile a ogni lato sotto le maniche, lavorare le maglie rimaste a maglia rasata). Alla fine di A.4, continuare a maglia rasata. Quando sono stati lavorati 6-6½-7-7-7½-7½ cm a maglia rasata dopo A.4, lavorare A.3 in tondo sul corpo. Alla fine di A.3, lavorare a maglia rasata per 6-6½-7-7-7½-7½ cm. Poi lavorare A.3 ancora in tondo sul corpo. Alla fine di A.3, continuare a maglia rasata. Quando il corpo misura 25-26-26-27-27-27 cm dalla divisione, lavorare 1 giro diritto e allo stesso tempo aumentare 20-22-22-26-28-30 maglie in modo uniforme = 230-244-266-294-316-338 maglie. Passare ai ferri circolari n° 3 mm. Lavorare a coste (1 maglia diritto/1 maglia rovescio) per 4 cm. Intrecciare senza stringere. Il maglione misura circa 52-54-56-58-60-62 cm dalla spalla. MANICHE: Rimettere le 60-64-70-78-80-82 maglie in sospeso a un lato del lavoro sui ferri a doppia punta/ferri circolari corti n° 4 mm e inoltre riprendere 1 maglia in ognuna delle 10-10-12-12-14-16 maglie avviate sotto la manica = 70-74-82-90-94-98 maglie. Inserire un segnapunti al centro sotto la manica (al centro delle 10-10-12-12-14-16 maglie). Iniziare il giro all’altezza del segnapunti. Se A.4 non è finito sullo sprone per la vostra taglia, finire A.4 (il motivo non combacerà sotto le maniche, fare in modo che continui correttamente sulle maglie dello sprone e lavorare il motivo fino a quando possibile verso il centro sotto le maniche, lavorare le maglie rimaste a maglia rasata). Alla fine di A.4, continuare a maglia rasata in tondo. Per le taglie L, XL, XXL e XXXL diminuire al centro sotto la manica come spiegato sotto (non diminuire per le taglie S e M). TAGLIE L, XL, XXL e XXXL: Quando la manica misura 4-3-3-2 cm dalla divisione, diminuire 2 maglie al centro sotto la manica – leggere il SUGGERIMENTO PER LE DIMINUZIONI. Diminuire in questo modo ogni 4-3-3-2 cm per un totale di 2-3-3-3 volte = 78-84-88-92 maglie. TUTTE LE TAGLIE: Quando la manica misura 14-14-12-11-10-8 cm dalla divisione, lavorare 1 giro diritto e diminuire 4-6-8-10-10-10 maglie in modo uniforme = 66-68-70-74-78-82 maglie. Passare ai ferri a doppia punta n° 3 mm. Lavorare a coste (1 maglia diritto/1 maglia rovescio) per 4 cm. Intrecciare senza stringere. La manica misura circa 18-18-16-15-14-12 cm dalla divisione. Lavorare l’altra manica nello stesso modo. |
||||||||||||||||||||||
Spiegazioni del diagramma |
||||||||||||||||||||||
|
||||||||||||||||||||||
 |
||||||||||||||||||||||
 |
||||||||||||||||||||||
Avete terminato questo modello?Allora taggate le vostre foto con #dropspattern #greengrovetee o inviatele alla #dropsfan gallery. Avete bisogno di aiuto con questo modello?Troverete 27 video tutorial, una sezione per i commenti/domande e molto altro guardando il modello su www.garnstudio.com © 1982-2026 DROPS Design A/S. Ci riserviamo tutti i diritti. Questo documento, compreso tutte le sue sotto-sezioni, è protetto dalle leggi sul copyright. Potete leggere quello che potete fare con i nostri modelli alla fine di ogni modello sul nostro sito. |
||||||||||||||||||||||


Con oltre 40 anni di esperienza nel design di modelli di maglia e uncinetto, DROPS Design offre la più estesa collezione di modelli gratuiti su internet - tradotti in 17 lingue. Ad oggi vi possiamo fornire 324 cataloghi e 12239 modelli - 9507 dei quali sono tradotti in Italiano.
Ci stiamo impegnando molto per darvi il meglio che vi possiamo offrire in termini di maglia e uncinetto, ispirazioni e consigli così come filati di grande qualità ad un prezzo incredibile! Volete utilizzare i nostri modelli per qualcosa d'altro oltre al vostro uso personale? Potete leggere tutto ciò che è consentito nel testo sul Copyright in basso su tutte le pagine dei nostri modelli. Buon lavoro!
Lasciare un commento sul modello DROPS 239-26
Noi saremmo felici di ricevere i tuoi commenti e opinioni su questo modello!
Se vuoi fare una domanda, fai per favore attenzione a selezionare la categoria corretta nella casella qui sotto per velocizzare il processo di risposta. I campi richiesti sono indicati da *.