
Categorie popolari
State cercando un filato?


Commenti / Domande (35)
![]() Mallet Severine ha scritto:
Mallet Severine ha scritto:
Bonjour au moment de rabattre les mailles pour l'encolure, le calcul n'est bon. On a bien 69 mailles mais si on rabattre 43 m, avec des bretelles de 13 m, il y a plus de mailles qu'au début. Quel est le problème ? Merci
30.03.2026 - 13:29DROPS Design ha risposto:
Bonjour Mme Mallet, vous avez 13 m pour la bretelle + 43 m pour l'encolure + 13 m pour la bretelle soit 13+43+13=69 mailles - ou bien peut-être que je comprends mal votre question?
07.04.2026 - 14:01
![]() Katharina ha scritto:
Katharina ha scritto:
Midsummer's Day Ist die Anzahl der Maschen inklusive der Randmaschen, oder soll ich zusätzlich noch zwei Maschen anschlagen? In manchen Anleitungen steht, dass auf jeder Seite eine Randmasche inklusive ist. Wenn das nicht erwähnt wird, wie soll ich dann vorgehen?
30.07.2025 - 02:54DROPS Design ha risposto:
Liebe Katharina, schlagen Sie die beschriebene Maschenanzahl für Ihre Größe an, keine extra Maschen, dann stricken Sie zuerst die 2 ersten und die 2 letzten Maschen kraus rechts. Viel Spaß beim Stricken!
30.07.2025 - 09:15
![]() Marie-Jeanne ha scritto:
Marie-Jeanne ha scritto:
Après avoir monté les mailles nous sommes sur l'endroit, doit-on faire un rang endroit sur l'endroit puis un rang envers sur l'envers ? J'ai du mal à comprendre. Merci
21.05.2025 - 12:24DROPS Design ha risposto:
Bonjour Marie-Jeanne, dans ce modèle, on doit d'abord tricoté 1 rang envers sur toutes les mailles, juste après avoir monté les mailles, ce sera un rang sur l'envers de l'ouvrage, ainsi, avant les côtes, on aura 1 rang jersey en bas du top. Bon tricot!
21.05.2025 - 13:12
![]() Silvia ha scritto:
Silvia ha scritto:
Salve, io lavorerò con i ferri al dritto, taglia L, devo quindi montare 61 maglie per il dietro e 61 per il davanti?
09.04.2025 - 10:20DROPS Design ha risposto:
Buongiorno Silvia, questo modello è progettato per la lavorazione in tondo. Se preferisce lavorarlo in piano deve riadattare le spiegazioni: per un aiuto più personalizzato può rivolgersi al suo rivenditore DROPS di fiducia. Buon lavoro!
10.04.2025 - 16:25
![]() Marita Katsaounis ha scritto:
Marita Katsaounis ha scritto:
I just want to know if this is the whole pattern and where can I find the whole pattern because I don’t see you mention where to apply diagrams A.1 and A.2. Please let me know. Thank you so much!
01.04.2024 - 16:23DROPS Design ha risposto:
Dear Marita, the whole pattern is on the page. You should start to knit the A.1 and A.2 pattern on the body, right after you switch to the 4 mm single pointed needles. See: "Then work as follows: 2 stitches in garter stitch, 5-4-4-4-5-6 stitches in stocking stitch, work A.1 7-8-9-10-11-12 times, A.2, 5-4-4-4-5-6 stitches in stocking stitch, and 2 stitches in garter stitch. Continue this pattern." I hope this helps. Happy Knitting.
01.04.2024 - 16:37
![]() Brenda Monks ha scritto:
Brenda Monks ha scritto:
Explain what you mean by 1ridge vertically =knit 2rows ?what I do you mean by a ridge is that a row of knitting my ? Comes from pattern Midsummers day
17.04.2023 - 05:00DROPS Design ha risposto:
Hi Brenda, 1 ridge is 2 knitted rows. Happy crafting!
17.04.2023 - 06:40
![]() Christelle ha scritto:
Christelle ha scritto:
Bonjour, Peut-on réaliser cet ouvrage en circulaire svp ? Merci pour tous ces superbes modèles et vos réponses toujours rapides.
19.02.2023 - 20:32DROPS Design ha risposto:
Bonjour Christelle, probablement, notez qu'ici nous avons 6 cm de fente de chaque côté, il vous faudra commencer séparément, puis joindre et diviser de nouveau après les emmanchures. Bon tricot!
20.02.2023 - 10:12
![]() Mima ha scritto:
Mima ha scritto:
Can you please explain what this means? thanks. AT THE SAME TIME cast off for neck at the beginning of every row from neck as follows: Cast off 2 stitches 1 time and 1 stitch 1 time.
17.11.2022 - 03:03DROPS Design ha risposto:
Dear Mima, this doesn't apply to this pattern, correct? I couldn't find this sentence here - but this means to cast off the stitches for neck at the beginning of each row starting from neck (it might be either from RS or from WS depending on the shoulder you are working on): first 2 sts then 1 stitch at the beg of next row starting from neck. Happy knitting!
17.11.2022 - 10:13
![]() Alba ha scritto:
Alba ha scritto:
Hello, when it says to seam in the outer loops of edge stitch, is there a special technique to use or do you just adapt something like the invisible side seam or matress stitch?
16.11.2022 - 18:34DROPS Design ha risposto:
Dear Alba, you can yes, or then sew the outermost loop of garter stitche edges on each side as shown in this video. Happy assembly!
17.11.2022 - 09:59
![]() May ha scritto:
May ha scritto:
Hello i find this instruction confusing: Now work rib over all stitches, but adjust so that at least 3 rows in stocking stitch have been worked after a row with relief pattern and that last row is from wrong side – increase in addition 1 stitch on last row = 69-71-75-77-81-83 stitches. . What does all stitches mean? And what is atleast 3 rows in stocking stitch mean. And where specifically will I put the additional stitch on last row
17.09.2022 - 02:17DROPS Design ha risposto:
Hello May! Knit 3 rows after a row with a relief pattern, on the last row (which is on the wrong side) increase 1 stitch anywhere in the row, then start knitting rib = 69-71-75-77-81-83 stitches in on the row. Happy knitting!
17.09.2022 - 10:43
|
||||||||||
Midsummer's Day#midsummersdaytop |
||||||||||
 |
 |
|||||||||
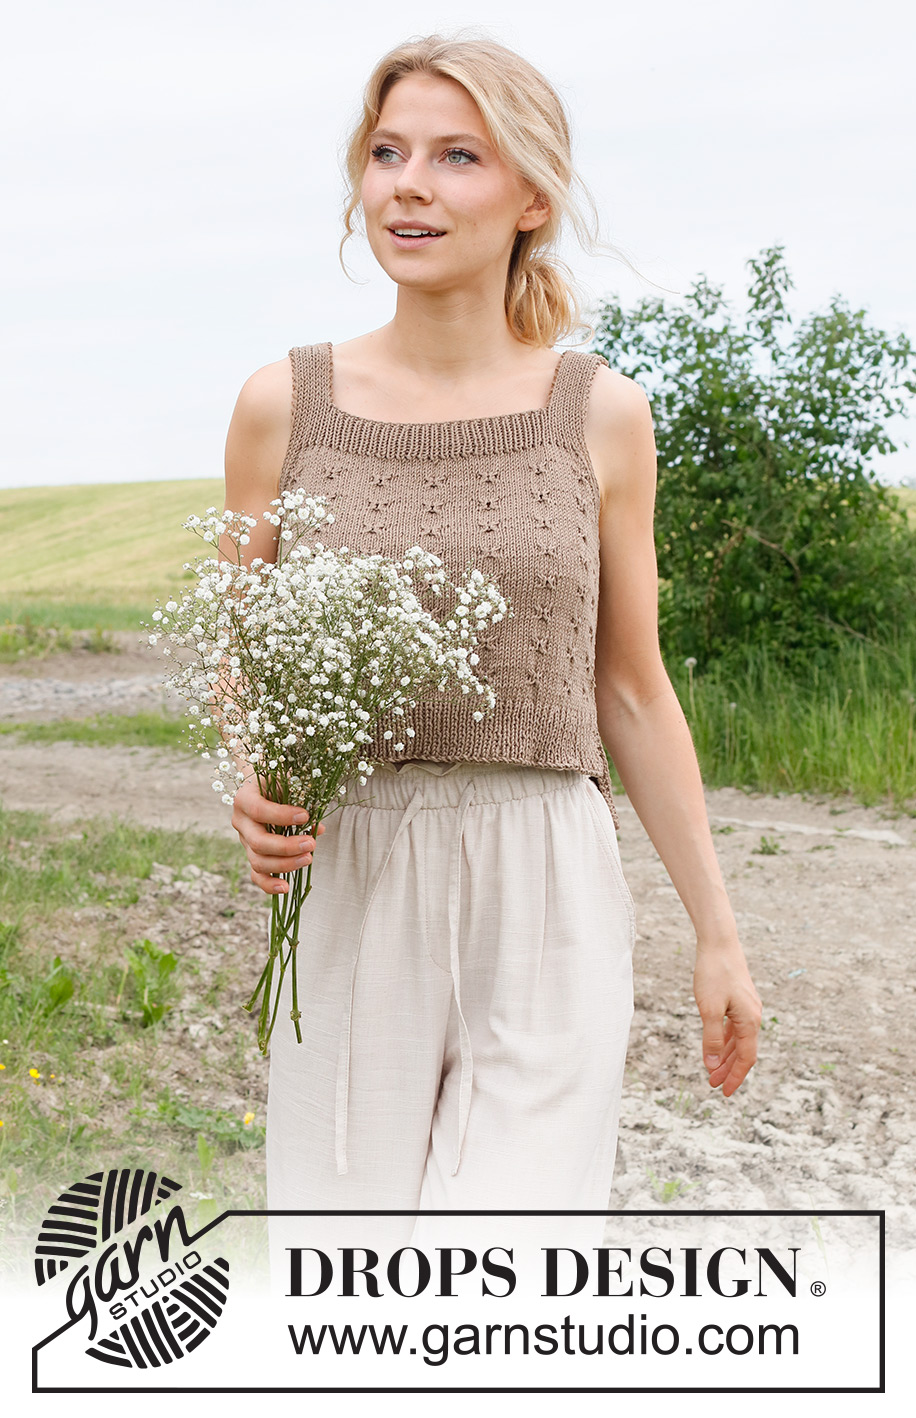
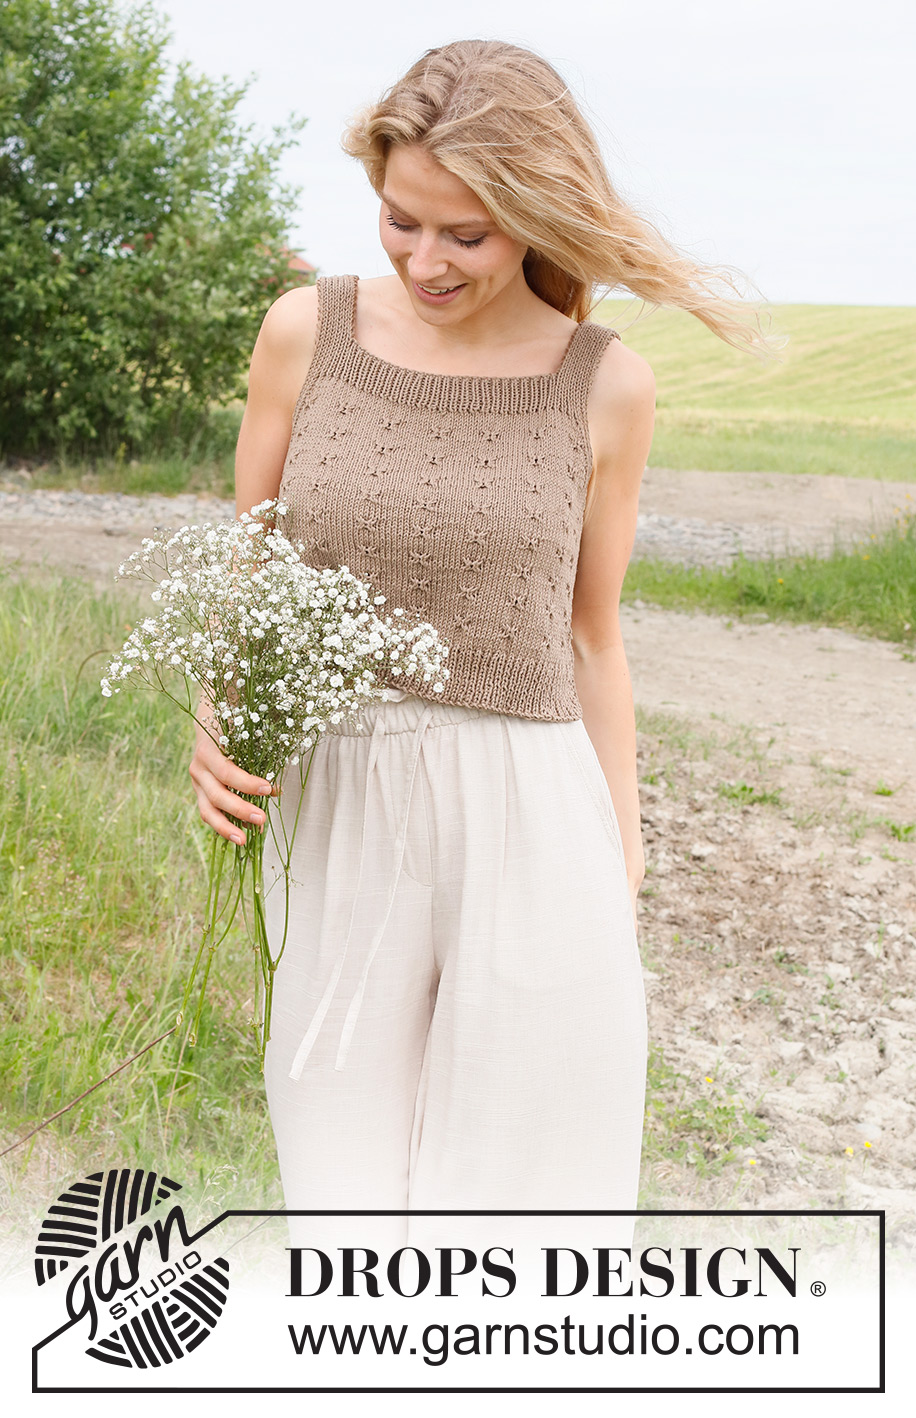
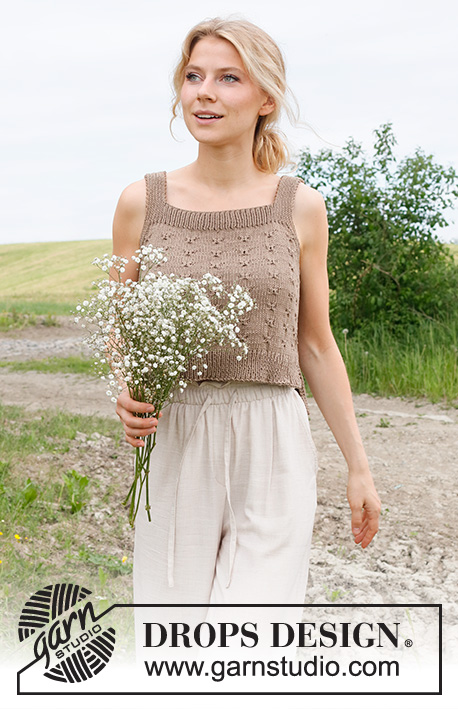
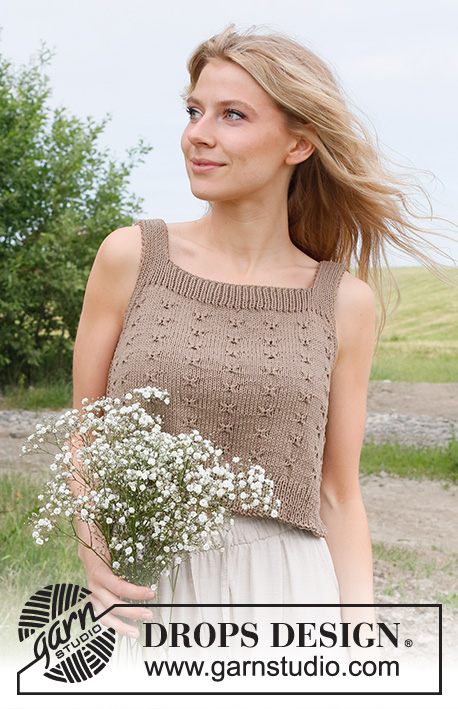
Top / canottiera lavorata ai ferri in DROPS Cotton Light. Lavorato dal basso verso l’alto con motivo in rilievo. Taglie: S – XXXL.
DROPS 232-24 |
||||||||||
|
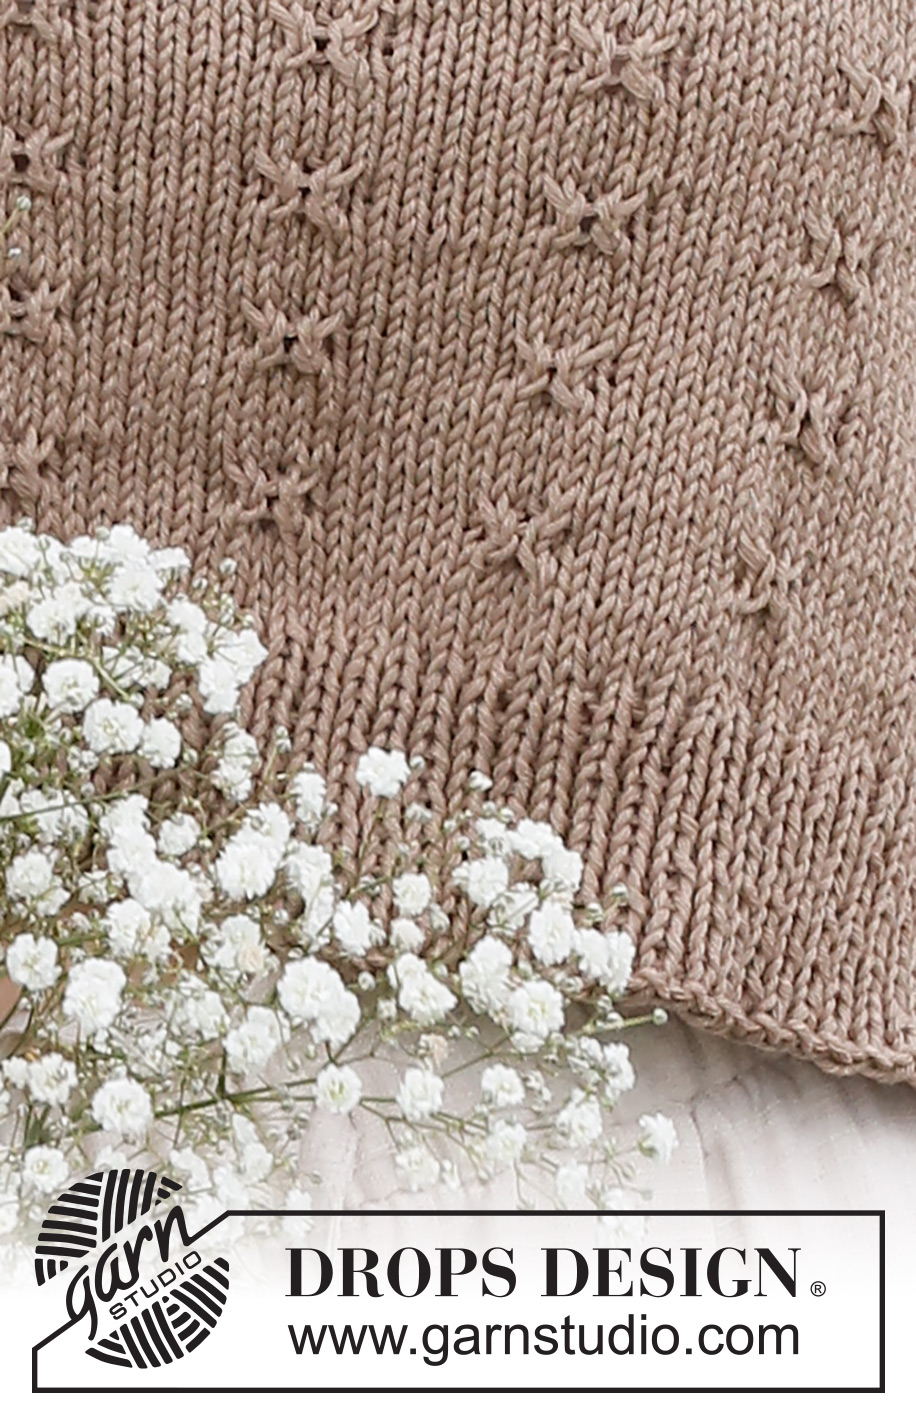
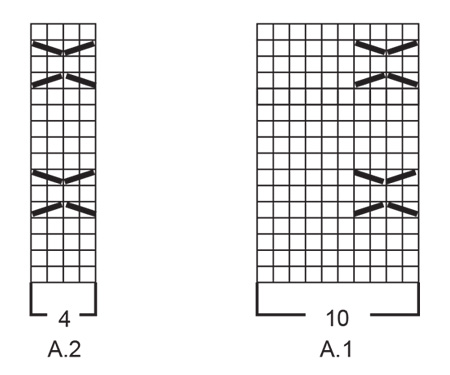
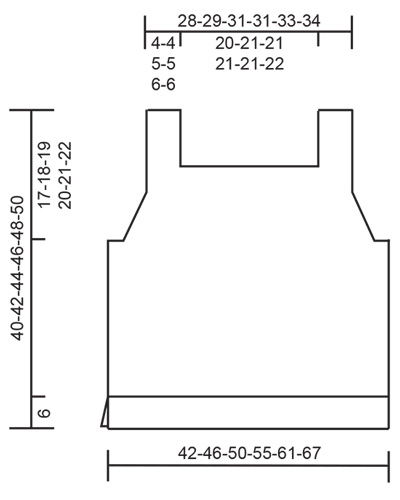
---------------------------------------------------------- TECNICHE IMPIEGATE: ---------------------------------------------------------- COSTA/MAGLIA LEGACCIO (avanti e indietro): Lavorare tutti i ferri a diritto. 1 costa in altezza = 2 ferri diritto. MOTIVO: Vedere i diagrammi A.1 - A.2. I diagrammi mostrano tutti i ferri del motivo visti dal diritto del lavoro. SUGGERIMENTO PER LE DIMINUZIONI (applicato agli scalfi): Diminuire all’interno delle 5-5-7-7-9-9 maglie più esterne a ogni lato. DAL DIRITTO DEL LAVORO: DIMINUIRE ALL’INIZIO DEL FERRO COME SEGUE: 5-5-7-7-9-9 maglie a coste come spiegato, passare 1 maglia a diritto senza lavorarla, 1 maglia diritto, accavallare la maglia passata sopra quella appena lavorata. DIMINUIRE ALLA FINE DEL FERRO COME SEGUE: Lavorare a diritto fino a quando rimangono 7-7-9-9-11-11 maglie sul ferro, 2 maglie insieme a diritto, lavorare 5-5-7-7-9-9 maglie a coste come spiegato. DAL ROVESCIO DEL LAVORO: DIMINUIRE ALL’INIZIO DEL FERRO COME SEGUE: 5-5-7-7-9-9 maglie a coste come spiegato, 2 maglie insieme a rovescio. DIMINUIRE ALLA FINE DEL FERRO COME SEGUE: Lavorare a diritto fino a quando rimangono 7-7-9-9-11-11 maglie sul ferro, 2 maglie insieme a rovescio ritorto, lavorare 5-5-7-7-9-9 maglie a coste come spiegato. ---------------------------------------------------------- INIZIO DEL LAVORO: ---------------------------------------------------------- TOP – BREVE RIASSUNTO DEL LAVORO: Lavorato in piano, dal basso verso l’alto in 2 parti uguali. Cucire sulle spalle e ai lati come spiegato. DAVANTI: Avviare 101-109-121-133-147-161 maglie con i ferri n° 3,5 mm con DROPS Cotton Light. Lavorare 1 ferro rovescio dal rovescio del lavoro. Lavorare il ferro successivo come segue dal diritto del lavoro: 2 maglie a MAGLIA LEGACCIO – leggere la spiegazione sopra - * 1 maglia diritto, 1 maglia rovescio *, ripetere *-* fino a quando rimangono 3 maglie, 1 maglia diritto, 2 maglie a maglia legaccio. Continuare a coste in piano in questo modo per 6 cm. Alla fine delle coste, lavorare 1 ferro diritto in cui diminuire 13-13-15-17-19-21 maglie in modo uniforme (non diminuire sulle 2 maglie più esterne a ogni lato) = 88-96-106-116-128-140 maglie. Lavorare 1 ferro rovescio dal rovescio del lavoro con 2 maglie a maglia legaccio a ogni lato. Passare ai ferri circolari n° 4 mm. Poi lavorare come segue: 2 maglie a maglia legaccio, 5-4-4-4-5-6 maglie a maglia rasata, lavorare A.1 7-8-9-10-11-12 volte, A.2, 5-4-4-4-5-6 maglie a maglia rasata, e 2 maglie a maglia legaccio. Continuare questo motivo. FARE ATTENZIONE ALLA TENSIONE DEL LAVORO! Quando il lavoro misura 21-22-23-24-25-26 cm, lavorare a coste a ogni lato come spiegato sotto prima di intrecciare per gli scalfi – se il motivo in rilievo combacia con le coste e le diminuzioni per gli scalfi, lavorare a maglia rasata su queste maglie invece della treccia. Lavorare il 1° ferro come segue dal diritto del lavoro: 2 maglie a maglia legaccio, * 1 maglia diritto, 1 maglia rovescio *, lavorare 3-4-6-6-8-8 volte in totale, continuare il motivo come prima fino a quando rimangono 8-10-14-14-18-18 maglie sul ferro, * 1 maglia rovescio, 1 maglia diritto *, lavorare *-* 3-4-6-6-8-8 volte in totale, 2 maglie a maglia legaccio Continuare in piano in questo modo. Quando il lavoro misura 23-24-25-26-27-28 cm, intrecciare 3-5-7-7-9-9 maglie per gli scalfi all’inizio dei 2 ferri successivi = 82-86-92-102-110-122 maglie. Poi intrecciare per le maniche come spiegato sotto. SCALFO: Continuare il motivo in piano come prima con 4-4-6-6-8-8 maglie a coste e 1 maglia a maglia legaccio sul bordo a ogni lato (ricordarsi che se il motivo in rilievo combacia con le coste e le diminuzioni per gli scalfi, si deve lavorare a maglia rasata su queste maglie invece della treccia). ALLO STESSO TEMPO sul 1° ferro dal diritto del lavoro iniziare a diminuire per lo scalfo – leggere il SUGGERIMENTO PER LE DIMINUZIONI. Diminuire 1 maglia a ogni lato su ogni ferro (sia dal diritto che dal rovescio del lavoro) 0-0-3-7-11-19 volte in totale, poi diminuire 1 maglia a ogni lato a ferri alterni (su ogni ferro dal diritto del lavoro) 7-8-6-6-4-1 volte in totale = 68-70-74-76-80-82 maglie. Ora lavorare a coste su tutte le maglie, ma aggiustarlo in modo che siano stati lavorati almeno 3 ferri a maglia rasata dopo un ferro con il motivo in rilievo e che l’ultimo ferro sia dal rovescio del lavoro – inoltre aumentare 1 maglia sull’ultimo ferro = 69-71-75-77-81-83 maglie. Passare ai ferri n° 3,5 mm. Lavorare come segue dal diritto del lavoro: 1 maglia a maglia legaccio, * 1 maglia diritto, 1 maglia rovescio *, lavorare *-* fino a quando rimangono 2 maglie, 1 maglia diritto, 1 maglia a maglia legaccio. Continuare a coste in piano in questo modo per 4 cm. Ora intrecciare come segue: lavorare 1 maglia a maglia legaccio, 12-12-14-14-16-16 maglie a coste come prima, poi mettere queste 13-13-15-15-17-17 maglie in sospeso per la spallina, intrecciare le 43-45-45-47-47-49 maglie successive per il collo, lavorare 12-12-14-14-16-16 maglie a coste come prima e 1 maglia a maglia legaccio. Poi lavorare la spallina come spiegato sotto. SPALLINA: = 13-13-15-15-17-17 maglie. Lavorare le coste in piano come prima con 1 maglia a maglia legaccio a ogni lato, fino a quando rimane 1 ferro prima che il lavoro misuri 40-42-44-46-48-50 cm dal bordo di avvio. Provare il davanti e lavorare fino alla lunghezza desiderata. Lavorare 1 ferro diritto dal diritto del lavoro in cui diminuire 4 maglie in modo uniforme = 9-9-11-11-13-13 maglie. Intrecciare a rovescio dal rovescio del lavoro. Lavorare l’altra spallina nello stesso modo. DIETRO: Avviare lo stesso numero di maglie del davanti e lavorare nello stesso modo del davanti. CONFEZIONE: Cucire le spalline all’interno del bordo di chiusura in cima alle spalle. Cucire i lati – dalla cima dello scalfo e cucire nei fili più esterni delle maglie di vivagno per ottenere una cucitura piatta, fermarsi quando rimangono 6 cm in basso a ogni lato (spacchi). |
||||||||||
Spiegazioni del diagramma |
||||||||||
|
||||||||||
 |
||||||||||
 |
||||||||||
Avete terminato questo modello?Allora taggate le vostre foto con #dropspattern #midsummersdaytop o inviatele alla #dropsfan gallery. Avete bisogno di aiuto con questo modello?Troverete 21 video tutorial, una sezione per i commenti/domande e molto altro guardando il modello su www.garnstudio.com © 1982-2026 DROPS Design A/S. Ci riserviamo tutti i diritti. Questo documento, compreso tutte le sue sotto-sezioni, è protetto dalle leggi sul copyright. Potete leggere quello che potete fare con i nostri modelli alla fine di ogni modello sul nostro sito. |
||||||||||


Con oltre 40 anni di esperienza nel design di modelli di maglia e uncinetto, DROPS Design offre la più estesa collezione di modelli gratuiti su internet - tradotti in 17 lingue. Ad oggi vi possiamo fornire 324 cataloghi e 12290 modelli - 9561 dei quali sono tradotti in Italiano.
Ci stiamo impegnando molto per darvi il meglio che vi possiamo offrire in termini di maglia e uncinetto, ispirazioni e consigli così come filati di grande qualità ad un prezzo incredibile! Volete utilizzare i nostri modelli per qualcosa d'altro oltre al vostro uso personale? Potete leggere tutto ciò che è consentito nel testo sul Copyright in basso su tutte le pagine dei nostri modelli. Buon lavoro!
Lasciare un commento sul modello DROPS 232-24
Noi saremmo felici di ricevere i tuoi commenti e opinioni su questo modello!
Se vuoi fare una domanda, fai per favore attenzione a selezionare la categoria corretta nella casella qui sotto per velocizzare il processo di risposta. I campi richiesti sono indicati da *.