
Categorie popolari
State cercando un filato?


Commenti / Domande (52)
![]() Carole Montaigne ha scritto:
Carole Montaigne ha scritto:
Bonjour, J’ai du mal à comprendre la partie 1 de la capuche. Selon moi il faut tricoter 9 rangs supplémentaires en comptant les allers retours avant de rabattre le reste des mailles sur l’endroit. Ma question alors est : de quel fil se sert on afin de terminer les 9 rangs de la partie 2? Merci d’avance pour votre réponse
22.01.2026 - 11:47DROPS Design ha risposto:
Bonjour Mme Montaigne, vous devez couper le fil à la fin de la partie-1 et le joindre à nouveau au début de la partie 2. Bon tricot!
23.01.2026 - 09:34
![]() FLORENCE ha scritto:
FLORENCE ha scritto:
Pouvez m'expliquer comment relever autant de mailles pour l'ouverture ? Merci
10.01.2026 - 00:49DROPS Design ha risposto:
Bonjour Florence, vous reprenez les mailles en attente, vous relevez les mailles le long des deux côtés de l'ouverture, il vous faut suffisamment de mailles car vous utilisez les aiguilles 3,5 et que vous tricotez en côtes (les côtes resserrent l'ouvrage) Bon tricot!
12.01.2026 - 08:52
![]() FLORENCE ha scritto:
FLORENCE ha scritto:
Si vous voulez je peux vous envoyer une photo de mon tricot ?
08.01.2026 - 23:50DROPS Design ha risposto:
Bonjour Florence, vous pouvez volontiers partager vos photos avec nous, il nous faut juste le lien de cette photo que vous aurez publié auparavant (Instagram, Facebook, blog, etc..). Utilisez alors le formulaire ici. Merci d'avance!
09.01.2026 - 10:58
![]() FLORENCE ha scritto:
FLORENCE ha scritto:
Bonjour, je n' arrive pas à relever les mailles. Mon ouverture me semble trop petite, elle mesure environ 10 cm su 10 cm je ne comprends pas pourquoi ? Cordialement
08.01.2026 - 22:02
![]() Heather ha scritto:
Heather ha scritto:
Hi! I'm having trouble understanding how to work the bind off for the hood. Do I bind off stitches mid-back for section 1 and 2 simultaneously, or should I bind off section 1 first and then move on to section 2? After reducing section 1, the pattern says to knit a row and then bind off all stitches in that section. Does that leave the yarn by the face? How do I then get the yarn over to the mid-back of section 2 to bind off that section?
06.01.2026 - 16:18DROPS Design ha risposto:
Dear Heather, you work each section separately the one after the other, so you divide piece at the marker and work first part-1 as explained, binding off from RS. Then take stitches from 2nd part back on needle and work 2nd part as first part and binding off from RS. Then sew both parts together, sewing cast off stitches together on top of head. Happy knitting!
07.01.2026 - 07:43
![]() Carole Montaigne ha scritto:
Carole Montaigne ha scritto:
Bonjour, Si je respecte l’échantillon je dois tricoter avec des aiguilles de 5 mais je trouve le point plus joli en 4,5. Puis-je rester en 4,5 et tricoter la grande taille en espérant avoir une capuche plus petite mais pas complètement déformée ? Merci d’avance pour votre réponse
05.01.2026 - 10:48DROPS Design ha risposto:
Bonjour Mme Montaigne, il va vous falloir calculer si vous obtiendrez ainsi, avec votre échantillon, les mesures de la taille S/M. Bon tricot!
05.01.2026 - 11:13
![]() Karoline ha scritto:
Karoline ha scritto:
I don't really follow this last part: Sticka avigmaskor över rätmaskor och rätmaskor över avigmaskor över dessa 17-19 maskorna, sedan stickas det upp ca 111 till 125 maskor innanför 1 maska runt öppningen fram = totalt ca 128 till 144 maskor. Do you have a tutorial I could follow? Thanks!
02.01.2026 - 01:56
![]() Palma ha scritto:
Palma ha scritto:
Buonasera, io uso questo filato e vorrei sapere se avete modelli di ballava con ferri diritti ( non circolari) , grazie
16.12.2025 - 14:43DROPS Design ha risposto:
Buonasera Palma, può adattare il modello alla lavorazione in piano. Buon lavoro!
17.12.2025 - 22:20
![]() FLORENCE ha scritto:
FLORENCE ha scritto:
Bonjour C'est ma 1ère cagoule et je veux être sûre de bien comprendre Je suis rendue au début de la capuche J'ai 70 mailles et 17 mailles en attente au milieu du rang, je continue à tricoter ce rang avec les mailles en attente au centre ? Est-ce ce bien cela ? Le trou est très petit et je ne comprends pas non plus comment on peut y relever 111 mailles ensuite ? Cordialement
07.12.2025 - 08:53DROPS Design ha risposto:
Bonjour Florence, continuez en allers et retours au point de riz sur toutes les 70 mailles jusqu'à ce que l'ouvrage mesure environ 26 cm depuis la séparation, milieu devant - 40 cm depuis le rang de montage (les mailles en attente au centre seront reprises lors de la realisation de la bordure autour du visage). Bon tricot!
07.12.2025 - 11:58
![]() Lyd ha scritto:
Lyd ha scritto:
I'm very confused with the part at the end of the hood, how come I bind off stitches mid-back? When on the next step it says to "continue with moss stitch". Do I bind off half and continue knitting the other half?
10.11.2025 - 19:33DROPS Design ha risposto:
Dear Lyd, this will be done as explained just afterwards, this means at the end of section "hood" just divide piece at the marker and work now each part /half separately starting with part-1, you will cast off stitches at the beginning of each row starting from mid back (= from middle of piece). Then work part -2 the same way and sew cast off stitches together on top of hood/head. Happy knitting!
18.11.2025 - 12:19
|
|
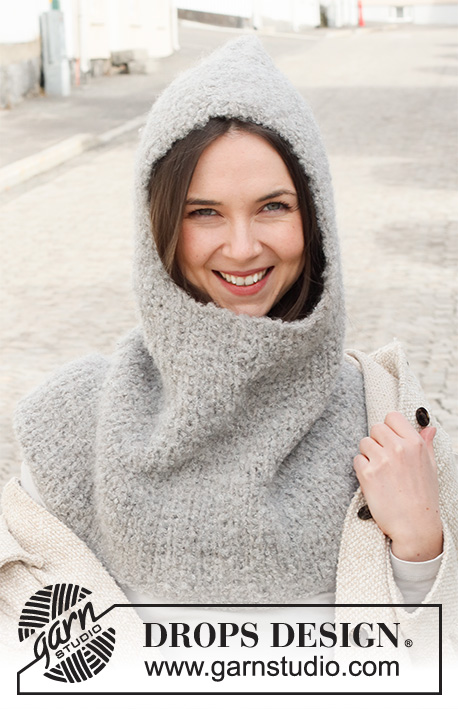
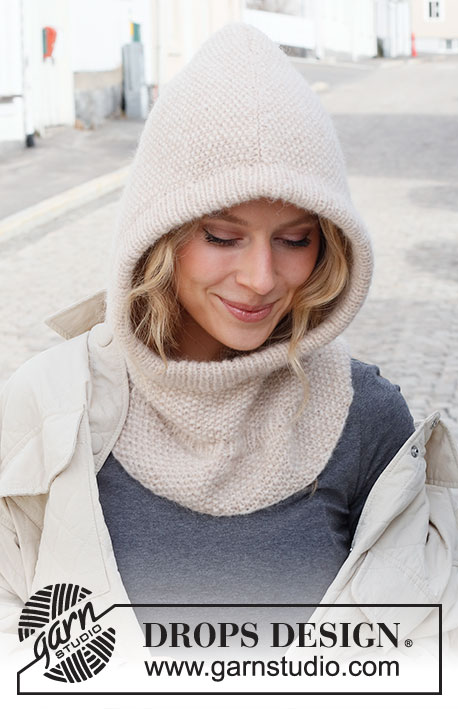
Frost Buster Balaclava#frostbusterbalaclava |
|
 |
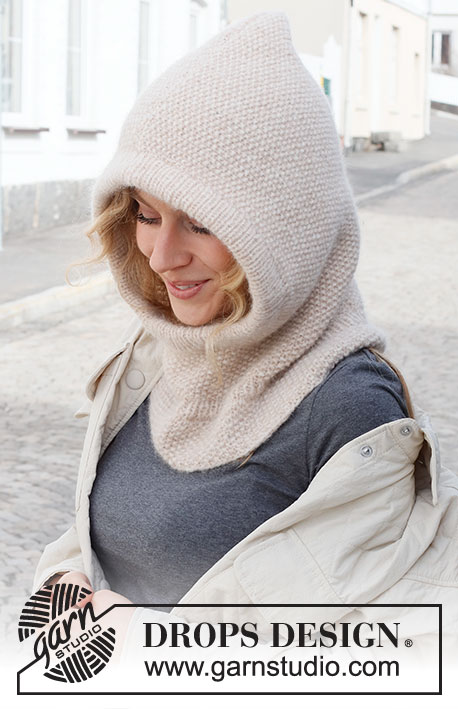 |
Cappello / passamontagna / balaclava lavorato ai ferri in DROPS Air. Lavorato a grana di riso e bordi a coste.
DROPS 225-7 |
|
|
------------------------------------------------------- TECNICHE IMPIEGATE: ------------------------------------------------------- COSTA/MAGLIA LEGACCIO (avanti e indietro): Lavorare tutti i ferri a diritto. 1 costa in altezza = 2 ferri diritto. GRANA DI RISO: Giro/ferro 1: * 1 maglia diritto, 1 maglia rovescio *, lavorare *-* fino alla fine del giro/ferro. Giro/ferro 2: rovescio su diritto e diritto su rovescio. Ripetere i giri/ferri 2. SUGGERIMENTO PER LE DIMINUZIONI (distribuiti in modo uniforme): Per stabilire ogni quanto diminuire in modo uniforme, prendere il n° totale di maglie sul ferro (ad esempio 115 maglie) e dividerlo per il n° di diminuzioni da fare (ad esempio 23) = 5. In questo esempio lavorare insieme a diritto ogni 4° e 5° maglia circa. SUGGERIMENTO PER LA CHIUSURA: Per evitare che il bordo di chiusura sia tirato potete intrecciare con un ferro di una misura più grande. Se il bordo risulta ancora tirato, fare 1 gettato dopo circa 4 maglie durante la chiusura e intrecciare i gettati come maglie normali. ------------------------------------------------------- INIZIO DEL LAVORO: ------------------------------------------------------- PASSAMONTAGNA / BALACLAVA – BREVE RIASSUNTO DEL LAVORO: Lavorato in tondo con i ferri circolari, dal basso verso l’alto. Mettere le maglie in sospeso per l’apertura della faccia e finire il lavoro in piano. Cucire il cappuccio in alto. Lavorare un bordo doppio a coste attorno all’apertura della faccia. PASSAMONTAGNA / BALACLAVA: Avviare, senza stringere, 115-127 maglie con i ferri circolari n° 4,5 mm e DROPS Air. Lavorare 1 giro a maglia rasata, poi lavorare a GRANA DI RISO – leggere la descrizione sopra. Ricordarsi della TENSIONE DEL LAVORO! Quando il lavoro misura 6 cm, lavorare 2 giri a maglia rasata – ALLO STESSO TEMPO sul 1° giro diminuire 23-25 maglie in modo uniforme – leggere il SUGGERIMENTO PER LE DIMINUZIONI = 92-102 maglie. Passare ai ferri circolari n° 3,5 mm. Lavorare 4 giri a coste (1 maglia diritto, 1 maglia rovescio). Alla fine di queste coste, tornare ai ferri n° 4,5 mm e lavorare 1 giro diritto in cui diminuire 5-5 maglie in modo uniforme – ricordarsi del SUGGERIMENTO PER LE DIMINUZIONI = 87-97 maglie. Continuare a grana di riso in tondo fino a quando il lavoro misura 14 cm dal bordo di avvio per entrambe le taglie. Sul giro successivo mettere in sospeso le 17-19 maglie al centro davanti, lasciando un’apertura al centro davanti = 70-78 maglie sui ferri. Inserire 1 segnapunti al centro del ferro (= centro dietro). Lasciare che il segnapunti seguano il lavoro – verrà utilizzato durante la divisione del lavoro in alto. Ora lavorare il cappuccino come descritto sotto. CAPPUCCIO: Continuare in piano a grana di riso su tutte le maglie. Continuare a lavorare fino a quando il lavoro misura 40-42 cm dal bordo di avvio (il lavoro misura circa 26-28 cm dalla divisione al centro davanti). Mancano circa 3 cm alla fine del lavoro; provare il passamontagna / balaclava e continuare fino alla lunghezza desiderata. Ora intrecciare le maglie al centro dietro. Dividere il lavoro all’altezza del segnapunti e finire ogni sezione in modo separato come descritto sotto. SEZIONE 1: = 35-39 maglie. Continuare a grana di riso in piano e intrecciare le maglie all’inizio di ogni ferro dal centro dietro come segue: intrecciare 1 maglia 1 volta, 2 maglie 2 volte e 3 maglie 1 volta = 27-31 maglie rimaste. Lavorare 1 ferro diritto dal diritto del lavoro. Intrecciare a diritto dal diritto del lavoro. Il lavoro misura circa 43-45 cm dall’alto in basso. SEZIONE 2: Lavorare nello stesso modo della sezione 1. CONFEZIONE: Cucire il passamontagna / balaclava in alto, all’interno del bordo di chiusura. BORDO ATTORNO ALLA FACCIA: Riportare le maglie in sospeso al centro davanti sui ferri circolari n° 3,5 mm. Lavorare con rovescio su diritto e diritto su rovescio su queste 17-19 maglie, poi riprendere 111 - 125 maglie all’interno di 1 maglia attorno a tutta l’apertura = 128 - 144 maglie. Il n° di maglie dev’essere divisibile per 2. Lavorare a coste in tondo (1 maglia diritto, 1 maglia rovescio) per 6-7 cm. Intrecciare senza stringere con diritto su diritto e rovescio su rovescio – leggere il SUGGERIMENTO PER LA CHIUSURA. Piegare il bordo a coste a metà all’interno e cucire. Per evitare che il bordo risulti tirato e si arrotoli verso l’esterno, è importante che la cucitura sia elastica. |
|
Avete terminato questo modello?Allora taggate le vostre foto con #dropspattern #frostbusterbalaclava o inviatele alla #dropsfan gallery. Avete bisogno di aiuto con questo modello?Troverete 23 video tutorial, una sezione per i commenti/domande e molto altro guardando il modello su www.garnstudio.com © 1982-2026 DROPS Design A/S. Ci riserviamo tutti i diritti. Questo documento, compreso tutte le sue sotto-sezioni, è protetto dalle leggi sul copyright. Potete leggere quello che potete fare con i nostri modelli alla fine di ogni modello sul nostro sito. |
|


Con oltre 40 anni di esperienza nel design di modelli di maglia e uncinetto, DROPS Design offre la più estesa collezione di modelli gratuiti su internet - tradotti in 17 lingue. Ad oggi vi possiamo fornire 325 cataloghi e 12298 modelli - 9569 dei quali sono tradotti in Italiano.
Ci stiamo impegnando molto per darvi il meglio che vi possiamo offrire in termini di maglia e uncinetto, ispirazioni e consigli così come filati di grande qualità ad un prezzo incredibile! Volete utilizzare i nostri modelli per qualcosa d'altro oltre al vostro uso personale? Potete leggere tutto ciò che è consentito nel testo sul Copyright in basso su tutte le pagine dei nostri modelli. Buon lavoro!
Lasciare un commento sul modello DROPS 225-7
Noi saremmo felici di ricevere i tuoi commenti e opinioni su questo modello!
Se vuoi fare una domanda, fai per favore attenzione a selezionare la categoria corretta nella casella qui sotto per velocizzare il processo di risposta. I campi richiesti sono indicati da *.