
Categorie popolari
State cercando un filato?


Commenti / Domande (126)
![]() Caroline ha scritto:
Caroline ha scritto:
Hej! I sista rapporten på A2 står det att omslaget ska stickas brödet på nästa varv så det inte blir hål. Men ska det inte blå hål? Tycker det ser ut som det på fotot.
25.07.2021 - 10:07DROPS Design ha risposto:
Hej Caroline, det vill bli ett litet hål. Vill du har det större så går det bra att inte sticka det vridet :)
06.08.2021 - 14:28
![]() Pirkko Karjalainen ha scritto:
Pirkko Karjalainen ha scritto:
En saa näkyviin mallineuleen piirroksia. Norjankielisessä ohjeessa ne näkyvät, mutta kääntäminen olisi työlästä. Mikä neuvoksi?
07.07.2021 - 09:01DROPS Design ha risposto:
Nyt piirrokset avautuvat taas.
09.07.2021 - 14:16
![]() Susanne Bang Hansen ha scritto:
Susanne Bang Hansen ha scritto:
Strikker str xl. Efter mønstret har jeg 351 masker( som jeg skal have), når jeg så deler i forstyk, ærmer og ryg, så har jeg 13 masker for meget????
03.07.2021 - 23:52DROPS Design ha risposto:
Hei Susanne. Litt usikker på hvor det blir feil hos deg, men du skal strikke 50 masker rett (= ½ bakstykket), sett de neste 76 maskene på en tråd til erme, legg opp 12 nye masker på pinnen (= i siden under ermet), strikk 99 masker rett (= forstykke), sett de neste 76 maskene på en tråd til erme, legg opp 12 nye masker på pinnen (= i siden under ermet), strikk de siste 50 masker rett (= ½ bakstykket). Om man ser bort fra de 24 ny maskene stemmer maskeantallet. 50+76+99+76+50= 351 masker. Kankje du har blandet noen størrelser? mvh DROPS design
05.07.2021 - 14:54
![]() Astrid ha scritto:
Astrid ha scritto:
Det står ingen plass i mønstret at kastene skal strikkes vridd,dette bør stå hvis det erslik det skal være
03.07.2021 - 15:31
![]() Bodil ha scritto:
Bodil ha scritto:
Så hvis jeg forstår det riktig da, skal omgang 6 strikkes bare rettmasker.
29.06.2021 - 10:56DROPS Design ha risposto:
Hej Bodil. Ja det stämmer. Mvh DROPS Design
29.06.2021 - 11:15
![]() Bodil ha scritto:
Bodil ha scritto:
Hei. Jeg har kommet til omgang 6 hvor den mørke trekant-symbolet er. Er det over 2 omganger, eller er det på omgang 7? Skjønner ikke helt dette.
29.06.2021 - 07:07DROPS Design ha risposto:
Hej Bodil. Det er på omgang 7. Mvh DROPS Design
29.06.2021 - 08:01
![]() Lene ha scritto:
Lene ha scritto:
A2, etter siste stjerne(som skal være 7m) viser diagrammet 3m på linjene over. Hvordan? Jeg sitter med altfor mye masker!!! Ser ut som dette er et problem som gjentar seg, er det noen som ser på dette?
27.06.2021 - 11:37DROPS Design ha risposto:
Hei Lene, Stjerne symbol betyr at du skal strikke 7-7-7-9-9-9 masker i samme masken, som gir deg de økte maskene på linjen over (se symbolforklaring over diagrammene). Håper dette hjelper og god fornøyelse!
28.06.2021 - 09:07
![]() Bodil ha scritto:
Bodil ha scritto:
Jeg lurer på om kastene skal strikkes vridd vrang eller vridd rett?
27.06.2021 - 01:22DROPS Design ha risposto:
Hei Bodil, Hvis du har en åpen rute i linje over kastet skal det strikkes vridd rett, hvis det er en rute med kors, skal det strikkes vridd vrang. God fornøyelse!
28.06.2021 - 09:10
![]() Ida Eline Sørensen ha scritto:
Ida Eline Sørensen ha scritto:
Hei. Jeg forstår ikke hvordan jeg skal lese diagram A2. Skal en og en av rapportene strikkes? Hvordan henger de sammen? Skal det være noen masker med kun rett, strikkes ett og ett diagram eller flere samtidig? Dette var en forvirrende oppskrift. Takk for svar på forhånd. Strikker forresten str.s.
17.06.2021 - 21:48DROPS Design ha risposto:
Hei Ida Eline, Du strikker A.2 i ett, så første omgang: 3 vrang, 1 rett, 3 vrang og 1 rett. Gjenta dette på omgangen. Når du er på omgang 3, skal du strikke 3 masker i stjernemasken (som forklart rett over diagrammene) slik at du kan strikke alle maskene i omgang 4. Håper dette hjelper og god fornøyelse!
18.06.2021 - 07:17
![]() Roswitha Zu Dritten ha scritto:
Roswitha Zu Dritten ha scritto:
Die letzte Frage habe ich mir selbst bewntworten können. Hab zu schnell aufgegeben. Jetzt läuft es. Aber trotzdem herzlichen Dank für die schnelle Hilfe. Habt einen schönen Freitag
11.06.2021 - 15:22
|
|||||||||||||||||||||||||
Swing by Spring Top#swingbyspringtop |
|||||||||||||||||||||||||
 |
 |
||||||||||||||||||||||||
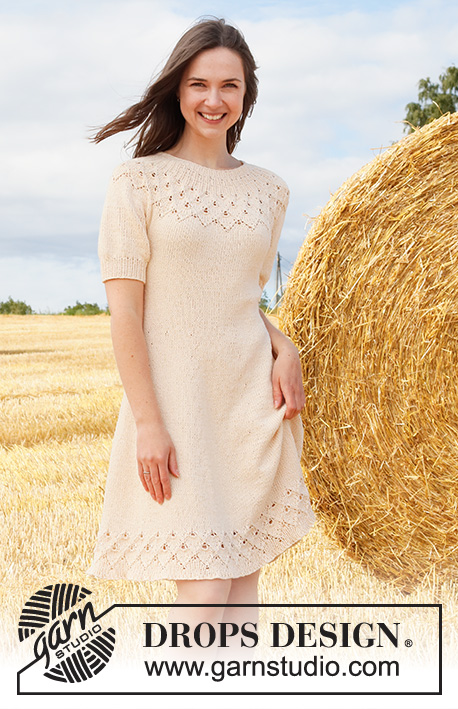
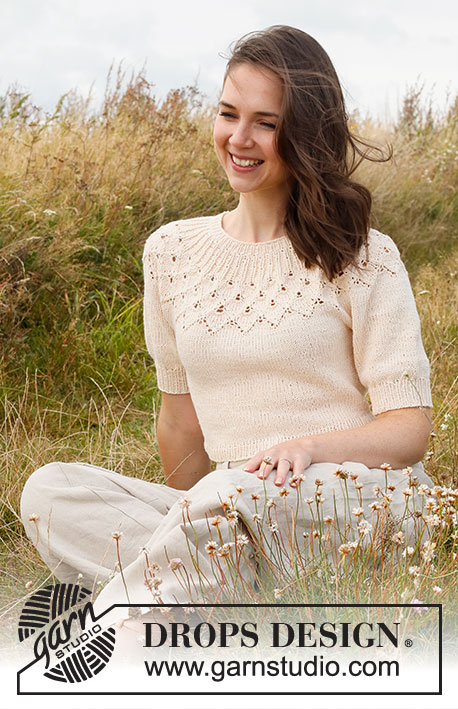
Maglione lavorato ai ferri in DROPS Belle. Lavorato dall'alto in basso con sprone rotondo, motivo traforato, motivo a foglie e maniche corte a palloncino. Taglie: S - XXXL.
DROPS 222-32 |
|||||||||||||||||||||||||
|
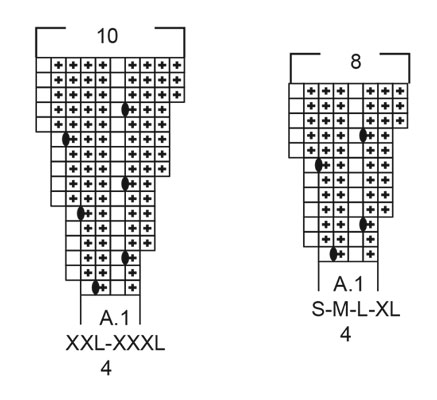
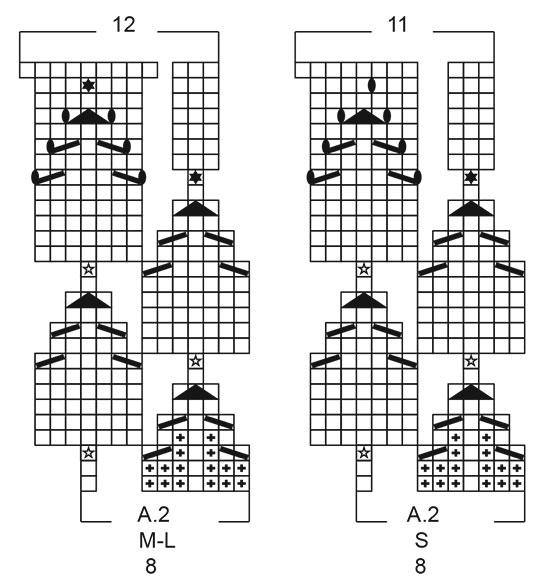
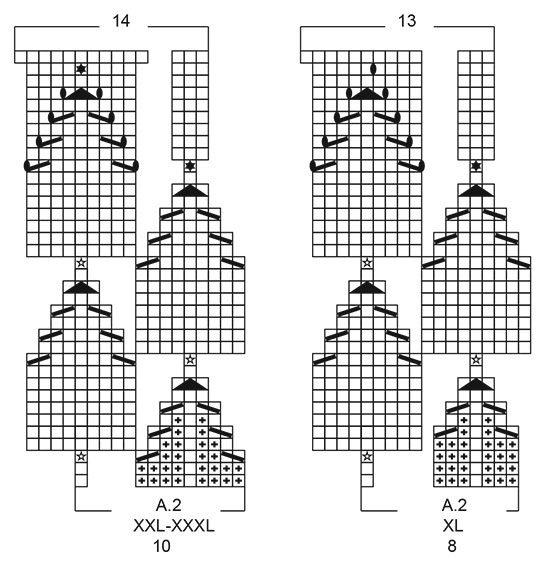
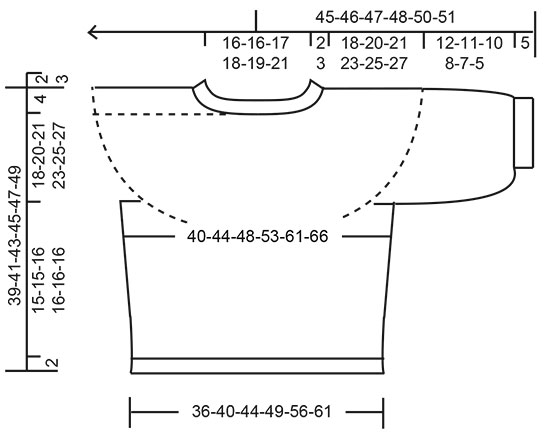
------------------------------------------------------- TECNICHE IMPIEGATE: ------------------------------------------------------- MOTIVO: Vedere i diagrammi A.1 e A.2. Scegliere il diagramma per la vostra taglia. SUGGERIMENTO PER LE DIMINUZIONI (applicato ai lati del corpo): Diminuire 1 maglia a ogni lato del segnapunti come segue: lavorare fino a quando rimangono 3 maglie prima del segnapunti e lavorare 2 maglie insieme a diritto, 2 maglie diritto (= il segnapunti è al centro di queste maglie), passare 1 maglia a diritto senza lavorarla, 1 maglia diritto, accavallare la maglia passata sopra quella appena lavorata. SUGGERIMENTO PER LA CHIUSURA: Per evitare che il bordo di chiusura sia tirato potete intrecciare con un ferro di una misura più grande. Se il bordo risulta ancora tirato, fare 1 gettato dopo circa 4 maglie durante la chiusura e intrecciare i gettati come maglie normali. ------------------------------------------------------- INIZIO DEL LAVORO: ------------------------------------------------------- MAGLIONE - BREVE RIASSUNTO DEL LAVORO: Lavorare il bordo del collo e lo sprone in tondo dal centro dietro, dall'alto in basso. Ora dividere lo sprone per il corpo e le maniche. Lavorare il corpo in tondo con i ferri circolari, dall'alto in basso. Lavorare le maniche in tondo con i ferri a doppia punta/ferri circolari corti, dall'alto in basso. BORDO DEL COLLO: Avviare 100-100-104-108-112-120 maglie con i ferri circolari n° 3 mm con Belle. Lavorare 1 giro diritto. Poi lavorare a coste = 1 maglia diritto/1 maglia rovescio. Quando le coste misurano 2-2-3-3-3-3 cm, passare ai ferri circolari n° 4 mm. Inserire 1 segnapunti all'inizio del giro al centro dietro, misurare lo sprone da questo segnapunti! SPRONE: Lavorare A.1 in tondo (= 25-25-26-27-28-30 ripetizioni di 4 maglie). Alla fine di A.1, ci sono 200-200-208-216-280-300 maglie sul ferro. Il lavoro ora misura 4-4-4-4-6-6 cm dal segnapunti. Poi lavorare A.2 in tondo (= 25-25-26-27-28-30 ripetizioni di 8-8-8-8-10-10 maglie). FARE ATTENZIONE ALLA TENSIONE DEL LAVORO! Alla fine di A.2, ci sono 275-300-312-351-392-420 maglie sul ferro. Il lavoro misura circa 14-14-14-17-19-19 cm dal segnapunti (cioè 16-16-17-20-22-22 cm dal bordo di avvio). Lavorare a maglia rasata fino a quando il lavoro misura 18-20-21-23-25-27 cm dal segnapunti. Ora dividere il lavoro per il corpo e le maniche. Lavorare il giro successivo come segue: 38-42-44-50-58-63 maglie diritto (= ½ dietro), trasferire le 62-66-68-76-80-84 maglie successive su un fermamaglie per la manica, avviare 8-8-12-12-12-12 nuove maglie (= a lato sotto la manica), 75-84-88-99-116-126 maglie diritto (= davanti), trasferire le 62-66-68-76-80-84 maglie successive su un fermamaglie per la manica, avviare 8-8-12-12-12-12 nuove maglie (= a lato sotto la manica), lavorare a diritto le ultime 38-42-44-50-58-63 maglie (= ½ dietro). Finire il corpo e le maniche in modo separato. ORA MISURARE IL LAVORO DA QUI! CORPO: = 167-184-200-223-256-276 maglie. Inserire 1 segnapunti al centro delle 8-8-12-12-12-12 nuove maglie sotto ogni manica (= a lato del corpo). Ora ci sono 83-92-100-111-128-138 maglie sul davanti e 84-92-100-112-128-138 maglie sul dietro. Spostare i segnapunti durante il lavoro; verranno usati durante le diminuzioni laterali. Lavorare a maglia rasata in tondo. Quando il lavoro misura 3 cm dalla divisione, diminuire 1 maglia a ogni lato di tutti i segnapunti - leggere il SUGGERIMENTO PER LE DIMINUZIONI (= 4 diminuzioni). Diminuire in questo modo ogni 2 cm 4-4-4-4-5-5 volte in totale = 151-168-184-207-236-256 maglie. Lavorare a maglia rasata in tondo fino a quando il lavoro misura 15-15-16-16-16-16 cm dalla divisione – o fino alla lunghezza desiderata (mancano circa 2 cm alla fine del lavoro). Lavorare 1 giro diritto in cui aumentare 23-26-28-31-36-38 maglie in modo uniforme = 174-194-212-238-272-294 maglie. Passare ai ferri circolari n° 3 mm. Lavorare a coste (1 maglia diritto/1 maglia rovescio) in tondo per 2 cm. Intrecciare con diritto su diritto e rovescio su rovescio - leggere il SUGGERIMENTO PER LA CHIUSURA. Il maglione misura circa 39-41-43-45-47-49 cm dalla spalla in giù. MANICHE: Riportare le 62-66-68-76-80-84 maglie in sospeso a un lato del lavoro sui ferri a doppia punta/ferri circolari corti n° 4 mm, e riprendere 1 maglia in ognuna delle 8-8-12-12-12-12 nuove maglie avviate a lato sotto la manica = 70-74-80-88-92-96 maglie. Lavorare a maglia rasata in tondo fino a quando la manica misura 12-11-10-8-7-5 cm dalla divisione (mancano circa 5 cm alla fine del lavoro, provare il maglione e lavorare fino alla lunghezza desiderata. Lavorare 1 giro diritto in cui diminuire 16-16-14-14-14-14 maglie in modo uniforme = 54-58-66-74-78-82 maglie. Passare ai ferri a doppia punta n° 3 mm. Lavorare a coste in tondo = 1 maglia diritto/1 maglia rovescio per 5 cm. Intrecciare con diritto su diritto e rovescio su rovescio - ricordarsi del SUGGERIMENTO PER LA CHIUSURA! La manica misura circa 17-16-15-13-12-10 cm dalla divisione. Lavorare l'altra manica nello stesso modo. |
|||||||||||||||||||||||||
Spiegazioni del diagramma |
|||||||||||||||||||||||||
|
|||||||||||||||||||||||||
 |
|||||||||||||||||||||||||
 |
|||||||||||||||||||||||||
 |
|||||||||||||||||||||||||
 |
|||||||||||||||||||||||||
Avete terminato questo modello?Allora taggate le vostre foto con #dropspattern #swingbyspringtop o inviatele alla #dropsfan gallery. Avete bisogno di aiuto con questo modello?Troverete 31 video tutorial, una sezione per i commenti/domande e molto altro guardando il modello su www.garnstudio.com © 1982-2026 DROPS Design A/S. Ci riserviamo tutti i diritti. Questo documento, compreso tutte le sue sotto-sezioni, è protetto dalle leggi sul copyright. Potete leggere quello che potete fare con i nostri modelli alla fine di ogni modello sul nostro sito. |
|||||||||||||||||||||||||


Con oltre 40 anni di esperienza nel design di modelli di maglia e uncinetto, DROPS Design offre la più estesa collezione di modelli gratuiti su internet - tradotti in 17 lingue. Ad oggi vi possiamo fornire 325 cataloghi e 12298 modelli - 9569 dei quali sono tradotti in Italiano.
Ci stiamo impegnando molto per darvi il meglio che vi possiamo offrire in termini di maglia e uncinetto, ispirazioni e consigli così come filati di grande qualità ad un prezzo incredibile! Volete utilizzare i nostri modelli per qualcosa d'altro oltre al vostro uso personale? Potete leggere tutto ciò che è consentito nel testo sul Copyright in basso su tutte le pagine dei nostri modelli. Buon lavoro!
Lasciare un commento sul modello DROPS 222-32
Noi saremmo felici di ricevere i tuoi commenti e opinioni su questo modello!
Se vuoi fare una domanda, fai per favore attenzione a selezionare la categoria corretta nella casella qui sotto per velocizzare il processo di risposta. I campi richiesti sono indicati da *.