
Popular categories
Looking for a yarn?


Comments / Questions (26)
![]() Claudia wrote:
Claudia wrote:
Die Ärmelzunahmen habe ich fertig und es sieht auch aus wie auf dem Bild, aber mit den Zunahmen für die Passe und Zunahme Tipp 3 komme ich nicht zurecht. Es wird rechts und links der Masche neben den 4 linken Maschen zugenommen. Immer neben dieser Masche? Oder immer die erste Masche nach den 4 linken?
17.02.2026 - 21:48DROPS Design answered:
Liebe Claudia, Sie nehmen stets direkt neben der markierten Masche zu (also der jeweils äußersten, rechts gestrickten Ärmelmasche, d.h. die erste Masche und die letzte Masche jedes Ärmels). Vom Ärmel aus gesehen kommen also erst die beiden Zunahmen am Markierer und dann die Linksmaschen. Viel Spaß beim Weiterstricken!
18.02.2026 - 13:57
![]() Inge wrote:
Inge wrote:
Moin,ich würde gern dieses Modell mit einer anderen Wolle stricken. Meine Maschenprobe ist 24 M in der Breite und 32 Reihen in der Höhe. können Sie mir eine genau Umrechnung dieser Anleitung nennen. Ich würde unbedingt Raglan mit der Sattelschulter arbeiten. Vielen Dank Inge
09.02.2026 - 18:30DROPS Design answered:
Liebe Inge, leider können wir Ihnen keine Umrechnung anbieten. Das Modell 215-9 würde zu Ihrer Maschenprobe passen, sieht aber etwas anders aus. Vielleicht stöbern Sie ja noch mal selbst.
18.02.2026 - 22:36
![]() Evelyn wrote:
Evelyn wrote:
Ich bin irgendwie irritiert, ich finde nichts wie weit man A1 stricken muss oder wann es Schluss ist. Auf den Photos sieht es auch anders aus als bei mir mit den Zunahmen . Vielleicht habe ich auch nur einen Knoten im Kopf
11.12.2025 - 20:30DROPS Design answered:
Liebe Evelyn, die letzten Zunahmen für die Passe werden beidseitig von den 4 Linken Maschen A.1 gestrickt, diese 4 linken Maschen sind jetzt die "Raglanmaschen" am Übergang zwischen Ärmel und Vorder-/Rückenteil. Viel Spaß beim Stricken!
12.12.2025 - 08:01
![]() Evelyn wrote:
Evelyn wrote:
Hallo, ich bin gerade bei der Zunahme für die Passe nach der Ärmelzuhname. Ist es richtig die vier linken Maschen nur auf einer Seite zu Stricken? Dankeschön und liebe Grüße
11.12.2025 - 15:14DROPS Design answered:
Liebe Evelyn die 4 Maschen links von A.1 Stricken Sie wie zuvor links, so sind es ingesamt 4 Mal 4 linken Maschen bei der Passe/ am Übergang zwischen Ärmel und Vorder-/Rückenteil. Viel Spaß beim Stricken!
12.12.2025 - 07:48
![]() Pernilla wrote:
Pernilla wrote:
Stickar Country Muse, Drops Design. Gör det som kallas "ökning ok", C. Man ska öka en maska före och en maska efter varje markörmaska, totalt 4 markörmaskor på ett varv. Ska man ha samma maska som markörmaska eller ska den flyttas vartefter ökningarna görs?
13.02.2025 - 19:15DROPS Design answered:
Hej Pernilla, når du har flyttet markørerne, skal de blive siddende i samme maske, så det bliver nye masker på hver side af oket :)
18.02.2025 - 10:04
![]() Rikkel Krog-Henriksen wrote:
Rikkel Krog-Henriksen wrote:
Jeg kan ikke finde et sted i opskriften hvor jeg kan se hvilken strørrelse jeg skal strikke - i forhold til mine mål?
13.11.2024 - 20:52DROPS Design answered:
Hei Rikkel. Alle mål finner du på målskissen nederst på oppskriften. Det første tallet i tallrekken er str. S og det siste tallet i tallrekken er str. XXXL. mvh DROPS Design
18.11.2024 - 13:59
![]() Perra wrote:
Perra wrote:
Liebes Team, ich habe diesen Pullover mit DROPS Merino Extra Fine gestrickte und musste fest stellen, dass er sehr gross und schwer geworden ist trotz Machen Probe. Nun habe ich ihn wieder aufgeribbelt. In vielen Kommentaren las ich nun, dass, dies Garn sehr wächst und nach dem Waschen viel grösser ist. Kann ich diesen Effekt mit der Zugabe von KidsSilk verändern? LG Petra
09.10.2024 - 07:05DROPS Design answered:
Liebe Perra, beachten Sie bei Merino Extra Fine immer, die Pflegehinweise wie bei der Farbkarte richtig zu folgen; Ihr DROPS Händler hat sicher für Sie mehr Hinweise. Sollten Sie mit Kid-Silk zusammenstricken, dann beachten Sie, daß die Maschenprobe immer (in der Höhe sowie in der Breite) immer stimmt, dann folgen Sie die Pflegehinweise für Kid-Silk (dh nicht mehr in der Maschinen waschen). Viel Spaß beim Stricken!
09.10.2024 - 08:50
![]() Margreet wrote:
Margreet wrote:
Ik snap niet goed waar de meerderingen voor de pas worden gemaakt. Als ik ze maak aan beide zijden van de markeerdraad dan loopt de lijn juist de andere kant op dan op de tekening. Of moeten de 4 averecht steken mee verlopen? Zoals ik het lees zijn de pasmeerderingen op de mouw. Klopt dit?
04.10.2024 - 08:01DROPS Design answered:
Dag Margreet,
Je meerdert eerst aan de kant van de panden, zodat de steken op de (zadel)schouder hetzelfde blijven (zie meerderingen voor de zadelschouder in patroonbeschrijving). De averechte steken blijven daarbij aan de kant van de schouder. Later maak je de meerderingen aan de kant van de mouw en niet op de panden.
19.10.2024 - 11:40
![]() Marianne wrote:
Marianne wrote:
Hej. Jeg kan simpelthen ikke få øje på, at vrangmaskerne mellem udtagningerne på skuldrene er beskrevet nogen steder. Stirrer jeg mig blind - eller er der en fejl i opskriften?
24.09.2023 - 21:18DROPS Design answered:
Hej Marianne, du har 4 vrangmasker i hver side af diagrammet som strikkes over skulderen :)
05.10.2023 - 09:00
![]() Torunn Ones Narvestad wrote:
Torunn Ones Narvestad wrote:
Hvordan lagre oppskriften?
24.06.2023 - 17:02DROPS Design answered:
Hei Torunn. Klikk på hjertet øverst til høyre og deretter skriv inn din e-post adresse for å legge denne oppskriften til dine favoritter. mvh DROPS Design
26.06.2023 - 11:36
|
||||||||||||||||||||||
Country Muse#countrymusesweater |
||||||||||||||||||||||
 |
 |
|||||||||||||||||||||
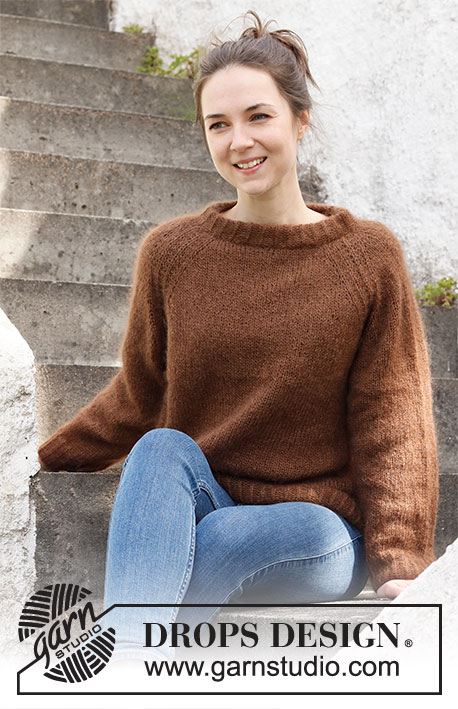
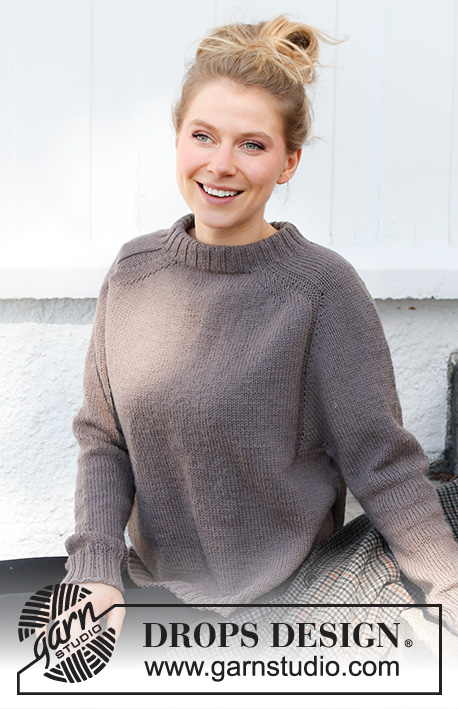
Knitted jumper in DROPS Lima. The piece is worked top down with double neck and saddle shoulders. Sizes S - XXXL.
DROPS 216-40 |
||||||||||||||||||||||
|
------------------------------------------------------- EXPLANATIONS FOR THE PATTERN: ------------------------------------------------------- PATTERN: See diagram A.1. Choose diagram for your size. INCREASE/DECREASE TIP (evenly spaced): To work out how to increase/decrease evenly, count the total number of stitches on needle (e.g. 92 stitches), and divide by the number of increases/decreases to be made (e.g. 28) = 3.3. In this example, increase by making 1 yarn over after alternately each 3rd and 4th stitch. On the next row work the yarn overs twisted to avoid holes. When decreasing, knit together alternately each 2nd and 3rd stitch and each 3rd and 4th stitch. INCREASE TIP-1 (saddle shoulder increase): Increase 2 stitches on each side of the 26-26-26-30-30-30 shoulder stitches by making 1 yarn over as described below. On the next round knit the yarn overs twisted to avoid holes. Then work the new stitches in stocking stitch. NOTE: The number of shoulder stitches remains the same – the increases are on the front and back pieces. BEFORE MARKER: Start 4 stitches before the marker, make 1 tight yarn over, 4 stitches in stocking stitch, make 1 tight yarn over (= 2 stitches increased). AFTER MARKER: Make 1 tight yarn over, 4 stitches in stocking stitch, make 1 tight yarn over (= 2 stitches increased). INCREASE TIP-2 (sleeve increase): BEFORE MARKER: The new stitch will be twisted, leaning towards the right. Use left needle to pick up strand between 2 stitches from the row below, pick up strand from behind and knit stitch in front loop (= 1 stitch increased). AFTER MARKER: The new stitch will be twisted, leaning towards the left. Use left needle to pick up strand between 2 stitches from the row below, pick up strand from the front and knit stitch in back loop (= 1 stitch increased). INCREASE TIP-3 (yoke increase): Start before the marker-stitch, use left needle to pick up strand between 2 stitches from the row below, pick up strand from behind and knit stitch in front loop, work marker-stitch in stocking stitch as before, use left needle to pick up strand between 2 stitches from the row below, pick up strand from the front and knit stitch in back loop (= 1 stitch increased on each side of the marker-stitch). Work the new stitches in stocking stitch. INCREASE TIP-4 (sides of body): Work until there are 3 stitches left before the stitch with the marker thread, make 1 yarn over, work 6 stitches in stocking stitch (marker thread sits in the middle of these 6 stitches), 1 yarn over (= 2 stitches increased). On the next round knit the yarn overs twisted to avoid holes. Then work the new stitches in stocking stitch. DECREASE TIP (for sleeves): Start 3 stitches before the marker thread, knit 2 together, knit 2 (marker thread sits between these 2 stitches), slip 1 stitch as if to knit, knit 1 and pass the slipped stitch over the knitted stitch (2 stitches decreased). CASTING-OFF TIP: To avoid the cast-off edge being tight you can cast off with a larger size needle. If the edge is still tight, make 1 yarn over after approx. each 8th stitch at the same time as casting off; the yarn overs are cast off as normal stitches. ------------------------------------------------------- START THE PIECE HERE: ------------------------------------------------------- JUMPER – SHORT OVERVIEW OF THE PIECE: The neck and yoke are worked in the round with circular needle, top down from mid back. Stitches are increased for the saddle shoulders, then for the sleeves and then for yoke. The yoke is divided for body and sleeves and the body continued in the round with circular needle. The sleeves are worked in the round with short circular needle/double pointed needles, top down. NECK: Cast on 92-96-100-104-108-112 stitches with short circular needle size 3.5 mm and Lima. Knit 1 round, then work rib in the round (= knit 2, purl 2) for 9 cm. When the rib is finished, knit 1 round where you increase 28-28-32-40-40-44 stitches evenly spaced – read INCREASE/DECREASE TIP = 120-124-132-144-148-156 stitches. Knit 1 round (yarn overs knitted twisted). YOKE: Change to circular needle size 4.5 mm. Insert 1 marker in the middle of the round (= mid-front) - yoke is measured from this marker! Work yoke as follows: In addition insert 4 new markers as described below – these markers are inserted without working the stitches, and each marker is placed between 2 stitches. These markers are used when increasing for saddle shoulders and should have a different colour from the marker mid-front. Start mid back, count 17-18-20-21-22-24 stitches (= ½ back piece), insert marker 1 before the next stitch, count 26-26-26-30-30-30 stitches (= shoulder), insert marker 2 before the next stitch, count 34-36-40-42-44-48 stitches (= front piece), insert marker 3 before the next stitch, count 26-26-26-30-30-30 stitches (= shoulder), insert marker 4 before the next stitch. There are 17-18-20-21-22-24 stitches left after the last marker; allow the markers to follow your work onwards. SADDLE SHOULDER INCREASE: Read the whole section before continuing! The piece is continued with stocking stitch on the front and back pieces and A.1 over the 26-26-26-30-30-30 shoulder stitches (i.e. between markers 1 and 2 and markers 3 and 4). AT THE SAME TIME on the first round increase 8 stitches for the saddle shoulders as follows: Increase 2 stitches BEFORE markers 1 and 3 (i.e. before A.1) and increase 2 stitches AFTER markers 2 and 4 (i.e. after A.1) – read INCREASE TIP-1. Remember there are only increases on front piece and back piece and number of shoulder stitches remains the same. Continue this pattern and increase every 2nd round a total of 10-12-13-14-16-17 times = 200-220-236-256-276-292 stitches. REMEMBER THE KNITTING TENSION! After the last increase, the piece measures approx. 8-9-10-11-12-13 cm from the marker on the neck. Now increase for sleeves as described below. SLEEVE INCREASE: Move the 4 markers from saddle shoulder increase so they are now on each side of the middle 18-18-18-22-22-22 stitches in A.1 on each shoulder – see arrows in A.1. Continue with stocking stitch and A.1 over A.1 as before. AT THE SAME TIME on the next round increase 4 stitches for the sleeves as follows: Increase 1 stitch AFTER markers 1 and 3 and increase 1 stitch BEFORE markers 2 and 4 – read INCREASE TIP-2. Remember there are only increases on sleeves and number of stitches in A.1 is increasing, but number of stitches on front piece and back piece remains the same – the increased stitches are worked in stocking stitch. Increase like this every 2nd round a total of 15-16-16-18-19-19 times = 260-284-300-328-352-368 stitches. After the last increase, the piece measures approx 11-12-12-13-14-14 cm from where the sleeve increases started. Now increase for yoke as described below. YOKE INCREASE: Move the 4 markers so each marker sits in the outermost sleeve stitches on each side. There are 46-48-48-56-58-58 stitches between the marker-stitches on each sleeve. Continue with stocking stitch and 4 purled stitches from A.1 which will continue down the front and back pieces as before. AT THE SAME TIME on the next round increase 8 stitches for yoke as follows: Increase 1 stitch on each side of the 4 marker-stitches – read INCREASE TIP-3. Increase like this every 2nd round a total of 5-5-6-7-7-8 times = 300-324-348-384-408-432 stitches. Continue working without further increases until the piece measures 16-17-18-19-20-21 cm from where the sleeve increase started after saddle shoulder increase. The piece measures approx. 24-26-28-30-32-34 cm from marker by the neck. On the next round divide the yoke for the body and sleeves as follows: Work the first 45-49-52-57-62-67 stitches as before (= ½ back piece), place the next 60-64-70-78-80-82 stitches on 1 thread for the sleeve, cast on 6-6-8-8-10-12 new stitches on the needle (= in side under sleeve), work 90-98-104-114-124-134 stitches as before (= front piece), place the next 60-64-70-78-80-82 stitches on 1 thread for the sleeve, cast on 6-6-8-8-10-12 new stitches on the needle (= in side under sleeve), work the last 45-49-52-57-62-67 stitches as before (= ½ back piece). Cut the strand and remove all markers. Body and sleeves are finished separately. THE PIECE IS NOW MEASURED FROM HERE! BODY: = 192-208-224-244-268-292 stitches. Insert 1 marker thread in the middle of the 6-6-8-8-10-12 stitches cast on under each sleeve. Allow the threads to follow your work onwards – they are used when increasing in the sides. Start the round at one of the marker threads and work stocking stitch in the round over all stitches. When the piece measures 6 cm from the division, increase 1 stitch on each side of both marker threads – read INCREASE TIP-4 (= 4 stitches increased). Increase like this every 6 cm a total of 3 times on each side = 204-220-236-256-280-304 stitches. Continue working until the piece measures 23-23-23-22-22-22 cm from the division. There is approx. 4 cm left to finished length; try the jumper on and work to desired length. Knit 1 round where you increase 48-52-56-64-68-76 stitches evenly spaced – remember INCREASE/DECREASE TIP = 252-272-292-320-348-380 stitches. NOTE: This is done to avoid the rib being tight. Change to circular needle size 3.5 mm and work rib (knit 2, purl 2) for 4 cm. Cast off with knit over knit and purl over purl – read CASTING-OFF TIP! The jumper measures approx. 56-58-60-62-64-66 cm from the shoulder down. SLEEVE: Place the 60-64-70-78-80-82 stitches from the thread on the one side of the piece on double pointed needles/short circular needle size 4.5 mm and knit up 1 stitch in each of the 6-6-8-8-10-12 stitches cast on under the sleeve = 66-70-78-86-90-94 stitches. Insert a marker thread in the middle of the 6-6-8-8-10-12 stitches under the sleeve. Allow the thread to follow your work onwards; it will be used when decreasing under the sleeve. Start at the marker thread and work stocking stitch in the round over all stitches. When the sleeve measures 2 cm from the division in all sizes, decrease 2 stitches under the sleeve – read DECREASE TIP. Decrease like this every 2-2-1½-1-1-1 cm a total of 7-8-11-14-15-16 times = 52-54-56-58-60-62 stitches. Continue working until the sleeve measures 36-35-33-32-31-29 cm from the division. There is approx. 6 cm left to finished length; try the jumper on and work to desired length. NOTE: Shorter measurements in larger sizes due to broader shoulders and longer yoke. Knit 1 round where you decrease 4-6-4-6-4-6 stitches evenly spaced – remember INCREASE/DECREASE TIP = 48-48-52-52-56-56 stitches. Change to double pointed needles size 3.5 mm and work rib (knit 2, purl 2) for 6 cm. Cast off with knit over knit and purl over purl – remember CASTING-OFF TIP! The sleeve measures approx. 42-41-39-38-37-35 cm from the division. Work the other sleeve in the same way. ASSEMBLY: Fold the neck to the inside of the piece and sew down. To avoid the neck being tight and rolling outwards, it is important the seam is elastic. |
||||||||||||||||||||||
Diagram explanations |
||||||||||||||||||||||
|
||||||||||||||||||||||
 |
||||||||||||||||||||||
 |
||||||||||||||||||||||
 |
||||||||||||||||||||||
Have you finished this pattern?Tag your pictures with #dropspattern #countrymusesweater or submit them to the #dropsfan gallery. Do you need help with this pattern?You'll find 31 tutorial videos, a Comments/Questions area and more by visiting the pattern on garnstudio.com. © 1982-2026 DROPS Design A/S. We reserve all rights. This document, including all its sub-sections, has copyrights. Read more about what you can do with our patterns at the bottom of each pattern on our site. |
||||||||||||||||||||||


With over 40 years in knitting and crochet design, DROPS Design offers one of the most extensive collections of free patterns on the internet - translated to 17 languages. As of today we count 324 catalogues and 12290 patterns translated into English (UK/cm). 12290
We work hard to bring you the best knitting and crochet have to offer, inspiration and advice as well as great quality yarns at incredible prices! Would you like to use our patterns for other than personal use? You can read what you are allowed to do in the Copyright text at the bottom of all our patterns. Happy crafting!
Post a comment to pattern DROPS 216-40
We would love to hear what you have to say about this pattern!
If you want to leave a question, please make sure you select the correct category in the form below, to speed up the answering process. Required fields are marked *.