
Popular categories
Looking for a yarn?


Comments / Questions (149)
![]() Christel Stickeln wrote:
Christel Stickeln wrote:
Bitte um Ausführung der Passe am Rückenteil. Komme nicht klar mir Zunahmen und Abnahmen bei verkürzten Reihen.
26.04.2019 - 10:33DROPS Design answered:
Liebe Frau Stickeln, Sie stricken die verkürten Reihen (es wird immer mehr Maschen gestrickt) gleichzeitig nehmen Sie nach 1 cm 1 Masche innerhalb der Randmasche in jeder 1½-1-1- ½-½-½ cm und gleichzeitig aber nur in den 4 grösseren Grösse: nach 2 cm stricken Sie eine verkürzte Krausrippe in jedem 5-4-3-2 cm. Viel Spaß beim stricken!
26.04.2019 - 10:57
![]() Anne wrote:
Anne wrote:
Hallo, kann ich diese Modell auch mit Drops Delight statt Fabel Sand und Baby Merino statt Fabel grau stricken? Sind beide auch Garngruppe A.
02.04.2019 - 21:25DROPS Design answered:
Liebe Anne, Baby Merino und Delight gehören beide zur Garngruppe A, genauso wie Fabel, sie sind ja Alternativen - benutzen Sie unseren Garnumrechner um die neue Garnmenge zu kalkulieren. Viel Spaß beim stricken!
03.04.2019 - 09:33
![]() Yvonne wrote:
Yvonne wrote:
I am still struggling with the bottom edge! When you mention "tip"of domino on mid back/front. Do you mean where the pattern is?
01.02.2019 - 13:41DROPS Design answered:
Dear Yvonne, when the domino is finished, the stitches on needle/thread are making a tip, you start to work the bottom edge knitting together the sts from bottom edge together with the sts from the tip of the domino (= from middle stitch on domino). Hope it helps!
01.02.2019 - 15:15
![]() Yvonne wrote:
Yvonne wrote:
I am really cross with the wording of the pattern!!! I have put both dominoes on needle and put a marker BETWEEN them (Is this correct?) then " left back piece bottom edge" NOW where is the mid back( tip of domino)??? when casting on 16 stitches on seperate needle do I attatch it at the 1st stitch on domino bottom edge ? it then says work from tip of domino to the side?? do not understand and where is the "left front bottom edge" I have bought all the yarn and not happy!!!!!
31.01.2019 - 23:48DROPS Design answered:
Dear Yvonne, you will work the bottom edge over the 16 new sts you cast on and join it to the domino at the end of every row from WS, starting from the tip of one domino to the side (between markers). And the bottom edge will be worked sideways in the round, starting on the top of one domino (middle on back piece) around body (both dominos) to the tip on domino (middle on back piece) through the domino on front piece. Happy knitting!
01.02.2019 - 08:34
![]() Yvonne wrote:
Yvonne wrote:
Thank you for replying BUT you haven't explained WHERE the BOTTOM TIP of domino is???????
24.01.2019 - 11:27DROPS Design answered:
Dear Yvonne, you start bottom edge from the tip of domino on back piece (= LEFT BACK PIECE BOTTOM EDGE) towards the left front piece bottom edge: repeat row 1 to 8 down to tip mid front (On last repetition of 8th or 2nd row slip the first 3 sts from stitch holder back on needle. ), then work right front piece bottom edge to side and finish with right back piece bottom edge towards tip of domino on back piece. Happy kniting!
24.01.2019 - 12:22
![]() Yvonne wrote:
Yvonne wrote:
I am really struggling with the pattern for dominoes! Your written instructions are hard to understand. I realise domino is knitted top down and finishes halfway BUT WHERE are instructions for the bottom half of domino?
23.01.2019 - 17:15DROPS Design answered:
Dear Yvonne, you first work the dominos top down (see on measurement chart = black square), then work the BOTTOM EDGE sideways knitted together with the stitchs from dominos (white star in chart) around whole bottom of piece. Then work the top part of jumper (bottom up from upper edge on dominos), first BACK PIECE in two parts: right back piece, left back piece then both pieces together etc. Happy knitting!
24.01.2019 - 09:11
![]() Yvonne wrote:
Yvonne wrote:
I have finished both dominoes and put them both on needle for bottom edge as per instruction BUT confused as what I am to do next??? Also where are instructions for the bottom tip of dominoes?
18.01.2019 - 00:35DROPS Design answered:
Dear Yvonne, after you have worked both dominos, work now the BOTTOM EDGE: cast on new sts and work the bottom edge from the left back piece (tip mid back) towards the left front piece (tip mid front), then from right front piece towards right back piece (tip mid back). Happy knitting!
18.01.2019 - 09:13
![]() Evelyne wrote:
Evelyne wrote:
Bordure du bas devant gauche rang 1 : faut il faire deux fois 2 mailles ensemble torse a l'endroit (ce qui correspond a 2diminutions et non 1 comme indiqué Merci pour votre aide
09.01.2019 - 23:08DROPS Design answered:
Bonjour Evelyne, désolée pour la réponse tardive, au rang 1 de la bordure bas du devant gauche, on tricote 2 fois 2 m ens torse à l'endroit, et comme on a fait un jeté juste avant, on ne diminue qu'une seule maille. Bon tricot!
05.03.2019 - 12:38
![]() Sylvia wrote:
Sylvia wrote:
Short ridges it says when piece measures 2cm, where should I be measuring, which piece.
24.12.2018 - 00:25DROPS Design answered:
Dear Sylvia, measure on the side in the knitting direction, from the first row worked over the sts for the half-piece. Happy knitting!
02.01.2019 - 08:57
![]() Breige wrote:
Breige wrote:
This does not answer my question . How do you find off 4 sts at the END of a row??
14.11.2018 - 18:44DROPS Design answered:
Dear Breige, the technique is the same, but do that at the end of row. Good luck!
14.11.2018 - 19:02
|
||||||||||||||||
Tauriel#taurielsweater |
||||||||||||||||
|
|
||||||||||||||||
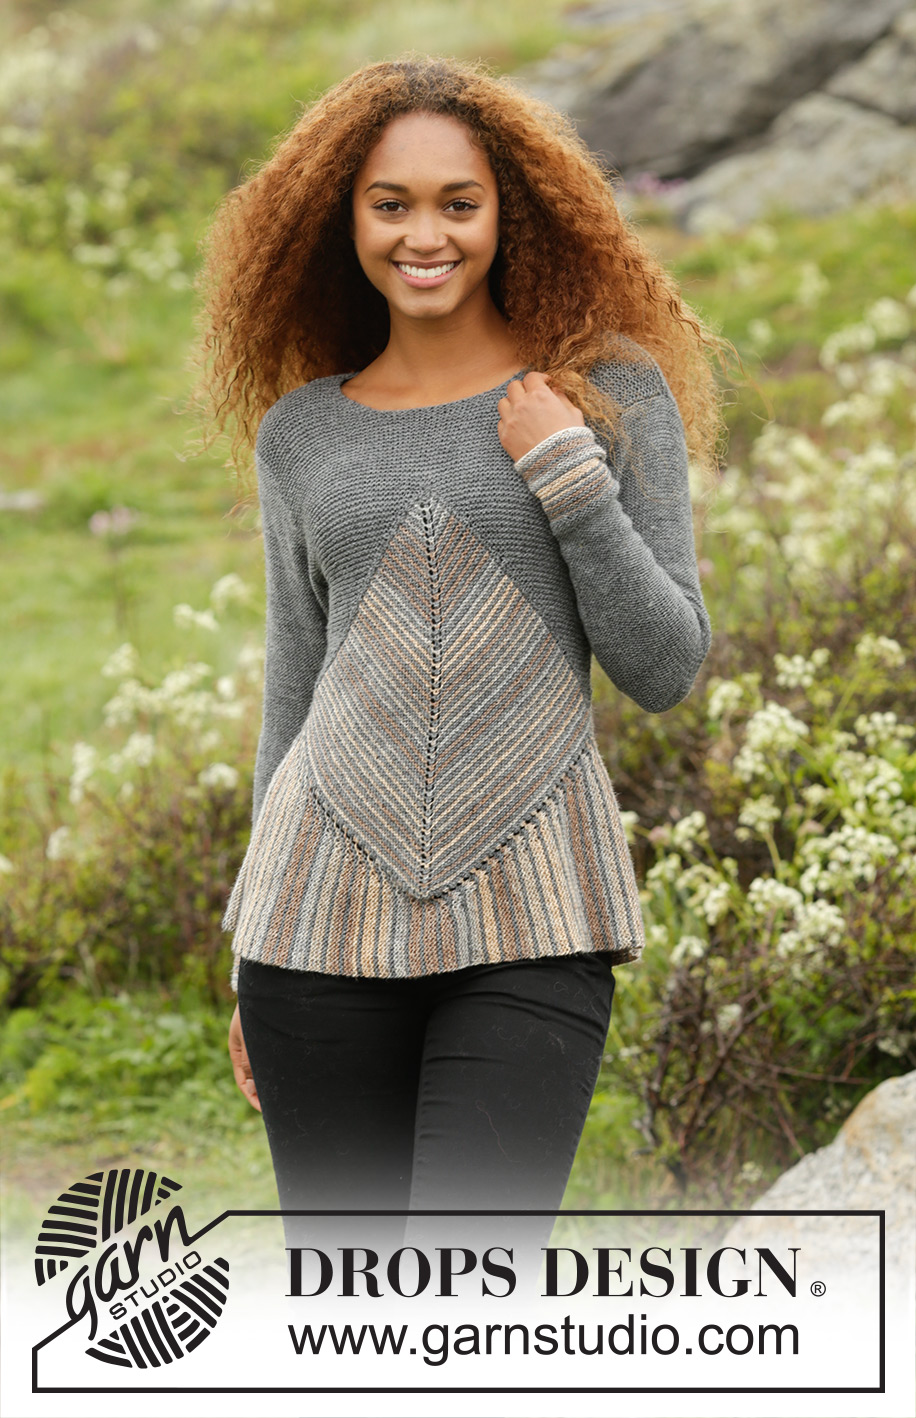
Knitted DROPS jumper in garter st with domino squares and stripes in ”Fabel”. Size: S - XXXL.
DROPS 173-4 |
||||||||||||||||
|
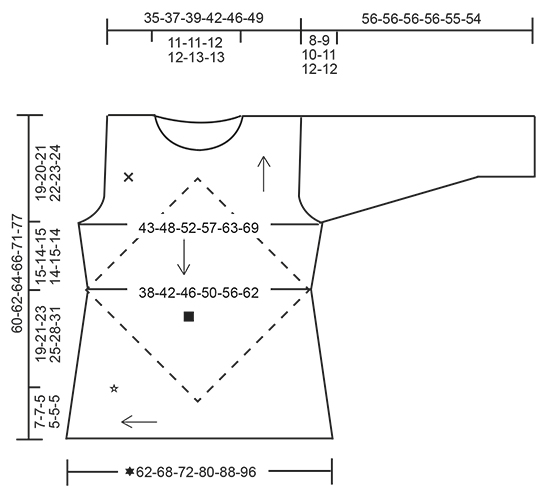
GARTER ST (back and forth): K all rows. 1 ridge = 2 rows K. STRIPES: * Work 1 ridge in GARTER ST - see explanation above, with sand. Work 1 ridge with grey. *, repeat from *-* until finished measurements. First row with new colour is always from RS. DOMINO SQUARE: Insert 1 marker in the middle st. ROW 1 (= RS): K until st with marker, 1 YO, K 1 (st with marker), 1 YO, K the rest of row (= 2 sts inc). ROW 2 (= WS): K all sts. Repeat 1st and 2nd row, i.e. inc 2 sts in the middle of the square on every row from RS. INCREASE TIP (applies to sleeve): Work until 2 sts remain before marker, 1 YO (= 1 st inc), K 4 (marker is in the middle of these sts), 1 YO (= 1 sts inc). Work YO twisted on next round. PATTERN (applies to sleeve): Work * 3 ridges with sand, work 1 ridge with grey *, repeat from *-* 4 times in total, then work stripes as follows: Work * 1 ridge with sand, work 1 ridge with grey *, repeat from *-* 4 times in total. Now work piece in grey until finished measurements. Turn piece inside out to that WS is outwards and continue in stocking st. ---------------------------------------------------------- JUMPER: Work first 2 domino squares – see square on chart, then work 1 edge to sts on domino square (i.e. bottom edge of jumper) with short rows - see star on chart. Edge is worked from mid back to mid front and mid back again. Finally work a yoke on jumper over domino square - se cross on chart. BACK PIECE: DOMINO SQUARE: Cast on 5 sts on circular needle size 3.5 mm with grey. K 1 row from WS. Switch colour to sand and work DOMINO SQUARE - see explanation above, back and forth and STRIPES – see explanation above. REMEMBER THE KNITTING TENSION Work Domino square and stripes until piece measures 38-42-46-50-56-62 cm at the widest = approx. 62-68-74-82-90-100 ridges, adjust so that last ridge is with sand, and approx. 64-70-76-84-92-102 sts on each side of st with marker (= approx. 129-141-153-169-185-205 sts in total on needle). Work 1 ridge with grey and inc as before (i.e. 1 st on each side of st with marker) and inc 4 sts evenly on each side of mid st on row from RS (= 10 sts inc in total on row from RS) = approx. 69-75-81-89-97-107 sts on each side of st with marker (= approx. 139-151-163-179-195-215 sts in total on needle). Slip sts on a stitch holder and work front piece domino square. FRONT PIECE: DOMINO SQUARE: Cast on and work as back piece domino square. Slip sts from domino on back piece back on needle tog with sts from front piece domino square. Insert 1 marker between transition between them (= 2 markers) = approx. 278-302-326-358-390-430 sts in total. BOTTOM EDGE: Work piece tog with sts from mid back (i.e. tip of domino) and to the side, down to tip mid front, up to the side and down to mid back. Cast on 16-16-12-12-12-12 sts on circular needle size 3.5 mm with grey. Work short rows and stripes as follows: LEFT BACK PIECE BOTTOM EDGE: Work tog with sts from tip mid back and out to marker in the side as follows: ROW 1 (= RS): K 1, 1 YO and K rest of row (= 1 st inc). ROW 2 (= WS): K until 1 st remains on row, work next st tog with the first 2 sts from domino (= K 3 tog = 2 sts dec from domino) Switch to sand. ROW 3 (= RS): As 1st row. ROW 4 (= WS): K until 5 sts remain on row, turn piece. ROW 5 (= RS): K all sts. ROW 6 (= WS): K until 3 sts remain on row, turn piece. ROW 7 (= RS): K all sts. ROW 8 (= WS): K until 1 st remains on row, work next st tog with the first 2 sts from domino (= K 3 tog = 2 sts dec from domino). Switch colour to grey. Repeat 1st to 8th row until all sts from tip of domino out to the side until marker has been worked tog with the edge. LEFT FRONT PIECE BOTTOM EDGE: Worked tog with sts from the side and down to tip of domino square on front piece as follows: ROW 1 (= RS): K 1, 1 YO, K 2 twisted tog, K 2 twisted tog, K the rest of row (= 1 st dec). ROW 2 (= WS): K until 1 st remains on row, work next st tog with the first 2 sts from domino (= K 3 tog = 2 sts dec from domino). Switch to sand. ROW 3 (= RS): As 1st row. ROW 4 (= WS): K until 5 sts remain on row, turn piece. ROW 5 (= RS): K all sts. ROW 6 (= WS): K until 3 sts remain on row, turn piece. ROW 7 (= RS): K all sts. ROW 8 (= WS): K until 1 st remains on row, work next st tog with the first 2 sts from domino (= K 3 tog = 2 sts dec from domino) Switch colour to grey. Repeat 1st to 8th row down to tip mid front. NOTE: On last repetition of 8th or 2nd row slip the first 3 sts from stitch holder back on needle. RIGHT FRONT PIECE BOTTOM EDGE: Work tog with sts from tip of domino square on front piece and out to marker in the side as left back piece bottom edge. RIGHT BACK PIECE BOTTOM EDGE: Worked tog with sts from the side and down to tip of domino square on front piece as left front piece bottom edge. Adjust so that last stripe is with sand. Cast off. BACK PIECE: Now work yoke on back piece with grey as follows: RIGHT BACK PIECE: Pick up 64-70-76-84-92-102 sts with grey from RS on needle size 3.5 mm on one side of domino, pick up 2 sts on tip of domino, pick up 64-70-76-84-92-102 sts down the other side of domino = 130-142-154-170-186-206 sts. K 1 row from WS and inc 15-13-13-11-13-9 sts evenly on each side of tip (= 30-26-26-22-26-18 sts inc in total) = 80-84-90-96-106-112 sts on each side (= 160-168-180-192-212-224 sts in total). Then work over the first 80-84-90-96-106-112 sts (i.e. in right side of piece seen from RS) as follows: READ ALL OF THE FOLLOWING SECTION BEFORE CONTINUING! WORK SHORT ROWS, SHORT RIDGES AND INC IN THE SIDE AT THE SAME TIME AS FOLLOWS: Row 1 (= RS): K the first 2 sts tog, turn piece (= 1 st). Row 2 (= WS): K back. Row 3 (= RS): K 1, insert 1 marker, K the next 2 sts from domino tog, turn piece (= 2 sts). Move the marker upwards when working. Row 4 (= WS): K back. Row 5 (= RS): K 2, K the next 2 sts tog, turn piece (= 3 sts). Row 6 (= WS): K back. Row 7 (= RS): K 3, K the next 2 sts tog, turn piece (= 4 sts). Row 8 (= WS): K back. Continue the short rows like this, i.e. work over 2 sts more on every row from RS but work them 2 K tog, i.e. 2 sts become 1 st. Continue like this until all sts up to tip of domino have been worked. SHORT RIDGES: Applies only to size L-XL-XXL-XXXL: When piece measures 0-0-2-2-2-2 cm, work 0-0-1-1-1-1 short ridge (i.e. work from RS until where the last turn was, turn piece and work back = 2 rows = 1 short ridge) over the sts already worked, work short ridge every 0-0-5-4-3-2 cm 0-0-4-6-8-11 times in total. INC IN THE SIDE: When yoke measures 1 cm, inc 1 st inside 1 edge st at beg of next row from RS. Inc like this every 1½-1-1- ½-½-½ cm 9-12-14-17-19-22 times in total = 10-13-15-18-20-23 sts before marker. When yoke measures 15-14-15-14-15-17 cm (measured along the side), cast off for armhole at beg of every row from RS as follows: Cast off 3 sts a total of 1-1-2-2-2-3 times, 2 sts a total of 1-2-2-3-4-4 times and 1 st a total of 4-5-4-5-5-5 times (i.e. 1 st remains before marker). Piece measures approx. 19-21-23-25-28-31 cm measured in the side from domino and up. When the short rows have been worked, there are 40-42-45-48-53-56 sts in total on needle. Slip sts on 1 stitch holder and work left back piece. LEFT BACK PIECE: = 80-84-90-96-106-112 sts. READ ALL OF THE FOLLOWING SECTION BEFORE CONTINUING! WORK SHORT ROWS, SHORT RIDGES AND INC IN THE SIDE AT THE SAME TIME AS FOLLOWS: SHORT ROWS: Row 1 (= WS): Work the first 2 sts from domino, turn piece. Row 2 (= RS): Work the 2 sts K tog (= 1 st). Row 3 (= WS): K 1, insert 1 marker, work the next 2 sts from domino, turn piece (= 3 sts). Move the marker upwards when working. Row 4 (= RS): K 2 tog, K 1 (= 2 sts). Row 5 (= WS): K 2, work the next 2 sts from domino, turn piece (= 4 sts). Row 6 (= RS): K 2 tog, K the rest of row. Row 7 (= WS): K, work the next 2 sts from domino, turn piece (= 4 sts). Row 8 (= RS): K 2 tog, K the rest of row. Continue the short rows like this, i.e. work over 2 sts more from domino on every row from WS and dec 1 st at beg of the every row from RS, i.e. 2 sts become 1 st. Continue like this until all sts up to tip of domino have been worked. SHORT RIDGES: Applies only to size L-XL-XXL-XXXL: When piece measures 0-0-2-2-2-2 cm, work 0-0-1-1-1-1 short ridge (i.e. work from WS until where the last turn was, turn piece and work back = 2 rows = 1 short ridge) over the sts already worked, work short ridge every 0-0-5-4-3-2 cm 0-0-4-6-8-11 times in total. INC IN THE SIDE: When yoke measures 1 cm, inc 1 st inside 1 edge st at end of next row from RS. Inc like this every 1½-1-1- ½-½-½ cm 9-12-14-17-19-22 times in total = 10-13-15-18-20-23 sts before marker. When yoke measures 15-14-15-14-15-17 cm (measured along the side), cast off for armhole at beg of every row from WS as follows: Cast off 3 sts a total of 1-1-2-2-2-3 times, 2 sts a total of 1-2-2-3-4-4 times and 1 st a total of 4-5-4-5-5-5 times (i.e. 1 st remains after marker). Piece measures approx. 19-21-23-25-28-31 cm measured in the side from domino and up. When the short rows have been worked, there are 40-42-45-48-53-56 sts in total on needle. BACK PIECE: Slip sts from right and left back piece on to same needle = 80-84-90-96-106-112 sts. Work in garter st. When piece measures 13-11-11-9-8-8 cm from tip of domino (approx. 2 cm remain), cast off the middle 34-34-38-38-40-40 sts for neck and finish each shoulder separately = 23-25-26-29-33-36 sts remain on shoulder. On next row from the neck dec 1 st = 22-24-25-28-32-35 sts. Work in garter st until piece measures 15-13-13-11-10-10 cm from tip of domino. Cast off. The whole piece measures approx. 60-62-64-66-71-77 cm. Work the other shoulder the same way. FRONT PIECE: RIGHT FRONT PIECE: Work as left back piece. LEFT FRONT PIECE: Work as right back piece. FRONT PIECE: Slip sts from right and left front piece on to same needle = 80-84-90-96-106-112 sts. Work in garter st. When piece measures 8-6-4-2-1-1 cm from tip of domino, loosely cast off the middle 20 sts for neck and finish each shoulder separately = 30-32-35-38-43-46 sts remain on shoulder. Then dec on every row from neck by dec 1 st inside 3 edge sts on every row from RS 8-8-10-10-11-11 times in total = 22-24-25-28-32-35 sts remain on shoulder. Work in garter st until piece measures 7-7-8-8-9-9 cm in total from the 20 sts cast off for neck, cast off. The whole piece measures approx. 60-62-64-66-71-77 cm. Work the other shoulder the same way. SLEEVE: Worked in the round on double pointed needles. Cast on 46-48-50-54-56-58 sts on double pointed needles size 3.5 mm with sand. Work PATTERN - see explanation above. When piece measures 14-12-10-8-3 cm, insert 1 marker at beg of round, inc 1 st on each side of marker – see INCREASE TIP. Inc like this every 1½ cm 21-22-23-24-25-26 times in total = 88-92-96-102-106-110 sts. When piece measures 48-47-46-45-43-42 cm (shorter measurements in the larger sizes because of longer sleeve cap and wider shoulders). Continue to work back and forth and cast off for sleeve cap at beg of every row in each side of piece as follows: Cast off 4 sts 2 times, 2 sts 3 times and 1 st 2 times, then cast off 2 sts in each side until piece measures 56-56-56-56-55-54 cm, then cast off 3 sts 1 time in each side of piece. Cast off the remaining sts. Knit another sleeve the same way. ASSEMBLY: Assemble with grey. Sew bottom edge tog mid back in outer loop of outermost st. Sew the shoulder seams. Sew in sleeves with WS outwards, i.e. stocking st is turned inwards. Sew side seams down to bottom edge in outer loop of edge sts. |
||||||||||||||||
Diagram explanations |
||||||||||||||||
|
||||||||||||||||
 |
||||||||||||||||
Have you finished this pattern?Tag your pictures with #dropspattern #taurielsweater or submit them to the #dropsfan gallery. Do you need help with this pattern?You'll find 27 tutorial videos, a Comments/Questions area and more by visiting the pattern on garnstudio.com. © 1982-2026 DROPS Design A/S. We reserve all rights. This document, including all its sub-sections, has copyrights. Read more about what you can do with our patterns at the bottom of each pattern on our site. |
||||||||||||||||


With over 40 years in knitting and crochet design, DROPS Design offers one of the most extensive collections of free patterns on the internet - translated to 17 languages. As of today we count 324 catalogues and 12290 patterns translated into English (UK/cm). 12290
We work hard to bring you the best knitting and crochet have to offer, inspiration and advice as well as great quality yarns at incredible prices! Would you like to use our patterns for other than personal use? You can read what you are allowed to do in the Copyright text at the bottom of all our patterns. Happy crafting!
Post a comment to pattern DROPS 173-4
We would love to hear what you have to say about this pattern!
If you want to leave a question, please make sure you select the correct category in the form below, to speed up the answering process. Required fields are marked *.