
Popular categories
Looking for a yarn?


Comments / Questions (21)
![]() Sarah wrote:
Sarah wrote:
Bonjour, J'ai commencé ce chale mais je me pose une question sur les jetés, à part ceux que l'on lache, les autres doivent être tricotés normalement pour faire un jour ou alors ils faut les tricoter torse pour éviter le jour? Merci
31.07.2018 - 15:09DROPS Design answered:
Bonjour Sarah, les jetés sont tricotés "normalement" pour qu'ils forment des trous. Bon tricot!
31.07.2018 - 15:27Mónica Ferreyra wrote:
Hola, quisiera saber qué significa MP en el punto musgo, en la tercera vuelta del chal. Gracias, desde Buenos Aires, Argentina
01.09.2017 - 12:37
![]() Annica Bruce wrote:
Annica Bruce wrote:
Hej jag undrar då man stickar rätstickningen mellan hålvarven ska man göra omslagen, ökningen, vid stickmarkören som tidigare eller ska man hoppa över den Mvh Annica
27.08.2017 - 22:24DROPS Design answered:
Hej, du ska fortsätta ökningarna med omslag som förut.
29.08.2017 - 14:22
![]() Silvana wrote:
Silvana wrote:
Non mi ritrovo con gli aumenti: quando si dice che la maglia gettata del primo ferro va fatta cadere dal ferro nel secondo, se si fa in realtà non c'è un aumento. Ma se si lavora si formano due occhielli e un terzo con la maglia gettata sul rovescio. Dalla foto sembrerebbe che ce ne sia uno solo. grazie per l'aiuto.
03.05.2016 - 01:28DROPS Design answered:
Buongiorno Silvana. Le indicazioni sono corrette. Nel primo ferro vengono fatte 6 gettate (2 da ciascun lato del lavoro, 1 prima e 1 dopo le m centrali). Al secondo ferro fa cadere 2 gettate del ferro precedente (quindi ci sono 4 m in più rispetto al ferro 1: 1 m da ciascun lato, e 1 m prima/dopo le m centrali) e aggiunge 2 gettate, quindi altri 2 aumenti. Le m gettate che vengono fatte cadere servono perchè il bordo non tiri troppo. Buon lavoro!
03.05.2016 - 06:55
![]() Mila wrote:
Mila wrote:
Ik krijg links en rechts een verschillende rand aan de buitenkant (bovenkant). Ik heb bij ‘omslagdoek’ NLD 2 geinterpreteerd als ‘av tot er 2 st PLUS OMSLAG over zijn op de nld’ (anders kan je niet nog 2 keer r breien en een omslag laten afglijden). Maar resultaat is dus dat de linker- en rechter buitenrand verschillend zijn. Heeft u een advies?
17.03.2016 - 00:33
![]() Kirsten A wrote:
Kirsten A wrote:
Veldig dårlig forklart på 2. Omgang vrangen når man kommer til slutten. Det bør stå når man kommer til de tre siste maskene , ikke de to siste. 😡
01.03.2016 - 11:01
![]() Daphne wrote:
Daphne wrote:
Klopt het dat er aan de ene zijde minder gemeerderd wordt dan aan de andere zijde? Wordt de omslagdoek dan asymmetrisch? Ik kom er niet goed uit. Vind het er overigens prachtig uitzien op afbeelding!
04.02.2016 - 17:31DROPS Design answered:
Hoi Daphne. Nee, je meerdert 3 st aan beide kanten van de markeerder (= 6 st per keer): 1 r, 1 omsl, 1 r, 1 omsl, r tot eerste markeerder, 1 omsl, 34 r, 1 omsl na tweede markeerder, r tot er 2 st over zijn op de nld, 1 omsl, 1 r, 1 omsl, 1 r.
09.02.2016 - 16:48
![]() Rosa wrote:
Rosa wrote:
Agradecería una respuesta a la consulta realizada: Hola, estoy tejiendo este chal y me surge esta duda: chal fila 2=LR, donde dice hacer en los 2 pts finales 1 HEB, 1 d., dejar caer la HEB, 1 d. Para hacerlo se necesitan 3 pts finales porque con 2 es imposible, como haces 2 d + dejar caer la HEB ?? Gracias y un saludo.
26.01.2016 - 19:01DROPS Design answered:
Hola Rosa, he mandado la consulta al departamento de diseño por si es necesario hacer algún cambio. Se trata efectivamente de 2 pts + 1 HEB donde dice: "cuando queden 2 pts"
27.01.2016 - 09:07
![]() Rosa wrote:
Rosa wrote:
Hola, estoy tejiendo este chal y me surge esta duda: chal fila 2=LR, donde dice hacer en los 2 pts finales 1 HEB, 1 d., dejar caer la HEB, 1 d. Para hacerlo se necesitan 3 pts finales porque con 2 es imposible, como haces 2 d + dejar caer la HEB ?? Gracias y un saludo.
23.01.2016 - 09:16DROPS Design answered:
Hola Rosa, he mandado la consulta al departamento de diseño por si es necesario hacer algún cambio. Se trata efectivamente de 2 pts + 1 HEB donde dice: "cuando queden 2 pts"
27.01.2016 - 09:08
![]() Päivi wrote:
Päivi wrote:
Nice combination of colours
03.01.2016 - 19:43
|
|
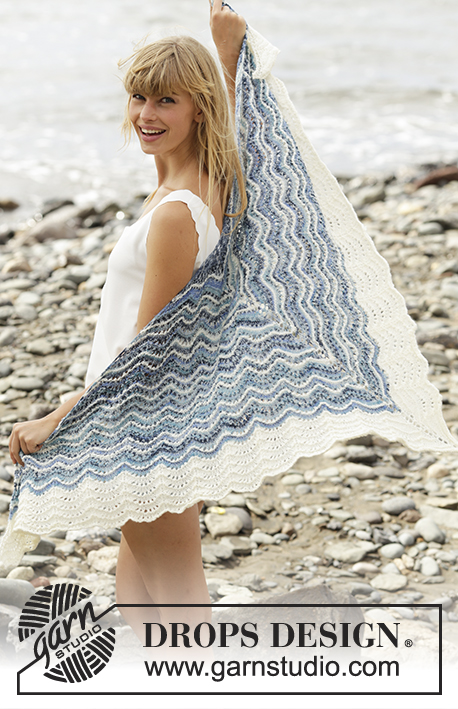
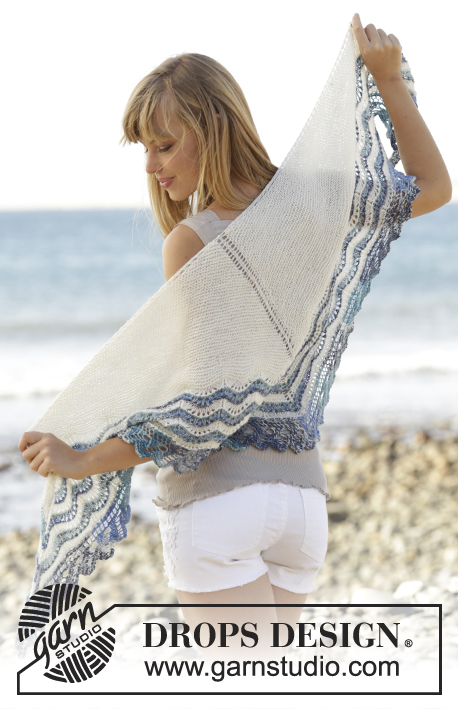
Lilia#liliashawl |
|
|
|
|
Knitted DROPS shawl with picot edge in ”Brushed Alpaca Silk”.
DROPS 168-14 |
|
|
GARTER ST (back and forth): K all rows. 1 ridge = 2 rows K. EYELET EDGE: ROW 1 (= RS): K 1, 1 YO, K 1, 1 YO, K until first marker, 1 YO, K 34, 1 YO after second marker, K until 2 sts remain on row, 1 YO, K 1, 1 YO, K 1. ROW 2 (= WS): K 1, drop YO off the needle, K 1, 1 YO, K until 2 sts remain on row, 1 YO, K 1, drop YO off the needle, K 1. ROW 3 (= RS): K 1, 1 YO, K 1, 1 YO, * K 2 tog, 1 YO *, repeat from *-* until 1 or 2 sts remain before first marker, K 1 or 2, 1 YO, repeat from *-* until 2 sts remain before second marker, K 2, 1 YO, repeat from *-* until 3 or 4 sts remain on row, K 1 or 2, 1 YO, K 1, 1 YO, K 1. ROW 4 (= WS): K 1, drop YO off the needle, K 1, 1 YO, K until 2 sts remain on row, 1 YO, K 1, drop YO off the needle, K 1. ---------------------------------------------------------- SHAWL: Worked back and forth on circular needle from top and down. Cast on 40 sts on circular needle size 5 mm with light grey green. Work 1 ridge in GARTER ST - see explanation above. Insert 2 markers in the piece as follows: Insert first marker after the first 3 sts, insert second marker when 3 sts remain on row. Then work in stocking st as follows: ROW 1 (= RS): K 1, 1 YO, K 1, 1 YO, K until first marker, 1 YO, K 34, 1 YO after second marker, K until 2 sts remain on row, 1 YO, K 1, 1 YO, K 1. ROW 2 (= WS): K 1, drop YO off the needle, K 1, 1 YO, P until 2 sts remain on row, 1 YO, K 1, drop YO off the needle, K 1. After the first 2 rows 6 sts (4 sts from RS and 2 sts from WS) have been inc and there are 46 sts in total on row. Continue to inc the same way 37 more times = 268 sts on needle (there should be 38 holes along each of the 2 markers and piece measures approx. 32 cm in the middle of piece). REMEMBER THE KNITTING TENSION Switch to off white and work EYELET EDGE - see explanation above. After eyelet edge switch to light lavender and work in garter st while AT THE SAME TIME inc 4 sts on every row from RS and 2 sts on every row from WS as before. When piece measures 38 cm (measured in the middle of piece), switch back to off white and work EYELET EDGE the same way as last time. CAST-OFF EDGE WITH PICOT: After eyelet edge cast off with a picot edge from RS as follows: K 1, (* insert right needle in between the first 2 sts on left needle (i.e. between sts on needle, not through sts), make 1 YO on right needle, pull YO forwards between sts and slip YO on left needle *, repeat from *-* 2 more times (= 3 new sts on left needle). ** K first st on left needle, pass first st on right needle over last st worked **), repeat from **-** 5 times in total and repeat from (-) along the entire shawl until 1 st remains. Cut the yarn and pull it through last st. |
|
Have you finished this pattern?Tag your pictures with #dropspattern #liliashawl or submit them to the #dropsfan gallery. Do you need help with this pattern?You'll find 15 tutorial videos, a Comments/Questions area and more by visiting the pattern on garnstudio.com. © 1982-2026 DROPS Design A/S. We reserve all rights. This document, including all its sub-sections, has copyrights. Read more about what you can do with our patterns at the bottom of each pattern on our site. |


With over 40 years in knitting and crochet design, DROPS Design offers one of the most extensive collections of free patterns on the internet - translated to 17 languages. As of today we count 324 catalogues and 12290 patterns translated into English (UK/cm). 12290
We work hard to bring you the best knitting and crochet have to offer, inspiration and advice as well as great quality yarns at incredible prices! Would you like to use our patterns for other than personal use? You can read what you are allowed to do in the Copyright text at the bottom of all our patterns. Happy crafting!
Post a comment to pattern DROPS 168-14
We would love to hear what you have to say about this pattern!
If you want to leave a question, please make sure you select the correct category in the form below, to speed up the answering process. Required fields are marked *.