
Popular categories
Looking for a yarn?


Comments / Questions (47)
![]() Helle Arrøe wrote:
Helle Arrøe wrote:
Mener i ikke to ret og en vrang fra retsiden?
03.03.2016 - 15:33DROPS Design answered:
Jo selvfølgelig Helle, du har ret :)
03.03.2016 - 15:53
![]() Helle Arrøe wrote:
Helle Arrøe wrote:
Når pind tre skal strikkes er det så tre ret en vrang to ret og en vrang?
03.03.2016 - 14:55DROPS Design answered:
Ja det stemmer, så du fra retsiden får (2 ret, 1 vrang) over hele pinden med 3 m retstrik i hver side. God fornøjelse!
03.03.2016 - 15:14
![]() Wilma wrote:
Wilma wrote:
Kan deze trui gebreid worden met combinatie van Brushed-alpaca-silk met Bomull-Lin? dank voor uw advies.
18.02.2016 - 15:38DROPS Design answered:
Hoi Wilma. Je kan vervangen door 1 draad Bomull-Lin / 1 draad Brushed, maar denk erom dat Bomull-Lin zwaarder zal vallen dan 1 draad Brushed (85 meter per 50 gr in vergelijking met 280 m per 50 gr). Maar brei ook eerst een proeflapje om te zien of je tevreden bent met het resultaat. Veel plezier mee.
24.02.2016 - 17:05
![]() Angelika Van Der Horst wrote:
Angelika Van Der Horst wrote:
Ben ook benieuwe naar het antwoord voor Karin Rochell, het rippatroon moet aan de goede kant zijn 2 links, 1 rechts?
05.02.2016 - 13:22DROPS Design answered:
Hoi Angelika. Je breit boordsteek aan de goede kant: 1 r/2 av, dus op de verkeerde kant brei je dan 2 r/1 av.
10.02.2016 - 15:42
![]() Rolf wrote:
Rolf wrote:
15 cm står det på rad 4.
05.02.2016 - 10:36
![]() Helen Lindblad wrote:
Helen Lindblad wrote:
På bak och framstycket, hur många cm resår ska man sticka?!? Det har ni inte skrivit med. Ärmen har 4 cm resår men bak och fram då?!?
05.02.2016 - 09:15DROPS Design answered:
Hej. 1:a och 2:a randen stickas i resår på fram- och bakstycket, så 5 cm resår (1+4 cm). Lycka till!
05.02.2016 - 12:02
![]() Karin Rochell wrote:
Karin Rochell wrote:
Wird das Rippenmuster tatsächlich 1 M re, 2 M li gestrickt? Der Pullover soll doch auf links gewendet werden. Auf dem Bild sieht das Rippenmuster auf der außen getragenen Seite nach 1M re, 2 M li aus. Dann aber müsste doch beim Stricken die Anordnung 1M li, 2 M re sein!?
31.01.2016 - 15:28DROPS Design answered:
Sie haben Recht, auf dem Bild sieht das Muster nach 1 M re, 2 M li aus, da der Pullover gewendet wird, müsste das Rippenmuster also genau andersherum gestrickt werden. Ich leite das Problem an die Designerinnen weiter, um es prüfen zu lassen.
07.02.2016 - 13:20
![]() Cousseau wrote:
Cousseau wrote:
Vivement les explications !
03.01.2016 - 14:44
![]() Gisèle wrote:
Gisèle wrote:
Hâte d'avoir les explications !
31.12.2015 - 16:33
![]() Unuth wrote:
Unuth wrote:
Bei diesem Modell kann ich gut meine Wollreste verarbeiten, ich freue mich schon auf die Anleitung
31.12.2015 - 16:26
|
|
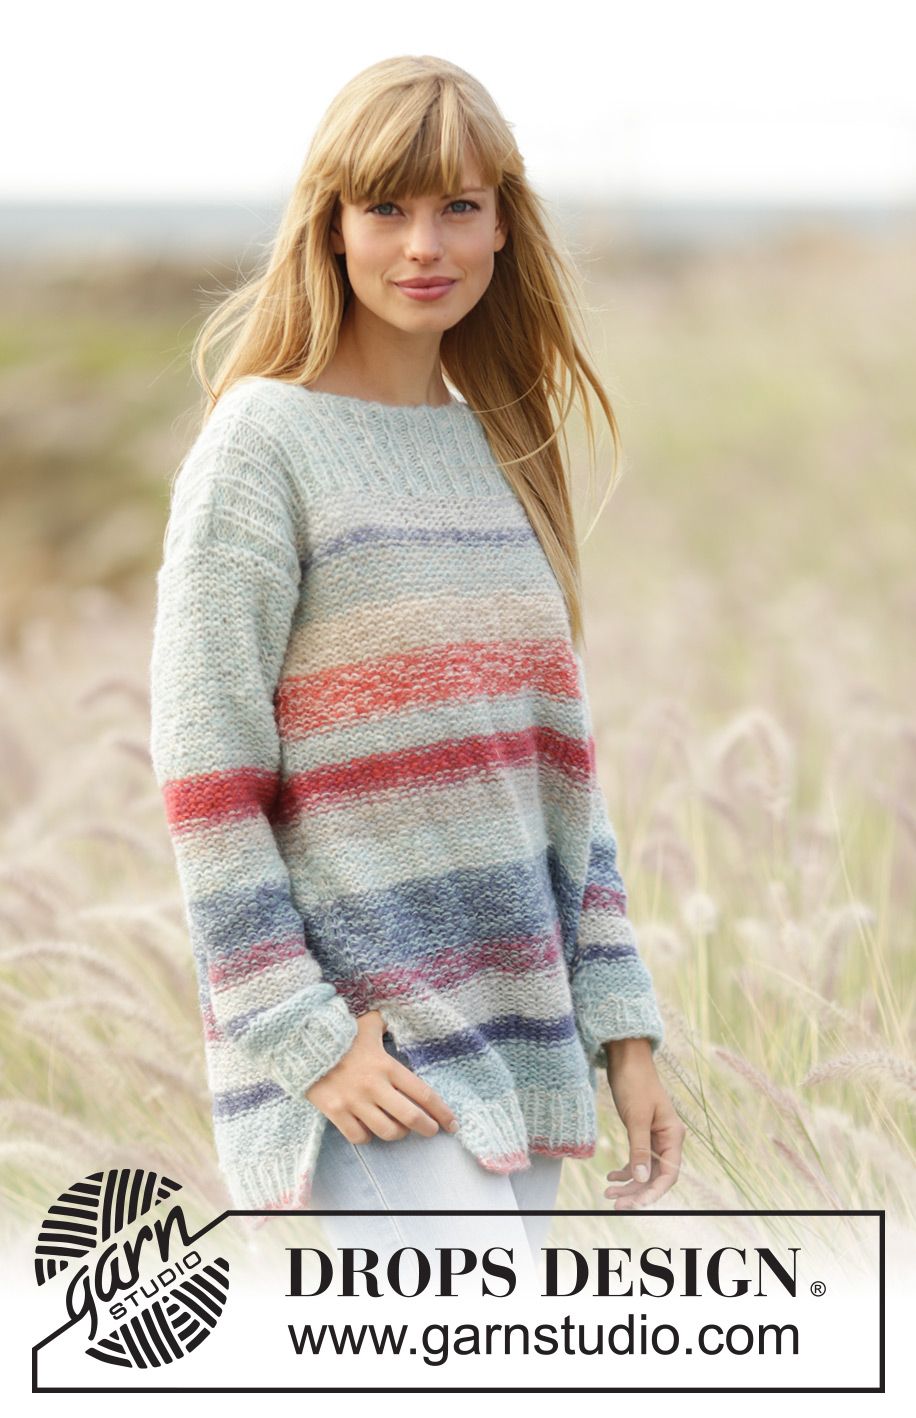
No Worries#noworriessweater |
|
|
|
|
Knitted DROPS jumper with stripes, rib and vents in 2 strands ”Brushed Alpaca Silk”. Size: XS - XXXL.
DROPS 169-9 |
|
|
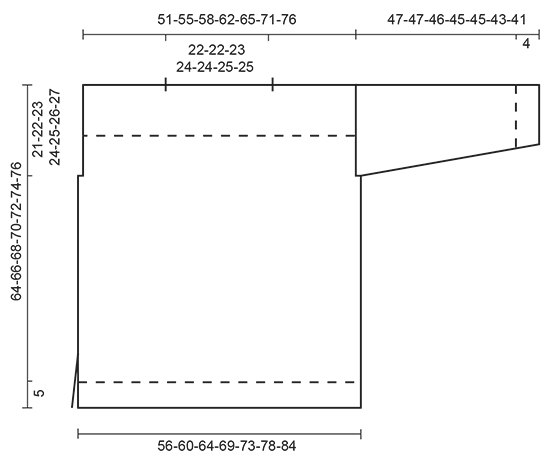
GARTER ST (back and forth): K all rows. 1 ridge = 2 rows K. STRIPES: Adjust so that last row in every stripe is from WS, i.e. first row in every stripe is from RS. Work stripes with 2 strands as follows: Stripe 1: 1 cm with coral and light sea green Stripe 2: 4 cm with off white and light sea green Stripe 3: 4-4-5-5-6-6-7 cm with light sea green and light grey green Stripe 4: 2 ridges with 2 strands denim blue Stripe 5: 4-4-5-5-4-6-7 cm with light grey green and off white Stripe 6: 3 cm with light grey green and heather Stripe 7: 5-5-6-6-7-7-7 cm with light sea green and denim blue Stripe 8: 4 cm with light grey green and off white Stripe 9: 2½ cm with light grey green and light beige Stripe 10: 1 cm with heather and light beige Stripe 11: 2½ cm with heather and coral Stripe 12: 1 cm with light sea green and light beige Stripe 13: 2 cm with light grey green and off white Stripe 14: 4 cm with coral and off white Stripe 15: 4-4-5-5-6-6-6 cm with light beige and off white Stripe 16: 4 cm with light beige and light sea green Stripe 17: 1 cm with light grey green and denim blue Stripe 18: 3 cm with light grey green and off white Stripe 19: Work the rest of the jumper in off white and light sea green. INCREASE TIP: Always inc from RS. Inc 1 st by making 1 YO, on next row P YO twisted to avoid holes. ---------------------------------------------------------- JUMPER: Worked back and forth on circular needle to make room for all the sts. Jumper is worked in stocking st but sewn tog with WS outwards. BACK PIECE: Cast on 73-76-82-88-94-100-106 sts on circular needle size 6 mm with 1 strand coral and 1 strand light sea green. P 1 row from RS. Then work in STRIPES - see explanation above - as follows from WS: Work 3 sts in GARTER ST - see explanation above - rib = K 1/P 2 until 4 sts remain, K 1, finish with 3 sts in garter st. When 2nd stripe has been worked, switch to circular needle size 8 mm. Work in stocking st with 3 sts in garter st in each side of piece and dec 11-10-12-12-14-14-14 sts evenly on first row = 62-66-70-76-80-86-92 sts. When piece measures 15 cm, cast on 1 edge st in each side of piece at the end of the next 2 rows = 64-68-72-78-82-88-94 sts. Work in stocking st with 1 edge st in garter st in each side of piece. REMEMBER THE KNITTING TENSION When piece measures 43-44-45-46-47-48-49 cm, cast off 4-4-4-5-5-5-5 sts for armhole at beg of the next 2 rows = 56-60-64-68-72-78-84 sts. When 18th stripe has been worked (piece measures 52-52-56-56-58-60-62 cm), adjust so that last row is from WS, work 19th stripe and inc 11-10-12-11-13-13-13 sts evenly on first row = 67-70-76-79-85-91-97 sts. Switch to circular needle size 6 mm. On next row from WS work as follows: Work rib = K 1/P 2, finish with K 1. Continue with K over K and P over P until piece measures 64-66-68-70-72-74-76 cm. Insert 1 marker after 20-21-23-24-27-29-32 sts in from each side (marks shoulder seams). Cast off sts with K over K and P over P on circular needle size 8 mm. FRONT PIECE: Cast on and work as back piece. SLEEVE: Worked back and forth on needle. Cast on 29-29-32-32-35-35-35 sts on circular needle size 6 mm with 1 strand off white and 1 strand light sea green. P 1 row from RS. Then work as follows from WS: Work rib K 1/P 2 with 1 edge st in garter st in each side of piece. When piece measures 4 cm, P from WS and dec 3-3-4-4-5-5-5 sts evenly = 26-26-28-28-30-30-30 sts. Switch to circular needle size 8 mm. Work in stocking st with 1 edge st in garter st in each side and work 3rd-13th stripe. When piece measures 8 cm, inc 1 st inside 1 edge st in garter st in each side of piece - READ INCREASE TIP! Repeat inc every 3½-3-3-2½-2½-2-2 cm 10-11-11-12-12-14-15 more times = 48-50-52-54-56-60-62 sts. When 3rd-13th stripe has been worked 1 time, finish piece with 1 strand light sea green and 1 strand off white. Cast off when piece measures 47-47-46-45-45-43-41 cm (shorter measurements in the larger sizes because of wider shoulders). Knit another sleeve. ASSEMBLY: Sew jumper tog with WS outwards. Sew shoulder seams in to markers. Sew in sleeves with WS outwards, sew sleeve seams inside 1 edge st, sew side seam inside 1 edge st down to the 3 sts in garter st in each side (= approx. 15 cm vent). |
|
 |
|
Have you finished this pattern?Tag your pictures with #dropspattern #noworriessweater or submit them to the #dropsfan gallery. Do you need help with this pattern?You'll find 17 tutorial videos, a Comments/Questions area and more by visiting the pattern on garnstudio.com. © 1982-2026 DROPS Design A/S. We reserve all rights. This document, including all its sub-sections, has copyrights. Read more about what you can do with our patterns at the bottom of each pattern on our site. |


With over 40 years in knitting and crochet design, DROPS Design offers one of the most extensive collections of free patterns on the internet - translated to 17 languages. As of today we count 324 catalogues and 12290 patterns translated into English (UK/cm). 12290
We work hard to bring you the best knitting and crochet have to offer, inspiration and advice as well as great quality yarns at incredible prices! Would you like to use our patterns for other than personal use? You can read what you are allowed to do in the Copyright text at the bottom of all our patterns. Happy crafting!
Post a comment to pattern DROPS 169-9
We would love to hear what you have to say about this pattern!
If you want to leave a question, please make sure you select the correct category in the form below, to speed up the answering process. Required fields are marked *.