
Popular categories
Looking for a yarn?


Comments / Questions (6)
![]() Heidrun wrote:
Heidrun wrote:
Moin, ich habe eine Frage zu den verkürzten Reihen. Werden von beiden Seiten verkürzte Reihen gestrickt oder nur auf der Rückseite?
10.12.2024 - 21:11DROPS Design answered:
Liebe Heidrun, die verkürzten Reihen werden nur auf eine Seite gestrickt, sie beginnen bei einer Rückreihe beim rechten Vorderteil/Rückenteil und mit einer Hinreihe beim linken Vorderteil/Rückenteil. Viel Spaß beim Stricken!
11.12.2024 - 08:55
![]() Christine wrote:
Christine wrote:
Ich komme mit der Spring Tide Anleitung nicht klar. Ribbel immer wieder auf. Ich kann das nicht mit diesen 33 Maschen zunehmen. 130 Maschen auf Nadel 33 Maschen verteilt zunehmen. Nehme ich nach 3 Machen 1 zu und nach jeder 4ten Masche eine, dann habe ich nachher 166 Maschen. Wie soll das gehen? Kann mir da bitte jemand helfen? Ich habe schon die Anleitungen dazu gelesen.. ich bekomme es nicht hin..
06.06.2022 - 17:41DROPS Design answered:
Liebe Christine, Sie sollen hier mehr mals abwechslunsweise nach jeder 3. und nach jeder 4. Masche zunehmen bis Sie die 33 Maschen zugenommen haben, dann stricken Sie die restlichen Maschen wie zuvor, ohne zuzunehmen. Viel Spaß beim stricken!
07.06.2022 - 10:15
![]() Christine Krajewski wrote:
Christine Krajewski wrote:
, oder muss ich da öfter hin und herstricken.... ??? Ich h bin gerade sehr ratlos. Dankeschön für die Antwort. LG Christine
22.12.2021 - 03:51DROPS Design answered:
Liebe Frau Krajewski, ich verstehe Ihre Frage leider nicht, können Sie uns bitte mehr sagen? Danke im voraus für Ihr Verständnis!
22.12.2021 - 07:19Linda wrote:
Hi there. What is the finished bust measurement (cm) for the XL and XXL sizes? Thanks Linda
25.06.2018 - 13:35DROPS Design answered:
Dear Linda, you will find all finished measurements taken flat from side to side for each size in the chart at the end of the pattern. Compare these measurements (= half back piece for example) to a similar garment you have and like the shape to find out the matching size. Read more about sizing here. Happy knitting!
25.06.2018 - 16:07Mónica wrote:
Hola Ines, si te refieres a que la manga es la parte tejida en musgo, claro que está incluida en el patrón, además se le llamaría ribete u orilla de la sisa, pues los chalecos no tienen manga, pienso que a parte de ser decorativo es para que no se enrrolle.
15.12.2014 - 08:41
![]() Ines wrote:
Ines wrote:
Perdón, pero donde están las dos mangas del chaleco? No aparecen en el patrón y si en la fotografía. Se trata de un error de las explicaciones? Aclaren ello, por favor, gracias.
13.12.2014 - 17:59DROPS Design answered:
Hola Ines. El chaleco no tiene mangas (no aparecen en la foto tampoco) y la cenefa en pt musgo para la abertura de la sisa se trabaja junto con el cuerpo. Lee atentamente a partir de:" Ahora rem para la sisa de la manera sig:......"
15.12.2014 - 12:18
|
||||||||||||||||
Spring Tide#springtidevest |
||||||||||||||||
 |
 |
|||||||||||||||
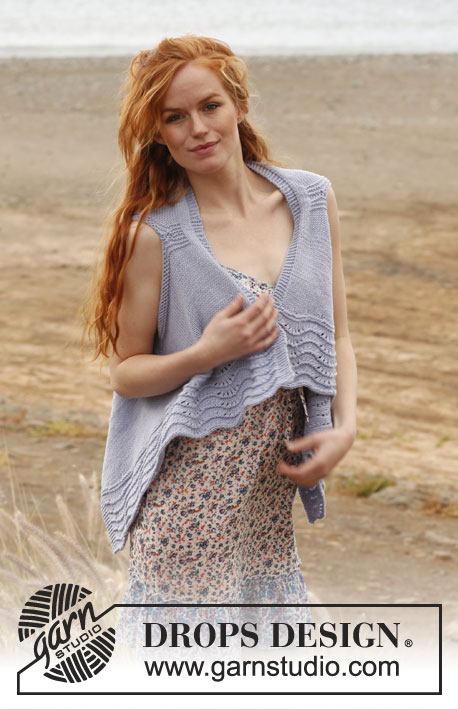
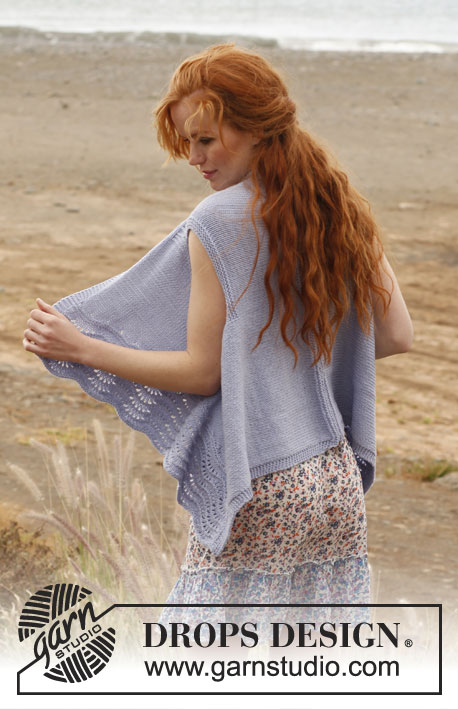
Knitted DROPS vest with wavy pattern in ”Merino Extra Fine”. Size S - XXXL
DROPS Extra 0-822 |
||||||||||||||||
|
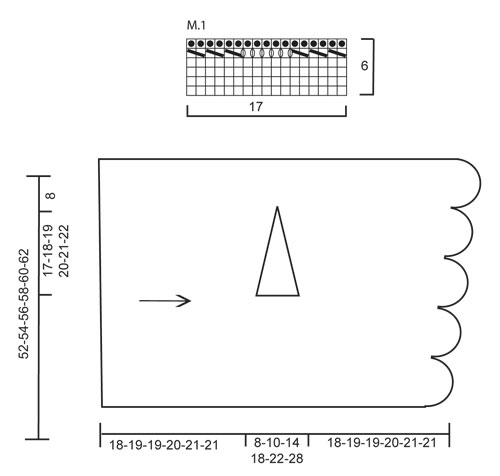
GARTER ST (back and forth on needle): K all rows. PATTERN: See diagram M.1. The diagram shows the pattern from RS. -------------------------------------------------------- -------------------------------------------------------- VEST: The garment is worked back and forth on circular needle because of no of sts. Work right back piece from mid back and out towards the side, cast off for armhole and continue until mid front on right front piece. Then work left front piece the same way but reversed, before the garment is sewn tog mid back. RIGHT BACK/FRONT PIECE: Cast on 110-114-118-122-126-130 sts on circular needle size 4 mm with Merino Extra Fine. Work 4 rows in GARTER ST - see explanation above (1st row = RS). Continue in stocking st but work the outermost 5 sts in each side in garter st until finished measurements. REMEMBER THE KNITTING TENSION! When piece measures 16-17-17-18-19-19 cm, work next row as follows – from RS: 5 sts in garter st, 44-46-48-50-52-54 sts in stocking st, 50-52-54-56-58-60 sts in garter st, 6 sts in stocking st, 5 sts in garter st. Work 5 rows like this. Now cast off for armhole as follows: On next row (from WS), work the first 16 sts, then slip these sts on a stitch holder, cast off the next 36-38-40-42-44-46 sts, work 9 sts in garter st, 44-46-48-50-52-54 sts in stocking st and 5 sts in garter st = 58-60-62-64-66-68 sts. Then work in stocking st with 5 sts in garter st in the right side and 9 sts in garter st in the left side – seen from RS. Continue over these sts until piece measures 26-29-33-38-43-49 cm in total. Work next row from RS as follows: 5 sts in garter st, 44-46-48-50-52-54 sts in stocking st, 9 sts in garter st, cast on 36-38-40-42-44-46 new sts, work sts on stitch holder back on needle = 110-114-118-122-126-130 sts. Work next row as follows – from WS: 5 sts in garter st, 6 sts in stocking st, 50-52-54-56-58-60 sts in garter st, 44-46-48-50-52-54 sts in stocking st, 5 sts in garter st. Work 3 rows like this. Continue in stocking st with 5 sts in garter st in each side. When piece measures 34-38-42-48-54-60 cm, work short rows as follows – beg from WS: Work until 8-6-10-8-6-10 sts remain on needle, turn and work back over all sts. Work until 14-12-16-14-12-16 sts remain on needle, turn and work back over all sts. Continue like this, work 6 sts more on every turn. Continue until short rows have been worked over all sts. Work 1 row over all sts (from WS). Work 4 rows in garter st while AT THE SAME TIME on 1st row, inc 19-15-28-24-20-33 sts evenly = 129-129-146-146-146-163 sts. On next row from RS, work diagram M.1 (7-7-8-8-8-9 repetitions in width) with 5 sts in garter st in each side. Work diagram M.1 a total of 6 times vertically, loosely cast off. Piece measures approx. 44-48-52-58-64-70 cm, measured in the shorter side (at the bottom). LEFT BACK/FRONT PIECE: Cast on and work as right piece but reversed. I.e. when casting off for armhole this is done from RS: Slip the first 16 sts on a stitch holder (work them first), cast off the next 36-38-40-42-44-46 sts, work 9 sts in garter st, 44-46-48-50-52-54 sts in stocking st and 5 sts in garter st = 58-60-62-64-66-68 sts. When working short rows, start from RS. ASSEMBLY: Sew tog mid back. |
||||||||||||||||
Diagram explanations |
||||||||||||||||
|
||||||||||||||||
 |
||||||||||||||||
Have you finished this pattern?Tag your pictures with #dropspattern #springtidevest or submit them to the #dropsfan gallery. Do you need help with this pattern?You'll find 19 tutorial videos, a Comments/Questions area and more by visiting the pattern on garnstudio.com. © 1982-2026 DROPS Design A/S. We reserve all rights. This document, including all its sub-sections, has copyrights. Read more about what you can do with our patterns at the bottom of each pattern on our site. |
||||||||||||||||


With over 40 years in knitting and crochet design, DROPS Design offers one of the most extensive collections of free patterns on the internet - translated to 17 languages. As of today we count 324 catalogues and 12290 patterns translated into English (UK/cm). 12290
We work hard to bring you the best knitting and crochet have to offer, inspiration and advice as well as great quality yarns at incredible prices! Would you like to use our patterns for other than personal use? You can read what you are allowed to do in the Copyright text at the bottom of all our patterns. Happy crafting!
Post a comment to pattern DROPS Extra 0-822
We would love to hear what you have to say about this pattern!
If you want to leave a question, please make sure you select the correct category in the form below, to speed up the answering process. Required fields are marked *.