
Popular categories
Looking for a yarn?


Comments / Questions (74)
![]() Elena wrote:
Elena wrote:
Mi pare ci sia un errore o non avrei capito io, sul collodice "allo stesso tempo distribuire uniformemente 26-22....AUMENTI, ma non si tratta invece di diminuzioni?
05.02.2016 - 17:32DROPS Design answered:
Buonasera Elena, abbiamo controllato e il testo è corretto, infatti in quel punto il n° di m passa da 76-80-84-88-92-96 a 102-102-108-108-114-114. Buon lavoro!
05.02.2016 - 17:40
![]() Mieke Baras wrote:
Mieke Baras wrote:
Ik wil even laten weten dat er in M3 een fout zit in het breischema ter hoogte van de 7de mindering (maat M), dat is op naald 41. De mindering achteraan toont 2 steken die moeten worden samen gebreid met kleur naturel. In werkelijkheid is dat met kleur lila/paars. Goed dat ik het tijdig zag, want anders had ik nog meer naalden moeten afsteken! Nu waren het er 'maar' 3!
09.01.2016 - 15:04DROPS Design answered:
Hoi Mieke. Het is niet samenbreien met naturel. Het is "gewoon" samenbreien met de kleur die nu mee breit - of dan hadden wij 3 aparte symbolen erbij moeten hebben voor samenbreien met naturel, met lila/paars en met grijs/paars.
13.01.2016 - 15:42
![]() Elena wrote:
Elena wrote:
Mia figlia vorrebbe questa maglia ma in versione più "quadrata", senza che sia ristretto sui fianchi, per cui mi serve aiuto sulle diminuzioni: come mi regolo? e le pinces (che non ho capito in realtà dove si trovino esattamente)? grazie
28.11.2015 - 10:12DROPS Design answered:
Buongiorno Elena, le diminuzioni e le pinces (che sono le diminuzioni sul davanti e sul dietro) servono per modellare il maglione all'altezza dei fianchi e in vita: se non vuole modellarlo, deve far provare a sua figlia il maglione durante il lavoro per trovare via via il n° di maglie adatto per lavorare tutto il busto. Buon lavoro!
29.11.2015 - 14:52
![]() Ulrike wrote:
Ulrike wrote:
Ich habe den Pullover aus Lima in Blau/weiß/rot nachgestrickt. Er ist superschön geworden. Statt alles umzurechnen, habe ich die nächstgrößere Größe gestrickt. Hat sehr gut geklappt. Ich werde immer auf das tolle Modell angesprochen, wenn ich ihn trage:)
13.10.2015 - 19:18
![]() Elena wrote:
Elena wrote:
Stupendo, adorabile, lo farò turchese e panna per mia figlia:)
12.01.2015 - 21:58
![]() Barbara Planinger wrote:
Barbara Planinger wrote:
Vielen Dank für die Hilfe. Ich hatte da einen kleinen Denkfehler. Das ich neu ansetzen muss war mir eigentlich klar, nur hatte ich im Kopf das ich da wieder ansetze wo ich beendet habe.
10.09.2014 - 06:49
![]() Barbara Planinger wrote:
Barbara Planinger wrote:
Hallo, ich stricke das Modell in 3 XL Nun steht in der Anleitung zur Passe die Arbeit beginnt in der hinteren Mitte? Bedeutet das nun das ich erst bis zur hinteren Mitte stricken muss und dann erst mit M3 beginne? Eigentlich würd ich ja nach den Abnahmen für den Ärmel wieder anfangen, also praktisch nach der ersten Markierung und nicht in der Mitte.
07.09.2014 - 15:49DROPS Design answered:
Sie müssten ja die letzte Rd von M.2 komplett zu Ende gestrickt haben, mit dem Abketten für die Ärmel. Dann legen Sie alle M wie beschrieben auf die Nadel und setzen den Faden neu an. Sie müssen an der hinteren Mitte beginnen, damit die Rentiere mittig/symmetrisch angeordnet sind.
09.09.2014 - 21:54
![]() Katja wrote:
Katja wrote:
Hallo Ich würde gern die Größeneinteilung wissen.Welcher Größe entspricht M? Vielen Dank für Ihre Hilfe
11.03.2014 - 19:03DROPS Design answered:
Liebe Katja, am besten schauen Sie in die Maßskizze ganz am Ende der Anleitung. Dort sind die Maße in der Reihenfolge S-M-L-XL-XXL-XXXL angegeben und Sie können prüfen, welche Größe am besten zu Ihren Körpermaßen passt.
11.03.2014 - 23:12
![]() Henriette wrote:
Henriette wrote:
Ik ben inmiddels bij de hals aanbeland en heb het heen en weer breien met keren van het werk gehad. Waar een markeerdraad voor middenvoor aangebracht moest worden, lijkt echter middenachter te worden omdat het model daar langer/hoger wordt dan het stuk ertegenover. Doe ik iets verkeerd of hoort dit zo?
26.06.2013 - 09:36DROPS Design answered:
Hoi Henriette. Het patroon klopt. Je plaatst de merkdraad middenvoor, maar je hebt de verhoging middenachter gebreid. Bijv: brei je maat S, dan heb 76 st op de nld en breit na het plaatsen van de markeerdraad 47 st (= na 38 st ben je weer middenachter) en breit hier de verkorte toeren. Dus middenachter wordt hoger dan middenvoor.
03.07.2013 - 11:23
![]() Henriette wrote:
Henriette wrote:
Bedankt voor uw reactie. Een andere vraag: ik ben dus bezig met de mouwen en brei deze op 'gewone naalden' - klopt dat of moeten het ook rondbreinaalden zijn? En waarom moeten het naalden zonder knop zijn?
02.04.2013 - 22:04DROPS Design answered:
De mouwen worden in het patroon in de rondte gebreid, daarom breinaalden zonder knoop. Je zou ook een kleine rondbreinaald kunnen gebruiken - het maakt niet uit. Kies je om de mouwen heen en weer te breien op gewone naalden, dan is dat ook prima, maar vergeet dan niet om 1 kantst op te zetten aan beide zijkanten voor de naad.
04.04.2013 - 21:11
|
|||||||||||||
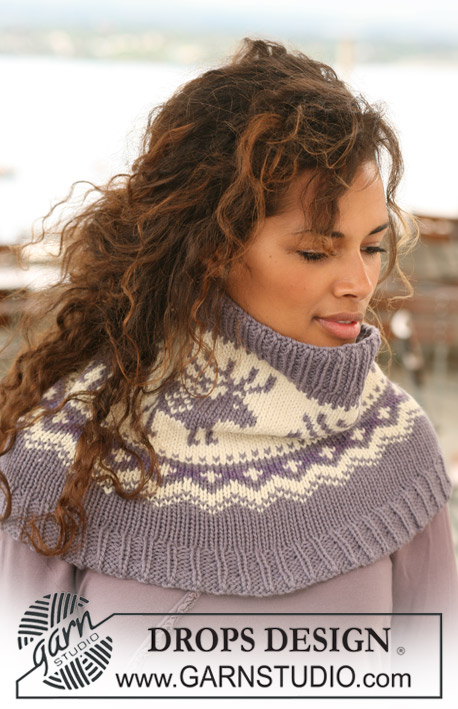
Reindeer Swing#reindeerswingsweater |
|||||||||||||
|
|
|||||||||||||
Knitted DROPS Christmas jumper with raglan sleeves and reindeer pattern on yoke in ”Nepal”. Size S - XXXL.
DROPS 122-43 |
|||||||||||||
|
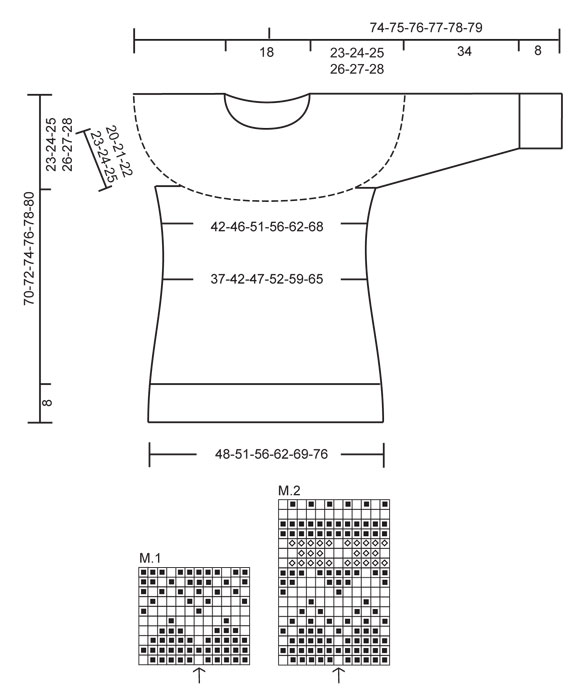
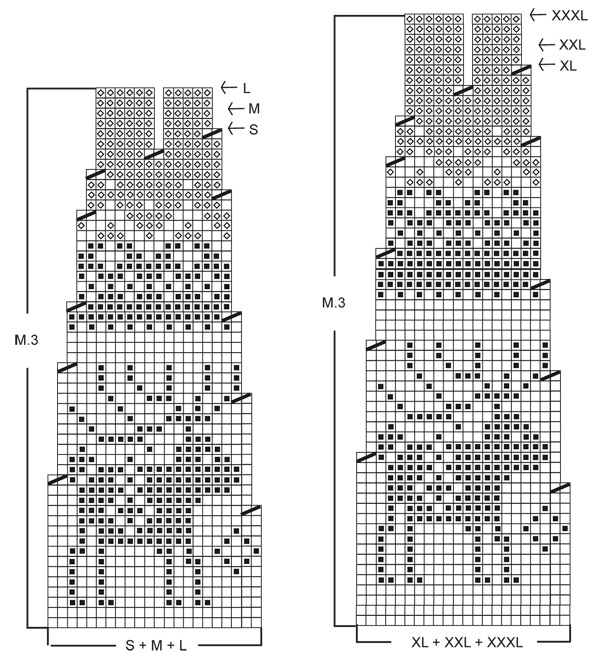
PATTERN: See diagram M.1 to M.3. The entire pattern is worked in stocking st in the round. MEASUREMENT TIP: Because of the weight of the yarn make all measurements while the garment is hanging otherwise it will be too long when worn. INCREASING TIP (applies to darts + inc at the side): Inc 1 st by picking up st from previous row and K this. DECREASING TIP (applies to darts + dec at the side): Dec as follows after marker: slip 1 st as if to K, K1, psso. Dec as follows 2 sts before marker: K2 tog. -------------------------------------------------------- BODY PIECE: See MEASUREMENT TIP! Cast on 240-255-282-312-348-384 sts on circular needle size 4 mm with grey/purple. Work rib, K1/P2. When piece measures 8 cm change to circular needle size 5 mm. K 1 round AT THE SAME TIME dec 78-81-90-102-114-126 sts evenly = 162-174-192-210-234-258 sts. Now work M.1 AT THE SAME TIME on last round dec 2 sts evenly in SIZE L (no dec in the other sizes) = 162-174-190-210-234-258 sts. After M.1 continue with grey/purple and stocking st. REMEMBER THE KNITTING TENSION! AT THE SAME TIME after M.1 insert 6 markers in piece as follows: Marker-1at beg of round (= the side). Marker-2 after 25-27-30-34-38-42 sts. Marker-3 after a further 31-33-35-37-41-45 sts. Marker-4 after a further 25-27-30-34-38-42 sts (= the side). Marker-5 after a further 25-27-30-34-38-42 sts. Marker-6 after a further 31-33-35-37-41-45 sts (= 25-27-30-34-38-42 sts left on round after last marker) – let the markers follow the piece as you go along. READ ALL OF THE FOLLOWING SECTION BEFORE CONTINUING! When piece measures 14 cm dec 1 st after marker-2 and -5 and before marker-3 and -6 – See DECREASING TIP (= darts on front and back piece). Repeat the dec on every 4.5 cm a total of 5 times. AT THE SAME TIME when piece measures 14 cm dec 1 st each side of marker-1 and -4 (= at the sides) and repeat the dec on every 6-9-9-9-9-6 cm a total of 4-3-3-3-3-4 times. After all dec there are 126-142-158-178-202-222 sts on needle. When piece measures 35-35-35-36-36-37 cm inc after marker-2 and -5 and before marker-3 and -6 – See INCREASING TIP. Repeat the inc on every 1.-1.-1,5.-1,5.-3,5.-3,5 cm a total of 4-4-4-3-2-2 times = 142-158-174-190-210-230 sts on needle. When piece measures 39-40-41-42-43-44 cm work M.2 - NOTE: adjust pattern to the middle, arrow in diagram marks the middle st front and back – pattern will not fit at the sides. When 1 round remain of M.2 (piece measures approx 47-48-49-50-51-52 cm) cast off 8 sts each side for armhole (i.e. 4 sts each side marker-1 and -4) = 63-71-79-87-97-107 sts left on front and back piece. Put piece aside and knit the sleeves. SLEEVE: READ ALL OF THIS SECTION BEFORE CONTINUING! Cast on 54-54-54-57-57-57 sts on double pointed needles size 4 mm with grey/purple. Work rib, K1/P2. When piece measures 8 cm change to double pointed needles size 5 mm , K 1 round AT THE SAME TIME dec 12-12-12-9-9-9 sts evenly = 42-42-42-48-48-48 sts. Now work M.1. After M.1 continue in grey/purple and stocking st AT THE SAME TIME dec 1 st for all sizes on round 1 = 41-41-41-47-47-47 sts. When piece measures 14-13-13-13-14-13 cm (M.1 is finished) inc 2 sts mid under sleeve. Repeat the inc on every 3-2.5-2.5-2.5-2-2 cm a total of 9-11-12-11-13-15 times = 59-63-65-69-73-77 sts. AT THE SAME TIME when piece measures 34 cm work M.2 – NOTE: adjust pattern to the middle, arrow in diagram marks the middle st on upper arm. When 1 round remain of M.2 (piece measures approx 42 cm for all sizes) cast off 8 sts mid under sleeve = 51-55-57-61-65-69 sts left on needle. Put piece aside and knit the other sleeve. YOKE: Slip sleeves on the same circular needle as body pieces where cast off for armholes = 228-252-272-296-324-352 sts. Round now beg mid back. K 1 round with eco off-white AT THE SAME TIME dec 8-10-8-10-16-0 sts evenly = 220-242-264-286-308-352 sts. Continue in M.3 – see chart for your size. After M.3 (finish pattern by arrow in diagram for your size) there are 110-121-132-143-154-176 sts on needle. K 1 round with purple/violet mix AT THE SAME TIME dec 34-41-48-55-62-80 sts evenly = 76-80-84-88-92-96 sts. NECK: Now work elevation mid back, back and forth on needle with purple/violet mix. Work row to mid front, insert a marker. K 47-50-52-55-57-60 sts, turn piece and P 18-20-20-22-22-24 sts. Turn piece, K 27-30-30-33-33-36 sts, turn piece and P 36-40-40-44-44-48 sts. Turn piece, K 45-50-50-55-55-60 sts, turn piece and P 54-60-60-66-66-72 sts. Turn piece, K all sts to marker. Change to double pointed needles size 4 mm and continue in the round. K 1 round AT THE SAME TIME inc 26-22-24-20-22-18 sts evenly = 102-102-108-108-114-114 sts. Work rib = K1/ P2 on all sts. Cast off with K over K and P over P when rib measures 14-14-15-15-16-16 cm, measured mid front. ASSEMBLY: Sew openings under sleeves. |
|||||||||||||
Diagram explanations |
|||||||||||||
|
|||||||||||||
 |
|||||||||||||
 |
|||||||||||||
Have you finished this pattern?Tag your pictures with #dropspattern #reindeerswingsweater or submit them to the #dropsfan gallery. Do you need help with this pattern?You'll find 19 tutorial videos, a Comments/Questions area and more by visiting the pattern on garnstudio.com. © 1982-2026 DROPS Design A/S. We reserve all rights. This document, including all its sub-sections, has copyrights. Read more about what you can do with our patterns at the bottom of each pattern on our site. |
|||||||||||||


With over 40 years in knitting and crochet design, DROPS Design offers one of the most extensive collections of free patterns on the internet - translated to 17 languages. As of today we count 324 catalogues and 12290 patterns translated into English (UK/cm). 12290
We work hard to bring you the best knitting and crochet have to offer, inspiration and advice as well as great quality yarns at incredible prices! Would you like to use our patterns for other than personal use? You can read what you are allowed to do in the Copyright text at the bottom of all our patterns. Happy crafting!
Post a comment to pattern DROPS 122-43
We would love to hear what you have to say about this pattern!
If you want to leave a question, please make sure you select the correct category in the form below, to speed up the answering process. Required fields are marked *.