
Popular categories
Looking for a yarn?


Comments / Questions (48)
![]() Fink wrote:
Fink wrote:
Alles gut, habe einfach angefangen zu stricken. Bin gespannt, wenns ferig ist.
05.12.2024 - 18:34
![]() Fink wrote:
Fink wrote:
Sorry, nicht nach 6 cm abnahme für den Armloch. War jetzt etwas irritiert.
05.12.2024 - 12:42DROPS Design answered:
Liebe Frau Fink, siehe Antwort unten - man wird zuerst das Rumfpteil und die Ärmel separat bis Armlöcher stricken, dann alle Teile zusammen auf dieselbe Nadel stricken - siehe Video und die Passe stricken. Viel Spaß beim Stricken!
06.12.2024 - 07:38
![]() Fink wrote:
Fink wrote:
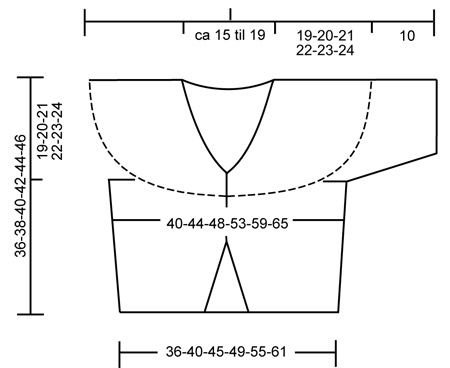
Guten Tag, erstmal vielen Dank. Das Diagramm mit den Zahlen, was bedeuten die Zahlen? Cm oder Maschenzahl? Nach 6cm abnahme für den Armloch, gemessen ab Markierung? oder ab Anschlag? Sowie die 17 cm höhe, ist verwirrend für mich. Möchte schon die Jacke stricken, scheint mir alles zu kompliziert. Wenn ich mir das Diagramm anschaue, sieht für mich nach 30 cm hoch stricken ab da 6 cm stricken bis zur Armloch abnahme. :(( Sorry
05.12.2024 - 12:36DROPS Design answered:
Liebe Frau Fink, die Zahlen in der Skizze sind die Höhe/Länge in cm für jede Größe - hier lesen Sie mehr. Nach 6 cm beim Rumpfteil wird man für die Seiten vom Bolero zunehmen, dh zwischen Vorder und Rückenteil, damit die Arbeit vor dem Armlöcher breiter (40 bis 65 cm) als am Anfang bei der Anschlagskante (36 bis 61 cm). Die gesamte Höhe ist 36 bis 46 cm vom Schulter, einschl. 19-24 cm Passe und 17 bis 22 cm Rumfpteil (wenn man die Maschen für die Armlöcher abkettet). Viel Spaß beim Stricken!
06.12.2024 - 07:36
![]() Fink wrote:
Fink wrote:
Guten Tag, ich stricke zum 1.mal nach Anleitung. Da fehlt es mir etwas schwer, dieses hier zu verstehen. Wenn Sie schreiben, Gleichzeitig gegen Mitte aufnehmen, soll heißen? Zunahme in der Mitte von den 110 M ? Wenn ich die Mitte markiert habe, auf beiden Seiten eine M zunehme? Komme trotzdem nicht auf die Gesamtzahl von 146 M. Bei jeder 2.R 1 M zunehmen und das 9x und danach bei jeder 4 R. 3x. Die 6 cm, ab wo?
03.12.2024 - 17:30DROPS Design answered:
Liebe Frau Fink, diese Zunahmen sind für die Vorderteile und entstehen nach den 5 ersten Maschen + vor den 5 letzten Maschen einer Hinreihe; gleichzeitig, nach 6 cm nehmen Sie beidseitig von jeder Markierung (Seite der Jacke) 2 Maschen (1 für jedes Vorderteil und 2 für Rückenteil) zu. So sind es 110+(9 Mal in jeder 2. Reihe +3 Mal in jeder 4. Reihe 1 M beidseitig für jedes Vorderteil)+ (3 Mal in jeder 4. cm 1 Masche beidseitig jeder Markierung = jeweils 4 Maschen)=110+24+12=146 Maschen. Viel Spaß beim Stricken!
04.12.2024 - 07:01
![]() Ruth Krokmo Jensen wrote:
Ruth Krokmo Jensen wrote:
Vad skall jag göra med dom 5 maskorna i framkanten som sitter på säkerhetsnål?????
01.03.2017 - 15:49DROPS Design answered:
Hej Ruth. Se nederst i opskriften under "Framkant". Her staar hvad du gör med maskerne.
01.03.2017 - 16:03
![]() Rebecca Field wrote:
Rebecca Field wrote:
When the pattern says one thread of each quality, how many threads does that mean you're knitting with?
05.11.2016 - 12:59DROPS Design answered:
Dear Mrs Field, you've to work all the bolero with 1 strand of Fabel and 1 strand of Cotton Viscose. Happy knitting!
05.11.2016 - 18:27
![]() M.Claire wrote:
M.Claire wrote:
Je pense qu'il y a une erreur dans le nombre de mailles totales. Par ex. Pour la taille XL, je trouve 184 m et non 190 ou alors j'en oublie. Cordialement
14.08.2014 - 22:55DROPS Design answered:
Bonjour Mme M.Claire, en taille XL, on commence avec 154 m, on augmente pour chaque devant: 9+3 = 12 m soit 24 m au total + sur les côtés 3 x 2 m x 2 côtés = 12 m. 154 + 24 + 12 = 190 m. Bon tricot!
15.08.2014 - 10:05
![]() Paula wrote:
Paula wrote:
Hi, I made this bolero and it is so cute...except that it rolls at the bottom, despite the garter stitch. If I were to make it again, I think I would add a couple rows of garter stitch.
04.04.2014 - 18:07
![]() Annie B wrote:
Annie B wrote:
Den er bare så flot,kan man ikke få opskriften i str.8 år,det ville være lykken for mit barnebarn,jeg har garnet klar
22.08.2008 - 17:13
![]() Angel wrote:
Angel wrote:
Un grand merci pour votre aide si rapide et efficace suite à ma demande. Ce modèle est magnifique et avec vos explications, c'est décidé je me lance. Bravo pour vos modèles.
16.06.2008 - 13:05
|
|
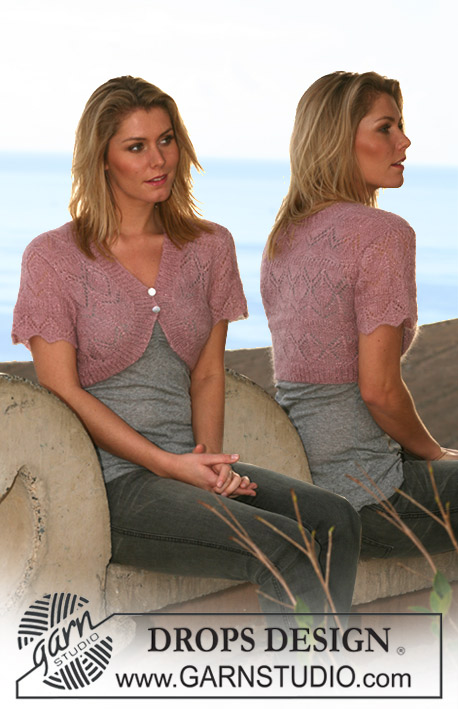
DROPS 107-19 |
|
|
|
|
DROPS bolero with round yoke and short sleeve in “Fabel” and “Cotton Viscose”. Size S – XXXL
DROPS 107-19 |
|
|
Garter st, back and forth on needle: K all rows. Garter st, in the round: K 1 round, P 1 round. Increasing tip: Inc inside 5 front band sts by making 1 YO. Work YO into back of loop on return row to avoid a hole. Buttonholes: Make 2 buttonholes on right front band. 1 buttonhole = K tog 2nd and 3rd st from mid front and make 1 YO. Make buttonholes when piece measures 15-15-16-16-17-17 cm and 19-19-20-20-22-22 cm. Note! The second buttonhole is made when front band is completed separately. Pattern: Row 1: K from RS Row 2: P from WS Row 3: K form RS Row 4: P from WS Row 5: K from RS (dec on this row) Row 6: K from WS BOLERO: Knitted back and forth on circular needle from mid front. Cast on 110-124-138-154-174-194 sts (includes 5 front band sts each side) on circular needle size 5 mm with 1 thread of each quality. Work 4 rows garter st - see above. Insert a marker after 24-28-31-35-40-45 sts from each side (= 62-68-76-84-94-104 sts on back piece). Read all of the following section before continuing! Continue in stocking st with 5 front band sts each side in garter st until completed measurements. At the same time inc in each side towards mid front – see Increasing tip: 1 st on every other row 9 times and then 1 st on every 4th row 3 times. At the same time when piece measures 6 cm for all sizes inc 1 st on each side of both markers at sides on every 4-4-5-5-6-6 cm a total of 3 times. Remember the knitting tension and buttonholes – see above. After all inc are complete there are 146-160-174-190-210-230 sts on row. Continue in stocking st with front bands in garter st until piece measures 17-18-19-20-21-22 cm. Now cast off 6 sts each side (i.e. 3 sts on each side of both markers) = 134-148-162-178-198-218 sts. Put piece aside and knit the sleeves. Sleeve: Worked in the round on double pointed needles. Cast on 48-50-52-54-56-58 sts on needles size 5 mm with 1 thread of each quality. Work 4 rounds garter st – see above – and continue in stocking st. At the same time when piece measures 2 cm inc 2 sts mid under arm on every 6-4-3-3-3-2 rounds a total of 3-4-5-5-6-7 times = 54-58-62-64-68-72 sts. When piece measures 10 cm cast off 6 sts mid under sleeve = 48-52-56-58-62-66 sts. Put piece aside and knit the other sleeve. Yoke: Slip sleeves in on circular needle where cast off for armholes = 230-252-274-294-322-350 sts. Slip the 5 front band sts each side on a stitch holder = 220-242-264-284-312-340 sts on row. P 1 row from WS. Continue in pattern – see above, at the same time dec on every 6th row (= Row 5 in pattern) as follows: dec 21-23-25-25-28-28 sts evenly on row a total of 7-7-7-8-8-8 times. At the same time when piece measures 21-21-22-22-23-23 cm dec to shape the neckline each side towards mid front: 1 st on every other row a total of 7 times, then 1 st on every 4th row until finished measurements. Continue in pattern until piece measures 36-38-40-42-44-46 cm (from casting on row to shoulder). Cast off remaining sts Assembly: Front band: Slip the 5 front band sts from one side back on needle and work garter st until piece fits round neckline to mid back (front band to be stretched slightly). Now slip sts back on stitch holder. Work the other front band the same way and then sew bands tog mid back (sew tog sts from holder and needle). Sew openings under arms. Sew on buttons. |
|
 |
|
Have you finished this pattern?Tag your pictures with #dropspattern or submit them to the #dropsfan gallery. Do you need help with this pattern?You'll find 19 tutorial videos, a Comments/Questions area and more by visiting the pattern on garnstudio.com. © 1982-2026 DROPS Design A/S. We reserve all rights. This document, including all its sub-sections, has copyrights. Read more about what you can do with our patterns at the bottom of each pattern on our site. |


With over 40 years in knitting and crochet design, DROPS Design offers one of the most extensive collections of free patterns on the internet - translated to 17 languages. As of today we count 324 catalogues and 12290 patterns translated into English (UK/cm). 12290
We work hard to bring you the best knitting and crochet have to offer, inspiration and advice as well as great quality yarns at incredible prices! Would you like to use our patterns for other than personal use? You can read what you are allowed to do in the Copyright text at the bottom of all our patterns. Happy crafting!
Post a comment to pattern DROPS 107-19
We would love to hear what you have to say about this pattern!
If you want to leave a question, please make sure you select the correct category in the form below, to speed up the answering process. Required fields are marked *.