
Popular categories
Looking for a yarn?


Comments / Questions (82)
![]() Marila wrote:
Marila wrote:
Genial. Muchas gracias. Observo que entonces el 5° marcador se coloca a los 35 puntos y no a los 25 que dice el patrón. Eso era lo que no me cuadraba. Aclarado. Un saludo
15.02.2025 - 10:21
![]() Marila wrote:
Marila wrote:
Genial. Muchas gracias. Observo que entonces el 5° marcador se coloca a los 35 puntos y no a los 25 que dice el patrón. Eso era lo que no me cuadraba. Aclarado. Un saludo
15.02.2025 - 09:41
![]() Marila wrote:
Marila wrote:
¿Me pueden explicar dónde se colocan exactamente los marcadores para la bufanda? Es decir ¿Cómo se reparten los 42 posibles entre los 6 marcadores? No entiendo para qué 1 antes y 1 después de los puntos. ¿Se cuentan los 7, luego para el siguiente. marcador se empiezan a contar los 15 a partir del 8° o desde el principio? A mi no me llegan los 42 ptos para repartir los 6 marcadores como ustedes indican. Por favor, ¿me lo pueden explicar más detalladamente? Muchas gracias y un saludo.
03.02.2025 - 00:59DROPS Design answered:
Hola Marila, tienes 42 pts en total. Pones el 1ºMP, se cuentan los primeros 7 pts e insertas el 2º MP. Después, a 15 pts desde el inicio insertar el 3ºMP. De nuevo, contando desde el principio, a 27 pts desde el inicio insertas el 4º MP. A 35 pts desde el inicio insertas el 5ºMP. El último MP estará al final de la fila.
10.02.2025 - 00:07
![]() Marila wrote:
Marila wrote:
¿Me pueden explicar dónde se colocan exactamente los marcadores? Es decir ¿Cómo se reparten los 42 posibles entre los 6 marcadores? No entiendo para qué 1 antes y 1 después de los puntos. ¿Se cuentan los 7, luego para el siguiente. marcador se empiezan a contar los 15 a partir del 8° o desde el principio? A mi no me llegan los 42 ptos para repartir los 6 marcadores como ustedes indican. Por favor, ¿me lo pueden explicar más detalladamente? Muchas gracias y un saludo.
03.02.2025 - 00:56DROPS Design answered:
Hola Marila, tienes 42 pts en total. Pones el 1ºMP, se cuentan los primeros 7 pts e insertas el 2º MP. Después, a 15 pts desde el inicio insertar el 3ºMP. De nuevo, contando desde el principio, a 27 pts desde el inicio insertas el 4º MP. A 35 pts desde el inicio insertas el 5ºMP. El último MP estará al final de la fila.
10.02.2025 - 00:07
![]() Sylvie wrote:
Sylvie wrote:
Bonjour. Je pense que vous n'avez pas dû voir mon précédent message. Merci pour votre réponse
26.12.2024 - 14:09DROPS Design answered:
Cf réponse ci-dessous :)
02.01.2025 - 11:30
![]() Sylvie wrote:
Sylvie wrote:
Bonjour. Je suis entrain de faire l'écharpe qui est magnifique en photo. Je souhaiterais savoir a quels centimètres ou rangs on voit les volants se former ? J'en suis a environ 15 centimètres au côté le plus haut et je ne vois pas encore un volant se former. Merci pour votre aide
23.12.2024 - 09:54DROPS Design answered:
Bonjour Sylvie, si votre ouvrage mesure 15 cm au milieu, les côtés doivent être plus longs en raison des rangs raccourcis. Vérifiez que vous tricotez bien les rangs raccourcis comme indiqué pour que les côtés (entre les marqueurs 1 et 3 d'un côté et entre les marqueurs 4 et 6 de l'autre côté) soient plus longs qu'au milieu (entre les marqueurs 3 et 4). Bon tricot!
02.01.2025 - 10:28
![]() Laura Campos wrote:
Laura Campos wrote:
Hace más de un año que estoy deseando tejer esta bufanda, me encanta el modelo y el color, espero me salga bien, gracias!!!
18.04.2024 - 03:29
![]() Elke Gorges wrote:
Elke Gorges wrote:
Hallo, in der Anleitung der Handschuhe steht nach den 10 cm Bündchen 1 R rechts Stricken und gleichzeitig 36- 42 Maschen abnehmen. Verstehe ich nicht. Dann habe ich ja nur noch 6 Maschen übrig. Liebe Grüße Elke
06.12.2022 - 17:07DROPS Design answered:
Liebe Frau Gorges, also hier sollen Sie gleichmässig verteilt abnehmen damit es nur noch 36-42 Maschen übrig sind, ie einfach 6 Maschen regelmäßig verteilt abnehmen (eine Korrektur erfolgt). Viel Spaß beim stricken!
07.12.2022 - 07:46
![]() Lola wrote:
Lola wrote:
Buenos trades. Se teje la bufanda de una sola pieza? Se teje siempre con dosnhebras de hilo? Seria posible alguna foto con la bufanda extendida Muchax gra ias
21.02.2022 - 18:03DROPS Design answered:
Hola Lola, sí, se teje toda de una sola pieza, con 1 hilo de cada calidad. No tenemos más fotos con esta bufanda, aparte de las ya publicadas.
27.02.2022 - 18:44
![]() Sassano wrote:
Sassano wrote:
Bonjour je voulais faire votre écharpe volant que d un côté du coup j ai pris un modèle sur internet bien plus facile j adore vos modèles mais vous faites beaucoup de tricot en aiguille circulaire écharpe mal expliqué je trouve cordialement
17.01.2021 - 10:43
|
|
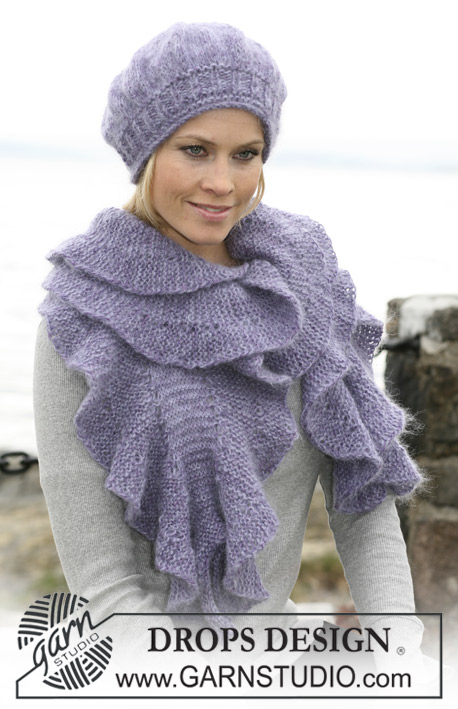
Enchantment |
|
 |
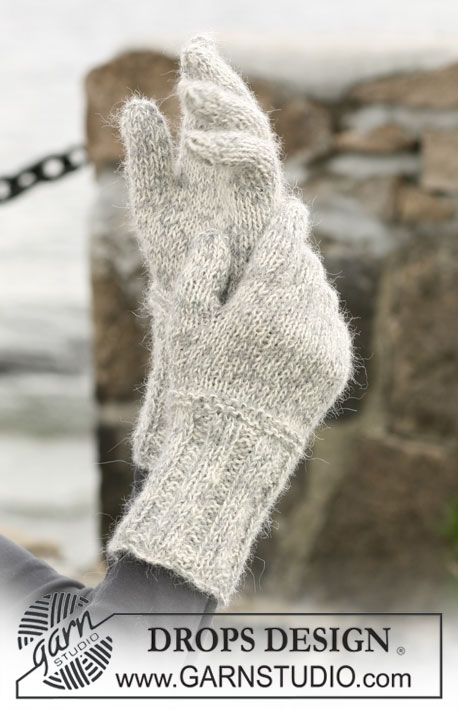 |
A set of: DROPS scarf with flounces, beret and mittens in ”Alpaca” and ”Vivaldi”.
DROPS 102-2 |
|
|
Turns: Make turns in your work to give the scarf flounces. Knit short rows like this: 1st row (RS): Knit from 1st to 6th MT (= marking thread), turn. The markers are no 1-6 seen from the RS. From WS they are no 6-1. 2nd row: Knit to 5th MT, 3rd row: Turn and knit back to the 6th MT. 4th row: Knit to 4th MT 5th row: turn and knit back to the 6th MT. 6th row: Knit as 2nd row. 7th row: Knit as 3rd row. 8th row: Knit as 4th row. 9th row: Knit as 5th row. 10th row: Knit from 6th to 1st MT. 11th row: turn and knit back to 6th MT. 12th to 19th row: Knit as 2nd to 9th row. 20th row: Knit from 6th to 1st MT, turn. 21st row: Knit to 2nd MT. 22nd row: turn and knit back to 1st MT. 23rd row: Knit to 3rd MT. 24th row: turn and knit back to 1st MT. 25th row: Knit as 21st row. 26th row: Knit as 22nd row. 27th row: Knit as 23rd row. 28th row: Knit as 24th row. 29th row: Knit from 1st to 6th MT. 30th row: turn and knit back to 1st MT. 31st to 38th row: Knit as 21st to 28th row. Repeat from 1st row. Knitting Tip: After every turn, slip the first st, tighten thread and knit back, this is to prevent holes at every turn. SCARF The whole scarf is knitted in garter stitch. This means you knit every row until finished measurement. Cast on 42sts on needle size 5mm with 1 thread of each quality. Put 6 marking threads in your work like this: 1st marking thread (MT) in the beginning of the needle. 2nd MT after 7 sts. 3rd MT after 15 sts. 4th MT after 27 sts. 5th MT after 35 sts. 6th MT at the end of the needle. Knit with turns – read above – and also read knitting tip. Continue until work measures approx 150 cm, make sure to end after a 38th row with turns. Cast off loosely. BERET Head measurement: approx. 53/55 – 56/58 cm Materials: DROPS Alpaca from Garnstudio 50-100 g colour no. 4434, purple/violet mix and use: DROPS Vivaldi from Garnstudio 50-50 g colour no. 24, light violet DROPS double pointed needles and circular needle (40 cm) size 5 mm - or needle size needed to make 17 sts x 22 rows in stocking sts with 1 thread of each quality on 10 x 10 cm. Increase: Inc 1st in every st by knitting the 4 threads in 1 st together 2 by 2 to 2 sts. This means that 1 st with 4 threads becomes 2 sts with 2 threads (= the number of sts are doubled). Beret: Knit round on a circular needle. Cast on 74-80 sts on circular needle size 5 mm with 2 threads of each quality (= 4 threads). K 3 rows, and then P 1 row. Continue in rib 1K/ 1P until work measures approx 5 cm. K 1 row then P 1 row. Change to 1 thread of each quaility (= 2 threads), knit 1 row in stocking sts at the same time as you inc 1 st in every st – read expl. above = 148-160 sts on the needle. Continue in stocking sts until work measures 11-12 cm. Now dec 4-0 sts evenly = 144-160 sts. Then put 18-20 marking threads (MT) with 8 sts in between each MT. Continue in stocking sts at the same time as you dec 1 st before every MT every 4th row a total of 6 times = 36-40 sts. Knit 2 rows in stocking sts. On following row knit all sts together 2 by 2 = 18-20 sts. Pull 1 thread through remaining sts. Pull tight together and fasten. The beret measures about 22-23 cm. MITTENS Size: S/M – L/XL Material: DROPS Alpaca from Garnstudio 50-50 g colour no. 501, light grey and use: DROPS Vivaldi from Garnstudio 50-50 g colour no. 06, off white DROPS double pointed needles size 4 mm - or needle size needed to make 19 sts x 25 rows stocking sts with 1 thread of each quality on 10 x 10 cm. Left mitten: Knit in the round on double pointed needles. Cast on 42-48 sts with 1 thread of each quality on double pointed needles size 4 mm. Knit 2 rows, continue in rib = K3 / P3. When work measures 10 cm knit 1 row – at the same time dec evenly to 36-42 sts. Then P 1 row, K 1 row and P 1 row. Continue in stocking sts. At the same time when work measures approx. ca 12 cm starts the inc for thumb wedge. Inc 1 sts on each side of second last sts on round – to inc: yo, to avoid holes at inc ensure to knit into back of sts on next round. Inc on every 3rd round 4-5 times in total = 9-11 thumb sts and 44-52 sts in total. When piece measures 17-18 cm slip thumb sts + 1 st on each side (= 11-13 m) on 1 thread or stitch holder. Cast on 1 new st behind thumb sts = 34-40 m. Continue round in stocking sts until piece measures 21-22 cm. Slip 15-17 sts on top of hand onto thread or stitch holder, keep next 6-8 sts on the needle and slip last 13-15 sts inside hand on another thread or stitch holder. Little finger: = 6-8 m. Cast on 2 new sts toward sts on thread = 8-10 m. Knit stocking sts in the round for 5½ -6½ cm, then knit all sts tog 2 by 2. Cut yarn and pull through remaining sts, pull tog. Hand: Slip sts from threads back on needle, gather an extra 2 sts up towards little finger = 30-34 sts. Knit 2 rounds stocking sts. Keep 2 sts that were gathered up together towards little finger + 4-5 sts on each side of these on needle. Slip remaining sts back on separate threads or stitch holders (11-12 sts on top of hand and 9-10 sts inside hand). Ring finger: = 10-12 m. cast on 1 new sts towards sts on threads = 11-13 sts. Knit stocking sts in the round for approx 7-8 cm, then knit all sts tog 2 by 2. Cut yarn and pull through remaining sts, pull tog. Middle finger: Slip 5-6 sts from thread or stitch holder on top of hand + 4-5 sts from thread or stitch holder inside hand back on needle, pick up furter 2 sts towards ring finger and cast on 1 new st toward sts on thread or stitch holders = 12-14 sts. Knit stocking sts in the round for approx 7½-8½ cm, then knit all sts tog 2 by 2. Cut yarn and pull through remaining sts, pull tog. Index finger: Slip remaining 11-11 sts from thread or stitch holder back on needle, pick up further 2-3 sts towards middle finger = 13-14 sts. Knit stocking sts in the round for approx 6½-7½ cm, then knit all sts tog 2 by 2. Cut yarn and pull through remaining sts, pull tog.. Thumb: Slip sts over thumb wedge onto needle and pick up 3 additional sts in edge behind thumb sts = 14-16 sts. Knit stocking sts in the round for approx 5½-6 cm, then knit all sts tog 2 by 2.. Cut yarn and pull through remaining sts, pull tog. Right mitten: Knit like left, but reversed, i.e. inc for thumb on each side of 2nd sts of round in stead of second last sts. |
|
Have you finished this pattern?Tag your pictures with #dropspattern or submit them to the #dropsfan gallery. Do you need help with this pattern?You'll find 20 tutorial videos, a Comments/Questions area and more by visiting the pattern on garnstudio.com. © 1982-2026 DROPS Design A/S. We reserve all rights. This document, including all its sub-sections, has copyrights. Read more about what you can do with our patterns at the bottom of each pattern on our site. |
|


With over 40 years in knitting and crochet design, DROPS Design offers one of the most extensive collections of free patterns on the internet - translated to 17 languages. As of today we count 324 catalogues and 12290 patterns translated into English (UK/cm). 12290
We work hard to bring you the best knitting and crochet have to offer, inspiration and advice as well as great quality yarns at incredible prices! Would you like to use our patterns for other than personal use? You can read what you are allowed to do in the Copyright text at the bottom of all our patterns. Happy crafting!
Post a comment to pattern DROPS 102-2
We would love to hear what you have to say about this pattern!
If you want to leave a question, please make sure you select the correct category in the form below, to speed up the answering process. Required fields are marked *.