
Popular categories
Looking for a yarn?




























Comments / Questions (34)
 Iris Peters wrote:
I understand all the instructions thanks to you. For size L I used almost 2 skeins for each of the front sides which leaves me 3 skeins for the back. I am afraid this is not enough. I think I should order one more of Drops Muscrat color 36, dye lot BT691. Do you agree?
12.09.2026 - 16:56DROPS Design answered:
Dear Iris, it seems you worked slightly tighter than the recommended gauge, which is why you used more of the yarn than needed for the front pieces. So yes, in your case you would need one more unit of this color and dye lot. Happy knitting!
13.09.2026 - 23:18
Iris wrote:
Thank you for answering my other question! Now, it says,,when piece measures 9" (L), start the decreases for armholes. Do I measure from the true beginning or from where I am done with the increases. Thank you
31.08.2026 - 00:17DROPS Design answered:
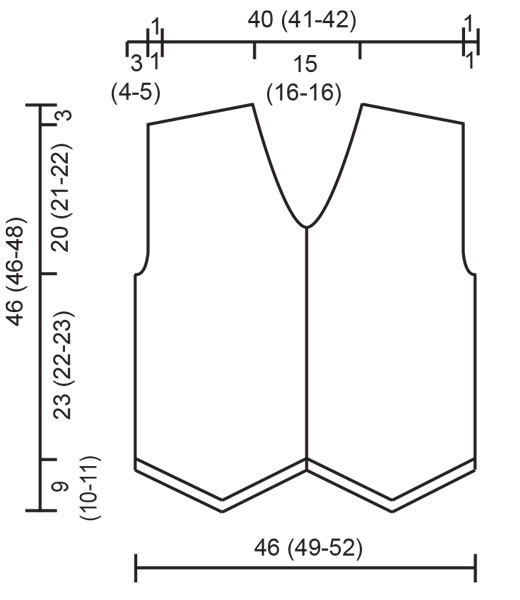
Dear Iris, the 9" / 23 cm should be measured from the straight side (check chart to see where the 23 cm = 9 " are measured). Happy knitting!
01.09.2026 - 19:22
Iris wrote:
On starting right front piece, I am confused,,, "alternating on every row, every 2nd row, every 2nd row" .I understand the left side of the right side front piece, every other row makes sense to me, but not understanding the "every row" part. Could you explain? Thank you
25.08.2026 - 21:21DROPS Design answered:
Dear Iris, when you have to increase (alternately every row 1 time and every other row 2 times) increase like that: *work 1 row increasing towards mid front/the side, work 1 row increasing towards mit front/the side, work 1 row without increasing, work 1 row increasing towards mit front/the side, work 1 row without increasing*, repeat these 5 rows until you have increased the requested number of stitches. The increases can be worked either from the right or the wrong side but they always should be on the same side = towards mid front / towards the side depending on the increases you are working on. Happy knitting!
26.08.2026 - 08:05
 Causse wrote:
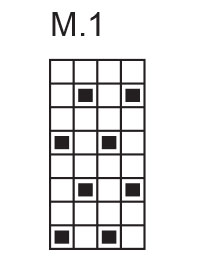
Bonjour, Le rang 1 de M1 ml endroit, ml envers, ml endroit… est il l’endroit où l’envers du tricot? Mercii
18.07.2026 - 18:44DROPS Design answered:
Bonjour Mme Causse, le 1er rang de M.1 se tricote ici sur l'endroit, vous lisez le diagramme de droite à gauche, et sur l'envers, lisez le diagramme de gauche à droite. Bon tricot!
04.08.2026 - 09:08
 Nicole wrote:
Gibt es vielleicht eine YouTube Anleitung, in der gezeigt wird, wie der Anfang mit den Zunahmen des Vorderteils gestrickt wird? Ich komme immer noch nicht klar, wo ich wann wieviele Maschen zunehmen muss (Größe M)? Hilfe...!!!
18.05.2026 - 17:57DROPS Design answered:
Liebe Nicole, so nehmen Sie in M zu: *1 Reihe mit 1 Zunahme (= 1 Masche an der rechten Seite + 2 Maschen an der linken Seite, von der Vorderseite gesehen), 1 Reihe ohne Zunahme, 1 Reihe mit 1 Zunahme beidseitig, 1 Reihe ohne Zunahme, 1 Reihe mit 1 Zunahme beidseitig, 1 Reihe ohne Zunahme* von*bis* wiederholen bis Sie 14 Maschen beidseitig zugenommen haben, dann noch 1 Reihe mit 1 Zunahmen in der rechten Seite der Arbeit = so haben Sie 46 Maschen. Viel Spaß beim Stricken!
19.05.2026 - 08:32
Nicole wrote:
Hallo, Ich bin noch nicht so fit im Lesen der Anleitung. Wie soll ich es verstehen, wenn ich in jeder, jeder 2. und jeder 2. R zunehmen soll? Es handelt sich ja um die untere Spitze. Muss ich von den 3 Ausgangsmaschen nach rechts und links zunehmen? Vielleicht könnt ihr das noch etwas genauer erklären. Danke.
18.05.2026 - 15:11DROPS Design answered:
Liebe Nicole, hier ist es so gemeint: 1 Mal in jeder Reihe, 2 Mal in jeder 2. Reihe, dh: 1 Reihe mit Zunahme, 1 Reihe ohne, 1 Reihe mit Zunahme, 1 Reihe ohne, 1 Reihe mit Zunahme - die Zunahemen werden so bei den Hin- aber auch bei den Rückreihen gestrickt werden = an der rechten Seite beim rechten Vorderteil (und (nur) in M (nicht in L) auch bei dem linken Seite). Viel Spaß beim Stricken!
18.05.2026 - 16:07
 Bernadet wrote:
Hallo, Ik begrijp het meerderen van de eerste 11 cm( maat L) van rechtervoorpand niet. Kunt u mij dit uitleggen per rij? Alvast bedankt, Bernadet
16.04.2026 - 17:58DROPS Design answered:
Dag Bernadet,
Na het opzetten van 3 steken begin je met het breien van M.1 waarbij je tegelijkertijd aan beide zijkanten steeds 1 steek meerdert. Dit doe je met een frequentie van: elke naald, de tweede naald, de tweede naald, elke naald, de tweede naald, de tweede naald, enzovoort.
04.05.2026 - 11:24
 Elaine wrote:
On the back piece it says “cast off on each side within edges stitches on alternating on every row, every 2nd row and every 2nd row” I don’t understand this
27.02.2026 - 16:44DROPS Design answered:
Dear Eleaine, you will decrease on each side as follows: (work 1 row decreasing 1 stitch on each side inside 1 edge stitch, work 1 more row decreasing 1 stitch on each side inside 1 edge stitch, then work 1 row without decreasing, work 1 row decreasing 1 stitch on each side inside 1 edge stitch, then work 1 row without decreasing), repeat from (to) until you have decreased 7 times 1 stitch on each side. Happy knitting!
02.03.2026 - 07:29
Jo Reynolds wrote:
Is there a chart or a fuller explanation of the increases for the front pieces. I cannot tell from your instructions which to follow for each size. I think you are saying increase 21 stitches on one side and 28 on the other but the image looks like they are the same shape.
08.02.2026 - 19:04DROPS Design answered:
Dear Jo, both front pieces are worked exactly the same way, but mirrored, so they will be identical. What changes is how many stitches you increase on the right and left edge of the front piece. On the right side: S: 1 st 14 times, alternating every row and every 2nd row. M: 1 st 15 times, alternating every row, every 2nd row and every 2nd row. L: 1 st 16 times, alternating every row, every 2nd row and every 2nd row. On the left side: S: 2 sts 13 times, alternating every row, every 2nd row and every 2nd row. M: 2 sts 14 times, alternating every row, every 2nd row and every 2nd row. L: 2 sts 15 times every 2nd row. Happy knitting!
08.02.2026 - 19:15
Christine Flick wrote:
Wie gross müssen die Knöpfe sein?
22.12.2025 - 18:25DROPS Design answered:
Hi Christine, they look like 2 cm, but you can choose buttons which fit you. Happy knitting!
27.12.2025 - 15:33
|
|||||||
Tropical Oceania |
|||||||
 |
 |
||||||
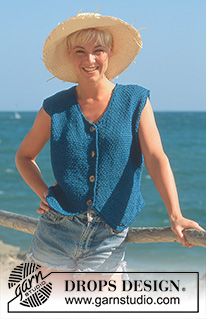
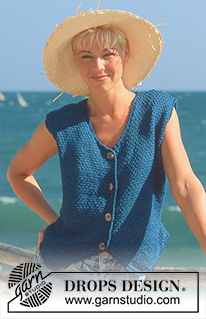
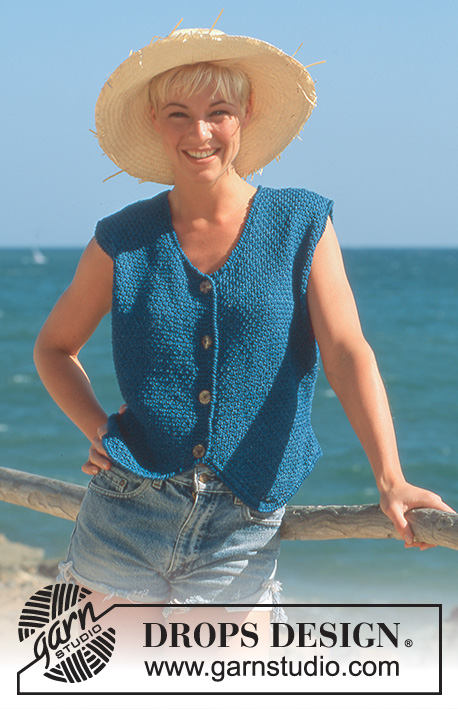
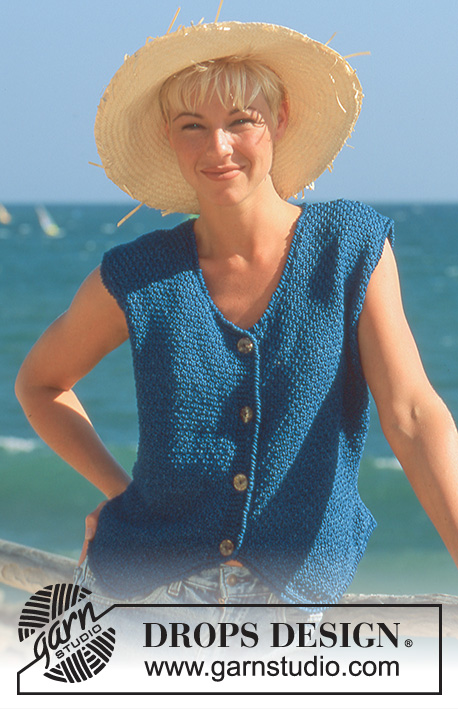
DROPS waistcoat with texture
DROPS 41-7 |
|||||||
|
Knitting tension: 20 sts x 26 rows on needle size 4 mm and stocking sts = 10 x 10 cm Ridge (back and forth on needle): 1 ridge = 2 rows 1st row: K, 2nd round: K Buttonhole: When front piece measures 1 (1-1), 10 (10-11), 19 (19-20) and 28 (28-30) cm cast off for buttonhole on right front piece as follows: Cast off 3rd and 4th sts and cast on 2 new sts over cast off sts on next row. Right front piece: Cast on 3 sts on needle size 4 mm and knit M.1 at the same time inc on each side within edge sts as follows: On right side (= towards mid front): 1 st 14 (15-16) times on Size S: Alternate on each row and every other row and Size M+L: Alternating on every row, every 2nd row and every 2nd row and on left side: 2 sts 13 (14-15) times on Size S+M: Alternate on each row, every 2nd row and every 2nd row and Size L: Every 2nd row = 43 (46-49) sts. Piece measures approx 9 (10-11) cm. Measure piece from here: Cast on 1 st on left side for side seam and 5 sts on right side (= front band) = 49 (52-55) sts (incl 1 edge st for seam). Knit the 5 front band sts in ridge throughout until piece is completed. Remember buttonhole on right front edge – see explanation above. Continuing cast off on left side within edge sts alternating on each row, every 2nd row and every 2nd row: 1 sts 7 (7-7) times = 42 (45-48) sts (incl 1 edge sts). When piece measures 5 (5-5) cm inc on left side within edge sts on every 4th row: 1 sts 10 (10-10) times = 52 (55-58) sts (incl 1 edge sts). Continuing when piece measures 23 (22-23) cm cast off for armhole on left side on every other row: 2 sts 3 (3-4) times, 1 st 1 (3-3) times = 45 (46-47) sts. When piece measures 29 (29-31) cm cast off for neck on right side on every other row: 5 (6-6) st 1 time, 2 st 3 times, 1 st 4 times and then on every 4th row: 1 st 5 times. At the sime time when piece measures 43 (43-45) cm cast off for shoulder from armhole towards neckline on every other row: 6 sts 3 times and then cast off remaining 7 (7-8) sts. All sts are now cast off. Piece measures approx 46 (46-48) cm (total length incl split = approx 55 (56-59) cm.) Left front piece: Knit like right, but opposite and without buttonholes on front band. Back piece: Cast on 88 (94-100) sts (incl 1 edge st on each side for seam) on needle size 4 mm and knit stocking sts at the same time cast off on each side within edge st on alternating on every row, every 2nd row and every 2nd row: 1 st 7 (7-7) times = 74 (80-86) st (incl 2 edge sts). When piece measures 5 (5-5) cm inc on each side within edge sts on every 4th row: 1 st 10 (10-10) times = 94 (100-106) sts. Continuing when piece measures 23 (22-23) cm cast off each side for armholes on every other row: 2 sts 3 (3-4) times, 1 st 1 (3-3) times = 80 (82-84) sts. When piece measures 43 (43-45) cm cast off each side for shoulder from armhole towards middle of piece on every other row: 6 m 3 times and then cast off remaining 7 (7-8) sts. At the same time, when piece measures 44 (44-46) cm cast off middle 26 (28-28) sts for neck. Then cast off 2 sts towards neck on next row to shape neckline. All should now be cast off and piece measures approx 46 (46-48). Assembly: Sew shoulder and side seams. Crochet 1 row dc with single yarn from RS with crochet hook size 4 mm distributed as follows: 30 sts on back neck, 38 sts along V-neck, 55 sts on front band, 28 sts on front part of split point, 30 sts on other part of split point, 70 sts over back piece. Then crochet a row of lobster st from RS as follows: Crochet a row of dc the opposite way, i.e. from left to right without turning piece. Lobster sts can also be crochet as follows: * Pick yarn under through dc, loosen sts slightly, (approx 2 cm high), now twist crochet hook 360 degrees anti clock wise, make a new loop on crochet hook and pull this through both sts on hook *. Repeat from *-*. Repeat both rows around armhole with approx 85 sts. Sew in buttons. |
|||||||
Diagram explanations |
|||||||
|
|||||||
 |
|||||||
 |
|||||||
Have you finished this pattern?Tag your pictures with #dropspattern or submit them to the #dropsfan gallery. Do you need help with this pattern?You'll find 9 tutorial videos, a Comments/Questions area and more by visiting the pattern on garnstudio.com. © 1982-2026 DROPS Design A/S. We reserve all rights. This document, including all its sub-sections, has copyrights. Read more about what you can do with our patterns at the bottom of each pattern on our site. |
|||||||






With over 40 years in knitting and crochet design, DROPS Design offers one of the most extensive collections of free patterns on the internet - translated to 17 languages. As of today we count 333 catalogues and 12525 patterns translated into English (UK/cm). 12525
We work hard to bring you the best knitting and crochet have to offer, inspiration and advice as well as great quality yarns at incredible prices! Would you like to use our patterns for other than personal use? You can read what you are allowed to do in the Copyright text at the bottom of all our patterns. Happy crafting!
Post a comment to pattern DROPS 41-7
We would love to hear what you have to say about this pattern!
If you want to leave a question, please make sure you select the correct category in the form below, to speed up the answering process. Required fields are marked *.