
Popular categories
Looking for a yarn?


Comments / Questions (51)
![]() Jane wrote:
Jane wrote:
I’m struggling to understand the bind off icord rows/s!!
07.09.2025 - 16:54DROPS Design answered:
Hi Jane, Here is a link to our video which shows you how to bind off with I-cord: https://www.garnstudio.com/video.php?id=86&lang=en Regards, Drops Team.
08.09.2025 - 06:49
![]() MARIA ISABEL wrote:
MARIA ISABEL wrote:
Como se sabe la talla que me puede corresponder?
26.08.2025 - 11:49DROPS Design answered:
Hola Maria Isabel, al final del patrón puedes encontrar un esquema de medidas de la prenda, donde encontrarás todas las medidas finales de la prenda en cm. Puedes leer esta lección para entender cómo interpretar este esquema.
26.08.2025 - 22:29
![]() Martine wrote:
Martine wrote:
Bonjour j'ai terminé le pull dos et devant, le dessous, rab. avec e-cord, roulotte. Comment puis-je faire afin d'avoir un fini droit ? C'est très moche avec ce bas de pull.
25.07.2025 - 20:15DROPS Design answered:
Bonjour Martine, si vous ne voulez pas de bordure roulottée en bas du pull, vous pouvez utiliser cette technique par exemple ou bien tricoter des côtes de la longueur souhaitée ou toute autre technique au choix. Bon tricot!
28.07.2025 - 07:12
![]() Flo wrote:
Flo wrote:
Hello. Je pense qu'il y a une erreur avec l'échantillon qui dit deux fois: s'il y a TROP de mailles. "NOTE! Ne pas oublier que la taille des aiguilles n’est qu’une suggestion. Si vous avez trop de mailles pour 10 cm, essayez avec des aiguilles plus grosses. Si vous avez trop de mailles pour 10 cm, essayez avec des aiguilles plus fines" Sinon j'adore tricoter vos modèles.
08.04.2025 - 12:21DROPS Design answered:
Bonjour Flo et merci, la correction a été faite. Bonne continuation!
08.04.2025 - 15:06
![]() Britta wrote:
Britta wrote:
Hallo liebes Drops Team, welche Größe trägt das Model? Ich dachte L würde reichen. Es kommt mir recht klein vor. Ich möchte gern oversized tragen. Viele Grüße Britta
04.04.2025 - 21:25DROPS Design answered:
Liebe Britta, unsere Modellen tragen meistens entweder S oder M. Um Ihre Größe zu finden, messen Sie einen ähnlichen Pullover, den Sie gerne haben und vergleichen Sie diese Maßen mit den in der Maßskizze - hier lesen Sie mehr. Viel Spaß beim Stricken!
07.04.2025 - 07:37
![]() Mary wrote:
Mary wrote:
Bonjour, Je suis à l’étape des diminutions des manches. Ma question concerne le moment où on diminue à 2 tours 1/2. Car il est précisé que les diminutions se font sous la manche donc 2 tours et demi, on est plus sous la manche mais sur le partie supérieure de la manche. Comment compter les 2 tours et demi? Merci d’avance
18.02.2025 - 14:01DROPS Design answered:
Bonjour Mary, vous devez d'abord diminuer tous les 2 tours, puis tous les X cm: mesurez la hauteur correspondante pour savoir le nombre de tours concernés, si vous avez vraiment 2,5 tours, alors diminuez par ex alternativement tous les 2 et tous les 3 tours. Bon tricot!
18.02.2025 - 17:32
![]() Polart wrote:
Polart wrote:
Re bonjour, Dans le cas des augmentations intercalaires sur envers. Est-ce problématique si on a fait l’augmentation sur envers pour gauche: prendre brin par avant et tricoter brin arrière et sur fin de rang, augmentation droite en prenant brin par l’avant et tricoter le brin arrière ? Merci 🙏
31.01.2025 - 09:26DROPS Design answered:
Bonjour Mme Polart, essayez éventuellement sur un échantillon pour voir si le résultat vous convient, vous pouvez ainsi tester les 2 méthodes, comme dans les explications/la vidéo et comme vous le décrivez et vous pourrez ensuite choisir votre façon de faire. Bon tricot!
31.01.2025 - 15:45
![]() Polart wrote:
Polart wrote:
Bonjour, Je me permets de signaler qu’il y a une erreur pour les augmentations intercalaires sur l’envers. C’est le contraire. AIG: prendre le brin de l’avant vers l’arrière et tricoter à l’envers le brin arrière. aID prendre le brin de l’arrière vers l’avant et tricoter à l’envers le brin avant.
31.01.2025 - 00:06DROPS Design answered:
Bonjour Mme Polart, retrouvez ces augmentations dans cette vidéo: en début de rang sur l'envers, on fait une augmentation inclinée à gauche (après le marqueur) en relevant le fil par l'arrière (time code 3:00) et en fin de rang sur l'envers, on fait une augmentation à droite avant le marqueur) en relevant le fil par l'avant (time code 3:22). Bon tricot!
31.01.2025 - 08:28
![]() Régine Roero wrote:
Régine Roero wrote:
Bonjour, je voudrais me tricoter ce pull mais je ne sais pas comment choisir ma taille. C'est une première pour moi. Merci pour votre aide. Régine.
15.01.2025 - 20:03DROPS Design answered:
Bonjour Régine, mesurez un vêtement similaire que vous avez et dont vous aimez la forme et comparez aux mesures du schéma en bas de page pour trouver la taille correspondante - retrouvez plus d'infos ici. Bon tricot!
16.01.2025 - 09:02
![]() Angela Treslove wrote:
Angela Treslove wrote:
Where can I find the sizing in your patterns please. I can see small, medium large etc but not the actual chest measurement for each size I don't know whether to knit a medium size or a large size jumper !
06.01.2025 - 22:36
|
|||||||
Coral Echoes#coralechoessweater |
|||||||
 |
 |
||||||
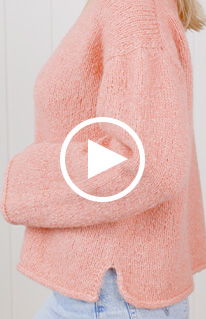
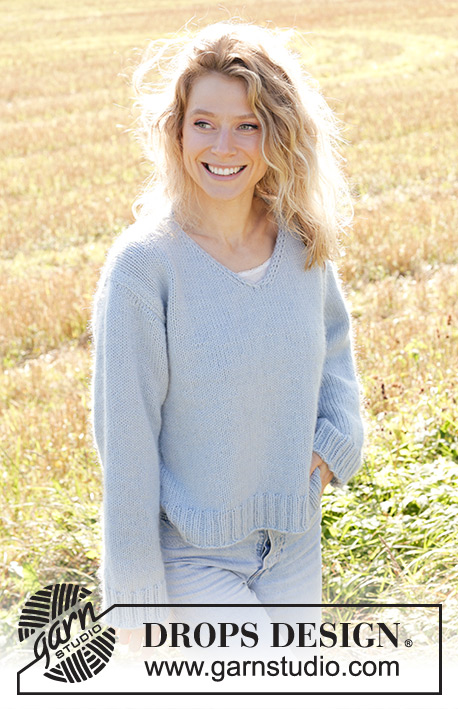
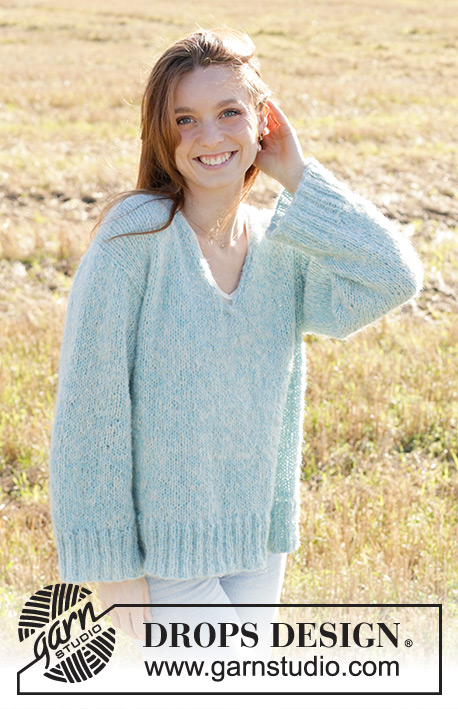
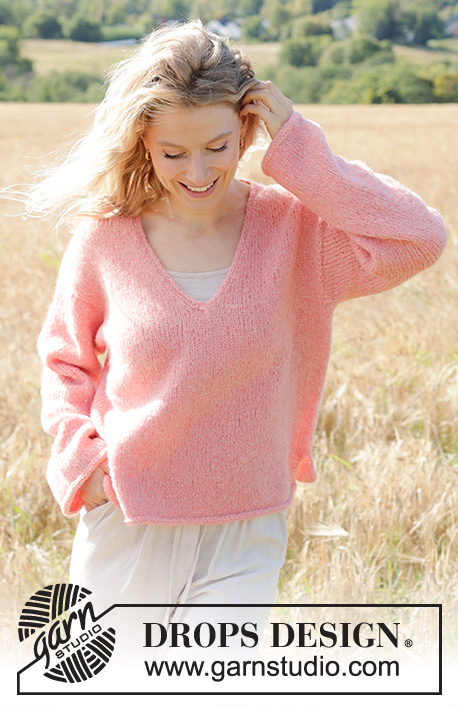
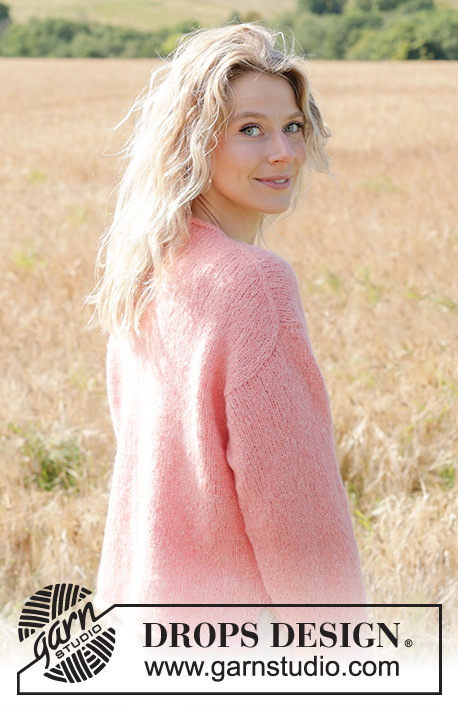
Knitted jumper in DROPS Air or DROPS Paris. Piece is knitted top down with European shoulder / diagonal shoulder, V-neck, I-cord and vents in the sides. Size: S - XXXL
DROPS 248-13 |
|||||||
|
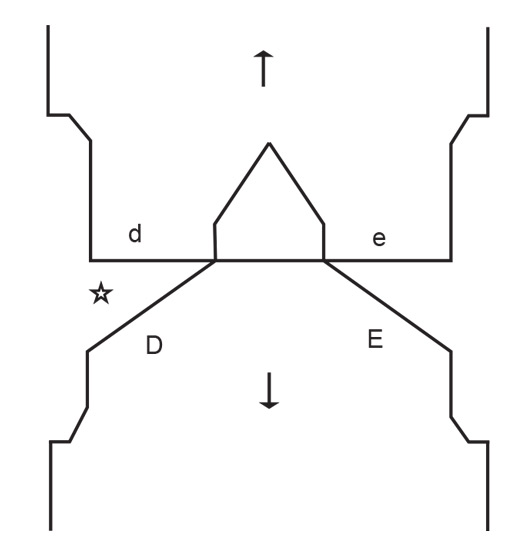
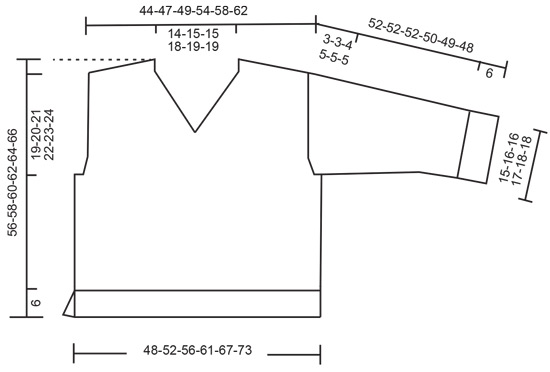
---------------------------------------------------------- EXPLANATION FOR THE PATTERN: ---------------------------------------------------------- INCREASE TIP-1: INCREASE 1 STITCH TOWARDS THE LEFT - from RIGHT SIDE: Use left needle to pick up yarn between 2 stitches from row below, pick up yarn from the front and knit in the stitch loop that is on the back of the needle. INCREASE 1 STITCH TOWARDS THE RIGHT - from RIGHT SIDE: Use left needle to pick up yarn between 2 stitches from row below, pick up yarn from the back and knit in the stitch loop that is on the front side of the needle. INCREASE TIP-2: INCREASE 1 STITCH TOWARDS THE RIGHT - from WRONG SIDE: Use left needle to pick up yarn between 2 stitches from row below, pick up yarn from the back and purl in the stitch loop that is on the front side of the needle. INCREASE 1 STITCH TOWARDS THE LEFT - from WRONG SIDE: Use left needle to pick up yarn between 2 stitches from row below, pick up yarn from the front and purl in the stitch loop that is on the back side of the needle. EDGE STITCHES I-CORD RIGHT SHOULDER: RIGHT SIDE: Work until 3 stitches remain, purl 1, slip 1 stitch purlwise with strand in front of piece and knit 1. WRONG SIDE: Slip 1 stitch purlwise with strand in front of piece and knit 1, knit 1, work the rest of row. EDGE STITCHES I-CORD LEFT SHOULDER: RIGHT SIDE: Slip 1 stitch purlwise with strand in front of piece, knit 1, purl 1, work the rest of row. WRONG SIDE: Work until 3 stitches remain, knit 1, slip 1 stitch purlwise with strand in front of piece, knit 1. I-CORD (in each side, applies to vents at the bottom of body): FIRST 2 STITCHES: Work as follows on every row: Slip 1 stitch purlwise with strand in front of piece, knit 1. LAST 2 STITCHES: Work as follows on every row: Work until 2 stitches remain on needle, slip 1 stitch purlwise with strand in front of piece, knit 1. I-CORD CAST-OFF (bottom edge on body and neck edge at the back): ROW 1 (= right side): Knit 2 , knit the next 2 stitches twisted together. ROW 2 (= right side): Slip the 3 stitches from right needle back on left needle, knit 2 , knit the next 2 stitches twisted together. Repeat ROW 2 until 3 stitches remain on right needle. Slip the 3 stitches from right needle back on left needle. Cast off. Sew a little stitch that binds beginning/end of I-cord to the garment. I-CORD CAST-OFF (sleeve): At the end of round and after last stitch on round has been worked: Cast on 3 new stitches on right needle from right side. Slip the 3 new stitches from right needle to left needle so that working yarn is 3 stitches in on left needle (the working yarn tightens the piece when working to form a little tube). ROW 1 (= right side): Knit 2 , knit the next 2 stitches twisted together. ROW 2 (= right side): Slip the 3 stitches from right needle back on left needle, knit 2 , knit the next 2 stitches twisted together. Repeat ROW 2 until 3 stitches remain on right needle. Slip the 3 stitches from right needle back on left needle. Cast off. Sew a little stitch that binds beginning/end of I-cord together. DECREASE TIP (applies to mid under sleeves): Decrease 1 stitch on each side of marker thread as follows: Work until 3 stitches remain before marker thread and knit 2 together, knit 2 (marker thread is between these 2 stitches), slip 1 stitch knitwise, knit 1, pass slipped stitch over stitch worked. ---------------------------------------------------------- START THE PIECE HERE: ---------------------------------------------------------- JUMPER - SHORT OVERVIEW OF THE PIECE: In this pattern long and short needles have been used - begin with fitting length and switch as needed. First work piece back and forth on needle. Begin by casting on stitches in the back of neck. Then work back piece downwards while at the same time increasing in each side of piece until number of stitches for shoulder width is reached. Back piece has a slight diagonal shoulder. Then work down to armholes. Now put back piece aside and work the front piece. Front piece is first worked in 2 parts. Begin by picking up stitches along right shoulder, work while increasing towards the neck. Repeat on the left shoulder. Put right and left front piece together when increases for neck are done. Then work front piece down to armholes. Now slip front piece and back piece on to same needle and work body downwards in the round on circular needle before dividing the piece again for vents. Pick up stitches for sleeves around the armholes. First work back and forth with short rows to form a sleeve cap. Then work sleeves downwards in the round on needle. BACK PIECE: Cast on 26-28-28-32-34-34 stitches on circular needle size 5 mm. Purl 1 row from wrong side. Read INCREASE TIP-1 and work next row from right side as follows: Knit 3, increase towards the left, knit until 3 stitches remain, increase towards the right, knit 3. Read INCREASE TIP-2 and work next row from wrong side as follows: Purl 3, increase towards the right, purl until 3 stitches remain, increase towards the left, purl 3. Continue like this and increase the same way from both right side and wrong side 24-26-28-30-32-36 times in total. REMEMBER THE KNITTING TENSION! After last increase there are 74-80-84-92-98-106 stitches on needle. Insert 1 marker in the side. Now measure piece from here! Work stocking stitch back and forth until piece measures 12-13-13-14-13-14 cm, measured along the edge of armhole. Work next row as follows from right side: Knit 3, increase towards the left, work until 3 stitches remain, increase towards the right, knit 3 – remember INCREASE TIP-1. Increase like this on every row from right side 2-2-3-3-4-4 times in total = 78-84-90-98-106-114 stitches. Work until piece measures 14-15-16-17-17-18 cm, measured along armhole. Cut the yarn, slip stitches on a thread or stitch holder, and work front piece as explained below. RIGHT SHOULDER: Begin with right shoulder (when garment is worn). Pick up 24-26-28-30-32-36 stitches inside outermost stitch along right shoulder on back piece (i.e. pick up 1 stitch in every row from edge at the top of back piece, see E on chart). All length measurements are done from here! Purl 1 row from wrong side, work next row as follows from right side: Knit until 3 stitches remain, 3 EDGE STITCHES - read explanation above. Continue like this. When piece measures 6 cm, increase stitches towards the neck. Increase towards the right at the end of every row from right side, increase before 4 stitches - remember INCREASE TIP-1. Increase 1 stitch on every other row (every row from right side) 13-14-14-16-17-17 times in total = 37-40-42-46-49-53 stitches. When last row with increase is done, slip stitches on a thread or needle. Then work left shoulder as explained below. LEFT SHOULDER: Pick up 24-26-28-30-32-36 stitches inside outermost stitch along left shoulder on back piece (i.e. pick up 1 stitch in every row from edge at the top of back piece, see D on chart). All length measurements are done from here! Purl 1 row from wrong side, then work as follows from right side: 3 EDGE STITCHES - read explanation above, knit the remaining stitches. Continue like this. When piece measures 6 cm, increase stitches towards the neck. Increase towards the left at the beginning of every row from right side, increase after 4 stitches– remember INCREASE TIP-1. Increase 1 stitch on every other row (every row from right side) 13-14-14-16-17-17 times in total = 37-40-42-46-49-53 stitches. Work next row as follows from wrong side: Work stocking stitch over the 37-40-42-46-49-53 stitches from left shoulder, slip stitches from right shoulder on left needle and then work them in stocking stitch = 74-80-84-92-98-106 stitches. Work next row as follows - from right side: Knit 36-39-41-45-48-52, slip next stitch on a cable needle in front of piece, knit 1, knit stitch from cable needle, work the last 36-39-41-45-48-52 stitches on row. Continue in stocking stitch. Continue to work until piece measures 22-23-23-24-25-26 cm. Work next row as follows from right side: Knit 3, increase towards the left, work until 3 stitches remain, increase towards the right, knit 3 – remember INCREASE TIP-1. Increase like this on every row from right side 2-2-3-3-4-4 times in total = 78-84-90-98-106-114 stitches. Continue in stocking stitch until piece measures 24-25-26-27-29-30 cm, finish with a row from wrong side. Now put front piece and back piece together for body as explained below. BODY: Work stocking stitch over the 78-84-90-98-106-114 stitches from front piece, cast on 4-4-6-6-8-10 new stitches at the end of this row (in the side), work stocking stitch over the 78-84-90-98-106-114 stitches from back piece, cast on 4-4-6-6-8-10 new stitches at the end of row = 164-176-192-208-228-248 stitches. Insert 1 marker thread in each side, in the middle of the new stitches that were cast on under sleeve. Work stocking stitch until piece measures 50-52-54-56-58-60 cm, measured from the top point on shoulder on front piece. Now divide the piece at the marker threads in the side, slip the last 82-88-96-104-114-124 stitches on a thread and continue over stitches from front piece. FRONT PIECE: = 82-88-96-104-114-124 stitches. Work stocking stitch with 2 stitches I-CORD in each side - read explanation above. Cast off with I-CORD when piece measures 56-58-60-62-64-66 cm from top point on shoulder - read explanation above. BACK PIECE: Slip the 82-88-96-104-114-124 stitches from thread back on needle size 5 mm and work the same way as front piece. SLEEVES: Place piece flat and insert 1 marker at the top of armhole (NOTE! It is not where stitches were picked up for front piece but approx. 5-6 cm down on front piece = mid on top of shoulder). Use circular needle size 5 mm, begin in the middle of the new stitches cast on under sleeve, and pick up 68-74-80-82-90-94 stitches along armhole - adjust to pick up same number of stitches on each side of marker along armhole. Now work stocking stitch back and forth with short rows over sleeve cap, this is done to get a better shape on sleeve. Begin mid under sleeve. 1st row (right side): work 9-10-10-10-11-11 stitches past marker, turn 2nd row (wrong side): work 9-10-10-10-11-11 stitches past marker, turn. 3rd row (right side): 10-11-8-6-5-5 stitches past where the previous turn was, turn 4th row (wrong side): work 10-11-8-6-5-5 stitches past where the previous turn was, turn Repeat 3rd and 4th row until 29-32-34-34-36-36 stitches have been worked past marker mid on top of sleeve (3-3-4-5-6-6 turns have been done in each side). Work from right side until beginning of round (mid under sleeve). Insert 1 marker thread here, this is used when decreasing stitches under sleeve. Move marker thread upwards when working. Continue working in the round in stocking stitch over all stitches as explained under. When sleeve measures 5-5-6-7-7-7 cm from where stitches were picked up (all length measurements are done mid on top of sleeve), decrease 2 stitches mid under sleeve - read DECREASE TIP. Decrease every other round 2-2-3-3-4-4 times, then decrease every 4½-3½-2½-2½-2-1½ cm 6-8-9-9-11-12 times, e.g. a total of 8-10-12-12-15-16 times in total = 52-54-56-58-60-62 stitches. Work until sleeve measures 52-52-52-50-49-48 cm from where stitches were picked up for sleeve. Cast off with I-CORD - remember explanation above. BACK NECK EDGE: Use circular needle size 5 mm and cast on 2 stitches on needle, pick in addition up stitches along the neck edge at the back, begin at shoulder line from right side and pick up inside 1 stitch to the other shoulder line. Pick up approx. 24-26-26-30-32-32 stitches. Fasten off. Begin in the side where stitches were cast on and cast off with I-CORD - remember explanation above. |
|||||||
Diagram explanations |
|||||||
|
|||||||
 |
|||||||
 |
|||||||
Have you finished this pattern?Tag your pictures with #dropspattern #coralechoessweater or submit them to the #dropsfan gallery. Do you need help with this pattern?You'll find 28 tutorial videos, a Comments/Questions area and more by visiting the pattern on garnstudio.com. © 1982-2026 DROPS Design A/S. We reserve all rights. This document, including all its sub-sections, has copyrights. Read more about what you can do with our patterns at the bottom of each pattern on our site. |
|||||||


With over 40 years in knitting and crochet design, DROPS Design offers one of the most extensive collections of free patterns on the internet - translated to 17 languages. As of today we count 324 catalogues and 12290 patterns translated into English (UK/cm). 12290
We work hard to bring you the best knitting and crochet have to offer, inspiration and advice as well as great quality yarns at incredible prices! Would you like to use our patterns for other than personal use? You can read what you are allowed to do in the Copyright text at the bottom of all our patterns. Happy crafting!
Post a comment to pattern DROPS 248-13
We would love to hear what you have to say about this pattern!
If you want to leave a question, please make sure you select the correct category in the form below, to speed up the answering process. Required fields are marked *.