
Popular categories
Looking for a yarn?


Comments / Questions (22)
![]() ESSEUL Annie wrote:
ESSEUL Annie wrote:
Bonsoir. Je viens de commencer ce modèle et j'arrive bien à 57 m après avoir fait les 16 rgs en suivant les diagrammes A2 à A4. Pour continuer je bloque. Je fais comment. Je démarre où. J'ai beau chercher je ne comprends pas. Pouvez vous m'expliquer. Merci d'avance.
14.09.2025 - 23:16DROPS Design answered:
Bonjour Annie, vous commencez des le debut des diagrammes A.2 et A.4. Au milieu du chal vous avez deja 48 mailles, donc vous repetez le diagramme A.3 6 fois. Bon tricot!
15.09.2025 - 07:48
![]() Johanna wrote:
Johanna wrote:
Jag blir så konfunderad över mönstret! Era mönster ses från den räta sidan, men plötsligt ska jag följa en rad som tydligen ska stickas på avigan. När vet jag om det är en räta rad och när det är en avig rad på mönstret? Och varför är inte alla aviga rader utsatta om de ibland finns med? Dessutom blir ju den aviga raden fel om jag ska följa mönstret från vänster till höger när det är en avig rad. Förstår verkligen inte. Hoppas ni förstår frågorna.
14.12.2024 - 15:01
![]() Ruth Drago wrote:
Ruth Drago wrote:
Me encanta su web
16.11.2024 - 12:39
![]() Jacques Brugere wrote:
Jacques Brugere wrote:
Bonjour pouvez vous m'expliquer SVP la légende "3 et 4 " ( faire 1 jeté, tricoter 1 maille endroit ) et ( faire 2 jetés, tricoter 1 maille endroit ) . ou trouvez vous la maille endroit elle n apparait pas sur le diagramme (entre les symboles ). je ne comprends vraiment pas . merci par avance , cordialement
12.10.2024 - 15:40DROPS Design answered:
Bonjour Mr Brugere, les mailles endroit de ces symboles correspondent à la maille sur l'aiguille gauche, on va en plus faire un ou 2 jetés pour créer des motifs - dans cette vidéo nous montrons comment tricoter ce type de motifs, attention, dans la vidéo, on tricote toutes les mailles (1 m end, 1 jeté), pour ce motif, ne le faites que quand indiqué (soit 1 m end, 1 jeté, soit 1 m end, 2 jetés). Bon tricot!
14.10.2024 - 07:59
![]() Anneke wrote:
Anneke wrote:
Dankjewel voor de hulp. Mijn volgende vraag is: een omslag tussen de steken begrijp ik. Dat is 1 rechte een omslag en terug een rechte. Maar hoe doe je de andere middelste 4 dan? Ook 1 recht breien en dan één omslag of twee omslagen en terug recht breien...? Dat is hetzelfde als de zijkanten? Klopt dit? Alvast bedankt. Anneke
01.01.2024 - 13:52DROPS Design answered:
Dag Anneke,
De middelste 4 doe je als volgt: 1 omslag, 1 recht, 2 omslagen, 1 recht, 2 omslagen, 1 recht, 1 omslag, 1 recht. In totaal heb je dan 4 steken recht gebreid met 1 of 2 omslagen erachter. Op de volgende naald laat je alle omslagen vallen. (Dus alle omslagen van het ruitjessymbool).
07.01.2024 - 13:45
![]() Anneke wrote:
Anneke wrote:
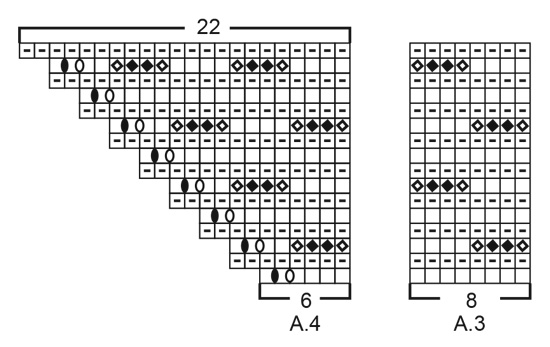
Beste, Hoe moet ik dat diagram lezen aub? Je begint met A1 en dan? Alvast bedankt. Grtjs Anneke
29.12.2023 - 23:27DROPS Design answered:
Dag Anneke,
Als je A.1 1 keer in de hoogte hebt gebreid, dan brei je A.2-A.3-A.4 over de steken van A.1. Dus de eerste 3 steken van A.2, dan A.3 en dan A.4. Wanneer je deze 3 telpatronen 1 keer in de hoogte hebt herhaald heb je meer steken op de naald. Je herhaalt steeds A.2-A.3-A.4 en er komt telkens een herhaling van A.3 bij wanneer je de telpatronen 1 maal in de hoogte hebt gebreid.
30.12.2023 - 17:44
![]() Linda wrote:
Linda wrote:
This is just a follow up to my recent question regarding the key to the diagram. My confusion lies in the fact that while the key shows the open oval having the line through it, in the diagrams none of the open ovals have a line going through them EXCEPT on row 12 of diagram A1. That makes it look like they are two different stitches. I have been acting as if they are the same as I knit it but just wanted to make sure. I'm using my own handspun yarn for this & I love how it is turning out.
21.08.2023 - 01:36DROPS Design answered:
Hi Linda, All the open ovals are for the lace pattern (leaving holes). The line through the ovals on row 12 is just the divide between the squares . Happy knitting!
21.08.2023 - 06:41
![]() Linda wrote:
Linda wrote:
In the Diagram Explanation for this pattern, there is no Key Entry for the open oval and I can't find a general Key on your website for all stitches in your many pattern diagrams. Is there one? Failing that, is there an updated for this pattern? It is so lovely, I really want to make it.
18.08.2023 - 19:05DROPS Design answered:
Dear Linda, all symbols are explained in the key; the open oval is the second to last symbol: between 2 stitches make 1 yarn over – on the next row knit the yarn over (leaves a hole), which is shown in the key as a white oval (the small line in the middle shows that the yarn over is worked between 2 stitches; it¡s the line that separates the 2 squares). We don't have a general key for all stitches, since these may vary in some patterns, especially in older patterns or when a special type of stitch is used, but all patterns will always have a key with all of the symbols of the chart explained in it. Happy knitting!
20.08.2023 - 17:59
![]() Diane wrote:
Diane wrote:
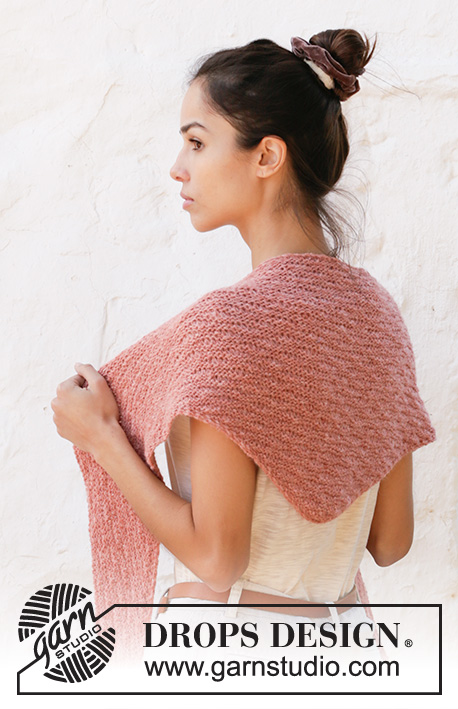
Bonjour, à la fin de A.2, j’ai les 19 mailles, mais on dit A.3 jusqu’à ce qu’il reste 6 mailles ( c’est-à-dire 2 motifs de 8 mailles). Mais si je fais 2 motifs de 8 mailles, il ne reste que 3 mailles. (19 - 16(2X8) = 3) Est-ce que je ne fais qu’une partie du 2e motif de A.3? Merci pour votre aide.
15.11.2021 - 04:04DROPS Design answered:
Bonjour Diane, tricotez ainsi: A.2 (= 3 m) au-dessus des 3 premières mailles du A.2 précédent puis 2 x A.3 (= 8m) au-dessus des 16 dernières mailles du A.2 précédent (= 3 + 16 = 19 m), tricotez les 2 x A.3 suivants comme avant, puis tricotez 2 x A.3 au-dessus des 16 premières mailles du A.4 précédent et terminez par A.4 au-dessus des 6 dernières mailles (16 + 6 = 22 m); ainsi vous tricotez 2 fois A.3 en plus de chaque côté des 2 A.3 du début. Bon tricot!
15.11.2021 - 08:40
![]() Tatiana K wrote:
Tatiana K wrote:
A mí me ha salido este chal de 40 cm del largo del centro y de 180cm de ancho usando un ovillo y medio. Aprox. 70 gr
11.11.2021 - 13:29
|
|||||||||||||||||||
Lovely Megan#lovelymeganshawl |
|||||||||||||||||||
 |
 |
||||||||||||||||||
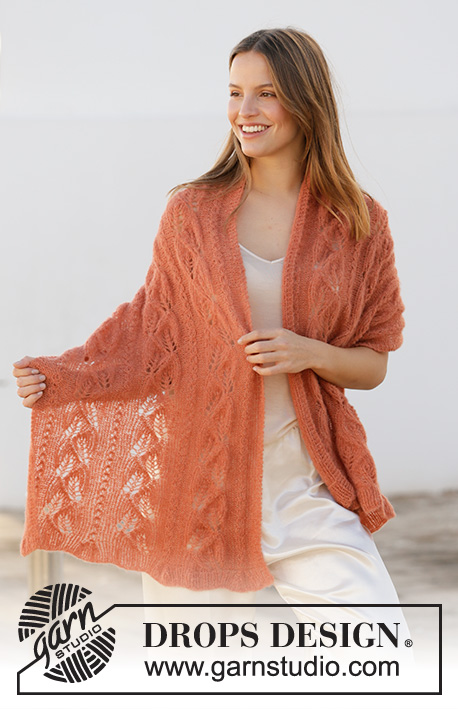
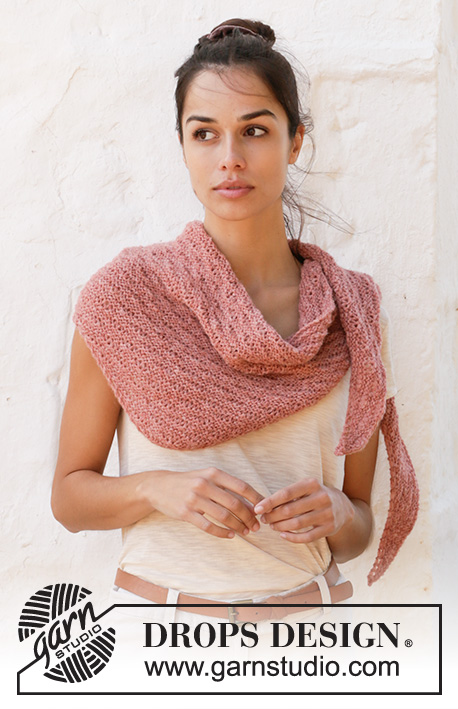
Knitted shawl in DROPS Sky. The piece is worked bottom up with garter stitch and dropped stitches.
DROPS 211-19 |
|||||||||||||||||||
|
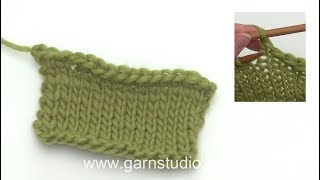
------------------------------------------------------- EXPLANATIONS FOR THE PATTERN: ------------------------------------------------------- RIDGE/GARTER STITCH (worked back and forth): Knit all rows. 1 ridge in height = Knit 2 rows. PATTERN: See diagrams A.1 to A.4. CASTING-OFF TIP (elastic casting-off edge): Cast off with knit from the right side as follows: Knit 2, * insert the left needle into the 2 stitches on the right needle from left to right and knit them together, knit 1 *, work from *-* until there is 1 stitch left. Cut the strand and pull it through the last stitch. Fasten the strand. ------------------------------------------------------- START THE PIECE HERE: ------------------------------------------------------- SHAWL – SHORT OVERVIEW OF THE PIECE: The piece is worked back and forth with circular needle, bottom up. To give yourself room for all the stitches when increasing it is a good idea to use 2 circular needles of the same size. SHAWL: Cast on 3 stitches with circular needle size 4.5 mm and Sky. Work A.1 – row 1 is worked from the wrong side. When A.1 has been worked 1 time in height there are 25 stitches on the needle. Work diagrams A.2 to A.4 as follows, from the right side: Work A.2 over 3 stitches, work A.3 until there are 6 stitches left on the row (i.e. 2 repeats of 8 stitches) and finish with A.4 over the last 6 stitches. Continue this pattern. When the diagrams have been worked 1 time in height there are 57 stitches on the needle. Continue working according to diagrams A.2 to A.4; each time you have worked them 1 time in height there is room for 4 more repeats of A.3 between A.2 and A.4. Work until the piece measures approx. 40 cm in the middle (= approx. 313 stitches on the needle) or to required length. Cast off with knit from the right side – read CASTING-OFF TIP! |
|||||||||||||||||||
Diagram explanations |
|||||||||||||||||||
|
|||||||||||||||||||
 |
|||||||||||||||||||
 |
|||||||||||||||||||
Have you finished this pattern?Tag your pictures with #dropspattern #lovelymeganshawl or submit them to the #dropsfan gallery. Do you need help with this pattern?You'll find 9 tutorial videos, a Comments/Questions area and more by visiting the pattern on garnstudio.com. © 1982-2026 DROPS Design A/S. We reserve all rights. This document, including all its sub-sections, has copyrights. Read more about what you can do with our patterns at the bottom of each pattern on our site. |
|||||||||||||||||||


With over 40 years in knitting and crochet design, DROPS Design offers one of the most extensive collections of free patterns on the internet - translated to 17 languages. As of today we count 324 catalogues and 12290 patterns translated into English (UK/cm). 12290
We work hard to bring you the best knitting and crochet have to offer, inspiration and advice as well as great quality yarns at incredible prices! Would you like to use our patterns for other than personal use? You can read what you are allowed to do in the Copyright text at the bottom of all our patterns. Happy crafting!
Post a comment to pattern DROPS 211-19
We would love to hear what you have to say about this pattern!
If you want to leave a question, please make sure you select the correct category in the form below, to speed up the answering process. Required fields are marked *.