
Popular categories
Looking for a yarn?


Comments / Questions (51)
Kern wrote:
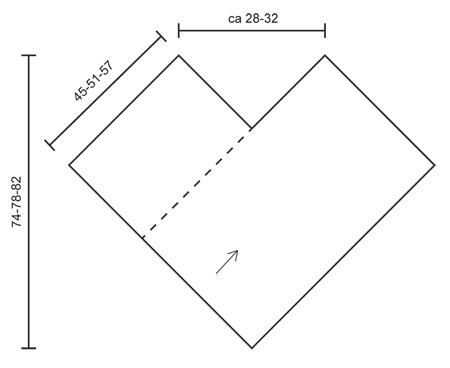
What do you mean by "marks to sew cast off edge tog with side". I have kniited the piece up to 45 cm long but which cast off edge is being referred to. The diagram does not give the measurement on the sides.
21.10.2015 - 16:11DROPS Design answered:
Dear Mrs Kern, When piece measures 45 cm (1st size), you insert a marker on the right side of piece - this marker will be used then later for assembly. Continue until piece measures 112 cm and bind off. Sew then the bind off edge along the side (from cast on edge to the marker). Happy knitting!
22.10.2015 - 09:50
![]() Claudia wrote:
Claudia wrote:
Danke für die Antwort! Hab's endlich kapiert. ; ) Die Konstruktion ist so einfach wie genial. Jetzt stricke ich erstmal das Rechteck und kann immer noch überlegen, evtl. ein 2. Rechteck zu stricken und gegenzunähen, dann würde der Poncho "zweizipflig". Die "Melody" zu stricken macht soviel Spaß, und man kommt flott voran; ich bin ganz begeistert von diesem Garn!
10.10.2015 - 09:47
![]() Claudia Niehues wrote:
Claudia Niehues wrote:
Hat der Poncho auf der Rückseite auch den eckigen "Zipfel" wie vorne,oder ist er hinten einfach gerade wie eine Stola?
08.10.2015 - 10:58DROPS Design answered:
Der Poncho ist hinten gerade ohne Zipfel. Das Prinzip besteht darin, dass Sie ein Rechteck stricken, das anschließend zusammengenäht wird, die Naht ist die Stelle, an der auf dem Foto die Fransen angebracht sind.
08.10.2015 - 22:08
![]() Ivonne wrote:
Ivonne wrote:
Hallo, also ich habe nun bereits die Hälfte des Rechteckes gestrickt. Wenn ich dann aber die beiden Seiten annähe, dann habe ich wohl nur das Dreieck an der Vorderseite und am Rücken ist es dann wie eine Strickjacke?
06.10.2015 - 11:59DROPS Design answered:
Ja, der Poncho ist hinten gerade, nur vorne bildet er eine Spitze. Hinten liegt er quasi wie ein breiter Schal am Rücken.
08.10.2015 - 22:23
![]() Elena wrote:
Elena wrote:
Buongiorno, complimenti per il modello. Non mi è chiara però la spiegazione, vorrei sapere se si tratta di un pezzo unico oppure se sono due pezzi separati che poi andranno cuciti insieme. Potete aiutarmi per favore? grazie molte! Elena
21.09.2015 - 19:19DROPS Design answered:
Buongiorno Elena. Il poncho viene lavorato in un unico pezzo. Dovrà poi piegare il lavoro in modo che il ferro di chiusura delle maglie si appoggi ad uno dei lati lunghi, da dove è stato posizionato il segno fino al ferro di avvio delle maglie. La linea tratteggiata nel diagramma indica la cucitura. Buon lavoro!
22.09.2015 - 09:16
![]() Petra Pohl wrote:
Petra Pohl wrote:
Hallo Also ich versteh die Strickanleitung echt nicht. Wenn ich die Skizze sehe würde ich jetzt nach 45 cm Maschen zunehmen um dann das längere Teil weiter zu stricken.Und dann Abkettkante und den seitlichen Rand des kurzen Teil zusammen nähen.Aber dann würde es so aussehen, das vorne das Dreieck runterhängt und hinten die Sicht ganz kurz ist. Ich glaube das kann wohl nicht sein. Wie sieht der Poncho hinten aus?????
20.09.2015 - 12:14DROPS Design answered:
Sie brauchen überhaupt keine Zunahmen zu arbeiten. Das Prinzip besteht darin, dass Sie einfach ein Rechteck stricken, für Gr. S 45 cm x 112 cm. Am Ende wird dann die eine Kurzseite (45 cm) bündig an eine Längsseite genäht. Die Skizze zeigt nur die Vorderseite, die gestrichelte Linie ist die Nahtkante, an sich geht das Rechteck aber hinten weiter. Sie können sich das einfach mal mit einem rechteckigen Stück Papier vor Augen führen, z.B. 10 x 4 cm, halten Sie die 4 cm bündig an ein Ende des 10 cm-Stücks, dann verstehen Sie, wie es gemeint ist.
20.09.2015 - 14:18
![]() Birgitta Schuberth wrote:
Birgitta Schuberth wrote:
Så som jag läser mönstret, ska man sticka ett rakt stycke, men på diagrammet ser det ut att vara stickat i vinkel. Förstår inte.
19.09.2015 - 00:15DROPS Design answered:
Hej. Du stickar ett rakt stycke som sedan sys ihop. Du ser stickriktningen på pilen i diagrammet. Lycka till!
22.09.2015 - 07:59
![]() Regine wrote:
Regine wrote:
Bonjour je ne comprends pas le schéma de ce poncho. Je voudrais le faire avec des aiguilles droites. Je comprends le sens du travail mais combien dois je diminuer de mailles ? ca28-32 ? merci cordialement
14.08.2015 - 11:16DROPS Design answered:
Bonjour Régine, le poncho se tricote ici en allers et retours sur aiguille circulaire pour avoir suffisamment de place pour y loger toutes les mailles. Vous pouvez ainsi le tricoter sur des aig. droites, vérifiez bien votre tension car vos mailles seront plus serrées. C'est une longue bande de 112-130 cm (cf taille) où l'on coud les mailles rabattues le long du long côté où vous avez mis le marqueur à 45-57 cm. "ca 28-32" correspond à la largeur de l'encolure. Bon tricot!
14.08.2015 - 14:16
![]() Rosi wrote:
Rosi wrote:
Ich bin jetzt fertig mit dem Poncho, hab L/XL gewählt. Es hätte gern etwas weiter werden können. Soll nur ein Tipp sein, lieber eine Größe mehr nehmen!
12.08.2015 - 00:30
![]() Rosi wrote:
Rosi wrote:
Und hinten stellt es sich als kurz heraus, auch eine Überraschung ;) Ich fände es sehr hilfreich, wenn die Fotos ebenfalls eine Ansicht von hinten zeigen würden.
11.08.2015 - 16:52
|
||||
Lorelei#loreleiponcho |
||||
|
|
||||
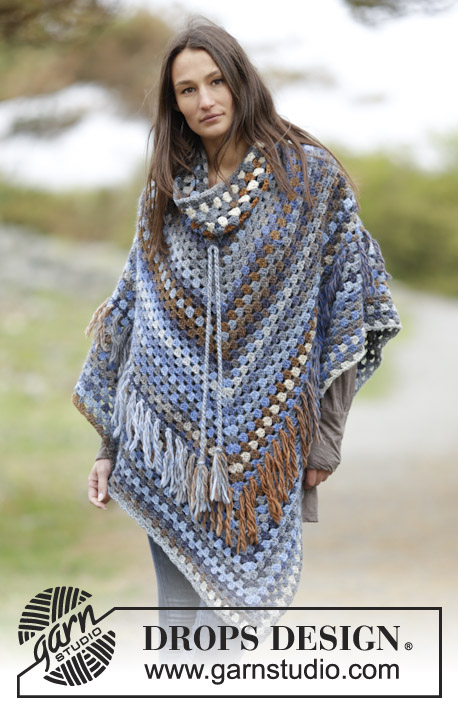
Knitted DROPS poncho in garter st with fringes in 2 strands ”Brushed Alpaca Silk” or 1 strand "Melody".
DROPS 166-30 |
||||
|
DOUBLE YARN TIP: Use yarn from both inside and outside of the ball. When switching to a new ball, try to avoid switching both strands at the same time - to avoid a thick yarn when fastening. GARTER ST (back and forth): K all rows. 1 ridge = 2 rows K. FRINGES: Cut 4 lengths of yarn of 36 cm. Fold them double and pull the loop through 1st st in cast-off edge and pull the yarn ends through the loop. Insert a fringe along cast-off edge approx. every 3 cm along the entire edge. Cut fringes to a length of approx. 15 cm. ---------------------------------------------------------- PONCHO: Worked back and forth on needle. READ DOUBLE YARN TIP. Cast on 63-71-80 sts on circular needle size 6 mm with 2 strands Brushed Alpaca Silk or 1 strand Melody. Work in GARTER ST back and forth - see explanation above! REMEMBER THE KNITTING TENSION Continue like this until piece measures 45-51-57 cm. Insert 1 marker in the side of piece, marks where to sew cast-off edge tog with the side. Work in garter st until piece measures 112-121-130 cm. Cast off. ASSEMBLY: Sew with Brushed Alpaca Silk/melody short side (= cast-off edge) tog with long side, from marker and down to cast-on edge. Sew in outer loops of edge sts. Opposite side now forms a tip mid front. Fasten FRINGES - see explanation above, on poncho. |
||||
Diagram explanations |
||||
|
||||
 |
||||
Have you finished this pattern?Tag your pictures with #dropspattern #loreleiponcho or submit them to the #dropsfan gallery. Do you need help with this pattern?You'll find 9 tutorial videos, a Comments/Questions area and more by visiting the pattern on garnstudio.com. © 1982-2026 DROPS Design A/S. We reserve all rights. This document, including all its sub-sections, has copyrights. Read more about what you can do with our patterns at the bottom of each pattern on our site. |
||||


With over 40 years in knitting and crochet design, DROPS Design offers one of the most extensive collections of free patterns on the internet - translated to 17 languages. As of today we count 324 catalogues and 12290 patterns translated into English (UK/cm). 12290
We work hard to bring you the best knitting and crochet have to offer, inspiration and advice as well as great quality yarns at incredible prices! Would you like to use our patterns for other than personal use? You can read what you are allowed to do in the Copyright text at the bottom of all our patterns. Happy crafting!
Post a comment to pattern DROPS 166-30
We would love to hear what you have to say about this pattern!
If you want to leave a question, please make sure you select the correct category in the form below, to speed up the answering process. Required fields are marked *.