
Popular categories
Looking for a yarn?


Comments / Questions (82)
![]() Donatella wrote:
Donatella wrote:
Aiutooo! scusi se la disturbo di nuovo ma ho appena finito i ferri accorciati del davanti sinistro e non riesco a capire quali sono le strisce e le asole di cui si parla. Mi perdoni ma proprio non ci riesco. grazie mille per la sua cortesia
13.10.2016 - 19:51DROPS Design answered:
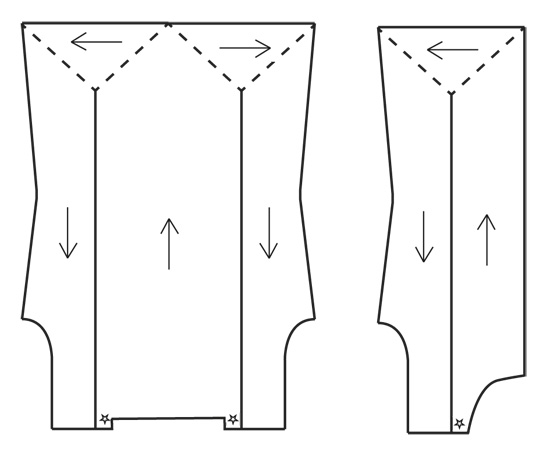
Buonasera Donatella, abbiamo leggermente modificato il testo per renderlo più comprensibile; in pratica, alla fine del triangolo, deve tornare indietro lavorando il davanti fino alla spalla, e allo stesso tempo unirlo alla striscia già lavorata. Guardi bene il disegno alla fine del modello per capire meglio. Mentre lavora i ferri a legaccio, deve riprendere le m esterne della parte che ha già lavorato come indicato nelle istruzioni, così arriverà alla spalla con un pezzo unico. Buon lavoro!
13.10.2016 - 21:17
![]() Donatella wrote:
Donatella wrote:
Buongiorno, sto facendo il davanti sinistro. Non ho ben chiaro come misurare i 6 cm per iniziare le diminuzioni. Sono forse i cm. di differenza a lato da quando ho iniziato i ferri accorciati? Grazie e cordiali saluti
13.10.2016 - 16:54DROPS Design answered:
Buonasera Donatella, praticamente con l'inizio dei ferri accorciati lei sta iniziando a lavorare la parte a triangolo (nella foto): se guarda lo schema in fondo al modello forse capisce meglio la lavorazione. I 6 cm devono essere misurati dal lato, quando arriva a 6 cm inizia a diminuire per realizzare l'altra parte del triangolo e poi lavorerà ancora a m legaccio per finire il davanti unendolo con la striscia già fatta. Ci riscriva se non è chiaro. Buon lavoro!
13.10.2016 - 17:29
![]() Diny Gijsbers wrote:
Diny Gijsbers wrote:
Een fragments Vraagje over patroon140-4 er staat bij een hoogte van 6 cm van af de onderkant gaan minderen moeten dan de verkorte toeren klaar zijn en dan gaan minderen of volgens het patroon dat ik dan weer terug ben naar boven
15.02.2016 - 14:26DROPS Design answered:
Hoi Diny. Zo te zien ben je klaar met de verkorte toeren (de draai langs de onderkant) als je op 6 cm bent.
17.02.2016 - 13:44
![]() Helle Reinhold wrote:
Helle Reinhold wrote:
Kan se jeg har fået et svar på min sidste henvendelse til jer. Men hvis jeg strikker to vendinger på samme måde som i opskriften, ender jeg med at have lavet et L i stedet, og vil jo så mene at det er forkert da jeg jo i sidste ende skal ende ud i atkunne tage masker op på det lange stykke, så det jeg spørg om er om de skal strikkes modsat af hinanden vendingerne ??? Mvh. Helle
04.01.2016 - 15:53
![]() Elke wrote:
Elke wrote:
Super Strickanleitung,hat Spaß gebracht diese Jacke anzufertigen. Trägt sich super.
03.12.2015 - 15:20
![]() Helle Reinhold wrote:
Helle Reinhold wrote:
Undskyld mig, men kan se der er kommentarer der er flere år gamle ang denne opskrift, hvorfor pokker ændre i dog ikke opskriften så ??? Jeg er selv i gang med den, og har det samme problem ang de 6 cm fra nederste kant, har jeg daforstået rigtigt ved de andre kommentarer, at de først skal tænkes på når man har strikket vendingerne og begyndt at strikke opad ?? Ang vendingerne skal de være ens el strikkesde modsat af hinanden ?
23.11.2015 - 23:00DROPS Design answered:
Hej Helle, der er ikke nogle fejl i opskriften! Fint at du har læst og forstået de andre kommentarer. Derimod forstår jeg ikke hvad du mener med om vendingerne skal være ens el modsat af hinanden, men den side som skal være bredest skal strikkes flest gange, det vil sige at du strikker flere pinde i den brede side og vender så det bliver smallere i den anden side. God fornøjelse!
25.11.2015 - 14:05
![]() Lisette Du Maine wrote:
Lisette Du Maine wrote:
Het elleboogstuk heeft een vorm van een O. Als je na 17 toeren afkant ontstaat deze vorm niet. Hoe krijg ik dat voor elkaar?
11.11.2015 - 22:53DROPS Design answered:
Hoi Lisette. Het lapje is niet helemaal als een O, het lapje is wat "puntiger" en gebreid zoals volgens de beschrijving hier op het patroon.
12.11.2015 - 16:02
![]() Jet wrote:
Jet wrote:
Dank voor de reactie maar volgens mij klopt het niet: je breit het linker-voorpand van de schouder naar beneden, dan kan ik toch niet al na 6 cm moeten minderen voor de taille? Heeft het minderen niet te maken met de punt die aan de onderkant moet ontstaan?
27.10.2014 - 16:18DROPS Design answered:
Het klopt wel, u hebt inmiddels 2 keer verkorte toeren gebreid en gaat weer naar boven. U meet 6 cm vanaf de onderkant, zie de tekening onderaan het patroon, dus de pijl die weer vanaf de onderkant (als u het werk draagt) naar de schouder wijst, daar bent u nu.
28.10.2014 - 09:53
![]() Jet wrote:
Jet wrote:
Ben enthousiast begonnen met dit vest maar heb al gelijk een 'probleem'. Er staat in het patroon van het linkervoorpand op een gegeven moment: 'Brei TEGELIJKERTIJD bij een hoogte van 6 cm vanaf de onderkant naar boven op het voorpand (gemeten langs de kant), de eerste 2 st op de nld samen (aan de goede kant), herhaal dit minderen elke 3 cm nog 4 keer = 22-24-26-29-33-37 st.' Moet ik dit minderen nu al gelijk na 6 cm breien doen? Ik heb op dat moment dan nog niet alle meerderingen gedaan.
27.10.2014 - 11:58DROPS Design answered:
Ja, dat klopt, u doet dat al na 6 cm om de zijkant van de taille te vormen. Het andere meerderen gaat gewoon verder.
27.10.2014 - 15:00
![]() Sylvia Karlsson wrote:
Sylvia Karlsson wrote:
Hej igen! Jag jobbar intensivt med detta mönster, blir inte som jag vill, det är nu dessa 6 cm som spökar. Koftan stickas ju uppifrån och ner och jag skall min ska från 6 cm längst ner på framst. Hur ska detta gå till, förstår inte eller har "det stannat i mitt huvud" snälla hjälp mig helst oå svenska
28.07.2014 - 13:16
|
||||||||||
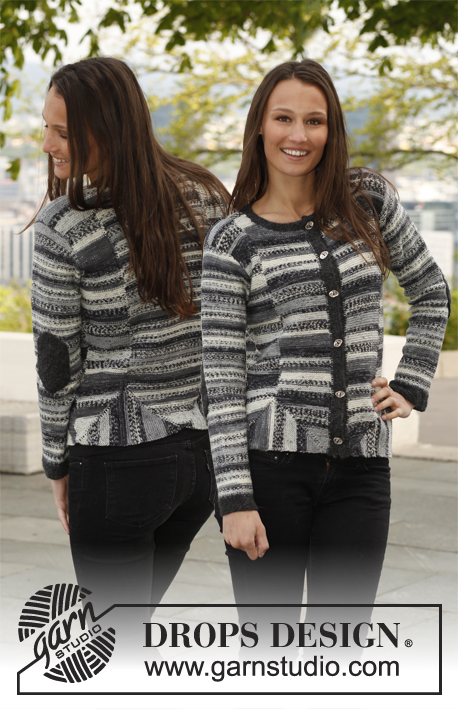
Loreen#loreencardigan |
||||||||||
 |
 |
|||||||||
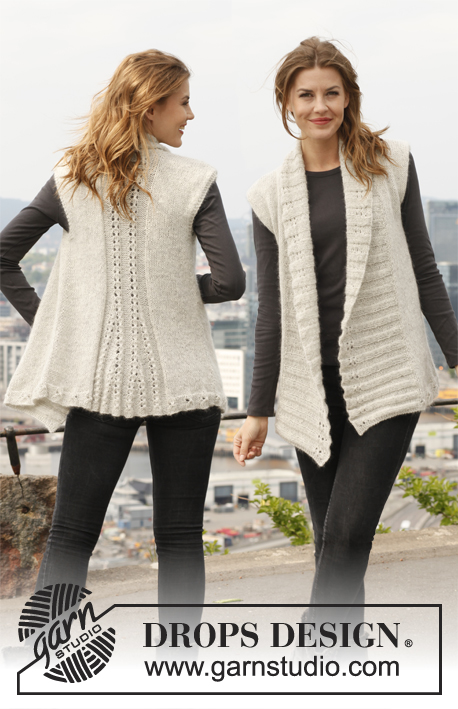
Knitted DROPS jacket with short rows in "Fabel".
DROPS 140-4 |
||||||||||
|
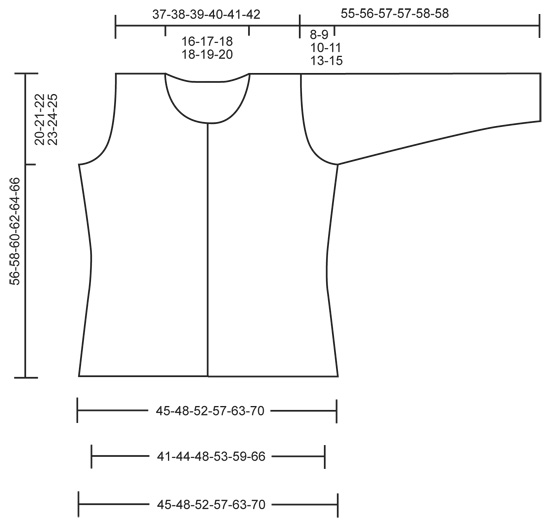
GARTER ST (back and forth on needle): K all rows. 1 ridge = 2 rows K. GARTER ST (in the round on circular needle): 1 ridge = 2 rounds * K 1 round and P 1 round *, repeat from *-*. SHORT ROWS: Work 1 row over the first 26-28-30-33-37-41 sts, turn and work back. Work 1 row over the first 25-27-29-32-36-40 sts, turn and work back. Continue with short rows, work one st less every time until two rows have been worked only over the first st. Then work 1 row over the first 2 sts, turn and work back, 1 row over the first 3 sts, turn and work back. Continue with short rows, work one st more every time, until 1 row has been worked over all sts, turn and work back. 1 repetition with short rows = 104-112-120-132-148-164 rows. BUTTONHOLES: Cast off for buttonholes on right band from RS. 1 buttonhole = K tog 3rd and 4th st from mid front, then make 1 YO. Cast off for buttonholes when piece measures: SIZE S: 3, 12, 21, 30, 39 and 48 cm. SIZE M: 3, 10, 18, 26, 34, 42 and 50 cm. SIZE L: 3, 11, 19, 27, 35, 43 and 52 cm. SIZE XL: 3, 11, 19, 27, 36, 45 and 54 cm. SIZE XXL: 3, 11, 20, 29, 38, 47 and 56 cm. SIZE XXXL: 3, 10, 18, 26, 34, 42, 50 and 58 cm. (NOTE: Work last buttonhole when 1 cm remains on neck edge.) ---------------------------------------------------------- LEFT FRONT PIECE: The entire piece is worked in GARTER ST - see explanation above. Work piece from shoulder down to bottom edge, then from bottom edge and back to shoulder. Cast on 8-9-10-12-15-18 sts on needles size 3 mm with Fabel. Work in garter st for 5 cm, then cast on new sts at the end of every row from WS as follows: 1 st 3 times, 2 sts 3 times and 10-11-12-13-14-15 sts 1 time = 27-29-31-34-38-42 sts. Continue in garter st until piece measures 45-46-47-47-48-49 cm. Work 2 repetitions with short rows – see explanation above, first row = from RS. AT THE SAME TIME when piece measures 6 cm from bottom on front piece (measured up along the side), K tog the first 2 sts on row (from RS), repeat dec every 3 cm 4 more times = 22-24-26-29-33-37 sts. When short rows have been worked, work in garter st over all sts. AT THE SAME TIME work the two stripes tog as follows - beg from WS: Pick up the outermost st in front loop from previous stripe, work first st from left needle, pass the new st over, work the rest of row. Repeat these two rows upwards until 1 st has been knitted up in every ridge along the entire side of previous stripe. AT THE SAME TIME when piece measures 22 cm from bottom edge, work 2 sts in first st on row (from RS), repeat inc every 2½-3-3-3½-3½-4 cm 4 more times = 27-29-31-34-38-42 sts. When piece measures 36-37-38-39-40-41 cm from bottom edge, cast off for armholes at the beg of every row from RS as follows: 3 sts 1-1-1-2-2-2 times, 2 sts 2-3-4-5-7-9 times and 1 st 3-3-4-4-7-10 times = 17-17-16-14-11-8 sts. Work until piece measures 56-58-60-62-64-66 cm, cast off. RIGHT FRONT PIECE: The entire piece is worked in garter st. Work piece from shoulder down to bottom edge, then from bottom edge and back to shoulder. Cast on 8-9-10-12-15-18 sts on needles size 3 mm with Fabel. Work in garter st for 5 cm, then cast on new sts at the end of every row from RS as follows: 1 st 3 times, 2 sts 3 times and 10-11-12-13-14-15 sts 1 time = 27-29-31-34-38-42 sts. Continue in garter st until piece measures 45-46-47-47-48-49 cm. Work 2 repetitions with short rows – see explanation above, first row = from WS. AT THE SAME TIME when piece measures 6 cm from bottom on front piece (measured up along the side), K tog the last 2 sts on row (from RS), repeat dec every 3 cm 4 more times = 22-24-26-29-33-37 sts. When short rows have been worked, work in garter st over all sts. AT THE SAME TIME work the two stripes tog as follows - beg from RS: Pick up the outermost st in front loop from previous stripe, work first st from left needle, pass the new st over, work the rest of row. Repeat these two rows upwards until 1 st has been knitted up in every ridge along the entire side of previous stripe. AT THE SAME TIME when piece measures 22 cm from bottom edge, work 2 sts in last st on row (from RS), repeat inc every 2½-3-3-3½-3½-4 cm 4 more times = 27-29-31-34-38-42 sts. When piece measures 36-37-38-39-40-41 cm, cast off for armholes at the beg of every row from WS as follows: 3 sts 1-1-1-2-2-2 times, 2 sts 2-3-4-5-7-9 times and 1 st 3-3-4-4-7-10 times = 17-17-16-14-11-8 sts. Work until piece measures 56-58-60-62-64-66 cm, cast off. BACK PIECE: The entire piece is worked in garter st. Work piece from shoulder down to bottom edge, then from bottom edge and back to shoulder. RIGHT SHOULDER: Cast on 8-9-10-12-15-18 sts on needles size 3 mm with Fabel. Work in garter st for 2 cm. Put piece aside. Work left shoulder the same way, keep sts on needle, cast on 38-40-42-44-46-48 new sts, and work sts from right shoulder back on needle = 54-58-62-68-76-84 sts. Work in garter st until piece measures 45-46-47-47-48-49 cm. Continue in garter st, AT THE SAME TIME on every other row slip 1 st in each side on a stitch holder. Continue until 2 sts remain on needle = 26-28-30-33-37-41 sts on each stitch holder. Slip the left of the 2 sts on stitch holder, then finish the right side of back piece. RIGHT SIDE OF BACK PIECE: = 1 st on needle. Continue in garter st, AT THE SAME TIME at the end of every row from RS work 1 st from stitch holder back on needle. Continue like this until all the sts have been worked back on to needle = 27-29-31-34-38-42 sts. Work 1 repetition with short rows – see explanation above, first row = from RS. AT THE SAME TIME when piece measures 6 cm from bottom on back piece (measured up along the side), K tog the first 2 sts on row (from RS), repeat dec every 3 cm 4 more times = 22-24-26-29-33-37 sts. When short rows have been worked, work in garter st over all sts. AT THE SAME TIME work the two stripes tog as follows - beg from WS: Pick up the outermost st in front loop from previous stripe, work first st from left needle, pass the new st over, work the rest of row. Repeat these two rows upwards until 1 st has been knitted up in every ridge along the entire side of previous stripe. AT THE SAME TIME when piece measures 22 cm, continue inc in the side and cast off for armhole as explained on left front piece. Work until piece measures 56-58-60-62-64-66 cm, cast off. LEFT SIDE OF BACK PIECE: Slip last st slipped on stitch holder back on needle size 3 mm = 1 st on needle. Continue in garter st, AT THE SAME TIME at the end of every row from WS work 1 st from stitch holder back on needle. Continue like this until all the sts have been worked back on to needle = 27-29-31-34-38-42 sts. Work 1 repetition with short rows – see explanation above, first row = from WS. AT THE SAME TIME when piece measures 6 cm from bottom on back piece (measured up along the side), K tog the last 2 sts on row (from RS), repeat dec every 3 cm 4 more times = 22-24-26-29-33-37 sts. When short rows have been worked, work in garter st over all sts. AT THE SAME TIME work the two stripes tog as follows - beg from RS: Pick up the outermost st in front loop from previous stripe, work first st from left needle, pass the new st over, work the rest of row. Repeat these two rows upwards until 1 st has been knitted up in every ridge along the entire side of previous stripe. AT THE SAME TIME when piece measures 22 cm, continue inc in the side and cast off for armhole as explained on right front piece. Work until piece measures 56-58-60-62-64-66 cm, cast off. SLEEVE: Worked in the round on double pointed needles. Cast on 56-58-60-62-64-68 sts on double pointed needles size 3 mm with Alpaca. Work in GARTER ST for 4 cm - see explanation above. Switch to Fabel, then work in stocking st (sleeve is sewn on with WS outwards). Insert 1 marker at the beg of round. When piece measures 8-8-8-8-6-6 cm, inc 1 st in each side of marker, repeat inc every 2½-2-2-1½-1½-1½ cm 14-16-18-20-22-23 more times = 86-92-98-104-110-116 sts. When piece measures 47-47-47-46-45-43 cm (shorter measurements in the larger sizes because of longer sleeve cap and broader shoulder width), cast off 6 sts mid under sleeve (= 3 sts on each side of marker). Then work back and forth and cast off for sleeve cap. Cast off at beg of every row in each side: 3 sts 1 time, 2 sts 5-6-6-6-6-6 times and 1 st 1-1-2-4-7-10 times, then cast off 2 sts in each side until piece measures 54-55-56-56-57-57 cm, then cast off 3 sts 1 time in each side. Cast off the remaining sts, piece measures approx. 55-56-57-57-58-58 cm in all sizes. LEFT BAND: Cast on 6 sts on needle size 3 mm with Alpaca. Work in garter st back and forth AT THE SAME TIME work them tog with front piece as follows - beg from RS: Pick up the outermost st in front loop from bottom of front piece, work first st from left needle, pass the new st over, work the rest of row. Repeat these two rows upwards until 1 st has been knitted up in every ridge along the entire front piece. Repeat on right front piece, first row = from WS. Cast off for BUTTONHOLES on right band - see explanation above. ASSEMBLY: Sew the shoulder seams. Sew side seams. Sew in sleeves, with WS outwards. NECK EDGE: Knit up approx. 120-130 sts around neck edge (also over bands) with Alpaca. Work in garter st for 2 cm, cast off. ELBOW PATCH: Work piece back and forth. Cast on 20 sts on needle size 3 mm with Alpaca. Work as follows: Row 1: K all sts. Row 2: K 1, 1 YO, K 1, 1 YO, K 6, 1 YO, K 1, 1 YO, K 2, 1 YO, K 1, 1 YO, K 6, 1 YO, K 1, 1 YO, K 1 = 28 sts. Row 3: K over all sts, K YO twisted. Row 4: K 1, 1 YO, K 2, 1 YO, K 8, 1 YO, K 2, 1 YO, K 2, 1 YO, K 2, 1 YO, K 8, 1 YO, K 2, 1 YO, K 1 = 36 sts. Row 5: K over all sts, K YO twisted. Row 6: K 1, 1 YO, K 3, 1 YO, K 10, 1 YO, K 3, 1 YO, K 2, 1 YO, K 3, 1 YO, K 10, 1 YO, K 3, 1 YO, K 1 = 44 sts. Row 7: K over all sts, K YO twisted. Row 8: K 1, 1 YO, K 4, 1 YO, K 12, 1 YO, K 4, 1 YO, K 2, 1 YO, K 4, 1 YO, K 12, 1 YO, K 4, 1 YO, K 1 = 52 sts. Row 9: K over all sts, K YO twisted. Row 10: K 1, 1 YO, K 5, 1 YO, K 14, 1 YO, K 5, 1 YO, K 2, 1 YO, K 5, 1 YO, K 14, 1 YO, K 5, 1 YO, K 1 = 60 sts. Row 11: K over all sts, K YO twisted. Row 12: K 1, 1 YO, K 6, 1 YO, K 16, 1 YO, K 6, 1 YO, K 2, 1 YO, K 6, 1 YO, K 16, 1 YO, K 6, 1 YO, K 1 = 68 sts. Row 13: K over all sts, K YO twisted. Row 14: K 1, 1 YO, K 7, 1 YO, K 18, 1 YO, K 7, 1 YO, K 2, 1 YO, K 7, 1 YO, K 18, 1 YO, K 7, 1 YO, K 1 = 76 sts. Row 15: K over all sts, K YO twisted. Row 16: K 1, 1 YO, K 8, 1 YO, K 20, 1 YO, K 8, 1 YO, K 2, 1 YO, K 8, 1 YO, K 20, 1 YO, K 8, 1 YO, K 1 = 84 sts. Row 17: Cast off all sts. Sew the elbow patch tog in the middle with neat little stitches. Knit another elbow patch. Sew an elbow patch at the back of each sleeve with stitches (try the jacket on for correct placing). |
||||||||||
Diagram explanations |
||||||||||
|
||||||||||
 |
||||||||||
 |
||||||||||
Have you finished this pattern?Tag your pictures with #dropspattern #loreencardigan or submit them to the #dropsfan gallery. Do you need help with this pattern?You'll find 15 tutorial videos, a Comments/Questions area and more by visiting the pattern on garnstudio.com. © 1982-2026 DROPS Design A/S. We reserve all rights. This document, including all its sub-sections, has copyrights. Read more about what you can do with our patterns at the bottom of each pattern on our site. |
||||||||||


With over 40 years in knitting and crochet design, DROPS Design offers one of the most extensive collections of free patterns on the internet - translated to 17 languages. As of today we count 324 catalogues and 12245 patterns translated into English (UK/cm). 12245
We work hard to bring you the best knitting and crochet have to offer, inspiration and advice as well as great quality yarns at incredible prices! Would you like to use our patterns for other than personal use? You can read what you are allowed to do in the Copyright text at the bottom of all our patterns. Happy crafting!
Post a comment to pattern DROPS 140-4
We would love to hear what you have to say about this pattern!
If you want to leave a question, please make sure you select the correct category in the form below, to speed up the answering process. Required fields are marked *.