Comments / Questions (81)
![]() Katarzyna Matejek wrote:
Katarzyna Matejek wrote:
Witam czy na lewej stronie sobutki robimy oczka lewe. A na prawej stronie robótki według schematu?
22.02.2019 - 15:27DROPS Design answered:
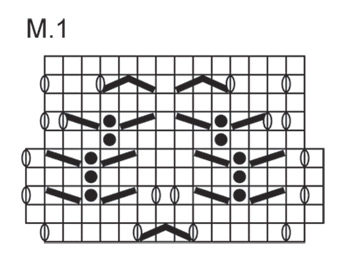
Witaj Kasiu, na prawej stronie robótki (rzędy nieparzyste schematu) przerabiamy wg schematu, a na lewej stronie robótki (rzędy parzyste) przerabiamy wszystkie oczka na lewo, za wyjątkiem tych które są oznaczone symbolem czarnej kropki, które są przerabiane na prawo na lewej stronie robótki. Powodzenia!
22.02.2019 - 16:54
![]() Rosy wrote:
Rosy wrote:
Bonjour, est-il possible de tricoter ce modèle avec de la laine "Lace" avec un fil en double, ou bien faut-il le laisser en simple fil ? Merci !
07.01.2019 - 12:58DROPS Design answered:
Bonjour Rosy, vous pouvez probablement tricoter ce modèle en DROPS Lace, en simple, mais le motif sera plus ajouré - il pourra être ensuite bloqué. N'hésitez pas à demander conseil à votre magasin - même par mail ou téléphone. Bon tricot!
07.01.2019 - 14:36
![]() Susanne Axelsen wrote:
Susanne Axelsen wrote:
Hej Når jeg skal starte pind 6, hvad gør jeg så efter de 4 retmasker .....?
31.12.2018 - 10:51DROPS Design answered:
Hei Susanne. Jeg antar du mener pinne 6 i M.1? Du følger diagrammet som vanlig (Pinne 6 strikkes fra vrangsiden): etter de 6 rillemaskene i siden strikker du altså 3 masker vrang, 1 maske rett, 5 masker vrang, 1 maske rett, 4 masker vrang. Første rapport av M.1 er ferdig og denne gjentar du til det gjenstår 4 masker på pinnen,. Strikk 4 masker i rille som vanlig (retmasker på dansk). God fornøyelse
04.01.2019 - 09:27
![]() Valeria wrote:
Valeria wrote:
Dit patroon klopt niet: als je 2 gebreide delen aan elkaar gaat breien, kloppen de rijen niet! Dit komt doordat de zijkanten verschillend zijn. Je moet eigenlijk bij deel 2 links en rechts omwisselen.
13.11.2018 - 23:42
![]() Clarissa Koeditz wrote:
Clarissa Koeditz wrote:
Have you actually made this piece?? If you had, you would know what I am talking about. If both of the outsides of each piece were exactly the same, then what you are telling me would work. But, they are not. One side has an extra stockinette stitch and if you simply put the right sides together, you would see that the extra stockinette stitch would be on opposite sides of each other.
01.04.2018 - 00:54DROPS Design answered:
Dear Mrs Koeditz, both pieces are the same: you finish M.1 with a WS row and K 3 rows (= 1 row from RS, 1 row from WS and 1 row from RS). Then graft sts from both pieces together from RS. For any further personnal assistance you are welcome to contact the store where you bought your yarn, even per mail or telephone, they will be able to explain you. Happy assembly!
03.04.2018 - 08:39
![]() Clarissa Koeditz wrote:
Clarissa Koeditz wrote:
I sewed each half exactly the same way, which means that when you hold them up side-by-side, they have that one stitch in stickinette on the same side. But when I turn one half to make the right sides together so I can graft them, that stockinette stitch on the half that I turned is now on the opposite side. I would basically have to make one half backward from the other to make the stockinette stitch on the same side when I graft them.
28.03.2018 - 20:29DROPS Design answered:
Dear Mrs Koeditz, last row on both pieces has been worked from RS, place both pieces from RS to graft them together with kitchener stitches. Happy assemby!
30.03.2018 - 11:51
![]() Halina Andruszkiewicz wrote:
Halina Andruszkiewicz wrote:
Witam nie mogę rozszyfrować tego wzoru nie zgadza mi się ilość oczek proszę o instrukcję wzór jest bardzo ładnyi chciałabym wykorzystać na swoją robótkę. Z góry dziękuję.
14.03.2018 - 07:46DROPS Design answered:
Witaj Halino! Niestety nie ma dokładnego opisu tego wzoru, a tylko schemat na dole. Nad schematem znajduje się legenda. Schemat odczytujemy od prawego dolnego rogu, od prawej do lewej strony na prawej stronie robótki, i od lewej do prawej strony na lewej stronie robótki. Najlepiej umieścić marker między każdym kolejnym powtarzanym motywem, aby uniknąć pomyłek. W razie pytań proszę o kontakt. Miłej pracy!
14.03.2018 - 14:04
![]() Clarissa Koeditz wrote:
Clarissa Koeditz wrote:
For pattern 127-39: In the chart pattern, on the 6th row, the pattern goes down by 2 sets {1 st at each end). How do I handle these missing stitches? Do I slip st?
04.02.2018 - 15:58DROPS Design answered:
Dear Mrs Koeditz, on row 5 in pattern you will dec 4 sts while only making 2 YOs, ie you will decrease 2 sts in each repetition of M.1. Happy knitting!
05.02.2018 - 09:44
![]() Laure B. wrote:
Laure B. wrote:
Bonjour, Est-il possible d'avoir la marche à suivre de ce modèle par écrit, et non avec le schéma. Je suis très nulle avec les schémas mais par contre si j'ai le détail avec les explications écrites j'y arrive. Merci d'avance. Cordialement, Laure
27.08.2017 - 23:17DROPS Design answered:
Bonjour Laure B, il n'existe qu'un diagramme pour les explications de ce motif, vous trouverez la légende juste au-dessus du diagramme. Lisez le diagramme en commençant en bas à droite, de droite à gauche sur l'endroit et de gauche à droite sur l'envers. N'hésitez pas à ajouter des marqueurs entre chaque motif à répéter pour bien vous repérer et éviter les erreurs. Bon tricot!
29.08.2017 - 11:58
![]() Astrid Jensen wrote:
Astrid Jensen wrote:
Korrektur: In der 7. Reihe sind jeweils außen zwei Umschläge zu viel.
17.03.2016 - 16:47DROPS Design answered:
Siehe vorherige Antwort, das Muster ist korrekt. Die Umschläge und Abnahmen in Reihe 7 gleichen sich aus (pro Mustersatz 4 umschlage und 4 Abnahmen).
21.03.2016 - 10:43
Silk Leaves#silkleavesshawl |
|||||||||||||||||||
 |
 |
||||||||||||||||||
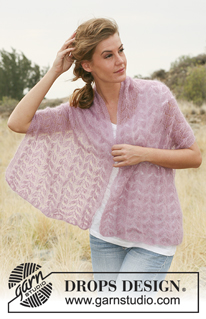
Knitted DROPS shawl with lace pattern in "Kid-Silk".
DROPS 127-39 |
|||||||||||||||||||
|
PATTERN: See M.1 (the diagram shows the pattern from RS) GARTER ST (back and forth on needle): K all rows. KNITTING TIP: No of sts may vary depending on the row worked in the pattern, it might therefore be wise to insert markers between the repetitions. -------------------------------------------------------- SHAWL: Worked back and forth on circular needle to make room for all the sts. Cast on 107 sts on circular needle size 3.5 mm with Kid-Silk. Work 4 rows in garter st - see explanation above. Continue to work as follows: 4 sts in garter st, M.1 (1st row = RS) over the next 98 sts (= 7 times - Read KNITTING TIP), 1 st in stocking st and 4 sts in garter st. Continue like this until piece measures approx. 70 cm (adjust after one whole repetition, next row is from RS) now K 3 rows over all sts before all sts are slipped on a stitch holder. Half the shawl has been knitted. Knit another part the same way. Sew the two parts tog by sewing the sts from the two stitch holders tog. |
|||||||||||||||||||
Diagram explanations |
|||||||||||||||||||
|
|||||||||||||||||||
 |
|||||||||||||||||||
Have you finished this pattern?Tag your pictures with #dropspattern #silkleavesshawl or submit them to the #dropsfan gallery. Do you need help with this pattern?You'll find 14 tutorial videos, a Comments/Questions area and more by visiting the pattern on garnstudio.com. © 1982-2025 DROPS Design A/S. We reserve all rights. This document, including all its sub-sections, has copyrights. Read more about what you can do with our patterns at the bottom of each pattern on our site. |
|||||||||||||||||||


Post a comment to pattern DROPS 127-39
We would love to hear what you have to say about this pattern!
If you want to leave a question, please make sure you select the correct category in the form below, to speed up the answering process. Required fields are marked *.