
Popular categories
Looking for a yarn?


Comments / Questions (152)
![]() Annick Dupal wrote:
Annick Dupal wrote:
I've tried to find an answer from previous questions/answers, to no avail. About the sleeves: I am about to switch to A4 (after increasing a full A9/A10). Do I continue increasing on either side of the A4 marker or at the beginning/end of this new A4 section? Increasing on either side would mess up the [knit/purl] sequence... 😊 Thank you!
11.04.2026 - 22:26DROPS Design answered:
Hi Annick, You work the same pattern throughout the length of the sleeve, (A.4, A.9, A.6, A.7, A.6 and A.10 in the round). It is the increased stitches under the sleeve which are first worked into A.9/A.10 until there is room for a new repeat of A.4 under the sleeve, then these new stitches are worked in A.4. Hops this helps. Regards, Drops Team.
13.04.2026 - 07:32
![]() Martine wrote:
Martine wrote:
Bonjour, J'aimerais savoir comment tricoter (pour les côtes) A2,A3,A2,A1 au dessus des 28 mailles. Merci pour votre réponse
26.03.2026 - 11:36DROPS Design answered:
Bonjour Martine, il faut tricoter seulement A.1 sur 28 mailles, vous devez tricoter avant A.2 (= 18 m), puis A.3 (26 m), puis encore une fois A.2 (18 m) et ensuite A.1 (= 14 m) au-dessus des 28 mailles suivantes = soit 2 fois A.1 en largeur. Bon tricot!
26.03.2026 - 16:02
![]() Josephine wrote:
Josephine wrote:
Hej igen. Det svarade inte på frågan. Som jag förstår det blir det endast tre extra varv till ryggen? Det är alldeles för lite för att få tröjan att sitta snyggt på ryggen för den storleken. Det måste rimligen stickas betydligt fler varv till ryggen?
10.02.2026 - 15:39
![]() Nathalie wrote:
Nathalie wrote:
Bonjour, je commence les manches (taille XL)mais je ne comprends pas où faire les augmentations. .. " les mailles augmentées se tricotent d abord en suivant A9/A10, puis A4. "? Merci pour votre aide.
09.02.2026 - 18:58DROPS Design answered:
Bonjour Nathalie, en XL vous commencez par tricoter les 12 dernières mailles de A.9 = les 2 premières augmentations vont se tricoter comme les 2 premières mailles du diagramme = à l'envers , pour que le diagramme soit complet, de même à la fin du tour, vous avez terminé le tour par les 12 premières mailles de A.10, les 2 premières augmentations seront les 2 dernières mailles du diagramme = 2 m envers; puis vous tricotez les augmentations en suivant A.4 (point de blé). Bon tricot!
10.02.2026 - 17:27
![]() Josephine wrote:
Josephine wrote:
Jag är snart klar med raglan och ska övergå till halsen. Jag stickar XL. Jg ska sätta framdelen på tråd och sen sticka mönstret fram och tillbaka i bakstycket? Hur långt? Ska jag minska eller inte? Jag vill ju att ryggen ska bli längre än frampartiet innan jag gör halsen
08.02.2026 - 19:32DROPS Design answered:
Hei Josephine. Ja, sett de midterste 42 maskene på 1 tråd og strikk videre til omgangens start og så klipp tråden. Deretter skal du starte fra vrangen ved halsen, og fortsett mønsteret frem og tilbake. SAMTIDIG felles det av til hals på begynnelsen av hver pinne fra halsen. Fell 2 masker 1 gang og deretter 1 maske 2 ganger i hver side. Du skal nå ha 112 masker på pinnen. Deretter strikkes halskanten. mvh DROPS Design
09.02.2026 - 15:37
![]() Anna wrote:
Anna wrote:
Could you please share if you can what chest measurements fits which size?
06.02.2026 - 17:52DROPS Design answered:
Hello Anna, if you scroll all the way down to the diagram section, at the bottom you'll find a pullover scheme with measurements corresponding sizes in pattern. Happy knitting!
08.02.2026 - 12:14
![]() Alice wrote:
Alice wrote:
Ser konstigt ut, är det mönster även i resoren?
27.01.2026 - 09:57DROPS Design answered:
Hej Alice, resåren består af ret og vrang, og fortsætter op i mønsteret :)
29.01.2026 - 09:17
![]() Nousiainen Tuula wrote:
Nousiainen Tuula wrote:
Kysymykseni on aiheeton. Pahoittelut
26.01.2026 - 05:37
![]() Tuula Nousiainen wrote:
Tuula Nousiainen wrote:
Olen kaarroke kohdassa, työn koko L. Eli puikoilla 436 silmukkaan, raglakavennusten kautta silmukoista lähtee 144 silmukkaa, etukappaleen pääntiehen 40 silmukkaa ja pääpienkavennukset vielä vie 6 silmukkaa, jonka jälkeen työssä pitäisi olla ohjeen mukaan koossa L 102 silmukkaa. Itse en millaan saa kavennusten ja pääntien jälkeen 102 silmukkaa, onko ohjeessa väärin vai enkö ole ymmärtänyt jotain kavennuksissa. Kiitos etukäteen
25.01.2026 - 16:32
![]() Elli Ogiers wrote:
Elli Ogiers wrote:
Pas zo aan dat volgende naald een oneven naald in de telpatronen is en kant de eerste 6-6-7-7-8-8 steken af, ga verder in patroon tot er 5-5-6-6-7-7 steken over zijn voor de tweede markeerdraadsteek, kant 11-11-13-13-15-15 Bedoel je dat de nld waarin de steken afgekant worden een oneven naald moet zijn of de naald daarna?
17.01.2026 - 22:53DROPS Design answered:
Dag Elli,
Inderdaad, de naald waarop je de steken afkant zoals je beschrijft, moet een oneven naald zijn.
21.01.2026 - 20:25
|
|||||||||||||||||||||||||||||||
Ice Island#iceislandsweater |
|||||||||||||||||||||||||||||||
 |
 |
||||||||||||||||||||||||||||||
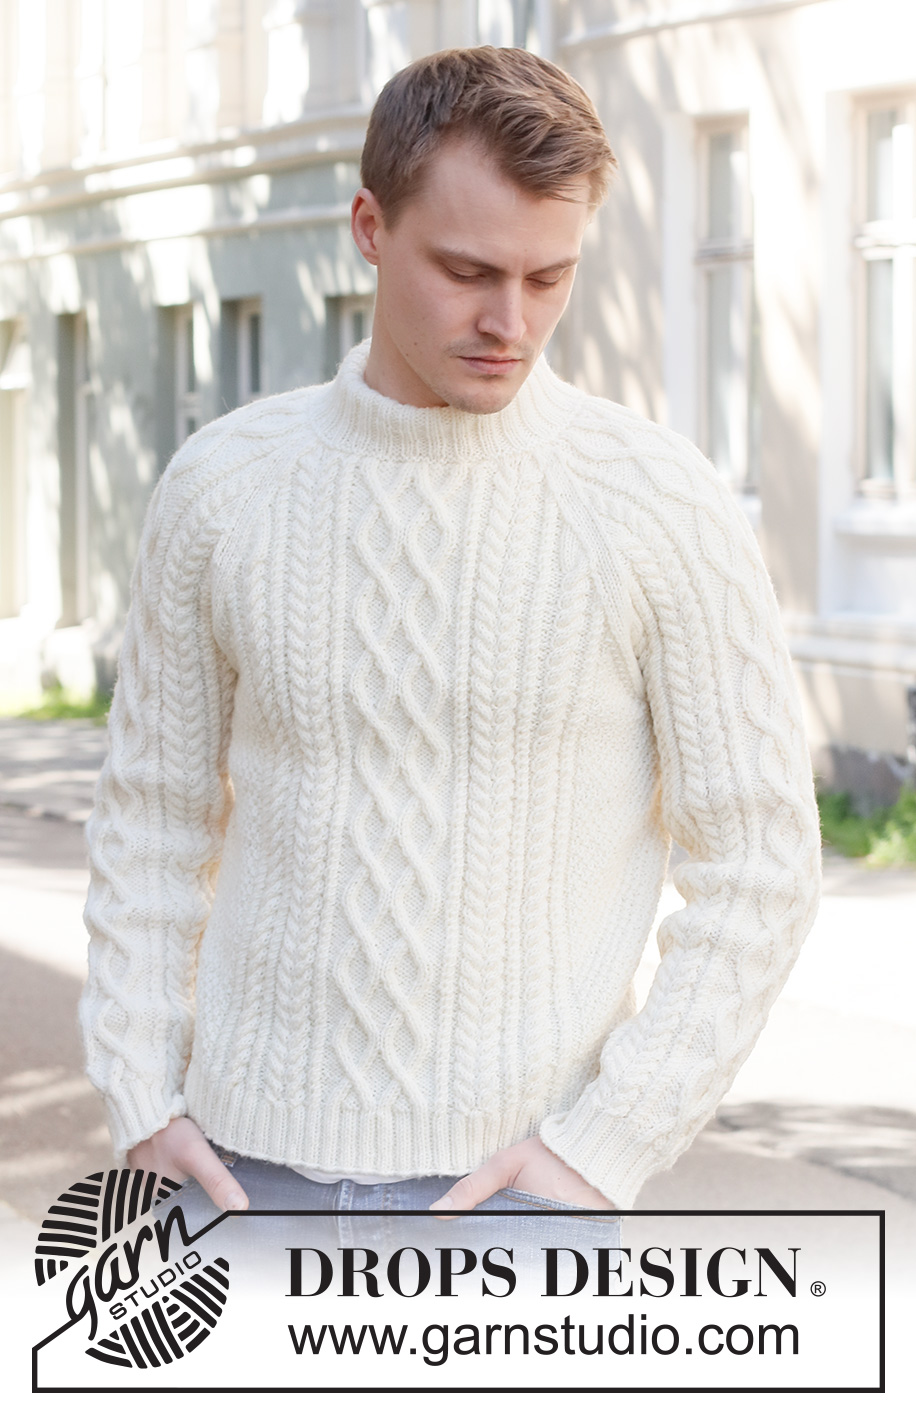
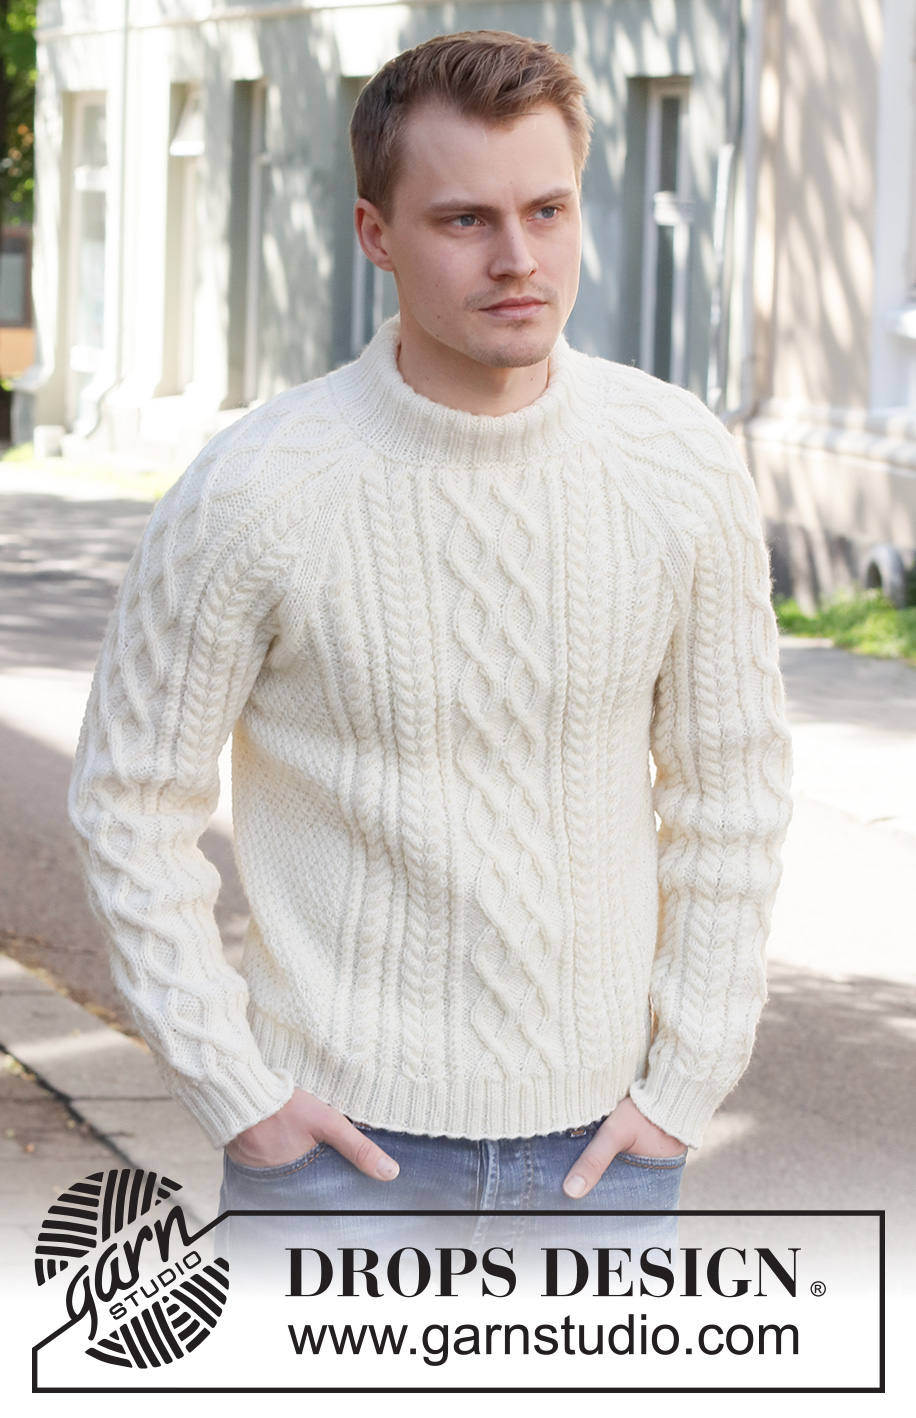
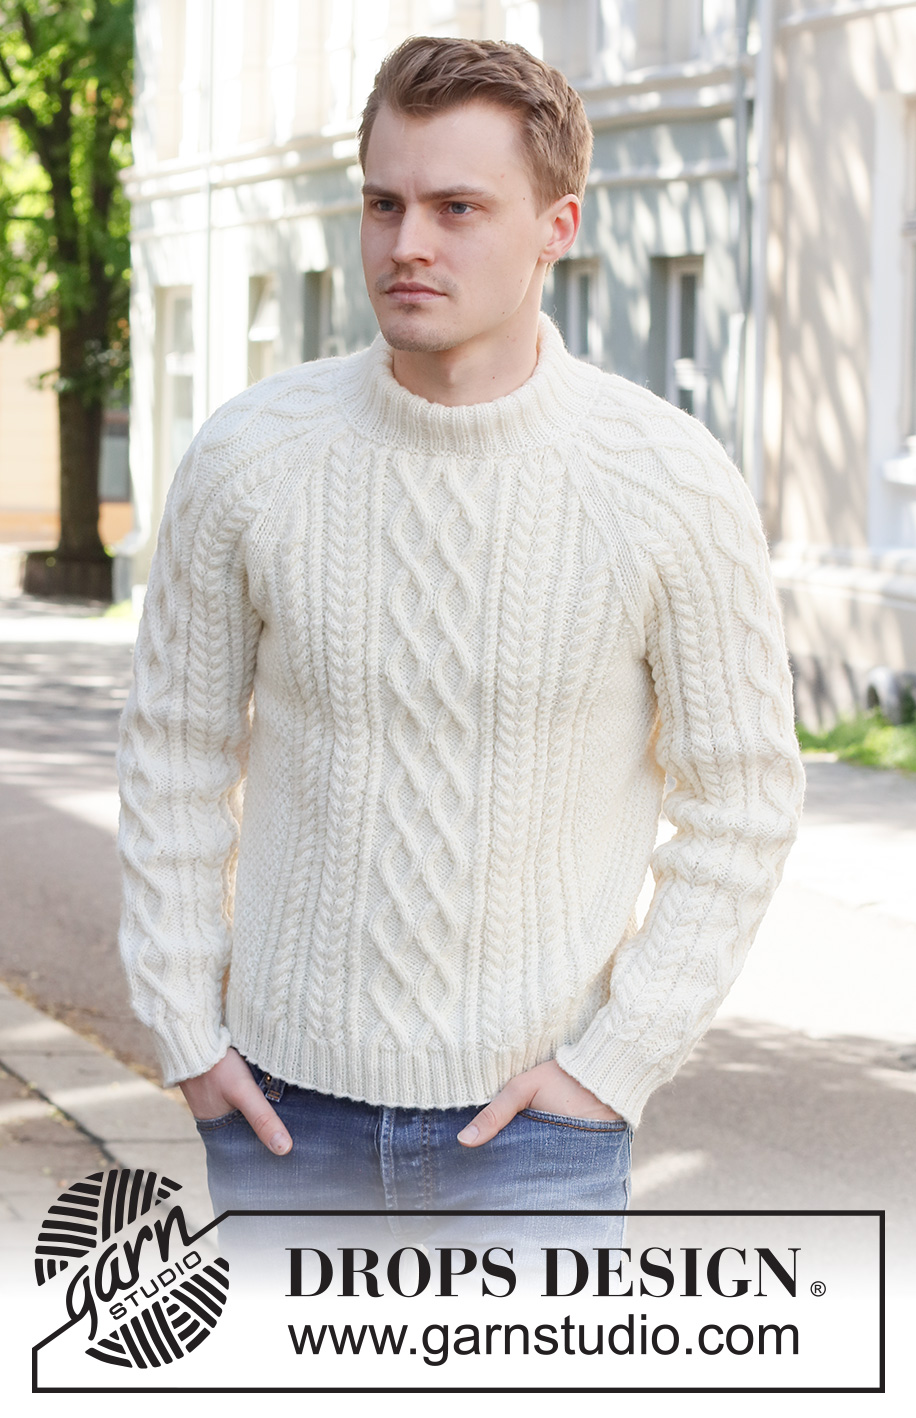
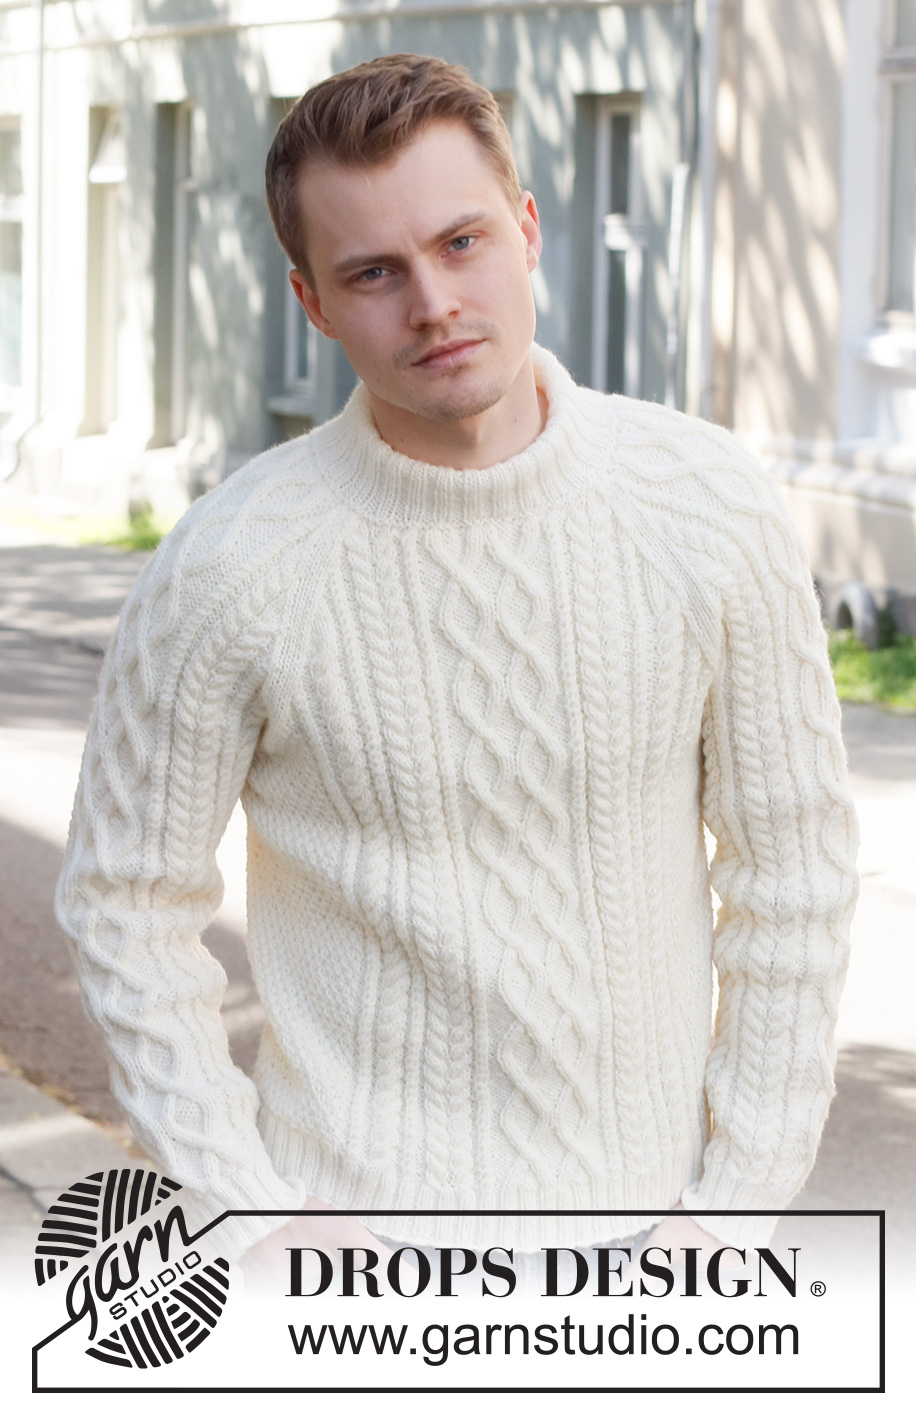
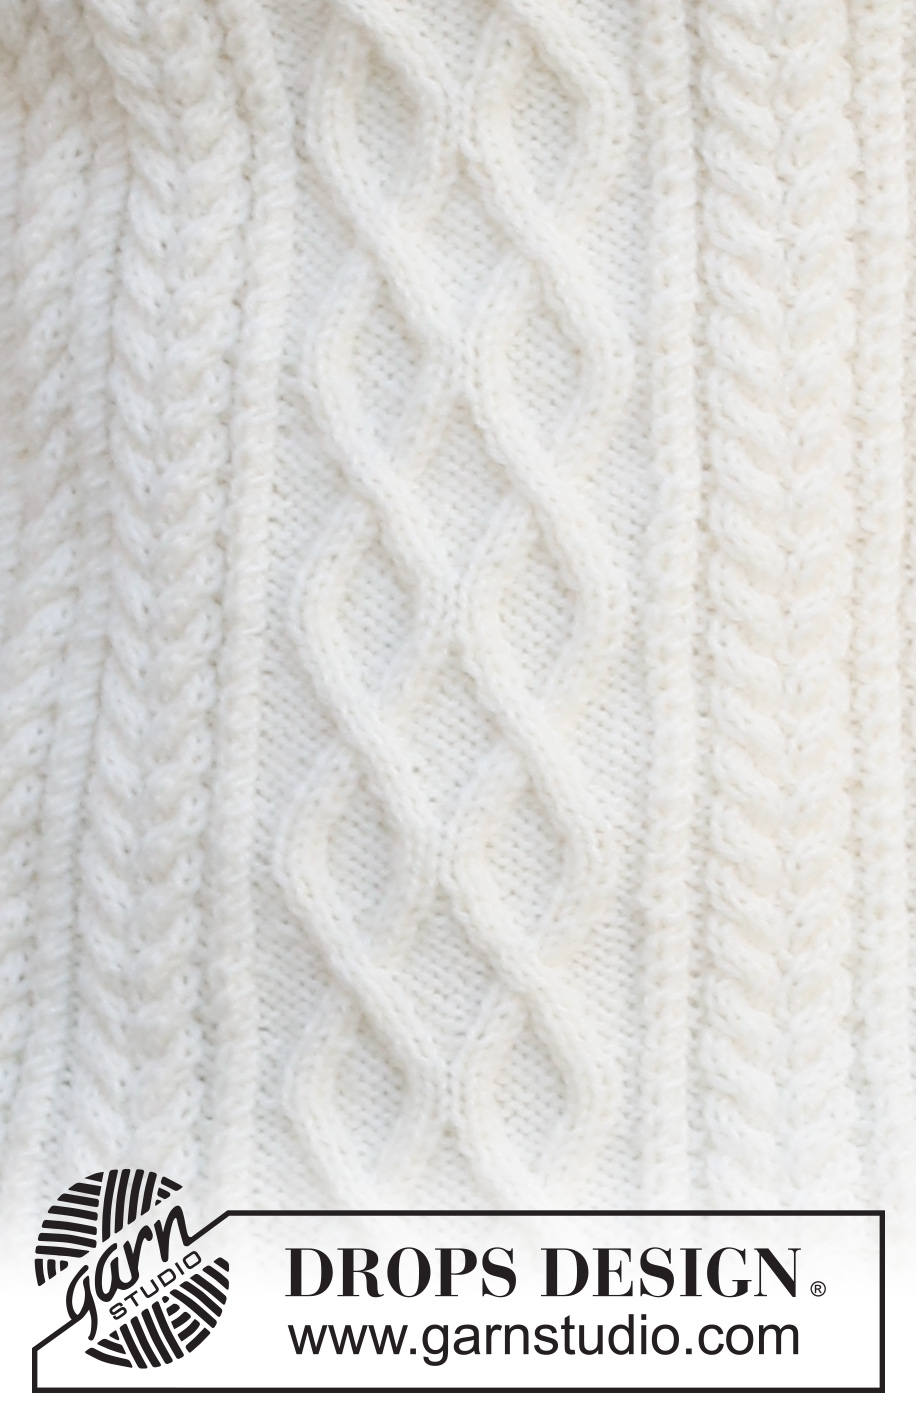
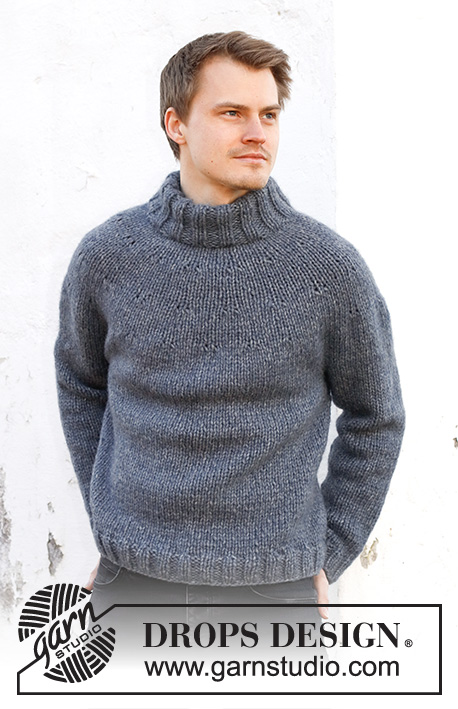
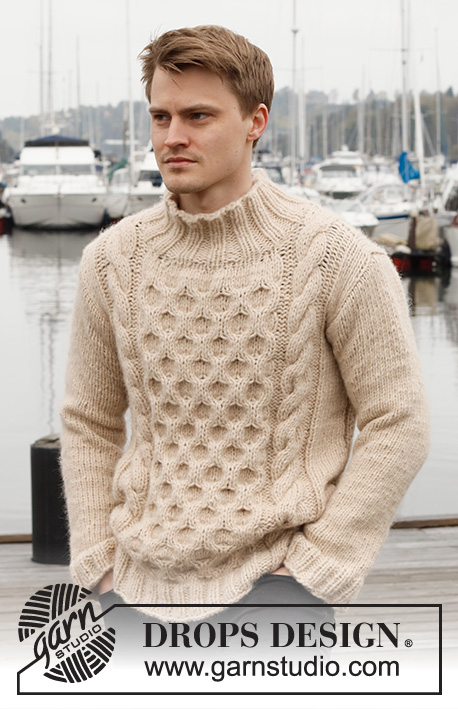
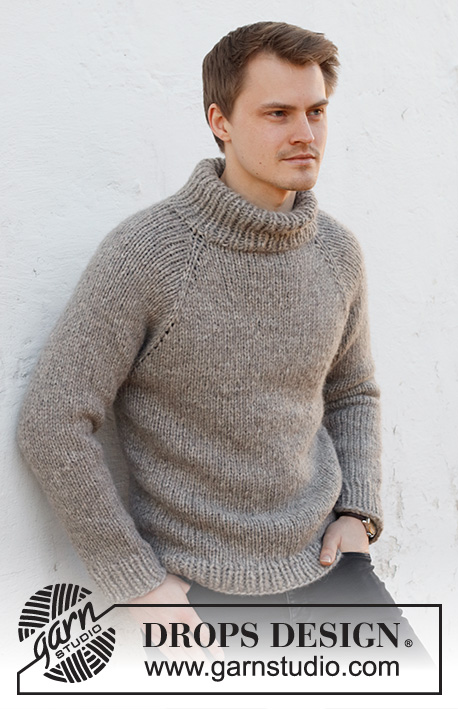
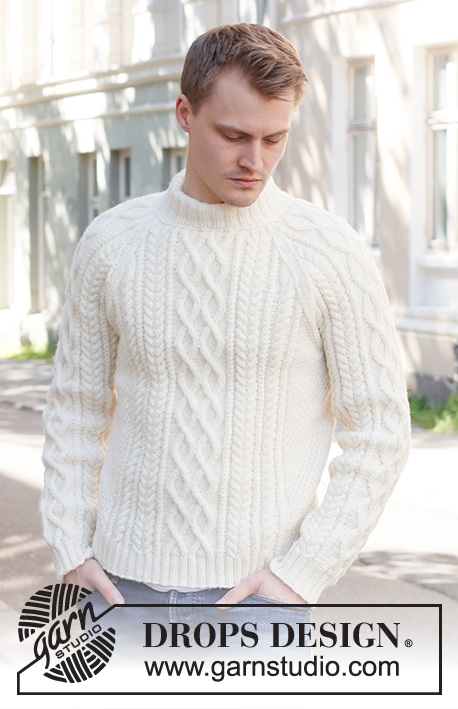
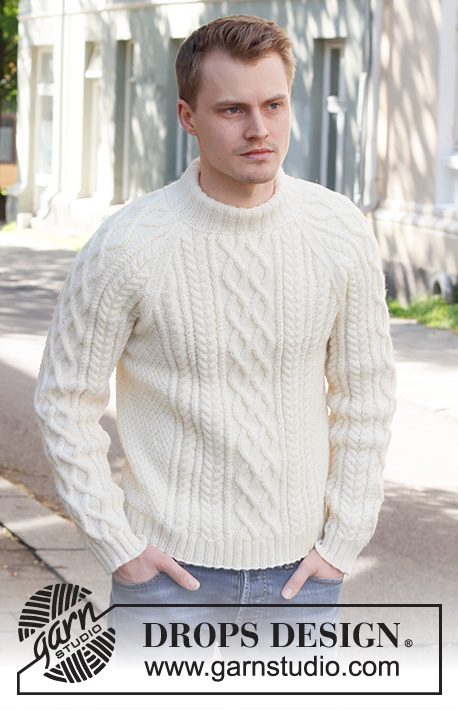
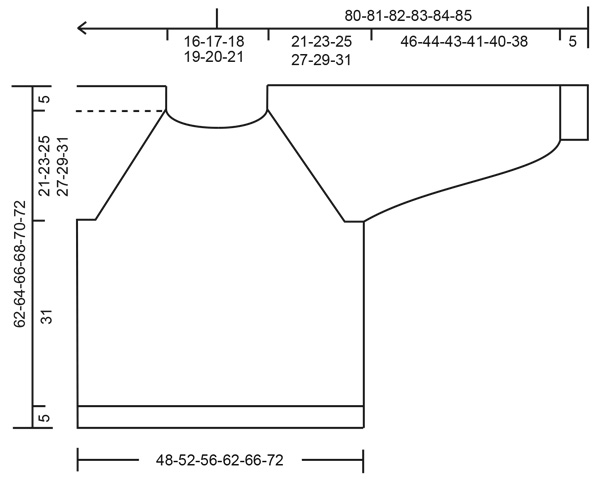
Knitted jumper for men in DROPS Karisma. The piece is worked with raglan, cables and double neck. Sizes S - XXXL.
DROPS 224-10 |
|||||||||||||||||||||||||||||||
|
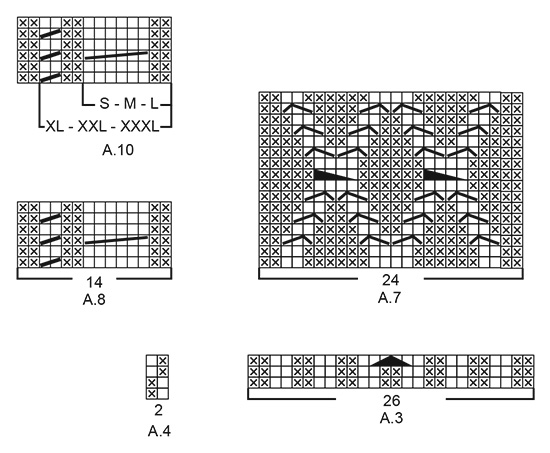
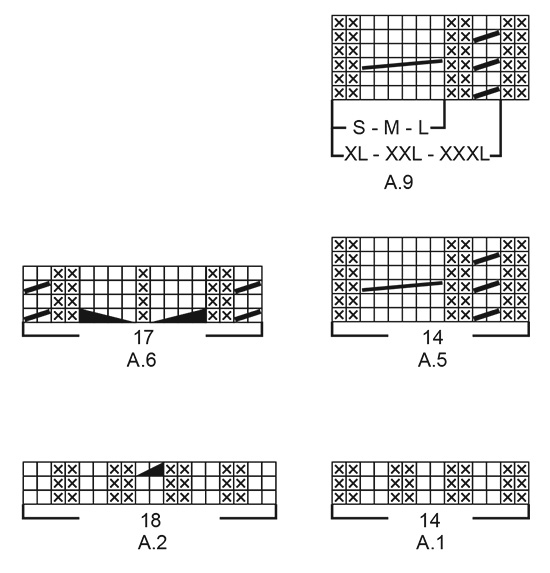
------------------------------------------------------- EXPLANATIONS FOR THE PATTERN: ------------------------------------------------------- KNITTING TIP: In sizes XL, XXL and XXXL, there will be 4 purl stitches next to each other when A.1 is worked 2 times in width. So the rib will match under A.5/A.8, which is worked after the rib. PATTERN: See diagrams A.1 to A.10. The diagrams show all rows in the pattern from the right side. DECREASE/INCREASE TIP (evenly spaced): To work out how to decrease/increase evenly, count the number of stitches to be decreased/increased over (e.g. 23 stitches), and divide by the number of decreases/increases to be made (e.g. 6) = 3.8. In this example, decrease by knitting together approx. each 3rd and 4th stitch. When increasing, make 1 yarn over after approx. each 4th stitch. On the next round work the yarn overs twisted to avoid holes. INCREASE TIP (sleeves): Increase 2 stitches under the sleeve by making 1 yarn over on each side of the marker-stitch as follows: Work the marker-stitch (always the first stitch in A.4), 1 yarn over, pattern as far as the marker-stitch, 1 yarn over (= 2 stitches increased). On the next round work the yarn overs twisted to avoid holes. Then work the new stitches into A.9/A.10 until you have room for a complete repeat, then work the stitches in A.4. RAGLAN: Decrease to raglan on each side of the marker, in each transition between body and sleeves as follows. FROM RIGHT SIDE: AFTER THE MARKER: Knit 1, slip 1 stitch as if to knit, knit 1 and pass the slipped stitch over the knitted stitch (= 1 stitch decreased) BEFORE THE MARKER: Work until there are 3 stitches left before the marker, knit 2 together, knit 1 (= 1 stitch decreased). FROM WRONG SIDE: AFTER THE MARKER: Purl 1, purl 2 together (= 1 stitch decreased) BEFORE THE MARKER: Work until there are 3 stitches left before the marker, purl 2 twisted together, purl 1 (= 1 stitch decreased). ------------------------------------------------------- START THE PIECE HERE: ------------------------------------------------------- JUMPER – SHORT OVERVIEW OF THE PIECE: The body is worked in the round with circular needle as far as the armholes. The sleeves are worked in the round with double pointed needles/short circular needle, bottom up. The body and sleeves are placed on the same circular needle and the yoke worked, decreasing to raglan at the same time. Stiches are cast off for the neck mid-front and the piece continued back and forth. The neck is worked to finish. BODY: Cast on 272-288-304-344-360-392 stitches with circular needle size 3.5 mm and DROPS Karisma. Knit 1 round. Then work the following rib: Purl 1, knit 2, * purl 2, knit 2 *, work from *-* over the next 20-24-28-24-28-36 stitches, work A.1 over the next 14-14-14-28-28-28 stitches (= 1-1-1-2-2-2 repeats of 14 stitches – read KNITTING TIP), A.2 (= 18 stitches), A.3 (= 26 stitches), A.2, A.1 over the next 14-14-14-28-28-28 stitches (= 1-1-1-2-2-2 repeats of 14 stitches – read KNITTING TIP), * knit 2, purl 2 *, work from *-* over the next 44-52-60-52-60-76 stitches, knit 2, A.1 over the next 14-14-14-28-28-28 stitches – remember KNITTING TIP, A.2, A.3, A.2, A.1 over the next 14-14-14-28-28-28 stitches – remember KNITTING TIP, * knit 2, purl 2 *, work from *-* over the next 20-24-28-24-28-36 stitches, knit 2 and purl 1. Continue this rib – NOTE: In diagrams A.2 and A.3 repeat the first 2 rounds onwards. When 1 round remains before the piece measures 5 cm, decrease stitches as follows: Work stocking stitch over the first 23-27-31-27-31-39 stitches and decrease 6-6-6-6-6-8 stitches evenly over these stitches – read DECREASE/INCREASE TIP, work A.1 as before over the next 14-14-14-28-28-28 stitches, work the last round in A.2 (= 18 stitches, 1 stitch decreased), work the last round in A.3 (= 26 stitches, 2 stitches decreased), work the last round in A.2 (= 18 stitches, 1 stitch decreased), A.1 as before over the next 14-14-14-28-28-28 stitches, work stocking stitch over the next 46-54-62-54-62-78 stitches and decrease 13-13-13-13-13-17 stitches evenly over these stitches, A.1 as before over the next 14-14-14-28-28-28 stitches, work the last round in A.2 (= 18 stitches, 1 stitch decreased), work the last round in A.3 (= 26 stitches, 2 stitches decreased), work the last round in A.2 (= 18 stitches, 1 stitch decreased), A.1 as before over the next 14-14-14-28-28-28 stitches, work stocking stitch over the last 23-27-31-27-31-39 stitches and decrease 7-7-7-7-7-9 stitches evenly over these stitches = 238-254-270-310-326-350 stitches. The rib is now finished. Insert 1 marker in the first stitch and 1 marker in the 120th-128th-136th-156th-164th-176th stitch (= sides). Allow these markers to follow your work onwards; they are used when casting off for the armholes. Change to circular needle size 4.5 mm. Work the next round as follows: A.4 over the first 17-21-25-21-25-31 stitches, A.5 over the next 14-14-14-28-28-28 stitches (= 1-1-1-2-2-2 repeats of 14 stitches), A.6 (= 17 stitches), A.7 (= 24 stitches), A.6, A.8 over the next 14-14-14-28-28-28 stitches (= 1-1-1-2-2-2 repeats of 14 stitches), A.4 over the next 33-41-49-41-49-61 stitches (marker sits in the middle of these stitches), A.5 over the next 14-14-14-28-28-28 stitches, A.6, A.7, A.6, A.8 over the next 14-14-14-28-28-28 stitches and A.4 over the last 16-20-24-20-24-30 stitches. Continue this pattern. REMEMBER THE KNITTING TENSION! When the piece measures 36 cm in all sizes, cast off for the armholes as described below. There is approx. 26-28-30-32-34-36 cm left to finished length. Adjust so that next round is an odd numbered row in the diagrams, and cast off the first 6-6-7-7-8-8 stitches, continue the pattern until there are 5-5-6-6-7-7 stitches left before the second marker-stitch, cast off 11-11-13-13-15-15 stitches, work until there are 5-5-6-6-7-7 stitches left on the round and cast off 5-5-6-6-7-7 stitches = 108-116-122-142-148-160 stitches on the front piece and 108-116-122-142-148-160 stitches on the back piece. Cut the strand. Lay the piece to one side and work the sleeves. SLEEVES: Cast on 56-60-60-64-64-68 stitches with double pointed needles size 3.5 mm and DROPS Karisma. Knit 1 round, then work rib in the round (knit 2, purl 2) for 5 cm. Knit 1 round where you increase 19-15-15-19-19-15 stitches evenly spaced – remember DECREASE/INCREASE TIP = 75-75-75-83-83-83 stitches. Insert 1 marker in the first stitch – allow the marker to follow your work onwards; it is used when increasing under the sleeve. Change to double pointed needles size 4.5 mm. Work the next round with pattern as follows: A.4 over the first stitch (marker-stitch), A.9 (= 8-8-8-12-12-12 stitches – start the diagram by the mark for your size and work from right to left), A.6 (= 17 stitches), A.7 (= 24 stitches), A.6, A.10 (= 8-8-8-12-12-12 stitches – start at the first stitch in A.10 and work from right to left as far as the mark for your size). Continue this pattern. When the piece measures 8-10-7-8-9-6 cm, increase 2 stitches under the sleeve – read INCREASE TIP. Increase like this every 4-2½-2½-2½-2-2 cm a total of 11-15-17-15-17-19 times = 97-105-109-113-117-121 stitches – NOTE: The increased stitches are first worked in A.9/A.10 until there is room for a complete repeat, then worked in A.4. Continue working until the sleeve measures approx. 51-49-48-46-45-43 cm (shorter measurements in larger sizes due to wider neck and longer yoke). Try the sleeve on and work to desired length. Adjust so that the next round is an odd numbered row in the diagrams and cast off for the armhole as follows: Cast off the first 6-6-7-7-8-8 stitches, work as before until there are 5-5-6-6-7-7 stitches left and cast off the last 5-5-6-6-7-7 stitches = 86-94-96-100-102-106 stitches. Cut the strand. Work the other sleeve in the same way. YOKE: Place the sleeves on the same circular needle size 4.5 mm as the body, where stitches were cast off for the armholes (without working the stitches) = 388-420-436-484-500-532 stitches. Insert a marker thread in each transition between the body and sleeves = 4 marker threads. Allow the threads to follow your work onwards; they are used when decreasing to raglan. Start at the transition between the back piece and the left sleeve – you can insert a marker here to show the start of the round. Continue the pattern as before, with 2 stitches in stocking stitch on each side of all 4 marker threads. OVERVIEW OF THE NEXT SECTION: On the next round start to decrease to raglan; you will also cast off stitches for the neck mid-front and finish working back and forth from mid-front. When there are not enough stitches for the cables, work stocking stitch over these stitches. Read RAGLAN and NECK before continuing. RAGLAN: Decrease to RAGLAN on each side of all 4 marker threads – read description above. Decrease every 2nd round a total of 24-27-30-32-36-38 times, then every round 7-7-6-7-4-4 times. NECK: When the piece measures 55-57-59-60-62-64 cm (adjust so the next round is an odd round in the diagrams), decrease 6-6-6-10-10-10 stitches evenly over the middle 24-24-24-32-32-32 in front – remember DECREASE/INCREASE TIP. Then place the middle 30-32-34-42-46-54 stitches on a thread for the neck. Work to the beginning of the round. Cut the strand. Start from the wrong side, by the neck and continue the pattern back and forth. AT THE SAME TIME cast off at the beginning of each row from the neck as follows: 2 stitches 1 time and 1 stitch 1-1-1-2-2-2 times on each side. After all the decreases to raglan and neck there are 98-104-102-112-116-124 stitches on the needle. Cut the strand. DOUBLE NECK: Start mid-back and knit up 134-142-142-162-170-186 stitches around the neck (including the stitches on the thread and on the needle) with short circular needle size 3.5 mm and DROPS Karisma. On the next round decrease stitches to avoid the neck being too loose – knit 1 round and decrease to 104-108-112-116-120-124 stitches evenly spaced. Purl 1 round and knit 1 round. Work the next round as follows: Knit 1, * purl 2, knit 2 *, work from *-* until there are 3 stitches left, purl 2 and knit 1. Continue this rib until the neck measures 8-8-8-10-10-10 cm. On the next round increase all purl-2 to purl-3 by making 1 yarn over after each purled section (the yarn overs are purled twisted on the next round to avoid holes). Continue working until the neck measures 11-11-11-13-13-13 cm. Switch to circular needle size 4.5 mm and cast off loosely with knit over knit and purl over purl. Fold the neck double to the inside and sew down. To avoid the neck being tight and rolling outwards, it is important that the seam is elastic. ASSEMBLY: Sew the opening under each sleeve. |
|||||||||||||||||||||||||||||||
Diagram explanations |
|||||||||||||||||||||||||||||||
|
|||||||||||||||||||||||||||||||
 |
|||||||||||||||||||||||||||||||
 |
|||||||||||||||||||||||||||||||
 |
|||||||||||||||||||||||||||||||
Have you finished this pattern?Tag your pictures with #dropspattern #iceislandsweater or submit them to the #dropsfan gallery. Do you need help with this pattern?You'll find 29 tutorial videos, a Comments/Questions area and more by visiting the pattern on garnstudio.com. © 1982-2026 DROPS Design A/S. We reserve all rights. This document, including all its sub-sections, has copyrights. Read more about what you can do with our patterns at the bottom of each pattern on our site. |
|||||||||||||||||||||||||||||||


With over 40 years in knitting and crochet design, DROPS Design offers one of the most extensive collections of free patterns on the internet - translated to 17 languages. As of today we count 324 catalogues and 12290 patterns translated into English (UK/cm). 12290
We work hard to bring you the best knitting and crochet have to offer, inspiration and advice as well as great quality yarns at incredible prices! Would you like to use our patterns for other than personal use? You can read what you are allowed to do in the Copyright text at the bottom of all our patterns. Happy crafting!
Post a comment to pattern DROPS 224-10
We would love to hear what you have to say about this pattern!
If you want to leave a question, please make sure you select the correct category in the form below, to speed up the answering process. Required fields are marked *.