
Popular categories
Looking for a yarn?


Comments / Questions (113)
![]() Anita Christensen wrote:
Anita Christensen wrote:
Jeg kan ikke finde forhandlere med farve 56/grålilla i Danmark - hvilken farve vil I foreslå som erstatning? Tak og bedste hilsner, Anita Christensen
08.02.2020 - 20:27DROPS Design answered:
Hei Anita. Farge 56 grålilla er utgått fra vårt sortiment. Den nærmeste fargen er nok farge: Lilla mel mix 54 (noe mørkere enn 56). mvh DROPS design
10.02.2020 - 14:51
![]() Maja wrote:
Maja wrote:
Jeg vil gerne lave tasken med én farve. Hvor meget garn skal jeg så ca. bruge?
07.11.2019 - 16:54DROPS Design answered:
Hei Maja. Det har vi dessverre ikke oversikten over, men tipper rundt ca 400 gram. mvh DROPS design
11.11.2019 - 14:41
![]() Hengie wrote:
Hengie wrote:
Bonjour et merci pour la réponse précédente mais j'ai un nouveau problème Je viens de rentrer le sac et il est très beau mais après feutrage les trous ont disparu ! Peut-on sans risque faire des incisions dans la laine feutrée sinon la bandoulière ne peut pas être montée. ... Merci pour votre aide ...
02.07.2019 - 13:06DROPS Design answered:
Bonjour Hengie, nous n'avons pas d'expérience à ce propos, et, en fonction du poids mis dans le sac, il ne faudrait pas que les ouvertures se déchirent, essayez de bien retrouver ces trous (ils ne devraient pas être complètement fermés, raison pour laquelle on fait 2 jetés), et éventuellement, passez une aiguille dedans (quand le sac est encore humide) pour bien les repérer une fois secs. Bonnes finitions!
02.07.2019 - 14:58
![]() Hengie wrote:
Hengie wrote:
Bonjour Comment monter la bandoulière sur le sac , les explications se contentent de " passer le lien dans les trous " mais j'avoue ne pas comprendre le montage Doit on ensuite coudre les 2 extrémités du lien ou faire un noeud ou quoi ?
28.06.2019 - 02:56DROPS Design answered:
Bonjour Mme Hengie, effectivement, on enfile le lien dans les trous du sac, puis on coud les extrémités du lien entre elles sur l'intérieur du sac. Bonnes finitions!
28.06.2019 - 06:59
![]() Beate wrote:
Beate wrote:
Hallo, habe die Tasche gestrickt, sieht super aus. Habe jetzt gefilzt und auch bei mir sind alle Löcher " verschwunden ". Wieviele Löcher waren es ? Waren es insgesamt 8 um den Träger einzuziehen.
15.01.2019 - 20:49DROPS Design answered:
Liebe Beate, ja genau, es waren 8 Löcher. Viel Spaß beim stricken!
16.01.2019 - 08:21
![]() Monique wrote:
Monique wrote:
Magnifique modèle, facile à réaliser, bien conçu , ayant une bonne tenue et une fermeture efficace. Merci à l'équipe DROPS !
12.12.2018 - 10:22
![]() Anna wrote:
Anna wrote:
Ik heb een vraag over het aan elkaar naaien van de zijkanten van strook 3 aan de kopse kanten van stroken 1 en 2. Mijn proeflapje meet 17x23 naalden = 10x10 cm. Brei ik een kleurvlak van 20 steken en 34 naalden dan kom ik uit op 12x14,5-15 cm. Dat is een rechthoek, geen vierkant. Mijn vraag is: hoe naai ik de lange kanten van de rechthoek aan de korte kanten van stroken 1 en 2? Hartelijk dank alvast voor uw antwoord.
30.09.2018 - 08:48DROPS Design answered:
Dag Anna, Bij het vilten is de krimp in de lengte en de breedte verschillend, zodat de rechthoeken na het vilten vierkant zijn (evt. proeflapje vilten in de wasmachine!). Bij het aan elkaar naaien van de lange kanten tegen de korte kanten, zul je het werk een beetje uit moeten rekken, zodat het mooi past. Zorg ervoor dat de kleurovergangen mooi tegenover elkaar komen.
30.09.2018 - 20:58
![]() Barbara wrote:
Barbara wrote:
Witam, przed filcowaniem otwory na pasek i guzik były niewielkie a po sfilcowaniu niestety znikły. Martwi mnie szczególnie otwór na guzik. W jaki sposób go poszerzyć? Naciąć? Czy nie będzie się strzępić?
02.04.2018 - 20:52DROPS Design answered:
Witaj Basiu! Spróbuj namoczyć i rozciągnąć. W tym miejscu raczej bym nie przecinała. Pozdrawiam
02.04.2018 - 21:15
![]() Barbara wrote:
Barbara wrote:
Jednym z kolorów do wykonania torebki wymieniony jest kolor nr 56 szarofioletowy. Niestety w ofercie dropsa nie znalazłam takiego koloru. Skoro ten kolor jest nie dostępny to jakim kolorem go zastąpić.
08.12.2017 - 21:13DROPS Design answered:
Witam, ja osobiście zastąpiłabym go kolorem jasny szary (nr 03). Pozdrawiam
11.12.2017 - 06:38
![]() Ilse Kunze wrote:
Ilse Kunze wrote:
Ich habe mich, so glaube ich genau an die farbliche Anordnung der Streifen gehalten. Leider sind die Farben nicht so angeordnet wie auf dem Bild. Eine Farbe des jeweiligen Seitenteils stößt mit der gleichen Farbe des Vorder- u. Rückenteils zusammen. Ergibt 3 gleiche Farbfelder nebeneinander. Was habe ich falsch gemacht?
21.10.2017 - 01:24DROPS Design answered:
Liebe Frau Kunze, es sollte nicht so sein, bitte die Farben jeder Streife und die Anordnung (und Strickrichtung) prüfen. Viel Spaß beim stricken!
23.10.2017 - 09:35
|
|||||||
Anatolia#anatoliabag |
|||||||
|
|
|||||||
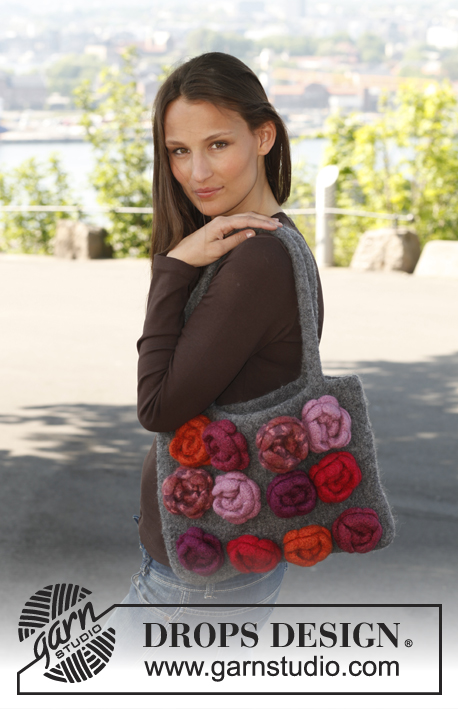
Felted DROPS bag in ”Alaska”.
DROPS 140-33 |
|||||||
|
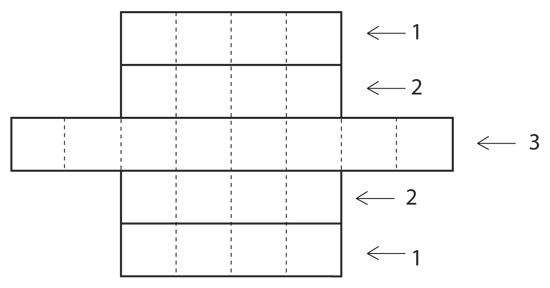
BAG: The entire bag is worked in stocking st, work 5 strips that are sewn tog when finished. STRIP 1 (make 2): Worked back and forth on circular needle. Cast on 20 sts on circular needle size 5 mm with colour no 54 and work 34 rows in each colour in the following order: Colour no 54, 53, 58, 37, cast off. STRIP 2 (make 2): Worked back and forth on circular needle. Cast on 20 sts on circular needle size 5 mm with colour no 56 and work 34 rows in each colour in the following order: Colour no 56, 11, 57, 45, cast off. STRIP 3 (make 1): Worked back and forth on circular needle. Cast on 20 sts on circular needle size 5 mm with colour no 45 and work 34 rows in each colour in the following order: Colour no 45, 57, 37, 58, 53, 54, 11, 56, cast off. Sew strips tog sideways – see figure for placement. Sew the rest of strip 3 to short side on strip 1 and 2 in each side. Knit up 200 sts around the upper edge of bag with colour no 23 on circular needle size 5 mm. Insert 1 marker in the middle st from one short side = beg of round. Work in stocking st in the round. When 3 cm have been worked, work as follows: K 8, 2 YO, K 2 tog, K 18, 2 YO, K 2 tog, K 38, 2 YO, K 2 tog, * K 18, 2 YO, K 2 tog *, repeat from *-* 3 times, K 38, 2 YO, K 2 tog, K 18, 2 YO, K 2 tog, K 10. On next row slip one YO off the needle and K the other YO – make sure that holes are made. Continue in stocking st. When piece measures 7 cm, work as follows: Cast off the first 40 sts on round, work 20 sts, cast off the remaining sts. Cut the thread. Work 28 rows in stocking st over the 20 sts, work next row as follows: Work 9 sts, 2 YO, K 2 tog, work the rest of row. On next row slip one YO off the needle and K the other YO – make sure that a hole is made. Work 5 rows in stocking st over all sts, cast off. TIE: Work a tube with 4 sts back and forth on circular needle size 5 mm as follows: Cast on 4 sts with colour no 23 and K 1 row. Then work as follows: * Slide all sts to the right side of needle without turning the piece, tighten thread and K over all sts *, repeat from *-* until tie measures 200 cm. Cut and fasten the thread. FELTING: The piece can be felted either in the washing machine or the tumble dryer – read description below. Remember: Subsequent washes are as for a normal wool garment. IN WASHING MACHINE: Washing machines will vary when felting. If the piece is not felted enough, it can be felted again. If it is felted too much, it can be stretched to the correct size while still wet. DO THE FOLLOWING: Lay the piece in the washing machine, using a programme of approx. 40 minutes (not a wool programme). Wash at 40 degrees without pre-wash, detergent is optional. After washing, shape the piece while it is still wet. IN TUMBLE DRYER: Felting in a tumble dryer gives good control over the degree of felting. The tumble dryer can be opened during drying to check the size of the piece. If it is not felted enough it can be thoroughly wetted and felted again. If it is felted too much it can be stretched to the correct size while still wet. DO THE FOLLOWING: Lay the piece in water so it becomes completely wet, then place it in the tumble dryer and begin the drying process. Dry to the desired size, checking regularly. Thread tie up and down the holes and tie ends tog inside the bag. Sew button on top of bag. |
|||||||
Diagram explanations |
|||||||
|
|||||||
 |
|||||||
Have you finished this pattern?Tag your pictures with #dropspattern #anatoliabag or submit them to the #dropsfan gallery. Do you need help with this pattern?You'll find 6 tutorial videos, a Comments/Questions area and more by visiting the pattern on garnstudio.com. © 1982-2026 DROPS Design A/S. We reserve all rights. This document, including all its sub-sections, has copyrights. Read more about what you can do with our patterns at the bottom of each pattern on our site. |
|||||||


With over 40 years in knitting and crochet design, DROPS Design offers one of the most extensive collections of free patterns on the internet - translated to 17 languages. As of today we count 324 catalogues and 12290 patterns translated into English (UK/cm). 12290
We work hard to bring you the best knitting and crochet have to offer, inspiration and advice as well as great quality yarns at incredible prices! Would you like to use our patterns for other than personal use? You can read what you are allowed to do in the Copyright text at the bottom of all our patterns. Happy crafting!
Post a comment to pattern DROPS 140-33
We would love to hear what you have to say about this pattern!
If you want to leave a question, please make sure you select the correct category in the form below, to speed up the answering process. Required fields are marked *.