
Popular categories
Looking for a yarn?






























Comments / Questions (13)
 Leroy wrote:
Bonjour, quand on compte les cms à partir du milieu dos, c'est donc après les augmentation, quand on commence le icord ? Merci beaucoup
20.10.2026 - 16:58DROPS Design answered:
Bonjour Mme Leroy, le milieu dos est au début de l'ouvrage, autrement dit, vous mesurez à partir du milieu du dos du bonnet, là où vous avez commencé le rond de l'arrière du bonnet (la hauteur totale que vous avez tricoté depuis le début). Bon tricot!
21.10.2026 - 10:01
 Lena Hammarstrand wrote:
Ang de förkortade varven vid ökningen och minskning av örat. Hur många maskor ska stickas vid andra och tredje gången? Det står bara " fler och fler", "färre och färre". Första gången enl beskrivning efter ökning " sticka 2 m vänd, sticka 7m" ska andra gången då vara " sticka 4 m vänd, sticka 9 m? Tredje gången " sticka 6 m vänd, sticka 11 m? Vid minskning, hur många maskor ska då stickas mindre? De öron jag stickat är hälften så stora som de på bilden
22.09.2026 - 08:19
Melanie wrote:
Bonjour, Comment adapter ce modèle de bonnet avec des Aiguilles circulaires?
22.09.2026 - 07:07DROPS Design answered:
Bonjour Mélanie, vous pouvez effectivement tricoter le dos du bonnet sur aiguille circulaire avec la technique du magic loop, mais comme c'est un béguin, on continue ensuite à tricoter en allers et retours pour former le dessus du bonnet d'un côté à l'autre (du bas d'un côté en passant au-dessus de la tête jusqu'à l'autre côté). Bon tricot!
23.09.2026 - 07:29
 Melanie wrote:
Jeg forstår ikke helt denne del: “2 masker I-CORD – læs forklaring over, strik retstrik over de resterende masker, efter sidste maske samles der 1 maske op i hver af de 2 første i-cord masker på omgangen = 56-62-74-80-86-93-100 masker.” Hvordan laver jeg udtagning i begyndelsen af omgangen efter jeg har strikket hele pinden? Jeg læser: 2 m I-C (70 m tilbage). Ret hele pinden (2 m tilbage). Hvad så nu?
14.09.2026 - 21:09DROPS Design answered:
Hej Melanie, du strikker da 2 masker op i de første 2 icord masker du lavede, vender arbejdet og strikker tilbage i retstrik og 2 masker i-cord i hver side :)
17.09.2026 - 08:28
 Feby wrote:
I still don’t understand, how do I pick up one stitch in each of the I-cord stitch?
21.08.2026 - 08:21
Feby wrote:
What does it mean by 'After the last stitch, pick up 1 stitch in each of the 2 I-cord stitches on the round = 56-62-74-80-86-93-100 stitches.'? Do you mean by increasing a stitch on each side? but where and how please?
20.08.2026 - 15:30DROPS Design answered:
Dear Feby, you hwe worked the first 2 stitches as I-cord stitches, then knit the remaining stitches, now pick up 1 stitch in each of the first 2 stitches of the row (the 2 I-cord sts) at the beginning of the row (so that the I-cord will be "joined" together on mid back), then work these 2 sts as I-cord sts, so that you get 2 I-cord in each side. You will increase a total of 2 sts at the end of the first row. Now turn and work back and forth in garter stitch with 2 I-cord in each side. Happy knitting!
21.08.2026 - 06:46
Lena wrote:
Förstår inte mönstret efter ökningarna är klara "Sticka 2 maskor i-cord, 2 varv rätstickning, sticka 2 räta tillsammans, gör 1 omslag om stickan, sticka rätstickning tills det återstår 5 maskor, gör 1 omslag om stickan, sticka 2 räta tillsammans, 2 varv rätstickning, 2 maskor i-cord. " 2 varv rätstickning, ska de stickas över hela varvet eller bara över de 2 I-cord maskorna? Om över hela varvet då görs hålen över I-cord Ska det vara 2 maskor?
19.08.2026 - 13:05DROPS Design answered:
Hej Lena. Det var dessvärre fel i den svenska översättningen - det är nu rättat. (Det ska vara: "Sticka 2 maskor i-cord, 1 maska rätstickning, sticka 2 räta tillsammans, gör 1 omslag om stickan, sticka rätstickning tills det återstår 5 maskor, gör 1 omslag om stickan, sticka 2 räta tillsammans, 1 maska rätstickning, 2 maskor i-cord. ") Mvh DROPS Design
24.08.2026 - 11:07
 Rocío wrote:
Hola! Antes que nada deciros que me encantan vuestras lanas y que las uso mucho pero tengo dificultades en entender perfectamente vuestros patrones. Por ejemplo, qué significa levantar una lazada en este patrón del gorro? Gracias
04.08.2026 - 11:18DROPS Design answered:
Hola Rocío, levantar 1 lazada = hacer 1 lazada/hebra, es decir, aumentar 1 punto.
23.08.2026 - 23:48
 Patrycja wrote:
Zu Rundnadel Nr. 3 wechseln und wie folgt stricken: 2 M. I-CORD (siehe oben), kraus rechts über die restlichen M. , nach der letzten Masche je 1 Masche aus den 2 ersten I-Cord-Maschen der Runde auffassen = 56 Maschen. Nun wenden und die Arbeit in Hin- und Rück-Reihen weiterstricken. Oben steht: am Ende der Reihe auch 2 I-cord Maschen und nicht zu Ende kraus rechts? Wie 2 M. Aus der ersten I-Cord M. aufnehmen? Bei der Rückreihe auch 2 M. immer aufnehmen?
26.07.2026 - 10:57
 Nour wrote:
Hi! Thanks a lot for the beautiful pattern One question about the short rows, in the first point of increasing ears, for the first turn, do we turn all the way back to the beginning of the piece or just 7 stitch (as in the second ear)? If we have to go back all the way it seems to me that one side will grow longer than the other, unless I'm missing something? Thanks in advance for your reply
10.07.2026 - 11:23DROPS Design answered:
Dear Nour, there is a mistake in the pattern, you only work back over 7 stitches, as in the 2nd ear. We will correct it as soon as possible. Happy knitting!
13.07.2026 - 00:05
|
|
Cocoa Dream Bonnet#cocoadreambonnet |
|
 |
 |
Knitted bonnet with ears, for babies and children in DROPS Alpaca. The piece is worked in garter stitch with picot cast-off and I-cord. Sizes: Premature – 4 years.
DROPS Baby 51-1 |
|
|
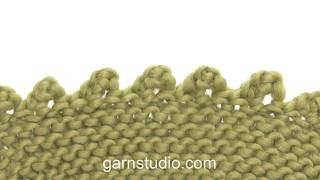
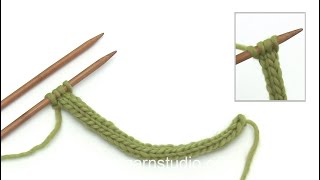
------------------------------------------------------- EXPLANATIONS FOR THE PATTERN: ------------------------------------------------------- GARTER STITCH (worked in the round): Alternately knit 1 round and purl 1 round. 1 ridge vertically = 2 rounds. GARTER STITCH (worked back and forth): Knit all rows. INCREASE TIP: Increase by making 1 yarn over after each marker-stitch. When working in the round, purl the yarn-over twisted on the next round. When working back and forth, knit the yarn over twisted on the next row. I-CORD: BEGINNING OF ROW: Slip 1 stitch purl-wise with yarn in front, knit 1. END OF ROW: Work until there are 2 stitches left on the row, slip 1 stitch purl-wise with yarn in front, knit 1. Work like this from both the right and wrong side. ------------------------------------------------------- START THE PIECE HERE: ------------------------------------------------------- BONNET – SHORT OVERVIEW OF THE PIECE: The piece is started in the round with double pointed needles, from mid-back while increasing. Then continue back and forth with I-cord on each side, while working holes for the ties on each side. Stitches are increased and decreased for the ears. Cast off with picot to finish. The ties are worked with tube-knit, then threaded through the holes. BONNET: Cast on 12-12-12-12-12-14-14 stitches with double pointed needles size 3 mm and DROPS Alpaca; leave a strand-end of 20 cm, which is later used to close the hole. Divide the stitches onto 4 needles. Insert 6-6-6-6-6-7-7 markers, one in every 2nd stitch. Work GARTER STITCH in the round – read explanation above, and increase 6-6-6-6-6-7-7 stitches every 2nd round (every knitted round) 7-8-10-11-12-11-12 times – read INCREASE TIP = 54-60-72-78-84-91-98 stitches. After the increases the piece measures approx. 3-3-4-4½-5-4½-5 cm. Change to circular needle size 3 mm and continue back and forth as follows: Work 2 stitches I-CORD – read explanation above, then garter stitch across the remaining stitches. After the last stitch, pick up 1 stitch in each of the 2 I-cord stitches on the round = 56-62-74-80-86-93-100 stitches. Turn and continue GARTER STITCH back and forth with 2 stitches I-cord on each side. At the same time, work holes for the ties on each side as follows: Work 2 stitches I-cord, 1 garter stitch, knit 2 together, make 1 yarn over, work garter stitch until there are 5 stitches left, work 1 yarn over, knit 2 together, 1 garter stitch and 2 stitches I-cord. On the next row, knit the yarn overs to leave holes. Continue working holes like this every 2 cm to finished length. AT THE SAME TIME, when the piece measures 5½-5½-7-7½-8-8½-9 cm from mid-back, work ears as follows. EARS: FROM WRONG SIDE: Work 20-22-28-30-33-35-38 stitches, insert 1 marker in the next stitch (mid-ear), knit 14-16-16-18-18-21-22 (head), insert 1 marker in the next stitch (mid-ear), work 20-22-28-30-33-35-38 stitches. INCREASE EARS: FROM RIGHT SIDE: Work to first mid-ear-stitch, make 1 yarn over, knit the mid-ear-stitch, make 1 yarn over, work to the second mid-ear-stitch, make 1 yarn over, knit the mid-ear-stitch, make 1 yarn over, work to end of row. Turn and work back, knitting the yarn-overs twisted from the wrong side. Increase like this 1 more time = 64-70-82-88-94-101-108 stitches. INCREASE EARS, POINTS 1-4: 1. FROM RIGHT SIDE: Work to first mid-ear-stitch, make 1 yarn over, knit the mid-ear-stitch, make 1 yarn over, knit 2. Turn and work 7 stitches at the same time, knit the yarn overs twisted (= 2 new ear-stitches). Turn. 2. FROM RIGHT SIDE: Work to first mid-ear-stitch, make 1 yarn over, knit the mid-ear-stitch, make 1 yarn over, knit to the second mid-ear-stitch, make 1 yarn over, knit the mid-ear-stitch, make 1 yarn over, knit 2 (2 new ear-stitches on each ear). Turn, work 7 stitches (yarn-overs knitted twisted. Turn. 3. FROM RIGHT SIDE: Work to second mid-ear-stitch, make 1 yarn over, knit the mid-ear-stitch, make 1 yarn over, work to end of row (= 2 new stitches on the 2nd ear). Turn. 4. FROM WRONG SIDE: Work across all stitches. There are 9 stitches on each ear = 72-78-90-96-102-109-116 stitches. Work POINTS 1-4 a total of 3-3-3-3-3-4-4 times, increasing as above on each side of the mid-ear-stitches; the short rows have more and more stitches. After all the increases there are 17-17-17-17-17-21-21 stitches on each ear = 88-94-106-112-118-133-140 stitches. DECREASE EARS, POINTS 1-3: 1. FROM RIGHT SIDE: Work until there are 8-8-8-8-8-10-10 stitches left before the first mid-ear-stitch, knit 6-6-6-6-6-8-8, knit 2 together, knit the mid-ear-stitch, knit 2 together, knit 6-6-6-6-6-8-8 (= 2 stitches less for the ear). Turn and work the 15-15-15-15-15-19-19 stitches from the wrong side. Turn. 2. FROM RIGHT SIDE: Work 5-5-5-5-5-7-7 stitches, knit 2 together, knit the mid-ear-stitch, knit 2 together, knit until there are 8-8-8-8-8-10-10 stitches left before the 2nd mid-ear-stitch, knit 6-6-6-6-6-8-8, knit 2 together, knit the mid-ear-stitch, knit 2 together, work 6-6-6-6-6-8-8 stitches (= 2 stitches less for each ear). Turn and work 15-15-15-15-15-19-19 stitches back from the wrong side. Turn. 3. FROM RIGHT SIDE: Work 5-5-5-5-5-7-7 stitches, knit 2 together, knit the mid-ear-stitch, knit 2 together, work to end of row (= 2 stitches less for the ear). Turn and work back across all stitches. There are 13-13-13-13-13-17-17 stitches on each ear = 80-86-98-104-110-125-132 stitches. Work POINTS 1-3 a total of 3-3-3-3-3-4-4 times, decreasing on each side of the marker-stitches; the short rows have fewer and fewer stitches. After all the decreases there are 5 stitches on each ear = 64-70-82-88-94-101-108 stitches. Continue with I-cord, garter stitch and the holes for the ties while working as follows: DECREASE FROM RIGHT SIDE: Work until there are 2 stitches left before the first mid-ear-stitch, knit 2 together, knit the mid-ear-stitch, knit 2 together, knit until there are 2 stitches left before the second mid-ear-stitch, knit 2 together, knit the mid-ear-stitch, knit 2 together, work to end of row (4 decreased stitches). Work like this a total of 4 times, on each row from the right side = 48-54-66-72-78-85-92 stitches. FRONT SECTION: Work garter stitch, I-cord and holes until the piece measures 10-11-12,5-13,5-14-15-16 cm from mid-back. On the last row from the wrong side adjust the stitch count to 49-53-65-73-77-85-93 stitches. PICOT CAST-OFF: Cast off loosely from the right side: PART-1: Knit 1, *insert the right needle between the next 2 stitches on the left needle (NOTE! between the stitches, not through the stitches), make 1 yarn over and pull it between the stitches, then place it on the left needle*, work from *-* 2 more times (3 new stitches on the left needle). Continue with part-2. PART-2: *Knit the first stitch on the left needle, pass the next stitch on the right needle over the knitted stitch (1 decreased stitch) *, work from *-* a total of 6 times, then repeat part-1 and part-2 until there is 1 stitch left, cut the strand and pull it through the last stitch. ASSEMBLY: Use the cast-on strand and tack it through each cast-on stitch, then tighten to close the hole. Cut and fasten the strand. TIES: Work a tube of 4 stitches using double pointed needles size 3 mm as follows: Cast on 4 stitches. Knit 1 row. * Push the 4 stitches to the right-hand end of the needle without turning, tighten the strand and knit all 4 stitches *. Work from *-* until the tie measures 55-60-60-65-65-70-70 cm. Cut and fasten the strand. Thread the tie up and down through the row of holes along the sides of the bonnet. |
|
Have you finished this pattern?Tag your pictures with #dropspattern #cocoadreambonnet or submit them to the #dropsfan gallery. Do you need help with this pattern?You'll find 10 tutorial videos, a Comments/Questions area and more by visiting the pattern on garnstudio.com. © 1982-2026 DROPS Design A/S. We reserve all rights. This document, including all its sub-sections, has copyrights. Read more about what you can do with our patterns at the bottom of each pattern on our site. |
|






With over 40 years in knitting and crochet design, DROPS Design offers one of the most extensive collections of free patterns on the internet - translated to 17 languages. As of today we count 333 catalogues and 12532 patterns translated into English (UK/cm). 12521
We work hard to bring you the best knitting and crochet have to offer, inspiration and advice as well as great quality yarns at incredible prices! Would you like to use our patterns for other than personal use? You can read what you are allowed to do in the Copyright text at the bottom of all our patterns. Happy crafting!
Post a comment to pattern DROPS Baby 51-1
We would love to hear what you have to say about this pattern!
If you want to leave a question, please make sure you select the correct category in the form below, to speed up the answering process. Required fields are marked *.