
Popular categories
Looking for a yarn?


Comments / Questions (36)
![]() Alexandra wrote:
Alexandra wrote:
Le modèle est sympa et facile à réaliser même pour une débutante. Le résultat est à la hauteur de mes attentes. Ce fut mon premier ouvrage en crochet.
20.02.2026 - 07:41
![]() Ilona wrote:
Ilona wrote:
Wo finde ich die Häkelschrift ?
10.07.2025 - 17:41DROPS Design answered:
Liebe Ilona, Diagram finden Sie nach der schriftlichen Anleitung; hier wird erklärt, wie man ein Diagram liest. Viel Spaß beim Häkeln!
23.07.2025 - 15:20
![]() Ilona Nosti wrote:
Ilona Nosti wrote:
Ich finde keine Häkelschrift
10.07.2025 - 17:40
![]() Marine wrote:
Marine wrote:
Bonjour, Je souhaiterais augmenter la couverture pour qu\'elle ait une largeur finie de 1,9 m. j\'ai compris que je devais ajouter 280 mailles chainette au début mais je ne comprends pas très bien ce qui doit être répété dans le motif. D\'autres parts, quand j\'additionne l\'enchainement des mailles du premier rang sur le modèle, je n\'arrive pas au 194 m de la première chainette. Pourriez-vous m\'expliquer où est mon erreur de calcul ? Merci pour votre aide.
06.07.2025 - 09:10DROPS Design answered:
Bonjour Marine, notez que l'on crochète davantage de mailles en l'air que l'on a besoin de mailles au 1er rang car la chaînette de base est généralement plus serrée que le 1er rang, donc, pour compenser et conserver la bonne largeur, on a davantage de mailles en l'air et on en saute au 1er rang. Répétez la partie de *à* dans les explications écrites (C dans le diagramme= 28 ml de la chaînette de base mais 15 brides au 1er rang) autant de fois que nécessaire pour avoir la largeur souhaitée et ainsi élargir la couverture. Bon crochet!
23.07.2025 - 11:30
![]() Mrs Pe wrote:
Mrs Pe wrote:
Die letzten 4 Maschen können gut auf 2 reduziert werden, indem man nur jede 2. Masche 1 Stäbchen macht. Pro Zacke müssen müssen 24 Maschen gerechnet werden, dann klappt es!
24.05.2025 - 09:53
![]() Carla wrote:
Carla wrote:
Ganz kleine Korrektur: Am Anfang von Reihe 3 muss es heißen "A.1 B 1 x häkeln".
05.10.2024 - 00:00
![]() Gunvor wrote:
Gunvor wrote:
Rörig beskrivning. Vad hände med *-* vid upprepningar? Istället för att skriva "3lm, hoppa över en, 1st i nästa lm" 5ggr. Blir jättejobbigt att hålla koll annars
22.06.2024 - 08:15
![]() Anne wrote:
Anne wrote:
Hej Jeg har problemer med at få række 1 og 2 til at passe sammen. Jeg har i række 1 hæklet 3 stgm sprunget 1 lm over og hæklet 3 stgm. I række to skal der så hækles 8 stgm for at nå hen til lm buen, men der er jo kun hæklet 6 stgm mellem buerne i række 1. Hvad gør jeg forkert?
31.05.2024 - 12:09DROPS Design answered:
Hei Anne. Du avsluttet 1.rad slik: ...1 stangmaske i hver af de næste 3 luftmasker, spring over 1 luftmaske, 1 stangmaske i hver af de næste 3 luftmasker, spring over 1 luftmaske, 1 stangmaske i hver af de næste 3 luftmasker = 9 stangmasker. Snu arbeidet og hekle 2.rad slik: 3 luftmasker (disse 3 masker erstatter første stangmaske). Du har nå heklet i 1. stangmaske av de 9 stangmaskene, så hekler du 1 stangmaske i hver af de 8 næste stangmasker. Du har nå 10 stangmasker. Hekle 1 stangmaske om luftmaske-buen = 10 stangmasker før du skal hekle 3 luftmasker. mvh DROPS Design
03.06.2024 - 11:04
![]() Anne wrote:
Anne wrote:
Hej Jeg har problemer med at få række 1 og 2 til at passe sammen. Jeg har i række 1 hæklet 3 stgm sprunget 1 lm over og hæklet 3 stgm. I række to skal der så hækles 8 stgm for at nå hen til lm buen, men der er jo kun hæklet 6 stgm mellem buerne i række 1. Hvad gør jeg forkert?
31.05.2024 - 12:08
![]() Pina wrote:
Pina wrote:
Salve per realizzarla 100x180 quanti gomitoli occorrono? Grazie
19.11.2023 - 22:10DROPS Design answered:
Buonasera Pina, per un aiuto così personalizzato può rivolgersi al suo rivenditore DROPS di fiducia. Buon lavoro!
22.11.2023 - 18:10
|
||||||||||||||||
Catch the Rainbow#catchtherainbowblanket |
||||||||||||||||
 |
 |
|||||||||||||||
Crocheted blanket with zig-zags and stripes in DROPS Paris.
DROPS 209-2 |
||||||||||||||||
|
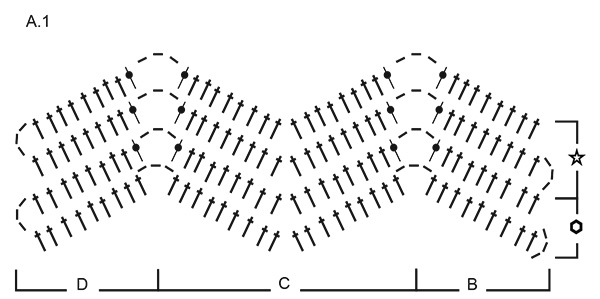
------------------------------------------------------- EXPLANATIONS FOR THE PATTERN: ------------------------------------------------------- CROCHET TIP: If you would like a wider blanket, cast on more repeats of zig-zags. One repeat measures approx. 11 cm in width. Cast on 28 more chain stitches for each zig-zag repeat. One extra repeat = 18 more treble crochets when row 1 is finished. PATTERN: See diagram A.1. STRIPES: Work 2 rows with each colour as follows: 2 rows with colour 64, amethyst 2 rows with colour 66, plum 2 rows with colour 62, sage green 2 rows with colour 25, moss green 2 rows with colour 61, lime 2 rows with colour 17, off white 2 rows with colour 41, mustard 2 rows with colour 65, rust 2 rows with colour 63, desert rose 2 rows with colour 61, lime 2 rows with colour 66, plum 2 rows with colour 17, off white 2 rows with colour 63, desert rose 2 rows with colour 62, sage green 2 rows with colour 41, mustard 2 rows with colour 64, amethyst 2 rows with colour 25, moss green 2 rows with colour 63, desert rose 2 rows with colour 65, rust 2 rows with colour 66, plum 2 rows with colour 41, mustard 2 rows with colour 17, off white 2 rows with colour 64, amethyst 2 rows with colour 61, lime 2 rows with colour 62, sage green 2 rows with colour 25, moss green 2 rows with colour 65, rust ------------------------------------------------------ START THE PIECE HERE: ------------------------------------------------------- BLANKET – SHORT OVERVIEW OF THE PIECE: The piece is worked back and forth. Pattern and stripes are worked simultaneously. BLANKET: Work 194 LOOSE chain stitches with hook size 4.5 mm and amethyst – read CROCHET TIP. See description of STRIPES above. Then work according to diagram A.1 where ROW 1 is worked as follows: 1 treble crochet in the 4th chain stitch from the hook, 1 treble crochet in each of the next 2 chain stitches, * skip 1 chain stitch, 1 treble crochet in each of the next 3 chain stitches, skip 1 chain stitch, 1 treble crochet in each of the next 3 chain stitches, 3 chain stitches, skip 1 chain stitch, 1 treble crochet in each of the next 3 chain stitches, skip 1 chain stitch, 1 treble crochet in each of the next 3 chain stitches, skip 1 chain stitch, 1 treble crochet in each of the next 3 chain stitches, skip 5 chain stitches, 1 treble crochet in each of the next 3 chain stitches *, repeat from *-* 5 more times, skip 1 chain stitch, 1 treble crochet in each of the next 3 chain stitches, skip 1 chain stitch, 1 treble crochet in each of the next 3 chain stitches, 3 chain stitches, skip 1 chain stitch, 1 treble crochet in each of the next 3 chain stitches, skip 1 chain stitch, 1 treble crochet in each of the next 3 chain stitches, skip 1 chain stitch, 1 treble crochet in each of the next 3 chain stitches = 127 treble crochets. There are 7 zig-zags in width. Turn the piece. ROW 2 IN THE DIAGRAM: 3 chain stitches (these 3 stitches replace the first treble crochet), * 1 treble crochet in each of the next 8 treble crochets, 1 treble crochet around the chain-space, 3 chain stitches, 1 treble crochet around the same chain-space, 1 treble crochet in each of the next 8 treble crochets, skip 2 treble crochets *, repeat from *-* 6 more times. Turn the piece. ROW 3 (change to plum): See diagram A.1. Work B one time, repeat C six times. Finish the row working D one time. ROW 4: See diagram A.1. Work D one time, repeat C six times and finish the row working B one time. Repeat ROWS 3 and 4 onwards at the same time as you remember work STRIPES as described above. When the stripes have been completed 1 time, repeat from the beginning. Continue until the piece measures 125 cm, or to desired length. Cut and fasten the strands. |
||||||||||||||||
Diagram explanations |
||||||||||||||||
|
||||||||||||||||
 |
||||||||||||||||
Have you finished this pattern?Tag your pictures with #dropspattern #catchtherainbowblanket or submit them to the #dropsfan gallery. Do you need help with this pattern?You'll find 8 tutorial videos, a Comments/Questions area and more by visiting the pattern on garnstudio.com. © 1982-2026 DROPS Design A/S. We reserve all rights. This document, including all its sub-sections, has copyrights. Read more about what you can do with our patterns at the bottom of each pattern on our site. |
||||||||||||||||


With over 40 years in knitting and crochet design, DROPS Design offers one of the most extensive collections of free patterns on the internet - translated to 17 languages. As of today we count 324 catalogues and 12290 patterns translated into English (UK/cm). 12290
We work hard to bring you the best knitting and crochet have to offer, inspiration and advice as well as great quality yarns at incredible prices! Would you like to use our patterns for other than personal use? You can read what you are allowed to do in the Copyright text at the bottom of all our patterns. Happy crafting!
Post a comment to pattern DROPS 209-2
We would love to hear what you have to say about this pattern!
If you want to leave a question, please make sure you select the correct category in the form below, to speed up the answering process. Required fields are marked *.