
Popular categories
Looking for a yarn?


























Comments / Questions (46)
 Helga Schreiner wrote:
Leider habe ich auf meine unten stehende Frage vom 12.7. nie eine Antwort bekommen
23.07.2026 - 12:17DROPS Design answered:
Liebe Frau Schreiner, wir entschuldigen uns für die verspätete Antwort, die auf die Sommerzeit und die Sommerferien zurückzuführen ist. Viel Spaß beim Stricken!
07.08.2026 - 06:55
Helga Schreiner wrote:
Hallo, ich versuche gerade dieses Tuch und komme mit der Beschreibung und dem Diagramm nicht zurecht. Habe die ersten drei in Worten beschriebenen Reihen gestrickt und 15 Maschen auf der Nadel. Zu Beginn des Diagramms bringe ich die 6 Rapporte aber nicht unter. Bitte um Beschreibung der ersten drei Muster-Hinreihen in Worten und die Maschenzahl an den Reihenenden. Danke!
12.07.2026 - 17:26DROPS Design answered:
Liebe Frau Schreiner, am besten benutzen Sie Markierer zwischen jedem Diagram Rapport, so können Sie auch am besten die Maschenanzahl bei jeder Reihe prüfen; so stricken Sie die 15 Maschen: 2 Krausrechte Maschen, dann stricken Sie 5 Mal A.1 (über 2 Maschen bei der 1. Reihe = 1 Umschlag, 1 M re, 1 Umschlag, 1 M re), dann stricken Sie A.1 noch einmal, nur nicht die letzte Masche (so wird das Muster symmetrisch) = 1 Umschlag, 1 M re,1 Umschlag; und am Enden der Reihen stricken Sie 2 krausrechte Maschen. Bei den Rückreihen lesen Sie das Diagram rechts nach links = Es wurde 2 M in jedem A.1 zugenommen = 15+(2x6)=29 M nach dieser Reihen. Es wird dann zugenommen, genauso wie im Diagram gezeigt. Viel Spaß beim Stricken!
07.08.2026 - 06:53
 Þóra wrote:
Á að prjóna munstur A.1b yfir A.6b þegar ég byrja á rönd 4 Passar ekki við lykkjufjölda.
13.04.2025 - 17:29DROPS Design answered:
Blessuð Þóra. 2 kantlykkjur + 21 lykkja A.1b + 21 lykkja A.1b + 2 kantlykkjur = 46 lykkjur yfir mynstur A.6b. Gangi þér vel.
13.04.2025 - 18:59
 Augusta Jensen wrote:
Hej. Forstår ikke at den sidste 1 m før 2 kantmasker skal med, så der er 2 kantmasker når man starter men 3 kantmasker til sidst. :-(
08.02.2024 - 05:23DROPS Design answered:
Hei Augusta. Når du har 15 masker på pinnen starter du med 2 kant-m (retstrik), så strikker du A.1a over 10 masker og for at det skal bli likt i begge sider, strikker du ikke siste maske av A.1a når du skal strikke A.1a siste gang. Du strikker kun 1 kast, 1 rett, 1 kast. Du har nå 2 masker igjen = 2 kant-m (i retstrik). Nå starter og slutter man med kast (før og etter de 2 kant maskene. mvh DROPS Design
16.02.2024 - 10:17
 Maria Gloria Zanardi wrote:
I started the first 3 step of Aurora Borealis. 3 doubts: when you say "all stitches in K" do you intend all, or just row 2?and when I start diagram 1a,4th row is to be knitted K or P? I should have 15 stitches, 2 garter, 6 yo and 6 k-2garter=27 st. But I end with 25...
26.11.2023 - 11:29DROPS Design answered:
Dear Maria, in the STRIPE 1, it indicates how to work each row. In ROW 2, it says K all sts, so you knit all of the stitches in that specific row. Since we work back and forth and the first row is from the right side, then the 4th row is from the wrong side and is purled. In the first row of A.1a you should have: 2 garter sts, then you work 5 repeats of A.1a, where you increase 2 stitches in each repeat (= 10 increases) and work A.1a again (with 2 increases, but worked over only one stitch) and 2 garter stitch stitches. So you have 2 + 5*4 (=20) (2 knit and 2 yarn overs in each repeat) +3 (1 knit and 2 yarn overs) + 2 sts in garter stitch = 27 in total. Happy knitting!
26.11.2023 - 22:38
Maria Gloria Zanardi wrote:
Ma se partiamo dal rovescio del lavoro facendo 3 ferri, come posso partire dallo schema sul diritto? Nello schema ci sono gettati che vanno sopra, altri gettati?
25.11.2023 - 14:46DROPS Design answered:
Buonasera Maria Gloria, il 3° ferro dell'inizio è sul rovescio del lavoro, quindi quello successivo in cui parte il motivo è sul diritto. Buon lavoro!
26.11.2023 - 23:15
 MO Diederiks wrote:
Welke driehoekjes?
19.03.2023 - 18:32DROPS Design answered:
Dag MO Diederiks,
De zwarte driehoekjes in het midden (1 steek afhalen, 2 samenbreien, de afgehaalde steek overhalen.
21.03.2023 - 21:18
MO Diederiks wrote:
"Brei dan A.6b en A.6a (let op dat U de minderingen recht boven elkaar maakt in de hoogte tot het werk klaar is) en minder tegelijkertijd in A.6b 4 steken gelijkmatig aan elke kant van de mindering in elke A.6b" Ik zie in het schema van A.6a en A.6b geen minderingen staan. Wat wordt er bedoeld?
18.03.2023 - 12:47DROPS Design answered:
Dag MO Diederiks,
Volgens mij wordt er bedoeld dat je de driehoekjes in het midden van het telpatroon boven elkaar hebt.
19.03.2023 - 16:35
 Perkele wrote:
On todella sekavasti selvitetty ohje, harmi kun alotin, hermot menee ......
27.06.2021 - 18:08
 GAUTHEROT wrote:
Bonjour , je crois que je viens de comprendre enfin !!! il était temps !! en faites 4 augm . oui il y a 2 augm a la 1ere ligne et 2 augm a la 7 eme ligne , donc il faut que je diminue a ces deux lignes-ci ? donc 2 mailles ensembles avant le trapèze ? Ai -je bien compris ?merci pour votre patience !!bonne journée
10.05.2021 - 14:11DROPS Design answered:
Bonjour Mme Gautherot, effectivement, dans A.6a vous devez bien augmenter 2 m au 1er rang et 4 m au 7ème rang, les autres rangs doivent conserver le nombre de mailles = autant de jetés que de diminutions aux rangs 3 et 5. Au milieu de chaque A.6a vous diminuez 2 mailles: glissez 2 m comme pour les tricoter ens à l'end, 1 m end, passez les 2 m glissées par-dessus la m tricotée. Bon tricot!
10.05.2021 - 14:43
|
||||||||||||||||||||||
Aurora Borealis#auroraborealisscarf |
||||||||||||||||||||||
|
|
||||||||||||||||||||||
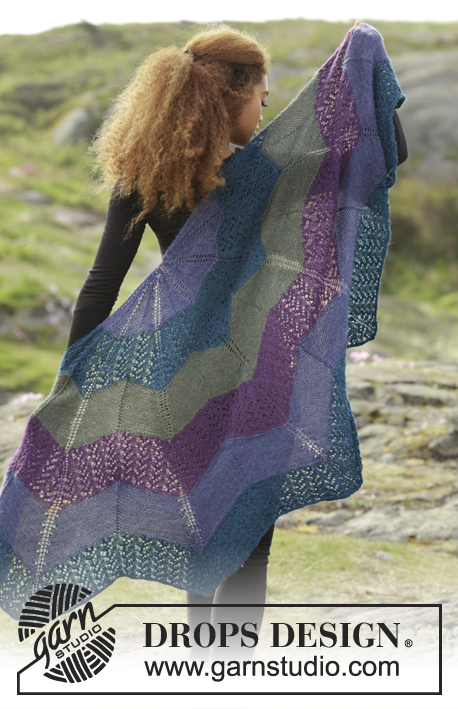
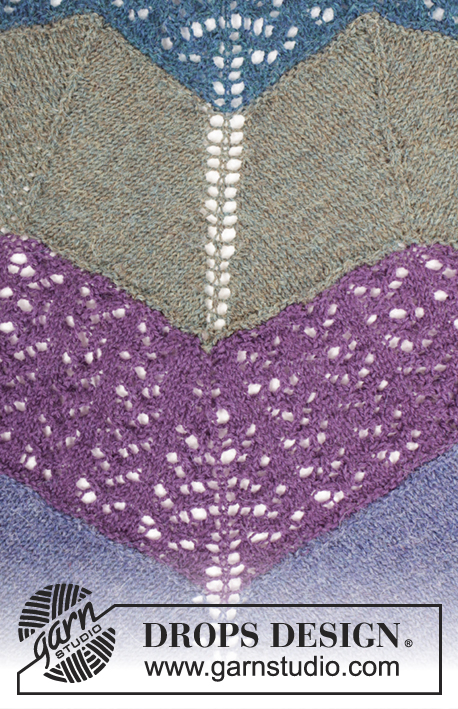
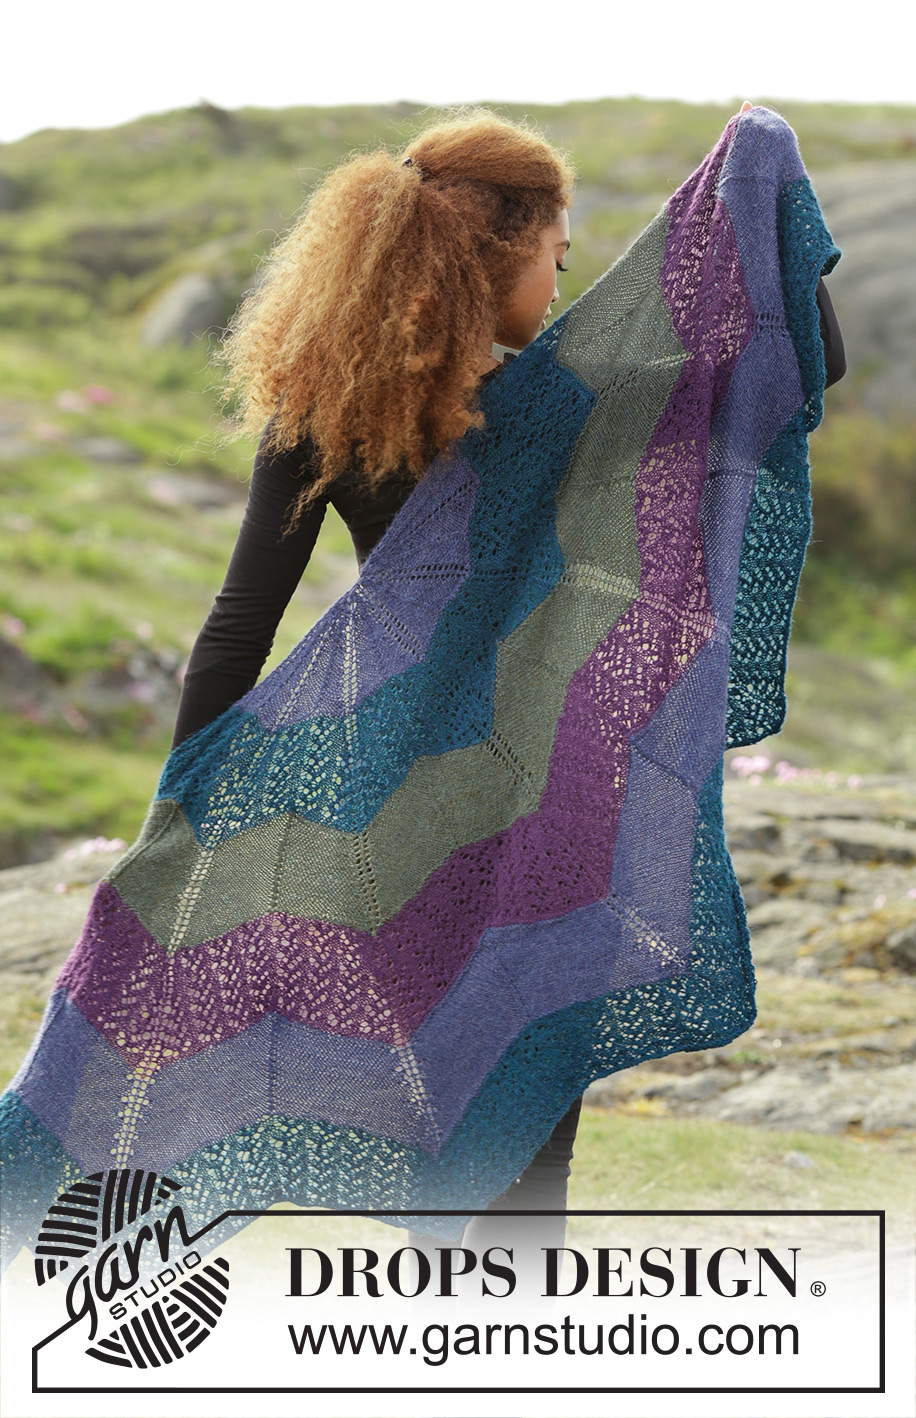
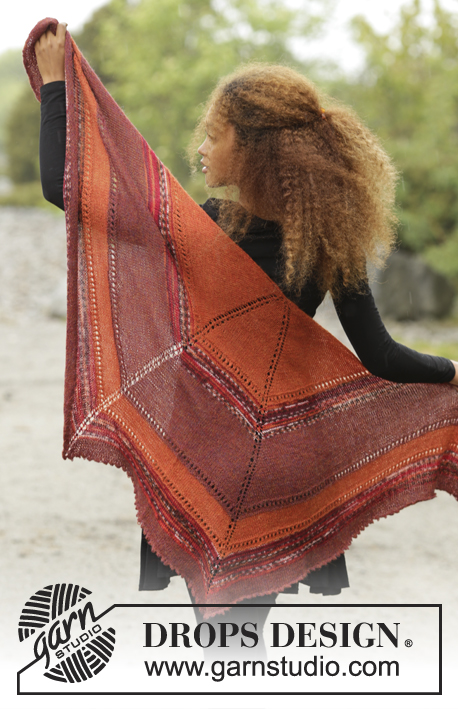
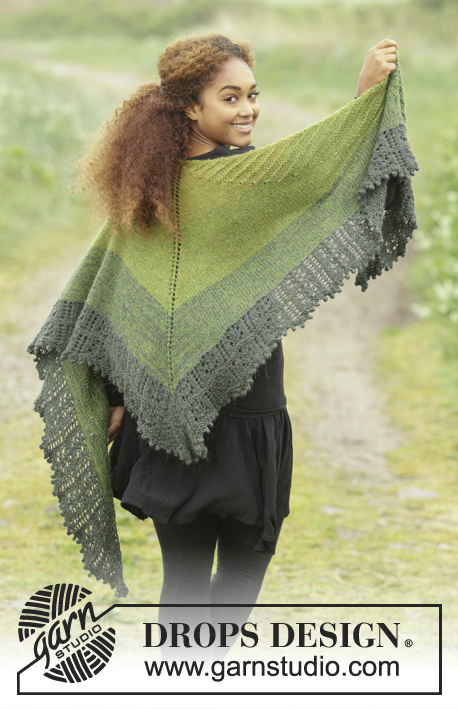
Knitted DROPS shawl with zig-zag pattern, lace pattern and stripes in ”Alpaca”.
DROPS 171-13 |
||||||||||||||||||||||
|
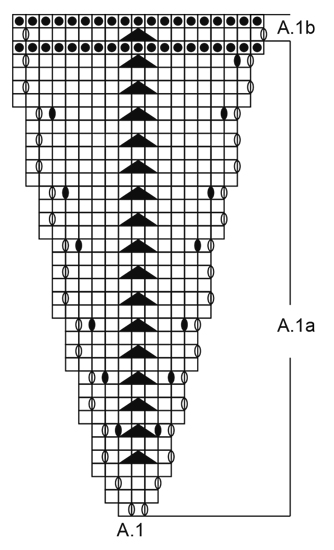
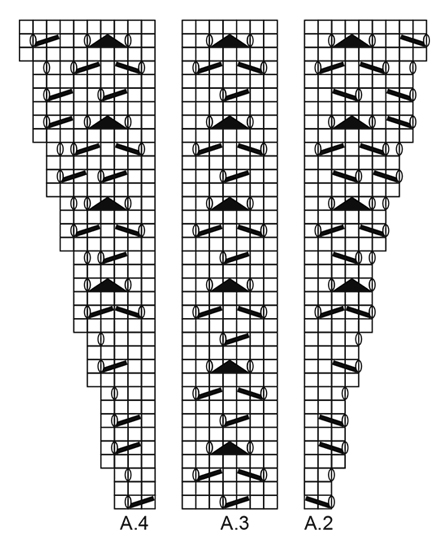
GARTER ST (back and forth): K all rows. 1 ridge = 2 rows K. MEASUREMENTS All measurements given in pattern are measured at the longest. PATTERN: See diagrams A.1 to A.6. The diagrams show all rows in pattern seen from RS. When diagram A.6 and A.1b are repeated, there are more and more sts between YO and dec (dec = slip 2 sts as if to K, K 1, pass the 2 slipped sts over) than shown in diagram, note that the dec will repeat vertically over themselves until finished measurements. ---------------------------------------------------------- SHAWL: Worked top down, back and forth on circular needle to make room for all the sts. Cast on 5 sts on circular needle size 3.5 mm with blue. STRIPE 1 (stocking st): ROW 1 (= WS): * K 1, 1 YO *, repeat from *-* until 1 st remains, K 1 = 9 sts. ROW 2 (= RS): K all sts. ROW 3 (= WS): K 2, * 1 YO, K 1 *, repeat from *-* 6 times in total, finish with K 1 = 15 sts. Then work pattern as follows, beg from RS: Work 2 edge sts in GARTER ST – see explanation above, repeat A.1a 6 times in total but on last repetition do not work last st in diagram (i.e. last repetition = 1 st), finish with 2 edge sts in garter st. Continue pattern like this. Work edge sts in garter st until finished measurements. REMEMBER THE KNITTING TENSION When A.1a has been worked 1 time vertically, there are 117 sts on needle (= 19 sts in each of the first 5 repetitions of A.1a and 18 sts in the last repetition). Piece measures approx. 12 cm - READ MEASUREMENTS. STRIPE 2 (lace pattern): Switch colour to petrol. Work A.1b over A.1a. Then work lace pattern as follows: Work 2 edge sts in garter st, * A.2 over the next 2 sts, repeat A.3 (= 7 sts) over the next 14 sts (= 2 times in total in width), A.4 over the next 3 sts *, repeat from *-* 5 times in total, then work A.2 over the next 2 sts, repeat A.3 (= 7 m) over the next 14 sts (= 2 times in total in width), A.4 over the next 2 sts (i.e. do not work last st in A.4), finish with 2 edge sts in garter st. Continue pattern like this. When A.2 to A.4 have been worked 1 time vertically, there are 201 sts on needle (= 33 sts in each of the first 5 repetitions of A.2 to A.4 and 32 sts in the last repetition of A.2 to A.4). Work next row as follows from RS: Work 2 edge sts in garter st, repeat A.5a (= 33 sts) 6 times in total in width but on last repetition in width do not work last st in diagram, finish with 2 edge sts in garter st. When A.5a has been worked 1 time vertically, there are 207 sts on needle (= 34 sts in each of the first 5 repetitions and 33 sts in the last repetition). STRIPE 3 (stocking st): Switch colour to green/turquoise. Work A.5b over A.5a. When A.5b has been worked 1 time vertically, there are 255 sts on needle (= 42 sts in each of the first 5 repetitions and 41 sts in the last repetition). Piece measures approx. 26 cm. Work 2 edge sts in garter st, work and inc as A.6a 6 times in total but on last repetition in width do not work last st in diagram, finish with 2 edge sts in garter st. When A.6a has been worked 3 times vertically - READ PATTERN, there are 327 sts on needle (= 54 sts in each of the first 5 repetitions of A.6a and 53 sts in the last repetition). Then work A.6b over A.6a (note that dec will continue over itself vertically until finished measurements) AT THE SAME TIME on first row in A.6b dec 4 sts evenly on each side of dec in every A.6b (= 8 sts dec in every A.6b = 48 sts dec in total on entire shawl) = 285 sts on needle (= 47 sts in each of the first 5 repetitions of A.6b and 46 sts in the last repetition). Piece measures approx. 37 cm. STRIPE 4 (lace pattern): Switch colour to dark purple. Work A.1b over A.6b. Then work lace pattern as follows: Work 2 edge sts in garter st, * A.2 over the next 2 sts, repeat A.3 (= 7 sts) over the next 42 sts (= 6 times in total in width), A.4 over the next 3 sts *, repeat from *-* 5 times in total, then work A.2 over the next 2 sts, repeat A.3 (= 7 m) over the next 42 sts (= 6 times in total in width), A.4 over the next 2 sts (i.e. do not work last st in A.4), finish with 2 edge sts in garter st. Continue pattern like this. When A.2 to A.4 have been worked 1 time vertically, there are 369 sts on needle (= 61 sts in each of the first 5 repetitions of A.2 to A.4 and 60 sts in the last repetition of A.2 to A.4). Work next row as follows from RS: Work 2 edge sts in garter st, repeat A.6b 6 times in total in width but on last repetition do not work last st in diagram, finish with 2 edge sts in garter st = 375 sts (= 62 sts in each of the first 5 repetitions of A.6b and 61 sts in the last repetition). Piece measures approx. 50 cm. STRIPE 5 (stocking st): Switch to blue. Work A.1b AT THE SAME TIME on first row inc 4 sts evenly on each side of dec in every A.1b (= 8 sts inc in every A.1b = 48 sts inc in total on entire shawl) = 423 sts (= 70 sts in each of the first 5 repetitions of A.1b and 69 sts in the last repetition). Work 2 edge sts in garter st, work and inc as A.6a 6 times in total but on last repetition do not work last st in diagram, finish with 2 edge sts in garter st. When A.6a has been worked 3 times vertically, there are 495 sts on needle (= 82 sts in each of the first 5 repetitions of A.6a and 81 sts in the last repetition). then work A.6b over A.6a AT THE SAME TIME on first row in A.6b dec 4 sts evenly on each side of dec in every A.6b (= 8 sts dec in every A.6b = 48 sts dec in total on entire shawl) = 453 sts on needle (= 75 sts in each of the first 5 repetitions of A.6b and 74 sts in the last repetition). Piece measures approx. 61 cm. STRIPE 6 (lace pattern): Switch colour to petrol. Work A.1b over A.6b. Then work lace pattern as follows: Work 2 edge sts in garter st, * A.2 over the next 2 sts, repeat A.3 (= 7 sts) over the next 70 sts (= 10 times in total in width), A.4 over the next 3 sts *, repeat from *-* 5 times in total, then work A.2 over the next 2 sts, repeat A.3 (= 7 sts) over the next 70 sts (= 10 times in total in width), A.4 over the next 2 sts (i.e. do not work last st in A.4), finish with 2 edge sts in garter st. Continue pattern like this. When A.2 to A.4 have been worked 1 time vertically, there are 537 sts on needle (= 89 sts in each of the first 5 repetitions of A.2 to A.4 and 88 sts in the last repetition of A.2 to A.4). Work next row as follows from RS: Work 2 edge sts in garter st, repeat A.6b 6 times in total but on last repetition do not work last st in diagram, finish with 2 edge sts in garter st = 543 sts (= 90 sts in each of the first 5 repetitions of A.6a and 89 sts in the last repetition). Loosely cast off. Piece measures approx. 74 cm. |
||||||||||||||||||||||
Diagram explanations |
||||||||||||||||||||||
|
||||||||||||||||||||||
 |
||||||||||||||||||||||
 |
||||||||||||||||||||||
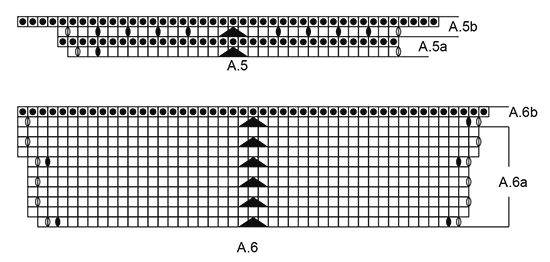 |
||||||||||||||||||||||
Have you finished this pattern?Tag your pictures with #dropspattern #auroraborealisscarf or submit them to the #dropsfan gallery. Do you need help with this pattern?You'll find 6 tutorial videos, a Comments/Questions area and more by visiting the pattern on garnstudio.com. © 1982-2026 DROPS Design A/S. We reserve all rights. This document, including all its sub-sections, has copyrights. Read more about what you can do with our patterns at the bottom of each pattern on our site. |
||||||||||||||||||||||






With over 40 years in knitting and crochet design, DROPS Design offers one of the most extensive collections of free patterns on the internet - translated to 17 languages. As of today we count 333 catalogues and 12532 patterns translated into English (UK/cm). 12532
We work hard to bring you the best knitting and crochet have to offer, inspiration and advice as well as great quality yarns at incredible prices! Would you like to use our patterns for other than personal use? You can read what you are allowed to do in the Copyright text at the bottom of all our patterns. Happy crafting!
Post a comment to pattern DROPS 171-13
We would love to hear what you have to say about this pattern!
If you want to leave a question, please make sure you select the correct category in the form below, to speed up the answering process. Required fields are marked *.