DROPS Baby Merino
DROPS Baby Merino
100% Wool
from 3.75 € /50g
DROPS Kid-Silk
DROPS Kid-Silk
75% Mohair, 25% Silk
from 5.05 € /25g
Get the yarn to make this pattern from 21.35€.

The yarn cost is calculated from the pattern’s smallest size and the yarn’s cheapest product type. Looking for an even better price? You might find it on the DROPS Deals!

DROPS AW2425

Midsummer

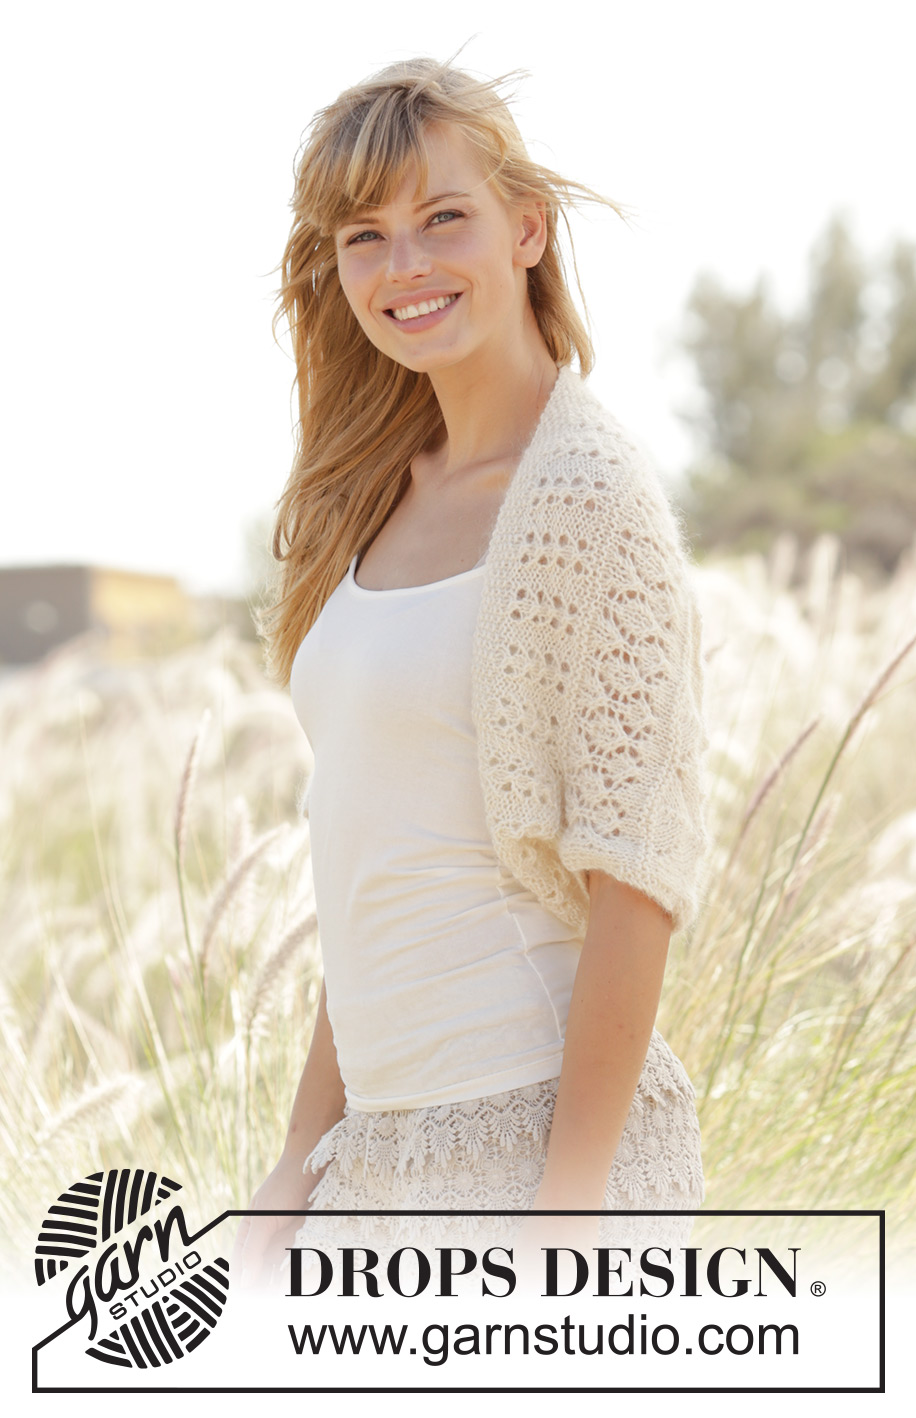
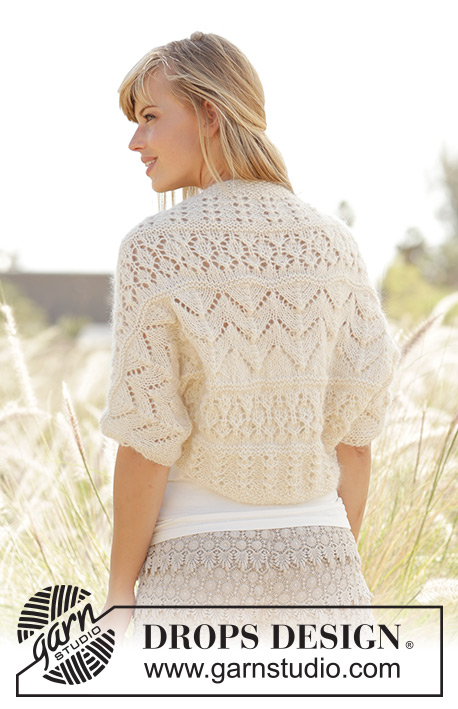
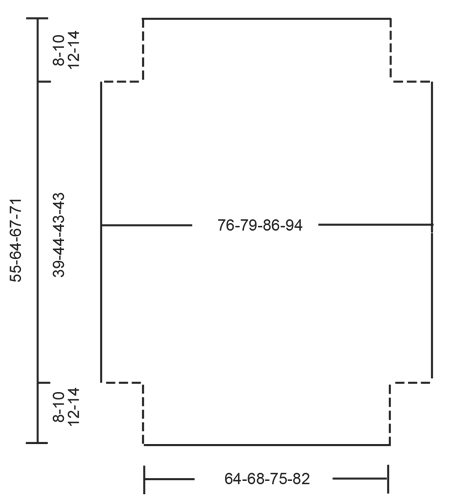
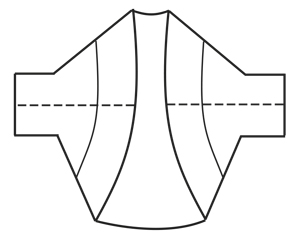
Knitted DROPS shoulder piece with lace pattern in ”BabyMerino” and ”Kid-Silk”. Size: S - XXXL.

DROPS Extra 0-1276
DROPS design: Pattern no bm-027
Yarn group A + A or C
----------------------------------------------------------
Size: S/M - L/XL - XXL - XXXL
Materials:
DROPS BABY MERINO from Garnstudio
150 g for all sizes in colour no 02, off white
and use:
DROPS KID-SILK from Garnstudio
50-50-50-75 g colour no 01, off white

DROPS STRAIGHT NEEDLES OR CIRCULAR NEEDLE (60 cm) SIZE 5 mm – or size needed to get 17 sts x 22 rows in stocking st with 1 strand of each yarn = 10 x 10 cm.

-------------------------------------------------------

Alternative Yarn – See how to change yarns here
Yarn Groups A to F – Use the same pattern and change the yarn here
Yarn usage using an alternative yarn – Use our yarn converter here

-------------------------------------------------------

DROPS Baby Merino
DROPS Baby Merino
100% Wool
from 3.75 € /50g
DROPS Kid-Silk
DROPS Kid-Silk
75% Mohair, 25% Silk
from 5.05 € /25g
Get the yarn to make this pattern from 21.35€.

The yarn cost is calculated from the pattern’s smallest size and the yarn’s cheapest product type. Looking for an even better price? You might find it on the DROPS Deals!

Pattern instructions

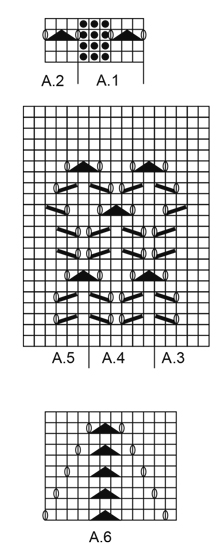
GARTER ST (back and forth):
K all rows. 1 ridge = 2 rows K.

MOSS ST (back and forth):
Row 1: * K 1, P 1 *, repeat from *-*.
Row 2: K over P and P over K. Repeat 2nd row.

PATTERN:
See diagrams A.1 to A.6. The diagrams show all rows in pattern seen from RS.
----------------------------------------------------------

SHOULDER PIECE:
Worked back and forth on needle.
Cast on 109-115-127-139 sts on straight needles or circular needle size 5 mm with 1 strand Baby Merino and 1 strand Kid-Silk (= 2 strands). Work in MOSS ST - see explanation above. When piece measures 3 cm, work according to diagram A.1-A.2 as follows: Work 2 edge sts in moss st, repeat A.1 17-18-20-22 times, A.2 over 3 sts and 2 edge sts in moss st (work edge st in moss st the entire piece). Work diagram 3-4-5-6 times in total vertically. REMEMBER THE KNITTING TENSION

Now work 2 ridges in GARTER ST - see explanation above, AT THE SAME TIME cast on new sts in each side as follows: Work 1 ridge, on next ridge cast on 10 new sts at the end of every row = 129-135-147-159 sts.

Then work as follows: Work 2 edge sts in moss st, A.3 over 5 sts, repeat A.4 19-20-22-24 times, A.5 over 6 sts and 2 edge sts in moss st. Work diagram 1 time vertically.

Work 2 ridges, and work 2 rows in stocking st. Work according to diagram A.6 as follows: Work 2 edge sts in moss st, 2-5-5-5 sts in stocking st, repeat A.6 10-10-11-12 times, 3-6-6-6 sts in stocking st and 2 edge sts in moss st. Work diagram 3-4-3-4 times in total vertically. Work 2 rows in stocking st and then 2 ridges.

Work diagram A.3-A.5 as follows: Work 2 edge sts in moss st, A.3 over 5 sts, repeat A.4 19-20-22-24 times, A.5 over 6 sts and 2 edge sts in moss st. Work diagram 1 time vertically.

Now work 2 ridges, AT THE SAME TIME cast off sts in each side as follows: Work 1 ridge, on next ridge cast off the first 10 sts at the beg of every row = 109-115-127-139 sts.

Work diagram A.1-A.2 as follows: Work 2 edge sts in moss st, repeat A.1 17-18-20-22 times, A.2 over 3 sts and 2 edge sts in moss st. Work diagram 3-4-5-6 times in total vertically. Then work moss st for 3 cm. Loosely cast off.

ASSEMBLY:
Sew side and seam under sleeves in one in front loop of outermost st - see dotted line on chart.

Diagram

symbols = K from RS, P from WS
symbols = P from RS, K from WS
symbols = 1 YO between 2 sts
symbols = K 2 tog
symbols = slip 1 st as if to K, K 1, psso
symbols = slip 1 st as if to K, K 2 tog, psso
diagram
diagram
diagram

Each of our patterns has specific tutorial videos to help you.

Do you have a question? See a list of frequently asked questions (FAQ)

Knitting tension is what determines the final measurements of your work, and is usually measured per 10 x 10 cm. It is provided like so: number of stitches in width x number of rows in height - eg: 19 stitches x 26 rows = 10 x 10 cm.

The knitting tension is very individual; some people knit/crochet loosely while others work tightly. You adjust the knitting tension with the needle size, which is why the suggested needle size is only meant as a guide! You need to adjust this (up or down) to ensure that YOUR knitting tension matches the knitting tension provided in the pattern. If you work with a different knitting tension than provided you will have a different yarn consumption, and your work will have different measurements than what the pattern suggests.

The knitting tension also determines which yarns can replace each other. As long as you achieve the same knitting tension you can replace one yarn with another.

See DROPS lesson: How to measure your tension/gauge

See DROPS video: How to make a gauge tension swatch

The required amount of yarn is provided in grams, eg: 450 g. To calculate how many balls you’ll need you first need to know how many grams are in 1 ball (25g, 50g or 100g). This information is available if you click on the individual yarn quality on our pages. Divide the amount required with the amount of each ball. For example, if each ball is 50g (the most common amount), the calculation will be as follows: 450 / 50 = 9 balls.

The important thing when changing from one yarn to another is that the knitting/crochet tension remains the same. This is so that the measurements of the finished piece will be the same as on the sketch provided. It is easier to achieve the same knitting tension using yarns from the same yarn group. It is also possible to work with multiple strands of a thinner yarn to achieve the knitting tension of a thicker one. Please try our yarn converter. We recommend you to always work a test swatch.

Please NOTE: when changing yarn the garment might have a different look and feel to the garment in the photo, due to individual properties and qualities of each yarn.

See DROPS lesson: Can I use a different yarn than the one mentioned in the pattern?

All our yarns are categorised into yarn groups (from A to F) according to thickness and knitting tension – group A contains the thinnest yarns and group F the thickest. This makes it easier for you to find alternative yarns to our patterns, should you wish to switch yarn. All yarns within the same group have a similar knitting tension and can easily replace each other. However, different yarn qualities have different structures and properties which will give the finished work a unique look and feel.

Click here for an overview of the yarns in each yarn group

At the top of all our patterns you’ll find a link to our yarn calculator, which is a helpful tool should you wish to use a different yarn than suggested. By filling in the yarn quality you wish to replace, the amount (in your size) and number of strands, the calculator will present good alternative yarns with the same knitting tension. Additionally it will tell you how much you’ll require in the new qualities and whether you’ll need to work with multiple strands. Most skeins are 50g (some are 25g or 100g).

If the pattern is worked with multiple colours, every colour will have to be calculated separately. Similarly, if the pattern is worked with several strands of different yarns (for example 1 strand Alpaca and 1 strand Kid-Silk) you will have to find alternatives for each, individually.

Click here to see our yarn calculator

Since different yarns have different qualities and textures we have chosen to keep the original yarn in our patterns. However, you can easily find options among our available qualities by using our yarn calculator, or simply pick a yarn from the same yarn group.

It is possible that some retailers still have discontinued yarns in stock, or that someone has a few skeins at home that they would like to find patterns for.

The yarn calculator will provide both alternative yarn as well as required amount in the new quality.

If you think it's hard to decide what size to make, it can be a good idea to measure a garment you own already and like the size of. Then you can pick the size by comparing those measures with the ones available in the pattern's size chart.

You'll find the size chart at the bottom of the pattern.

See DROPS lesson: How to read size chart

The needle size provided in the pattern serves only as a guide, the important thing is to follow the knitting tension. And since knitting tension is very individual, you will have to adjust the needle size to ensure that YOUR tension is the same as in the pattern – maybe you’ll have to adjust 1, or even 2 needle sizes, up or down to achieve the correct tension. For this, we recommend that you work test swatches.

Should you work with a different knitting tension than the one provided, the measurements of the finished garment might deviate from the measurement sketch.

See DROPS lesson: How to measure your tension/gauge

See DROPS video: How to make a tension/gauge swatch

Working a garment top-down provides more flexibility and room for personal adjustment. For example it is easier to try the garment on while working, as well as making adjustments to length of yoke and shoulder caps.

The instructions are carefully explaining every step, in the correct order. Diagrams are adjusted to the knitting direction and are worked as usual.

The diagram depicts all rows/rounds, and every stitch seen from the right side. It is read from bottom to top, from right to left. 1 square = 1 stitch.

When working back and forth, every other row is worked from the right side and every other row is worked from the wrong side. When working from the wrong side, the diagram will have to be worked reversed: from left to right, knit stitches are purled, purl stitches are knit etc.

When working in the round every round is worked from the right side and the diagram are worked from right to left on all rounds.

See DROPS lesson: How to read knitting diagrams

The diagram depicts all rows/rounds, and every stitch seen from the right side. It is worked from bottom to top, from right to left.

When working back and forth every other row is worked from the right side: from right to left and every other row is worked from the wrong side: from left to right.

When working in the round, every row in the diagram are worked from the right side, from right to left.

When working a circular diagram you start in the middle and work your way outwards, counter clockwise, row by row.

The rows usually start with a given number of chain stitches (equivalent to the height of the following stitch), this will either be depicted in the diagram or explained in the pattern.

See DROPS lesson: How to read crochet diagrams

Instructions for working several diagrams after each other on the same row/round, will often be written like so: “work A.1, A.2, A.3 a total of 0-0-2-3-4 times". This means you work A.1 once, then A.2 is worked once, and A.3 is repeated (in width) the number of times provided for your size – in this case like so: S = 0 times, M = 0 times, L=2 times, XL= 3 times and XXL = 4 times.

The diagrams are worked as usual: begin with the first row in A.1, then work the first row in A.2 etc.

See DROPS lesson: How to read knitting diagrams

See DROPS lesson: How to read crochet diagrams

The total width of the garment (from wrist-to-wrist) will be larger in the larger sizes, despite the actual sleeves being shorter. The larger sizes have longer sleeve caps and wider shoulders, so there will be a good fit in all sizes.

The measurement sketch/schematic drawing provides information regarding the full length of the garment. If it’s a jumper or a jacket the length is measured from the highest point on the shoulder closest to the neckline, and straight down to the bottom of the garment. It is NOT measured from the tip of shoulder. Similarly, the length of yoke is measured from the highest point on the shoulder and down to where yoke is split into body and sleeves.

On a jacket measures are never taken along bands, unless specifically stated. Always measure inside band stitches when measuring the length.

See DROPS lesson: How to read a schematic drawing

Diagrams are often repeated on the round or in height. 1 repeat is the diagram the way it appears in the pattern. If it says to work 5 repeats of A.1 in the round, then you work A.1 a total of 5 times after/next to each other in the round. If it says to work 2 repeats of A.1 vertically/in height you work the entire diagram once, then begin again at the start and work the entire diagram one more time.

Chain stitches are slightly narrower than other stitches and to avoid working the cast-on edge too tight, we simply chain more stitches to begin with. The stitch count will be adjusted on the following row to fit the pattern and measurement sketch.

The rib edge is more elastic and will contract slightly compared to, for example, stocking stitch. By increasing before the rib edge, you avoid a visible difference in width between the rib edge and the rest of the body.

It’s very easy to cast off too tightly, and by making yarn overs while casting off (and simultaneously casting these off) you avoid a too tight cast off edge.

See DROPS video: How to bind off with yarn overs (yo)

To achieve an even increase (or decrease) you can increase on, for example: every 3rd and 4th row alternately, like so: work 2 rows and increase on the 3rd row, work 3 rows and increase on the 4th. Repeat this until the increase is complete.

See DROPS lesson: Increase or decrease 1 st on every 3rd and 4th row alternately

Should you prefer to work in the round instead of back and forth, you may of course adjust the pattern. You’ll need to add steeks mid-front (usually 5 stitches), and follow the instructions. When you would normally turn and work from the wrong side, simply work across the steek and continue in the round. At the end you’ll cut the piece open, pick up stitches to work bands, and cover the cut edges.

See DROPS video: How to knit steeks and cut open

Should you prefer to work back and forth instead of in the round, you may of course adjust the pattern so you work the pieces separately and then assemble them at the end. Divide the stitches for the body in 2, add 1 edge stitch in each side (for sewing) and work the front and back pieces separately.

See DROPS lesson: Can I adapt a pattern for circular needles into straight needles?

Pattern repeats can vary slightly in the different sizes, in order to get the correct proportions. If you’re not working the exact same size as the garment in the photo, yours might deviate slightly. This has been carefully developed and adjusted so that the complete impression of the garment is the same in all sizes.

Make sure to follow instructions and diagrams for your size!

If you have found a pattern you like which is available in women’s size it’s not very difficult to convert it to men’s size. The biggest difference will be the length of sleeves and body. Start working on the women size that you think would fit across the chest. The additional length will be worked right before you cast off for the armhole/sleeve cap. If the pattern is worked top-down you can add the length right after the armhole or before the first decrease on sleeve.

Regarding additional yarn amount, this will depend on how much length you add, but it is better with a skein too many than too few.

All yarns will have excess fibres (from production) that might come off as lint or shedding. Brushed yarns (ie hairier yarns) have more of these loose, excess fibres, causing more shedding.

Shedding also depends on what is worn under or over the garment, and whether this pulls at the yarn fibres. It’s therefore not possible to guarantee that there will be no shedding

Below are some tips on how to get the best result when working with hairier yarns:

1. When the garment is finished (before you wash it) shake it vigorously so the looser hairs come off. NOTE: do NOT use a lint roller, brush or any method that pulls at the yarn.

2. Place the garment in a plastic bag and put it in your freezer - the temperature will cause the fibres to become less attached to each other, and excess fibres will come off easier.

3. Leave in the freezer for a few hours before taking it out and shaking it again.

4. Wash the garment according to the instructions on the yarn label.

Pilling is a natural process that happens to even the most exclusive of fibers. It's a natural sign of wear and tear that is hard to avoid, and that is most visible in high friction areas of your garment like a sweater's arms and cuffs.

You can make your garment look as new by removing the pilling, using a fabric comb or a pill/lint remover.

Still can't find the answer you need? Then scroll down and leave your question so one of our experts can try to help you. This will be done normally within 5 to 10 working days.
In the meantime, you can read the questions and answers that others have left to this pattern or join the DROPS Workshop on Facebook to get help from fellow knitters/crocheters!

You might also like...

Post a comment to pattern DROPS Extra 0-1276

We would love to hear what you have to say about this pattern!

If you want to leave a question, please make sure you select the correct category in the form below, to speed up the answering process. Required fields are marked *.

Comments / Questions (48)

country flag Marie wrote:

Bonjour, Est-ce mieux de bloquer la pièce avant de l'assembler ? Merci

20.09.2017 - 15:14

DROPS Design answered:

Bonjour Marie, chacun a sa propre technique et habitude, n'hésitez pas à demander conseil à votre magasin DROPS si besoin. Bon tricot!

20.09.2017 - 15:59

country flag Edith Hoekstra wrote:

Hallo! Ik begrijp uit onderstaande antwoorden dat dit bolerootje in zijn geheel met twee draden wordt gebreid. Hoe kan het dan dat van het ene garen 150 gram nodig is en van het andere slechts 50 gram (maat S/M) ? Bij voorbaat dank voor uw antwoord: ik hoop dat ik het snel krijg, dan kan ik het garen gaan bestellen, mijn handen jeuken! 😂

04.09.2017 - 15:16

DROPS Design answered:

Hallo Edith, Dat komt omdat kidsilk veel dunner garen is en dus een langere looplengte heeft. Daardoor heb je er minder bollen van nodig.

04.09.2017 - 16:27

country flag Heike Lorenz wrote:

Vielen Dank für die schnelle Antwort. Jetzt blicke ich durch. Nun kanns weiter gehen. Vielen Dank mochmql

31.07.2017 - 20:26

country flag Heike Lorenz wrote:

Hallo. Bin gerade überm Stricken und habe eine Frage zu A3 und A4. In Reihe 7 werden nach dem Umschlag de facto 3 Maschen zusammengestrickt. Wenn ich A4 dann als Maschenschritt nehme und immer wiederhole - muss ich dann nur 2 Maschen rechts zusammenstricken, da ja die 3. Masche in A3 ist. Danke.

30.07.2017 - 21:43

DROPS Design answered:

Liebe Frau Lorenz, bei der 7. Reihe wird die letzte Masche im A.3 zusammen mit den 2 ersten Maschen in A.4 gestrickt (neue letzte Masche in A.3 ist der Umschlag), dann die letzte Masche im A.4 wird mit den 2 ersten Maschen bei dem nächsten A.4/bei A.5 gestrickt. Viel Spaß beim stricken!

31.07.2017 - 10:30

country flag Sigrid wrote:

Ich möchte das Modell in Bomull-Lin stricken. Sind 200 g ausreichend oder brauche ich mehr?

02.06.2017 - 18:15

DROPS Design answered:

Liebe Sigrid, hier finden Sie, wie Sie die neue Mengeangabe kalkulieren sollen. Viel Spaß beim stricken!

06.06.2017 - 08:28

Kate wrote:

Hello! Schemes A.1-A.2: if I understand the pattern correctly, size s requires 17 times A1, and then A2. Questions: 1) While doing consecutive A1 in the third row, should I make 1 or 2 YO between the two A1 (ending one A1 and one starting next A1, or is there only 1 YO)? 2) What exactly should I do in 4th row with YOs from the third row (treat them as left or right sts)? Thanks!

03.01.2017 - 13:56

DROPS Design answered:

Dear Kate, on 3rd row, the 2 yos one each side of the double dec compensate the 2 sts dec (= 2 sts dec, 2 yos = 3 sts). A.1 ends with P3 and A.2 will be (YO, slip 1 as if to K, K2 tog, psso, YO). Happy knitting!

03.01.2017 - 14:55

country flag Katarzyna wrote:

Witam, Schematy A.1-A.2: Jak rozumiem w rozmiarze s należy przerobić 17 razy A1, a następnie A2. Moje pytania: 1) Czy przerabiając następujące po sobie A1 należy w rzędzie trzecim zrobić 1 czy 2 narzuty między nimi (jeden kończący A1 i jeden rozpoczynający kolejny A1, czy tam jest wyłącznie 1 narzut)? 2) Jak w rzędzie 4 przerobić narzuty z rzędu 3 (jak prawe czy jak lewe oczka)?

03.01.2017 - 13:33

DROPS Design answered:

Witam. Oto odpowiedzi: 1). Nie ma narzutu kończącego schemat A.1, ten narzut należy do schematu A.2, jest więc tylko 1 narzut między kolejnymi schematami A.1. 2)Na lewej stronie robótki w miejscach narzutów z rzędu 3 będą oczka lewe, zgodnie ze schematem. MIŁEJ PRACY I POWODZENIA!

03.01.2017 - 14:14

Gery wrote:

Hello, I would like to know what is the knitting direction? Have a nice day!

09.12.2016 - 14:49

DROPS Design answered:

Dear Gerry, you are working bottom up, see measurement chart, from the bottom to the top of chart. Happy knitting!

09.12.2016 - 15:18

country flag Knithexe wrote:

Hallo das DROPS-Team, ich stricke gerade die Jacke in Größe S. Da habe ich festgestellt, dass nach dem Muster A6 sollte nicht die A3, A4 und A5 nur 1 mal wiederholt werden? Außerdem finde ich mit 2 Reihen rechts, 2 Krausrippen und 2 Reihen rechts sieht das Strickstück optisch besser aus. Das ist meine persönliche Meinung. Liebe Grüße, Knithexe

16.08.2016 - 07:26

DROPS Design answered:

Liebe Knithexe, ja das stimmt, es gibt nun einen Korrekturbutton dafür.

17.08.2016 - 13:44

country flag Paola wrote:

Volendo fare questo coprispalle con un solo filato (in questo caso avrei scelto il cotton viscose) e cambiando ovviamente i ferri usando il 3,5, il numero delle maglie da montare rimane lo stesso o essendo un filato solo devo prendere in considerazione una taglia in più?

19.07.2016 - 19:02

DROPS Design answered:

Buonasera Paola, deve provare a fare un campione e vedere se corrisponde a quello indicato, altrimenti può provare a cambiare il numero di ferri e lavorare più morbido per ottenere il campione indicato. Buon lavoro!!

19.07.2016 - 20:37