
Popular categories
Looking for a yarn?


Comments / Questions (221)
![]() Agnes wrote:
Agnes wrote:
Pour confirmation les shémas A1 et A2 se tricotent sur 27 rangs endroits et par conséquent 28 rangs envers. Merci
15.01.2014 - 13:51DROPS Design answered:
Bonjour Agnès, les diagrammes A.1 et A.2 se tricotent sur 14 rangs (1 case = 1 m x 1 rang): tous les rangs figurent dans le diagramme, ceux sur l'endroit mais aussi ceux sur l'envers. Ainsi, la torsade se fait au 5ème rang de chaque diag, puis se répète tous les 14 rangs. Bon tricot!
15.01.2014 - 14:30
![]() Emma wrote:
Emma wrote:
Bonjour ,c'est vraiment magnifique ! mais vous n'avez pas indiquer commet augmenter au fur et a mesure pour arriver a 160 cm a la fin . Pouvez vous m'expliquez s'il vous plait ? je suis un peu perdu ..
18.12.2013 - 19:04DROPS Design answered:
Bonjour Emma, on tricote en rangs raccourcis, en commençant à droite par le côté milieu dos/milieu devant (début de rang sur l'endroit), ainsi on va former un cercle en tricotant plus de rangs sur l'extérieur que sur l'intérieur (côté poignet). Bon tricot!
19.12.2013 - 08:50Mahtab wrote:
Cast on ........ Work 1 RIDGE in garter s....... it means work the first row of it or knit 4 rows then start the pattern????
17.12.2013 - 12:36DROPS Design answered:
Dear Mahtab, just after cast on, you work 1 ridge in garter st, ie knit 2 rows and then start pattern with short rows. Happy knitting!
17.12.2013 - 13:33
![]() Hepnarová wrote:
Hepnarová wrote:
Dobrý den, v popisu na tento fantastický kabátek mi chybí okamžik, kdy mám plést ZKRÁCENÉ ŘADY. Byli byste tak laskavi a podívali se na to? Jsem blbá anebo se vloudila chybička :).? Moc děkuji Hepnarová
16.11.2013 - 11:12DROPS Design answered:
Dobrý den, paní Hepnarová, zkrácené řady pletete od samého začátku a nyní je Vám k dispozici u návodné video - viz seznam u návodu. Hodně zdaru!
03.03.2014 - 18:11Amna Hassan wrote:
Hello, the pattern is "5 sts in garter st, K 2, P 3, K 2, P 3, A.1 (= 10 sts), P 3, A.2 (= 10 sts), P 3, K 2, 12-18-24 sts RIDGE PATTERN, K 2, P 3, A.2 (= 10 sts), P 3, K 2, P 3, K 2, 18 sts in garter st.These are 104 sts for L/XL where will the short rows come?Thank you.
14.10.2013 - 13:30DROPS Design answered:
Dear Mrs Hassan, short rows in size L/XL will be worked as follows (start from RS): 2 rows on the first 10 sts, 2 rows on the firt 41 sts, 2 rows on the first 63 sts, 2 rows on all sts. Repeat these 8 rows until finished measurements. Happy knitting!
14.10.2013 - 15:37
![]() Marité wrote:
Marité wrote:
C'est fait. Que du bonheur !
07.10.2013 - 21:01
![]() Agnes wrote:
Agnes wrote:
J'aimerai savoir comment tricote t'on les 10 premières mailles, je comprends les 41 suivantes. Au départ 2 rangs endroits sur toutes les mailles, et après comment faire les 10 suivantes ou la côte mousse se fait que sur 10 mailles ? merci de votre aide
01.10.2013 - 13:11DROPS Design answered:
Bonjour Agnès, on tricote toutes les mailles ainsi: 5 m au point mousse, 2 m end, 3 m env, 2 m end, 3 m env, A.1, 3 m env, A.2, 3 m env, 2 m end, 12-18-24 m en point mousse fantaisie, 2 m end, 3 m env, A.2, 3 m env, 2 m end, 3 m env, 2 m end, 18 m au point mousse. Mais juste après la côte mousse, on commence les rangs raccourcis. Les 10 premières m = 5 m point mousse + 2 m end + 3 m env. Bon tricot!
01.10.2013 - 15:12
![]() BARBION wrote:
BARBION wrote:
Très beau modèle, mais pas simples à comprendre... Je suis un peu perdue et un schéma complet aurait été le bienvenu. Je suis en train de m'en créer un et j'aurais une question: comment tricoter sur le rang retour (envers de l'ouvrage) les "2 m end, 3 m env, 2 m end, 3 m env" du rang aller (donc les "tronçons" hors point mousse, torsades et mousse-fantaisie)? Merci par avance pour votre réponse.
10.09.2013 - 10:04DROPS Design answered:
Bonjour Mme Barbion, ces mailles se tricotent en jersey end/jersey env (comme des côtes), ainsi, si vous avez, sur l'endroit : 2 m end, 3 m env, 2 m end, 3 m env, vous tricoterez sur l'envers 3 m end, 2 m env, 3 m end, 2 m env. Bon tricot!
10.09.2013 - 10:48
![]() Anja wrote:
Anja wrote:
Het mooiste is het 2e gedeelte de kabels andersom de kruisen zodat als je de delen aan elkaar naait de kabels het zelfde eruit zien
05.09.2013 - 22:12
![]() Anja wrote:
Anja wrote:
Bij de verkorte toeren staan 8 pennen beschreven. Maar het eindigt met de opmerking ", dus 8 nld aan de breedste kant en 2 nld aan smalste kant in 1 herhaling. " dat is als ik goed tel 10'pennen klopt patroon niet of is dit een "schrijf" fout
05.09.2013 - 22:10DROPS Design answered:
Hoi Anja. Je breit in totaal 8 nld. Volg je de instructie heb je dan 8 nld aan de breedste kant gebreid, maar alleen 2 nld aan de smalste kant = de laatste twee nld over alle st.
10.09.2013 - 17:07
|
||||||||||
Barroque#barroquejacket |
||||||||||
 |
 |
|||||||||
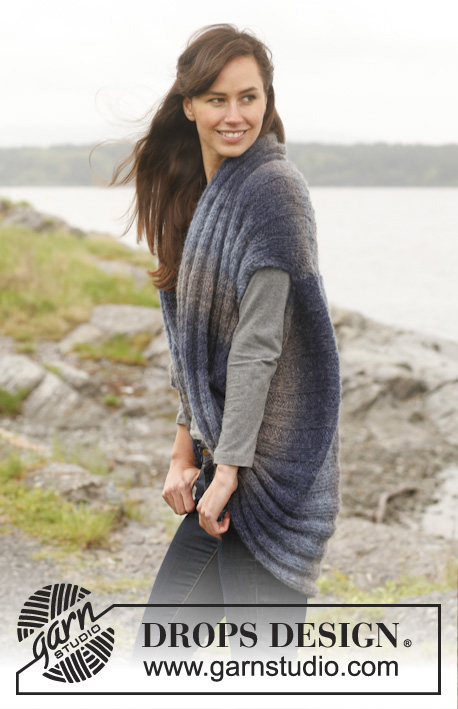
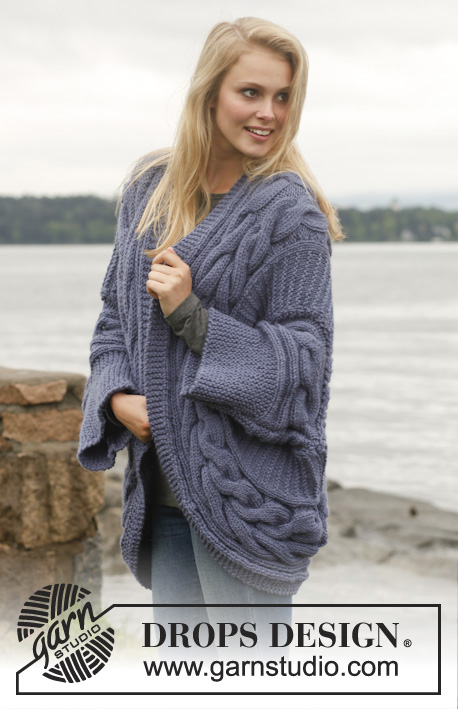
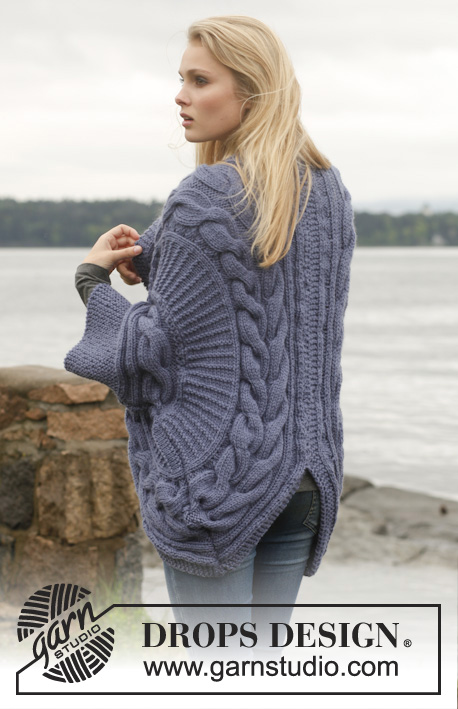
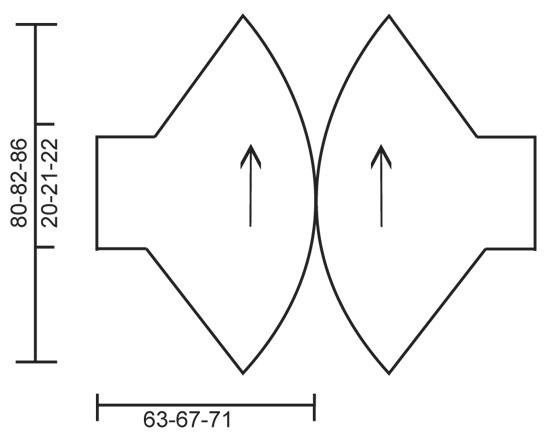
Knitted DROPS jacket worked in a circle with cables in ”Alaska”. Size: S - XXXL.
DROPS 149-6 |
||||||||||
|
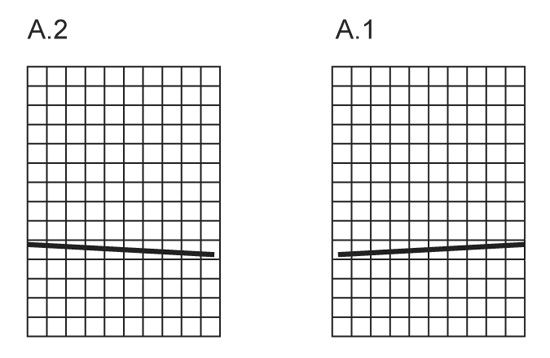
GARTER ST (back and forth on needle): K all rows. 1 ridge = 2 rows K. RIDGE PATTERN: Row 1 (= from RS): K Row 2 (= from WS): P Row 3 (= from RS): K Row 4 (= from WS): K Repeat these 4 rows upwards. PATTERN: See diagrams A.1 and A.2. Diagrams show all rows in pattern from RS. SHORT ROWS: * Work 1 row over the first 10 sts on row, turn and work back. Work 1 row over the first 41 sts on row, turn and work back. Work 1 row over the first 57-63-69 sts on row, turn and work back. Work 1 row over all sts, turn and work back *. Repeat from *-*, i.e. 8 rows at the widest and 2 rows at the most narrow in 1 repetition. ---------------------------------------------------------- BODY: Worked back and forth on circular needle. Cast on 98-104-110 sts on circular needle size 7 mm with Alaska. Work 1 RIDGE in garter st - see explanation above. Then work pattern AT THE SAME TIME work SHORT ROWS – see explanation above (1st row = from RS): 5 sts in garter st, K 2, P 3, K 2, P 3, A.1 (= 10 sts), P 3, A.2 (= 10 sts), P 3, K 2, 12-18-24 sts RIDGE PATTERN – see explanation above, K 2, P 3, A.2 (= 10 sts), P 3, K 2, P 3, K 2, 18 sts in garter st. Continue pattern until piece measures 40-41-43 cm at the most narrow and 160-164-172 cm at the widest. Work 1 ridge in garter st and cast off. Sew tog the cast-on and cast-off edge. Knit another part the same way. ASSEMBLY: Place the two part towards each other so that the 5 sts in garter st overlap, and sew tog approx. 58-62 cm mid back – make sure that seam on the parts is mid under sleeve. |
||||||||||
Diagram explanations |
||||||||||
|
||||||||||
 |
||||||||||
 |
||||||||||
Have you finished this pattern?Tag your pictures with #dropspattern #barroquejacket or submit them to the #dropsfan gallery. Do you need help with this pattern?You'll find 11 tutorial videos, a Comments/Questions area and more by visiting the pattern on garnstudio.com. © 1982-2026 DROPS Design A/S. We reserve all rights. This document, including all its sub-sections, has copyrights. Read more about what you can do with our patterns at the bottom of each pattern on our site. |
||||||||||


With over 40 years in knitting and crochet design, DROPS Design offers one of the most extensive collections of free patterns on the internet - translated to 17 languages. As of today we count 324 catalogues and 12290 patterns translated into English (UK/cm). 12290
We work hard to bring you the best knitting and crochet have to offer, inspiration and advice as well as great quality yarns at incredible prices! Would you like to use our patterns for other than personal use? You can read what you are allowed to do in the Copyright text at the bottom of all our patterns. Happy crafting!
Post a comment to pattern DROPS 149-6
We would love to hear what you have to say about this pattern!
If you want to leave a question, please make sure you select the correct category in the form below, to speed up the answering process. Required fields are marked *.